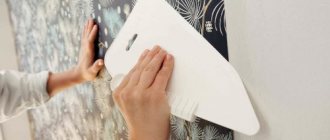
Noticeable joints in wallpaper are a problem familiar to almost everyone who has glued wallpaper at least once in their life. Such a defect can ruin any interior. The problem may appear the next day after gluing or much later, in any case, do not be upset! Depending on the cause, there are ways to deal with it. We will figure out why joints on wallpaper become visible and what to do to hide them.
Fixing gap problems between wallpapers
The only option when this is not a problem is when a gap appears on the wallpaper for painting.
In all other cases, the problem will have to be corrected or masked. Gaps often appear on paper wallpaper because they get too wet during the gluing stage. Cellulose has the property of expanding when wet. Therefore, if the edges of the wallpaper strips are very wet, then there is a considerable probability that in the future they will separate when drying. In order to correct the situation, we will need water again.
The idea is to wet the edges of the wallpaper and try to straighten them with your hands, simultaneously smearing them with a quick-setting glue such as PVA. If you succeed in doing this, then after setting you only need to go over it with a roller to remove the air.
However, this method often does not work. Especially when it comes to laminated wallpaper, such as vinyl. In this case, you will need to try to wet the base, which is much more difficult. And vinyl tends to return to its original shape after stretching, so discrepancies may reappear.
Reason #2 – Excess glue
Along with a lack of glue, the reason that the joints have come apart may also be due to an excess of glue. Excessive amounts of adhesive will cause the wallpaper to swell. When paper gets wet, it tends to stretch. This is how you glue them to the wall. But when the glue begins to dry, the wallpaper returns to its original state, and due to the narrowing of the material, gaps appear on the walls.
Why do the joints appear on the wallpaper?
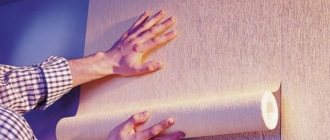
Absolutely all wallpaper, regardless of whether it is paper or textile based, has the property of swelling when exposed to moisture, in this case glue. Moreover, this can be seen even with the naked eye. So, for example, if the wallpaper is half a meter wide and it is wetted with glue, it increases by several millimeters. Consequently, nothing is noticeable when pasting, and after drying the paper takes on its original appearance. As a result, gaps appear between the sheets and a bare wall is visible. To prevent this, it is not recommended to get the used piece of wallpaper too wet. When the sheet is wet enough, it must be glued immediately.
It is important to follow the instructions and give them the specified soaking time. When gluing sheets, you must strictly observe the impregnation time of each sheet and prepare only the amount that can be glued in the same period of time.
It is very important to properly prepare the wall for wallpapering and do not forget to prime the surface.
Glue quantity
Do not apply a lot of glue to the wallpaper. It is necessary to apply such an amount of adhesive material that when it dries, the adhesive mixture sets first, and only then the sheet itself, and not vice versa. Be sure to saturate the edges of the wallpaper. As an addition, coat the joints on the wall and in the corners with PVA; be sure to also coat the needles. Read more about the secrets of wallpapering.
Trimming the canvas
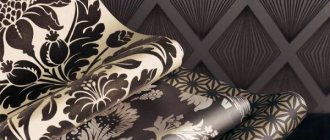
Another reason why wallpaper peels off the wall may be that the edges of the canvas are cut unevenly. One edge may be darker than the other. Therefore, when purchasing, you need to check the series of each roll - they must be the same. It is also worth noting that cheaper wallpapers often have a visible joint.
Treat the rolls with care, do not place the rolls vertically, this leads to bending of the edges and stains the ends of the rolls. As a result, the joint becomes unclear and dirt will appear and the joint will be visually noticeable.
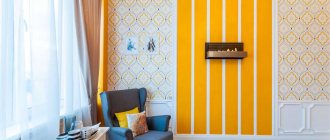
If you take wallpaper with a checkered pattern or with a vertical stripe, the joints will be almost invisible. Transportation and storage conditions of purchased wallpaper are also important. It is not recommended to store rolls without their original packaging, and it is better if they are stored lying down.
For what reasons can joints diverge?
When glue is applied to the canvases, they become soaked and increase in size.
When paper-based wallpaper panels get wet when they are smeared with glue, they swell and change linear dimensions. This applies to both completely cellulose material and textile material with a paper backing.
Non-woven fabrics also swell, but to a lesser extent. Thus, the width of a standard material of 53 cm increases by 3–5 mm when it is moistened.
Without experience and knowledge about the behavioral characteristics of different types of panels, you will not be able to accurately determine the results of wallpapering. As you work, the seams can look great. But after the canvases dry, they shrink, trying to return to their original sizes. At the same time, their width will become smaller, which will lead to the opening of the joints.
Reasons why seams are visible on non-woven paper wallpaper:
| Photo | Description |
| Cause 1 An insufficient or excessive layer of adhesive was applied to the edges of the canvases. | |
| Reason 2 The base was poorly prepared. For example, not primed or puttied. | |
| Reason 3 The brand of glue is not suitable for the type of wallpaper used or the composition was prepared incorrectly. | |
| Reason 4 The cladding dried when the temperature, humidity and other conditions in the room were violated. The manufacturers' instructions note that the wallpaper really doesn't like drafts. |
How to fix such defects?
The resulting joints in the wallpaper can be corrected. There are several ways to do this. It is very convenient if the wallpaper is paintable. In this case, the knocks can be treated with sealant, then painted to match the selected wall color. But it is better to carry out such manipulations before painting the wallpaper.
Attention! Experts do not recommend using putty for this, as over time it will begin to crack and crumble.
Bubbles and places that have come off
To carefully glue the joints of wallpaper that have come off in places or bubbles, for these purposes we take a 5 cc syringe. We put PVA glue into it, but you just need to first check its passage through the needle. If necessary, dilute with water. Work on gluing wallpaper is carried out in such a way that the needle does not stick into the wall and does not become clogged. It is important to saturate the wallpaper with glue and give it time to soak and then press it.
How to glue wallpaper joints
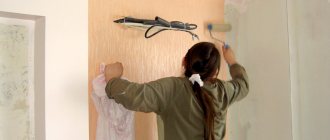
If the situation is more complicated and it is necessary to re-glue the joints, you will have to prepare some tools and materials. For this work you will need a spray bottle, a brush, a brush, a rubber roller, glue and warm water. First of all, you need to moisten the edges of the sheets and carefully pull them together.
After a few minutes, they will absorb moisture, and then PVA glue can be applied. Then you should level the joint areas and run a rubber roller over them. And, of course, smooth out the resulting wrinkles and air bubbles. As you know, all paper wallpaper can be deformed, so you should not get the paper too wet, otherwise it will simply tear or be unevenly distributed.
Sufficient hydration
Regarding vinyl or non-woven wallpaper, it should be noted that after drying they shrink greatly, returning to their original appearance. In this case, you will need to moisten the back of the edges that are supposed to be re-glued. In this case, you can use a rubber roller, which does not stretch the paper, but only presses it against the wall surface.
It is important to take into account that before gluing the wallpaper, you must wet it. Please note that the more the wallpaper gets wet, the wider it becomes. This will help you align the wallpaper correctly.
Sandpaper
There are other ways to seal joints that are used for more serious damage. First, you need to rub the front side of the scraps remaining after work with sandpaper. Next, you need to take the tinting paste and dilute it with PVA glue. To mask the resulting gap, you should cover it with the resulting paste. This must be done very carefully. The paste can be the same color as the wallpaper.
It is also possible that the edges turn out darker due to the fact that the rolls are from different batches or that a defective product was simply purchased. Therefore, you need to be very careful when purchasing and look at the ends of the rolls.
Patches and inserts
There is another method for hiding joints on wallpaper. But using it as an option is not suitable for all types of wallpaper. You can make “patches” from the remaining pieces of wallpaper and paste them as artificial joints. To do this, you need to cut the patches and connect them to the edges of the wallpaper. It is important to accurately match the pattern of the wallpaper and the pattern of the finished patch.
It is important to maintain the soaking time of the sheet so that the sheet does not swell too much. When cutting, it is better to use a good, even spatula and an upholstery knife with a new blade.
If you do everything very carefully, the result will be good.
.
Paper borders
But you can do it differently. If you have imagination, you can use paper borders. The main task in this case is the selection of the border itself, which will be suitable both in color and in structure and material used in its production. You can also disguise areas of discrepancies with all kinds of ribbons and curtains. And then make, for example, a frame for a photograph or painting from the same material. It will turn out very beautiful and original. No one will even understand that this was done later; everyone will assume that initially everything was intended to be so.
Be wary of pencils and markers; if applied too hard, the pigment may bleed through the wallpaper.
Currently, there are many technologies that can be used to correct various wall defects, including gaps formed between sheets of wallpaper. But it is better to immediately adhere to all the rules when carrying out work and take into account all the features of the acquired type of wallpaper, than to later look for ways to hide the joints or make them invisible. Write your wallpaper repair options in the comments.
How to choose the best glue
To repair joints between wallpaper, you need to select the optimal glue for the seams. It doesn't have to be the same brand you used when you originally started. The main thing is that it matches the type of finish.
The most popular types of adhesives are shown in the table:
| Image | Brand of glue and its characteristics |
| Polyex-Rash/Universal . The composition is used for paper and all other types of wallpaper. Produced in the form of a dry composition. Packaging price is 150 rubles. | |
| Metylan/Vinyl-Premium . The material is used for vinyl panels. Available in the form of a dry mixture. The package costs 900 rubles. | |
| Metylan/Flizelin-Ultra-Premium . The adhesive is designed for non-woven fabrics. Available in the form of a dry composition. Cost - 1000 rubles. | |
| Metylan/Universal-Premium . Suitable for all types of wallpaper, including paper. Produced in the form of a dry mixture. Costs 500 rubles. | |
| Aquadecor-Ultra . The material is designed for fiberglass fabrics. Available in the form of a ready-to-use liquid. The cost of packaging is 150 rubles. |
Defect options
Most often, owners blame both the craftsmen and the quality of the wallpaper. But if the craftsmen are professionals, and before this room they managed to glue kilometers of canvases with high quality without any comments, why did they not take into account the peculiarities of the brand of trellis when gluing. Indirect confirmation is the fact that the same problem occurs with both cheap paper and expensive non-woven wallpaper.
The answer to the question of how to make wallpaper joints invisible does not have a clear answer, since the defect itself at the joints can manifest itself in different ways:
- The neighboring canvases have separated, and a thin gap has formed through which the wall is visible;
- A lighter or darker uneven strip of glue residue appeared along the joint;
- The joints at the border of the wallpaper have risen like a “house”;
- At the joints, the difference in shades of the two canvases is clearly visible.
The last point is the most unpleasant. It often happens that when buying wallpaper in a company store, you can purchase rolls from the same manufacturer, the same brand, but belonging to different batches. To sell mismatched items and make the product attractive, salons collect leftover rolls from different batches into one and sell them at a slightly reduced price.
For your information! Even within the same batch, wallpaper may differ in shades.
Many manufacturers, due to the peculiarities of the technology for applying paints to the panel, are not able to ensure ideal distribution of the toner; as a result, one edge turns out to be slightly darker and more saturated than the other. It is impossible to hide such a defect, so an icon with two vertical arrows directed in different directions is placed on the roll. This means "reverse sticker sequence". To hide uneven coloring, each subsequent roll must be turned 180° before cutting and gluing. If you do not pay attention in time to the icon hidden in the text of the marking, the discrepancy in shades at the joints can only be corrected by painting the trellises.
Learning from mistakes
To never again encounter the problem of noticeable joints on any wallpaper, remember three simple rules:
Before purchasing, carefully inspect the rolls for defects; they must all be from the same batch (otherwise the color may differ).
Don't skimp on preparing the walls; prime them at every stage.
Carefully read the instructions for the glue and wallpaper, strictly follow the gluing technique.
And finally, a little life hack for joining: if, when gluing, you overlap the sheets of wallpaper by 3-4 cm, and then carefully trim off the excess edges with a spatula, the seams will be so invisible that you can barely see them yourself.
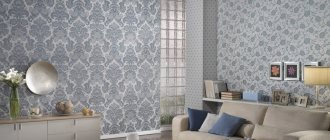
High-quality wallpaper on a wall well prepared for hanging
Five ways to hide joints
Correctly hiding a defect at a joint is often even more difficult than gluing wallpaper correctly. You can learn how to work with trellises from the instructions, while you have to come up with and look for ways to hide defects on your own.
You can hide joints using one of the following methods:
- Clean the edges of the wallpaper from any remaining glue;
- Shade or paint the walls to hide the background, revealing the gap between the joints;
- Try to flatten the wallpaper panels after first slightly moistening the trellis material;
- Paint the wallpaper or hide the joint using a special tinting paste.
Advice! Before trying to hide joints with paint or tinting compound, you will need to practice in a closed area, for example, behind a closet, where the furniture is covered by wallpaper.
The easiest way to hide revealing light spots is to try to paint over them with special paint or pencil. To do this, you will need to buy a special coloring composition.
To hide the white stripe between the panels, just apply a tinting color to the seam using a brush or ear stick. Wipe off excess paint with a clean napkin.
Unfortunately, hiding the joints in such a simple way is only possible with plain wallpaper, if you can choose the composition of a suitable color.
The riskiest way to hide seam problems is to use tinting paste. To prepare it, you will need to trim the wallpaper, from which the surfaces with paint are removed with a sharp knife or sandpaper. Colored paper dust is mixed with glue and the joint is rubbed. In this way, restorers restore old books and paper products; the method is complex, so it is not always possible to hide the problem.
In particularly difficult cases, owners decide to use polyurethane decorative strips that are glued to the joints. In this way, you can hide any defects, even if the shade of the panels is different.
The seam between the wallpaper is noticeable when it fits perfectly
The problem is typical for vinyl coverings, but is slightly less common at the joints of non-woven wallpaper. It looks like this: from the picture you can see that the seams fit perfectly, but at the junctions of the rolls there is a white unpainted stripe. The cause may be a manufacturer error or improper storage and transportation of rolls.
Expensive wallpaper consists of at least two layers, roughly speaking – base and coating. Sometimes when cutting edges in production, the coating is cut a little shorter than the base. The second possible reason is careless transportation or storage. Because of this, the design on the edges may be erased.
The way out of the situation is to paint the joints. You can do this in two ways:
Use a cosmetic pencil if the wallpaper pattern is glossy. Over time, the tinting procedure may have to be repeated. The technique is simple: carefully paint over the joints and rub them with a clean rag or your fingers.
Tinting paste to match the coating (the cheapest one is possible). The color is applied to the joints using a thin spatula or a regular cotton swab in short sections. After a small area of the seam is covered with paste, this area should be wiped with a damp microfiber cloth. The colorless seam will be colored and will become invisible. Before you start working, be sure to check the color on an unnecessary piece of wallpaper; it should wash off well without leaving any traces. During the process, you need to regularly rinse the rag to keep it clean.
If the color of the coating allows, you can paint over the joints with a simple felt-tip pen or pencil. If you decide, be very careful; a felt-tip pen or pencil, unlike color scheme, cannot be washed off the wallpaper with a damp cloth.
If the coating is a single color, the joints can be painted in the appropriate color.
The most difficult case
It is most difficult to hide joints with a gap when the edges of the panels have diverged so much that the wall is visible. To hide the unmasking seam, you need to try to move the edges and fix the canvas using proven glue. Many two-layer wallpapers react differently to moisture. Most trellises swell and become plastic when liquid glue is applied. After gluing to the wall and smoothing, the width of the canvas can increase by several millimeters, and after drying the reverse process occurs.
To hide the resulting gap, you first need to moisten the edges of the canvas using a spray bottle or spray bottle. After 10-15 minutes, the wallpaper will become soft, and you can lightly press the canvas with your hands and try to connect the edges of the panels. The seams are glued with PVA glue and rolled with a rubber roller.
If it is not possible to hide the joint in this way, for example, joints on paper wallpaper are very difficult to hide in this way, you can try to decorate the seams, as in the photo.
Colored stripes and individual fragments are suitable for decorating joints; you just need to stick them on the panel so as to hide the defect and at the same time distract attention from the problem area. Wallpapers of different patterns will help to ideally hide a frayed seam, since a brighter color always attracts the eye. Before you make a joint from different wallpapers, you need to plan an overlap transition. The glued new trellis does not even need to be cut.
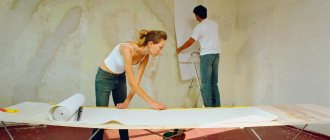
How to properly glue trim
First you need to cut out the wallpaper.
To avoid problems with wallpaper seams, you need to properly glue the trim the first time.
It's done like this:
- First of all, cut out the panels. At the top and bottom, based on the characteristics of the patterns on the material, leave a spare 3–4 cm.
Apply glue to wallpaper only on a clean surface.
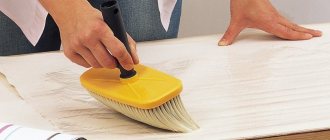
- Lay the piece of cloth on the thoroughly washed floor, face down. Use a large flat brush to spread the adhesive.
- Fold the cut and wait the time specified by the manufacturer for soaking the wallpaper. At the same time, you can prepare other panels.
You need to start working from the window or door.
- Glue the prepared cut to the base in the corner next to the door or window. The supply of material on their side should be 3–4 cm.
- Using clean and dry gauze or a roller, straighten the trim and press it to the base, simultaneously expelling air from under the canvas.
- Trim off any extra inches of wallpaper at the corners and at the top.
- Glue the second piece of wallpaper with an overlap of 3–4 mm on the first panel. This way the joints will not separate when the finish dries.
- Cover all walls using the described method.
Recommendations
Here are tips to help you hang wallpaper correctly:
- The panels must be glued to a leveled, primed and puttied base.
- The brand of glue must match the selected type of wallpaper.
- Remember that the methods for gluing different types of panels are different. For example, when using non-woven wallpaper, it is not the wallpaper that is coated with glue, but the base. Sometimes it is necessary to apply a fixing compound to both walls and panels.
- You cannot glue wallpaper without seams, that is, joint to joint. The canvases need to overlap each other. Then they won’t come apart after drying.
- Do not press seams with strong pressure. You will squeeze out the glue, which will moisten the front side of the canvases. This will remove the paint layer on the finish.
- Finishing work should be carried out in a warm room and at low humidity.
- Until the cladding is completely dry, doors and windows, heating equipment and air conditioning must not be opened.
Fighting the edges that have risen up like a house
Not the most difficult, but quite common case when joints rise and twist, photo. Usually craftsmen in such a situation, in order to hide their imperfections, blame the quality of the wallpaper and poor glue. In fact, the problem lies precisely in the lack of professionalism of the workers. In the process of coating the cloth, experienced craftsmen apply glue to the edges twice, because the adhesive mass dries much faster along the edge of the cloth. To hide the raised joints, just apply an additional layer of adhesive under the seam line and roll the trellis with a rubber roller.
It is much more difficult to hide a defect at the joints in a situation where the seams have risen along with pieces of soil and whitewash. This means that the preparation of the wall surface was carried out extremely carelessly, and when shrinking, the wallpaper tore off the adhesive seam at the joint. In this case, you have to spend a lot of time soaking and removing the old glue from under the joint, and only then gluing and rolling the fabric. If you try to re-glue the seams as they are, the remnants of the old glue and whitewash will make the seam stand out, and under certain lighting the defect will appear in a new way.
Solving the problem correctly
If it so happens that the joints of just pasted wallpaper have come apart, then we suggest you correct this misunderstanding. Fortunately, there are many ways, and you can choose the most optimal one for yourself.
- Re-paste the wallpaper. Yes, this is a radical method that requires additional nervous and financial expenses. But if the gap between the wallpaper is thicker than three fingers, then this is the most obvious and high-quality solution;
- Color in with a felt-tip pen. No, children's pencils and felt-tip pens will not help in this case. You will have to go to a hardware store and buy a special felt-tip pen;
- Mask the joint. Most often, homeowners resort to this method. You need to cut a strip of wallpaper a little wider than the divergence space, and glue it under the edges of the wallpaper that hangs on the wall;
- Install panels. You can stick panels or baguette on top of the peeling wallpaper. So in one fell swoop you will not only hide the defect, but also add originality to the interior.
- And remember that a mistake during renovation can happen to anyone. You shouldn’t get discouraged and worry about this, because the solution to the problem is always on the surface, the main thing is to know where to look for it.
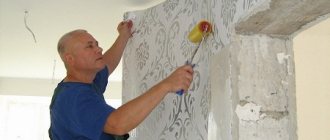
How to prepare walls for wallpapering?
Gluing wallpaper so that joints and bumps are not visible can only be done on perfectly flat surfaces. When using thin fabrics, special attention is paid to the quality of the base. Thicker varieties can hide minor defects, but the likelihood of them appearing in the future is quite high.
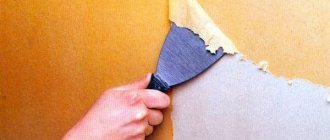
To prepare surfaces for work, remove the old coating. If you have previously used wallpaper, wet it with water and scrape the walls with a metal spatula.
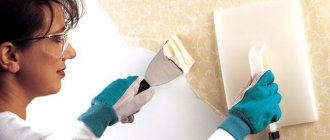
After the work has been done, evaluate the condition of the surface. If there are no large cracks or uneven areas, smooth the base using finishing putty. It is capable of covering defects up to 5 mm deep into the wall.
If the walls are too crooked, level them using plaster along the beacons. The material can be applied in layers up to 15 cm, which allows you to completely eliminate all flaws.
How to make an even seam if the edges of the roll are slightly frayed?
It often happens that as a result of damage to the packaging or due to improper storage, the wallpaper can become frayed on one or both sides of the roll. What should you do if you come across just such a product? How to glue the joints of vinyl wallpaper (or other types) so that they remain invisible?
In such situations, the first strip is glued using the standard method, and the second strip overlaps the first strip. To do this, on a strip that has a curved and disheveled edge, you need to draw a straight line (stepping back 1-2 cm).
The second stripe must be placed exactly along the applied markings. Now, using a ruler and a knife, carefully remove the excess part from the top and bottom layers. This way you get an even and invisible seam. Additionally, it should be rolled with a roller.