Patterns on the walls in the apartment - photos, design ideas
A little lower we will present to your attention a large number of stencils for wall decor. Now we’ll show you what such wall decoration might look like. Watch and be inspired!
Patterns on the walls in the apartment - photos, design ideas:
Volumetric heart for the hallway
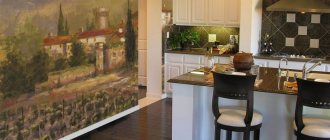
Original kitchen
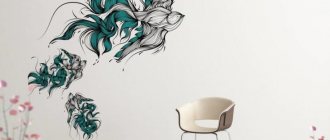
Bright bird
Flowers
Laconic ornament
Fairy-tale characters Tree
Large dandelions Cute sheep - ideal decor for a nursery
Another idea for a nursery
Types of stencils
An ornament or pattern can be applied to any surface in the room and even to furniture. For this, specially prepared stencils or templates are used, which make it possible to cover the entire desired area with the same pattern. For painting, acrylic and waterproof paints of different colors are usually used, as well as spray paint.
Stencils come in various types:
- Single-color (1 tone of paint) - used for inscriptions, silhouettes and ornaments.
- Several shades or colors - allow you to draw pictures; the method is also used when applying the main and auxiliary drawing to highlight any part of it (the number of stencils is determined by the number of colors).
Related article: Bright design of bottles and glasses for a wedding
- Volumetric ornaments are made using putty; after drying, the protruding part can be additionally painted for a greater emphasis.
- Anti-stencil – when painting is done outside the border of the stencil and a silhouette of the drawing is obtained.
DIY geometric patterns on the wall - ideas, photos
Only a few people choose geometric patterns for decorating walls, as they consider such a design to be too complex and too bright. But if you try to make a similar finish with your own hands, you will be surprised to realize that making geometric designs is very easy.
How to make such an original drawing on the wall:
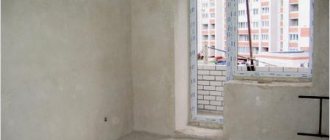
- We level the wall - seal all the cracks and holes. This must be done, otherwise these minor defects will spoil the final appearance of the wall.
- We prime the wall and wait until it dries. Next, we take the painter and begin to create the outlines of the figures.
- After this you can start painting. To make the pattern beautiful, combine at least 2 colors. The wall will look even more beautiful if the pattern is applied in 3 colors or shades.
- Let the decorative material dry and you can carefully remove the tape. If, after removing the auxiliary tape, any imperfections are found, take a thin brush and carefully paint on everything.
Do-it-yourself geometric patterns on the wall - ideas, photos:
Delicate room design
Discreet minimalism Discreet minimalism
Bright decoration of the room
Imitation of mountain peaks
DIY geometric patterns on the wall - ideas, photos
Complex room design
Combination of yellow and white
Interesting combination of shapes and colors
Cozy room design
Master class No. 3
You can make a more complex drawing. To do this, you need to use so-called coloring by numbers - you can buy it in a store, download it on the Internet, or do it yourself: there are special programs that convert any image into a kind of mosaic.
When you have decided on the picture and palette, using a projector and a pencil, trace the outlines and arrange the numbers as in your sample drawing.
Then you can start coloring according to the color numbers.
Decorative patterns on the walls - stencils for printing
If you want to save time and effort, then decorate your walls using stencils. All you have to do in this case is to stick the stencil on the wall using masking tape, and then use paint to paint the “picture”. Decorative material can be applied with a piece of washcloth, a sponge, or brushes of different sizes.
Decorative patterns on the walls - stencils for printing:
Stencil for decorating corners in a room
Floral themes will decorate any interior Intricate pattern on the wall
Imitation tiles in oriental style
Original pattern for room decor
Patterns for creating airy interior design
Patterns for creating airy interior design
A selection of patterns for decor A selection of patterns for decor A selection of patterns for decor
Master class No. 6
What to do if you can’t use a projector? Masking tape comes to the rescue.
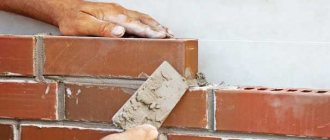
To depict, for example, such a realistic tree on the wall, you will need:
- masking tape
- stationery knife
- black marker
- primer for wall treatment
- newspaper to protect the wall from paint
- dye
- thick brush.
First you need to mark the outline of the future tree on the wall using masking tape.
Then the entire space inside the outline is filled with masking tape and on top of it we draw the future tree. It is better to outline the contours of the resulting tree with a black marker for clarity.
After this, using a stationery knife, carefully cut out the design along the contour. Before you start painting, you should, firstly, protect the wall around the future drawing from paint. The easiest way is to use newspapers for this purpose.
The area of the wall that will be painted must first be treated with a primer so that the paint adheres better. After the primer has dried, apply the paint using a brush. Ten hours later, when the paint is completely dry, you can remove the newspapers and peel off the masking tape: your drawing is ready.
Simple patterns on the wall - stencils for printing
If you don’t like complex tasks, then decorate the walls in the room with simple, laconic stencils. With their help you can create interesting and memorable stories.
Simple patterns on the wall - stencils for printing:
A selection of stencils for room decor
A selection of stencils for room decor
A selection of stencils for room decor
Light feathers - they can be made very bright
Butterflies Cute owl Cute owl
Feminine silhouette for bold design Laconic cats Airy dandelion
Beautiful patterns on the wall - stencils for printing
Beautiful patterns on the wall - stencils:
Ready-made composition for room decor Ready-made composition for room decor Ready-made composition for room decor Ready-made composition for room decor Ready-made composition for room decor Ready-made composition for room decor Ready-made composition for room decor Ready-made composition for room decor Ready-made composition for room decor Ready-made composition for room decor Ready-made composition for room decor Ready-made composition for room decor Ready-made composition for room decor
Design options for finished work:
Framed on the wall
Papertol "The sea in the picture"
As a decorative element
Papertol “Girl with Roses”
Christmas tree decoration
Papertol “Girl with a Basket”
We also draw your attention to the various design options for the finished work. Combined with such a powerful style variety, you will decorate your apartment (house, office) with taste, turning it into a real private gallery, in which you yourself will be the creator of all the masterpieces!
Papertol in our catalog
Patterns on the wall in the kitchen - stencils
The kitchen is a place where the whole family gathers every day, and therefore this room should be as cozy and beautiful as possible. It is best to choose thematic decor for the kitchen - on a culinary theme.
Patterns on the wall in the kitchen - stencils:
Invigorating coffee - what would you do without it?
Hot tea Patterns on the wall in the kitchen - stencils
Patterns on the wall in the kitchen - stencils
Patterns on the wall in the kitchen - stencils
Technique for creating three-dimensional paintings in papertol style
The main expressive means of paperwork is zoning: each paper picture in this technique has a background, a foreground and an intermediate zone. This division is very important, since it is what gives the image volume and depth.
Papertol "Girl in Butterflies". Click to go to this product page.
The blanks from the set are cut according to the pattern into individual parts and assembled into a picture according to the principle “from the general to the specific, from the background to the decor.” Before the final gluing, it is important to dry-fold the image and make sure that everything is correct, and then place it on double-sided adhesive tape.
So, let's move from big to small. Let's say we have a village house in front of us (pictured below). The general outline of the hut is superimposed on the background, and then its details: door, window, cornice, pipe, and at the very end the grass in front of the house and a butterfly on a flower are pasted on. In order for each detail to look like a natural continuation of the picture, and not a “patch,” it is important to treat its edges with a marker of a suitable color, and upon completion of assembly, place accents with a shiny water-based varnish.
Papertol "House with a kitten". An example of the finished work and the assembly process. Click on the photo to go to the page for this product.
If you want to achieve a retro effect, instead of a glossy finish, carefully go over individual elements of the composition with sandpaper or varnish with a craquelure effect.
Patterns on the wall in the bedroom - stencils
Patterns on the wall in the bedroom - stencils:
Cute pattern for bedroom decor Moon and stars - gentle and beautiful
A selection of stencils for bedroom decor
The angel is suitable for both an adult bedroom and a nursery
Night fairy
Bubble Mood
This drawing is an excellent option to hide any flaws in the design of the wall before renovation. The motif will look good in a child's room.
The template in this case is a circle cut out in a sheet of cardboard
To make a three-dimensional bubble you will need two contrasting paints. The dark one should be applied to the top of the template
Light paint is applied to the bottom of the template and another stroke is applied to the top of the dark circle.
The author added the drop-bubble with two strokes from below, but even without them it looks very interesting
If you regularly arrange such droplets, you will get a cheerful parade of capitoshkas
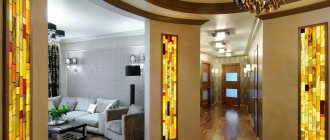
Patterns on the wall in the hallway - stencils
The hallway may have brighter and more dynamic wall decor, because this is the room your guests see when they enter your home. And, perhaps, the hallway is exactly the place where you can use the brightest colors and shades. Since you won't be spending a lot of time in this room, bright colors won't have a negative effect on you.
Patterns on the wall in the hallway - stencils:
An elegant shoe is very appropriate in the hallway Lightness and simplicity
Floral motifs
Floral motifs
Floral motifs
Basic techniques
Today there are a large number of techniques for painting on walls in an apartment. Familiarization with the most popular methods will allow you to choose the most suitable one.
Drawing with paint
The technique is often used when drawing images without clear lines and contours. To perform such work, spatial imagination and preliminary visualization of the result are required. The base color is used when applying key details.
On the wall you can depict a landscape with a tree in the center and individual details on the periphery. When applying an image, it is recommended to use greenish or brownish shades; they are present in landscapes. This stage is considered marking and becomes the basis for work. When applying a picture, a translucent base composition is used, on top of which a thicker layer is applied. The technique is considered the most difficult and requires experience and talent. 3D drawings on the walls in the apartment are painted using paints.
Pencil
Drawing on a wall with a pencil is also not considered easy. The image is transferred from the sketch to a scale drawing, the possibility of distortion is eliminated. The difficulty of transferring lies in the need to maintain proportions, shapes, and direction of movement, which is quite difficult.
At the initial stage, an area for the painting should be designated on the wall; it is marked with crosses or dots. It is necessary to reproduce the picture in the center of the selected plane. In addition to the pencil, you should prepare an eraser and a soft cloth.
By squares
In this case, the image is transferred from an image, photo or painting to the wall using the method of dividing into separate squares. This method is considered the most accessible for those who lack artistic skills and talent. The method requires perseverance, precision, and a meticulous attitude to work. There is no need for drawing experience in this case.
Stages:
- Draw the sketch into squares 30x30, 40x40, 50x50, etc.
- Mark the area for the future drawing using a ratio of 1:10 or 1:5 (you should choose the ratio yourself) and mark the selected area into squares.
- Transfer the image from the sketch to the wall step by step. The line of each sector must have continuations in the adjacent one, which guarantees accuracy.
The method does not require the use of a large number of tools. You should first prepare a pencil, an eraser, several rulers, and a plumb line.
Shadow
Transferring a picture to a wall using a shadow is used quite rarely, despite its relative simplicity. The main point is to create the right lighting. The shadow of the object should fall on the wall being painted.
Attention! This technique is suitable for applying geometric patterns, branches, human figure, profile, etc. The main advantage of shadow painting is that the shadow increases the size of objects.
Shadow can be used when composing individual elements of a landscape. It is possible to rearrange objects, find the best position for them until their maximum harmonious arrangement is achieved.
After clearly fixing the shadow, its contours should be outlined with a pencil; at the next stage, small details are drawn in. The technique of transferring a picture over the shadow allows you to create exclusive panels. The drawing is applied with a pencil; it is recommended to use a projector or lamp to create shadows.
Stencil drawing
The stencil painting technique is considered the simplest. The main disadvantage is the difficulty in creating blanks for large elements and the monotony of the picture. The stencil does not allow you to recreate full-fledged images with a lot of detail.
The advantages of stencil designs outweigh their disadvantages. The stencil allows you to recreate clear lines of the picture. At a minimum, you need to use 1-2 templates, which will allow you to properly design the entire site.
Paint printing
For stuffing you only need a couple of shades. The main work is carried out using a paint brush or a regular brush. Adjusting the contour requires the use of watercolor brushes. Spraying a can of paint will help speed up the process.
Attention! Following two rules will help you avoid adjustments. Masking tape will help ensure a tight fixation, the use of which will not disturb the wall coating. The use of thin putty, applied with a spatula, will help achieve relief. The drawing turns out to be voluminous, protruding beyond the wall by 1-1.5 mm.
Shade and shape
After applying the base, it is recommended to proceed to the next step. Life should be breathed into the contours, as a result the image takes on the desired appearance.
Roller
The main advantage of the technique is speed; there is no need for adjustments. The disadvantage is the monotony and limitations in the choice of pictures.
Painting a pencil drawing
When painting, water-based paints and a palette are used to combine shades. First of all, a transparent layer is applied, due to which the color distribution is ensured. The entire picture is gradually filled with color spots. It is not recommended to use bright colors at this stage. It is recommended to draw objects located in the foreground as clearly as possible. Small details should be painted after applying the main drawing; thin brushes are used when carrying out the work.
Patterns on the wall in the hall - stencils
Patterns on the wall in the hall - stencils:
Another variation of a beautiful female silhouette A selection of stencils for wall design Patterns on the wall in the living room - stencils Flowers are always beautiful
Laconically
Patterns on the wall in the nursery - stencils
Make the nursery as beautiful and original as possible, do not be afraid to combine many colors and shades in the decoration of the walls, this will help make the world around your baby as colorful as possible, and the children really like it. The only thing is, do not use acidic shades - they will have a stimulating effect on the baby’s nervous system, and she will be capricious a lot.
Patterns on the wall in the nursery - stencils:
Cheerful family of kittens Universal decor Universal decor
Fun decor for a nursery
Universal decor
Universal decor Universal decor Universal decor
Universal decor Universal decor
Idea #4: Using a Sprayer
In order to draw a more complex and large pattern on the wall, in which there are transitions and gradations from color to color, it is impossible to do without a sprayer. Before using it, you need to take care of protecting the entire room and furniture by covering everything with oilcloth or newspaper. It is also necessary to open all windows to allow fresh air to enter. Do not forget that you only need to wear safety glasses and a mask when working with the sprayer.
We used this one:
So, to, for example, depict a beautiful sunset, as in the photograph, you will need dark red, orange and yellow paint. First, apply dark red paint in a thick layer, moving from the corners to the center, gradually the layer of paint should become thinner. Then we apply orange paint, adding a little dark red to gently mix the colors, and finally paint over the yellow middle. Then you can start painting small details: Using a thin brush, paint over the desired space limited by the pencil lines.
For this work we also used a protector when we painted the shore, palm trees and other details of the picture over the sunset.
Ornamental patterns on the wall - stencils
A correctly chosen ornament can greatly change the perception of a room. For example, it may look larger than it actually is. And all because such decor, due to its “volume,” adds visual “depth” to the walls.
Ornamental patterns on the wall - stencils:
This pattern is suitable for large rooms
Ornament of different sizes
Floral motifs
Heart
A selection of hearts of different shapes
Ornamental patterns on the wall - stencils
Kazakh ornament
Oriental motifs Smooth lines
Volumetric paintings made of wood
Textured paintings on the wall made of wood look rich, but creating a three-dimensional picture will require not just skill, but also a lot of effort and time. The method of decorating the walls is unusual, and the work requires chisels, special knives, varnish, stain, and a wooden frame. The selected three-dimensional drawing must be transferred to the tree, and then begin cutting out the contours. The depth of the cut will create a three-dimensional picture. Due to the stain, an original look is obtained and the volume increases, and the finished painting is coated with varnish to protect it.
Three-dimensional painting on a wooden wall
In this case, the painting does not require the additional use of accessories; you just need to cut out the design and hang it on the wall. This type allows you to create a modular design, for example, a triptych, but it is very difficult to create the desired relief. When finished, some people put glass in the frame. Before creating three-dimensional paintings from wood, it is better to watch a master class on cutting wood.
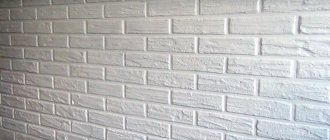
Brick wall - large-scale pattern: stencils
Brick wall - large-scale pattern:
Stencil - forest motif Majestic forest Brick wall - large-scale pattern Selection of stencils Brick wall - large-scale pattern:
Pattern on a white wall - animal stencils
Pattern on a white wall - animal stencils:
Wolf cub in his habitat
Pattern on the wall Geometric cat pattern
Geometric pattern
Pair of wolves
Simple and original
A selection of silhouettes for wall decor
A selection of silhouettes for wall decor
Decor with strong energy
Horses
Patterns on the wall - flowers: stencils
Patterns on the wall - flowers:
Flower arrangement Flower arrangement
Rose Tulips
flower composition
Flower arrangement Flower arrangement
Flower arrangement Flower arrangement
flower composition
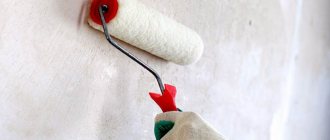
Preparing the wall surface
First you need to prepare the tools needed to paint the wall:
- spray adhesive that attaches the stencil to the wall;
- brushes, paint roller, sponge;
- acrylic or spray paint;
- level for correct determination of horizontal and vertical.
Related article: Options for decoupage of an old suitcase: some interesting ideas
To prepare the wall, you need to clean it of dirt and dust. If possible, wash or vacuum and wipe with a dry cloth. When applying an ornament, it is better to stock up on a level, then the design will not be able to bend or move away from the intended horizontal line.
The stencil is applied to the wall, starting from the center, and the points and edges are marked with a pencil. It is better to practice in advance on old wallpaper or whatman paper; this practice will help you master the application technique and choose the desired shade of the ornament.
It is best to make several prints in different shades and apply each one to the wall for optimal color selection.
Garland patterns on the wall - stencils
Garland patterns on the wall - stencils:
Beautiful garland
Beautiful garland
Beautiful garland
Beautiful garland
Video: DIY wall decor - 13 ideas! Lifehacks for painting walls
Read other articles on our website that will help make your home more beautiful and comfortable:
- How and with what to update old interior and entrance doors with your own hands?
- DIY kitchen decor from scrap materials: ideas, tips
- Decorative fireplace: what role does it serve, what can be quickly made from?
- How to make a decorative stone from gypsum: instructions
- How to beautifully and modernly decorate a window in a house, apartment, or country house: 100 ideas
- DIY decor made of concrete, Turkish putty and plaster: loft in the interior
How to make paintings with your own hands (step by step)
Shaving foam painting
- Shaving foam;
- Paper;
- Scotch;
- Frame;
- Acrylic paints;
- Ruler;
- Baking tray;
- Knife.
We have a separate review on our website with this master class, you can come and study it. Well, in general, it’s easy to do. Fill a baking tray with shaving foam and drip onto the surface of the foam with different acrylic paints that are harmonious in tone. Using a knife we create beautiful patterns. We immerse a sheet of paper here, lightly press it with our hands, and turn it over. We remove all the foam from the surface of the sheet with a ruler. We leave the sheet to dry and then put it in a frame.
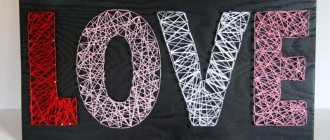
Picture made of nails and threads
- Pattern of a rabbit or other silhouette;
- Nails;
- Threads;
- Hammer;
- Scissors;
- A piece of tinted plywood.
This master class has already been published on our website, look for all the details here. Well, now we will briefly describe the process of creating such a panel. We attach the bunny template to a piece of plywood and drive in nails around the perimeter. After that, we remove the template and wrap the carnations by interlacing the threads.
DIY painting made from feathers
- Tinted feathers;
- Hot glue gun;
- Base from frame;
- Button.
Details on how to create this panel can be found here. Well, generally speaking, we tint the feathers in the desired color, and after drying, first lay out the outer circle on the canvas, simultaneously gluing the feathers to the base. We continue to line the inside of the panel with feathers. Well, in the center we glue a beautiful large button. Finally, we place the feather panel under the glass in the frame.
Painting with paints
- Acrylic paints;
- Canvas;
- Brush;
- Palette for mixing paints.
Apply light blue paint on top of the canvas, and draw a slightly darker stripe below with a brush. The result is such an unobtrusively rolling gradient. Next, draw a few more stripes of dark blue color. You can correct the blue or cyan tone of the paint by mixing white paint with blue. We draw a beige line below, and a white line above it, and with a brush you can work like a sponge. This will create a foam effect near the sea sandy shore.
Picture with sequins
Cut out a square of sequin fabric according to the size of the frame. We turn the frame over with the glass down, lay a piece of fabric, put a cardboard backing on top, and press the holding metal brackets.
Transferring a photo to canvas
- Canvas;
- Photo;
- Spray bottle with water;
- Acrylic paints;
- Hair dryer.
Apply acrylic paint to the canvas and immediately press the photo face down. Leave everything alone until completely dry. When the paint is dry, heat the image with a hairdryer. Next, moisten it a little with water from a spray bottle and remove the layer of paper with your finger. Just rub the paper with your finger, it will begin to roll and eventually a print of the photo will appear.
Glitter painting
- Canvas;
- PVA glue;
- Sequins;
- Brush;
- Varnish in a can;
- Template of the desired silhouette.
We cover the deer template to the canvas and trace it along the outline with a pencil. Fill the entire inside of the deer with glue. And sprinkle generously with glitter, wait 5 minutes, and turn the picture over to face down to shake off excess glitter. We leave the canvas to dry for about 12 hours. Then we fix the image with spray varnish.
Fabric painting
- Textile;
- Silhouette template;
- Scissors;
- Frame covered with burlap;
- Thread and needle.
We transfer the silhouette of a deer onto the fabric and cut it out. We apply the silhouette to the canvas and sew it with a dotted seam.
Seashell painting
Remove the rear part from the frame. We put shells inside, densely and a lot. Next, we return the back part and bend the retaining brackets.
Button painting
- Buttons;
- Frame covered with burlap;
- Glue gun;
- Ribbon bow.
Draw the outline of a heart on the canvas. We lay out the outline with buttons, gluing them with a hot glue gun. We fill the inside of the heart with buttons, gluing them in several layers to avoid gaps.