Installation of window slopes is finishing work. Some owners opt for insulation, but most prefer to give the windows a beautiful look so that the entire interior is made in the same style, because well-designed double-glazed windows will add coziness and comfort, especially if we are talking about year-round living.
Slopes solve several important problems:
- provide protection for frames and openings from moisture;
- serve as an additional barrier to the cold, extending the service life of the structure;
- decorate the window and increase aesthetics.
Hence the conclusion: the elements must be durable, water-resistant and have a pleasant appearance.
Choice of window design
In a wooden structure, it will be possible to install both plastic and wooden windows. To decorate the appearance of such a source of natural light, you will need to make a high-quality finishing of the slopes. The choice of finishing for the slopes depends on what material the windows are made of. In a wooden house, the finishing of the slopes can be external or internal. To do this, they often use:
- Plastic.
- Wooden lining.
- Natural wood.
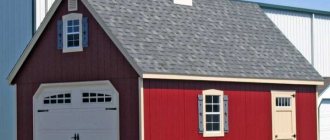
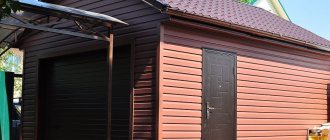
For external slopes, it would be better to opt for more practical finishing materials that do not absorb moisture. Only then can such slopes serve for a long period of time. In interior decoration, it is possible to use any finishing material, since the surface of the slopes will be protected from the effects of weather and climatic phenomena.
Plastic in finishing the slopes of a wooden house
For many years, finishing materials such as plastic have been used for external and internal work. It is very practical and durable. If there is a plastic window in a wooden house, then it would be best to make the slope out of plastic:
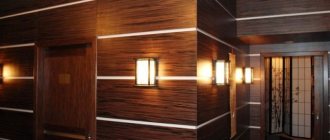
- Plastic panels for finishing work have a wide range of colors, which will allow you to choose the desired tone. As a rule, in a wooden house, plastic windows have an imitation of wood. Today, plastic panels have a large selection of colors that can also imitate wood covering.
- In addition to all this, plastic is considered a sealed material that is not capable of allowing air and moisture to pass through, which means that the tree will be fully protected from the effects of weather or climatic phenomena.
- Plastic panels are very easy to clean as they do not absorb any dirt. It will be enough to wash them with a damp cloth without using special detergents.
- Do not forget about the durability of such finishing material. The service life of plastic panels is almost unlimited. It can be replaced in case of breakdown or loss of presentation. If plastic panels have a fairly low cost, then they can lose color very quickly, which cannot be said about higher-class panels, which are mainly used for finishing slopes in a wooden house from the outside.
- Plastic is considered an environmentally friendly material, which means it will not pollute the environment. It is for this reason that finishing windows in a wooden house with plastic is possible even indoors (see Finishing windows with plastic - installation stages).
- Plastic panels are frost-resistant. This fact is very important for those regions that have a very low temperature threshold in winter. They are also not subject to mechanical and physical stress.
Advice. To ensure that the finishing of plastic windows in a wooden house with plastic is of higher quality, you need to carefully examine the surface of the finishing material. It should be smooth and not have any deformations. This is the only way the appearance of the slope will not be disturbed.
In the process of finishing the slopes in a wooden house, it will be possible to replace the window sill or install it. It can also be made of plastic, which will create the effect of integrity of the entire structure. In order to finish slopes in a wooden house with plastic panels, you will need to have:
- Plastic.
- External and internal corners.
- Screwdriver.
- Sealant.
- Construction stapler with staples, matching the color of the plastic panels.
Manufacturing of casing (plugs)
Embedding block
The lower part of the window opening casing can serve as a finishing window sill. Its appearance can be customized to suit your taste. For example, move the window sill inside the room and expand the protruding part to the sides. This is called “with ears.”
In another case, if the window has a plastic window sill, the lower part of the window casing is made thinner than the other parts. This way it retains its function and does not interfere.
Bottom with ears = excellent wooden window sill
Casing without threshold on internal doorways. We suggest you familiarize yourself with How to fill the floor in a bathhouse with a slope under the drain with your own hands?
This is where the differences between window and door frames end. Their side parts and top are the same.
Simple tools you will need are a hammer, a chisel, a construction level, a hacksaw, a pencil or marker, a ruler, and a corner. Power tools include a chain saw or circular saw, an electric planer, and a hand router. The help of one or two friends will not be superfluous.
In a timber house we will make a T-frame, as it is easier to make with our own hands. Here you can do without a router, just use one hand-held circular saw, which you can rent.
The final result of the work.
For the top we take a beam 150 x 50 mm.
Windowsill. With a wind lock made of 150x90 mm timber and without a wind lock made of 150x50 mm timber.
Longitudinal cuts are made with a circular saw. If the cutting depth is not enough, carefully cut out the remaining wood with a chisel. We also select the groove for the wind lock using a chisel or a router.
And this is what a drawing of the sides of a classic casing deck looks like. The top and window sill are marked in the same way as the T-view.
Drawing of the side parts of the P-casing.
The technology for installing a pigtail in a timber house is as follows:
- We mark and cut out openings
- We mark a groove at the ends of the cut openings. Let's choose it. Or we form a spike if you chose a P casing.
- We impregnate the openings and the adjacent part of the casing with an antiseptic, for example Veres Base
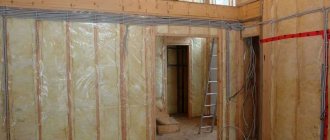
- We insulate the opening with jute tape
- We install the bottom part, then the sides and finish by installing the top
- Checking the geometry
- We fill the free space above the tops tightly with jute
It seems simple, but as usual, the devil is in the details. I’ll try to show the process of installing casing in a house made of 150x150 mm timber. If it is unclear, ask in the comments.
When marking openings, remember the golden rule “measure twice, cut once.”
Slowly and carefully form a tenon on the side walls of the opening.
Use a building level. The window sill must be strictly horizontal, the sides must be vertical.
First, we insulate the lower part and install the window sill, then we insulate the remaining perimeter and install the sides. We close the casing by installing the top.
We coat the locks with wood sealant. No self-tapping screws!
At the final stage, we stuff the protruding jute into the seams. We also tightly plug the space above the top with it.
Let's check the geometry again. Profit!
The result of the work.
In the video, the house is not entirely made of timber. It is a fire monitor, but also with smooth walls. All stages of casing installation were well filmed. A bonus is the visual installation of plastic windows and doors.
Let's take as an example a 1.4 by 1.2 meter window in a house made of 150x150 profiled timber. We will calculate the width and height of the opening for a P-casing with a thickness of 90 mm. The wooden window sill is the lower part of the frame.
Calculation using the example of a window 1400 x 1200 mm.
- window width 1400 mm, window height 1200 mm
- thickness of side panels - 90 mm, top and window sill - 60 mm
- depth of the selected quarter for the frame - 25 mm
- drank above the tip - 70 mm
By the way! It will be interesting to know: How to insulate a wooden house from the outside and with what
The width of the opening = the width of the window, two thicknesses of the casing - two quarter depths of 5 mm for the gap between the casing and the wall on each side and 10 mm for the gap between the casing and the frame, also on each side.
1400 90 90 30–50 = 1560 mm
The height of the opening = the height of the window, the thickness of the window sill, the thickness of the top 25 mm for gaps - two quarter depths, the gap above the top.
1200 90 90 25–40 70 = 1435 mm
The principle, I think, is clear. If anything, ask in the comments.
Advantages of wooden slopes for a wooden house
Despite the positive characteristics of plastic, for many, the choice in favor of wood remains a priority. In addition to external aesthetics, installing wooden slopes has many positive aspects.
Reliable fixation and proper care provide wooden casing with strength and durability
Compared to plastic and other synthetic materials, such products are environmentally friendly and do not cause allergies. Wood has good soundproofing properties. Wooden slopes can be securely fixed, and if cared for correctly, they can last much longer than plastic .
Wooden slopes and window sills are suitable for finishing windows of any size, made of PVC or wood. Wooden products can harmoniously hide the shortcomings and errors in creating a window opening that may appear during the installation of windows.
An alternative method of attaching a wooden slope
In this case, a wooden frame is made, which is fixed to the window opening of the house using self-tapping screws.
- Cut the wood panels to the required sizes.
- Attach insulation to them, for example, strips of mineral wool.
- The top layer of insulation should be covered with plastic film, which is secured with double-sided tape.
- Fix the panels together: fasten them with self-tapping screws.
- Next comes the installation and fastening of the resulting frame structure in the window opening.
This method, like the first, will reliably block access of the external environment to the polyurethane foam. After finishing in this way, a plastic or wooden window in the house will be well protected and will retain its best characteristics for as long as possible.
There is a third option, which involves the use of wooden lining. Please note that before such finishing, battens are usually installed to hide uneven walls.
Slopes finished with clapboard are a good option for wooden buildings, but installation of sheathing may be required
Also, if necessary, you can make window slopes using one of the many modern natural wood-based materials. The procedure for carrying out work in this situation, compared to the first two methods, will not change significantly. In any case, it is advisable to insulate the window with foam or insulation to ensure maximum heat and moisture insulation.
Mounting options
The most common two methods of installing wooden slopes in a window opening are on polyurethane foam and on a frame made of timber. Let's take a closer look at both options.
On polyurethane foam
The method is relevant if work is carried out in a relatively flat opening, the side edges and top of which are plastered with cement mortar or evenly finished with other rough materials.
- A small layer of polyurethane foam is applied to the pre-prepared, cut-to-size elements of wooden slopes;
- For better adhesion, the surface of the opening is slightly moistened and wooden parts are glued to it with foam;
Water the opening with a spray bottle with plain water
- The installation is carried out in such a way that the sidewalls support the upper part; if necessary, additional spacers are installed until the foam is completely polymerized.
- A mounting rail or galvanized profile is fixed in the opening (the bars must be installed in the same plane, maintaining the level);
- The space between the slats is filled with insulation corresponding to the thickness of the slats (expanded polystyrene, penoplex, mineral wool);
During installation, it is important to ensure that the structural elements are symmetrical and straight. If any sagging or distortion occurs, they must be immediately corrected by adjustment.
On a frame made of bars
This option is suitable for openings with significant unevenness; in addition, fixation on a beam or rail allows for additional insulation of the structure.
The easiest way is to insulate using mineral wool. The finishing (wooden panels, plywood, lining, etc.) is attached to the frame.
The outer mounting bar does not need to be attached if there is somewhere to nail it.
Fixation to the frame is carried out in one of the following ways:
- Liquid Nails . The process is similar to fastening with polyurethane foam, but the polymerization of liquid nails is much faster and less fastening material is required.
- Self-tapping screws with plugs. The wooden panels are screwed to the frame with ordinary self-tapping screws, the caps of which are recessed and closed with decorative plugs.
- Fasteners for lining. As a rule, special clamps are used. They are inserted into the groove of the lining, after which they are nailed with small nails. Such fasteners are completely invisible from the outside.
Similar fixation options can be used without a frame. In this case, space is saved significantly, but you need a smooth opening, and to fix it with self-tapping screws you will have to drill holes for the dowel (if the wall is stone). Fastening the lining to clamps is only possible on a pre-assembled frame.
Which slope finish should I choose?
Experts recommend using a slope made from the same types of wood that were used in the manufacture of the frame. Due to this, you will achieve the same color and pattern, because it is obvious that each type of wood has its own texture. If you combine several types of wood, the pattern will be different. Slopes can be up to 2.8 m long and 1 m wide. Their thickness is usually 12 and 15 cm.
Wooden panels are made from FSF plywood. This material is famous for its strength and reliability, it has a high level of wear resistance and resistance to moisture. Before installing the panels, a primer is applied to them, and a veneer mixture is applied to the base. Thanks to this, the slopes will hold stronger, and after this, the paint and varnish compositions will lie more evenly. To treat slopes, use a transparent or colored polyurethane-based varnish that lies flat on the wooden surface.
Experts recommend using slopes made of larch. This type of wood has high strength, is resistant to rot, does not lend itself to moisture and easily tolerates temperature changes. Another advantage of larch is its low cost, since trees of this species grow quickly.
Types of window slopes used in private housing construction
The choice of slopes, both external and internal, is largely determined by what kind of window structures are installed in a residential building.
Today, the greatest preference is given to PVC products, although many owners still choose wooden fillings. In any case, quite stringent requirements are imposed on slopes, which include not only an aesthetically pleasing design, but also the presence of such parameters as moisture resistance, strength, practicality in operation and, importantly, durability. Today, three types of slopes are used in private housing construction:
- Plastic. Their advantages are compatibility with PVC windows, practicality in use, simplicity and ease of installation. It is also necessary to note the low cost of the products;
- Wooden. It is also used quite often. The obvious advantages of such slopes include an aesthetically pleasing and natural appearance, natural use in buildings made of logs or timber, as well as excellent performance properties. The main disadvantage is the higher manufacturing price compared to plastic ones;
- Made from lining. In such a situation, only natural panels are used that provide a sufficient level of strength and reliability. Slopes of this type act as a kind of intermediate option between the two described above.
Any of the varieties described can be used as slopes for plastic windows in a wooden house. Obviously, when installing wooden fillings, installation of all three types of products in question is also possible. However, when using structural elements made from different materials, it is extremely important to carefully comply with all technological requirements.
Do-it-yourself installation of plastic windows
The installation of double-glazed windows itself is not very complicated, but requires strict adherence to technology. Otherwise, the window will almost certainly condense and the frame will warp.
Checking the delivered glass unit
If mosquito nets are planned on the windows, you must also check the presence of fasteners. Handles are often “lost” because windows are shipped without them. But dowels are special fasteners that you need to select yourself.
Their length should be such that when fully screwed in, they only reach the middle of the casing board. And this is taking into account the gap. If the dowel is screwed into the wall of a wooden house, the window will begin to deform regardless of the presence of the frame.
Wooden or plastic wedges are used to level the frame.
They may not be included in the kit, so it is better to order them in advance. Wedges are convenient because, thanks to their different sizes, you can align the frame evenly by simply placing a wedge of the required thickness under the corners and posts.
Disassembly and preparation of double-glazed windows
The finished glass unit is delivered in assembled form. But to install it, you will have to disassemble everything down to the frame. For this:
Once the preliminary preparation is completed, you can proceed directly to installation.
Installation of frame and assembly of plastic windows
- Decorative overlays are placed on the sash fastening elements. The lower ones are put on the frame, the upper ones - on the sash. First, the sash is installed on the frame, and only then the handle is attached in the open state.
- Double-glazed windows are placed on special gaskets. Without them, the window may simply burst due to the emphasis on the metal parts in the corners of the frame.
- First, the short glazing beads are hammered in (in a standard window these are the top and bottom), and then the long (side) ones.
Once the polyurethane foam has hardened, you can begin finishing the windows.
Finishing with strips
The use of flashings is especially effective when finishing windows in wooden houses. The nuance of this work is that the external finishing of a plastic window should begin only after the external finishing is completed.
It is best to carry out this type of work in the dry season, when air humidity is normal.
When performing external work, it will be necessary to install flashing and flashings.
In addition to the ebb itself, we will need:
- an ordinary screwdriver, preferably compact;
- metal scissors;
- ruler or meter tape;
- construction pencil or felt-tip pen;
- square or level;
- screws suitable in length, self-tapping screws are possible. Usually no more than two centimeters long.
We determine the length of our ebb by measuring the width of the opening. Add five centimeters to each side. It is recommended to cut the ebbs strictly at an angle of 90 degrees, and carefully bend the edges down. After the work has been completed, we fix our ebb using screws or self-tapping screws. We fill the ebb areas and all cavities with polyurethane foam using a special gun.
At the very end of the work, we begin gluing the strip. The strip itself is a strip that covers the mounting foam from external environmental influences. Pay attention to the temperature! If it is below five degrees, then problems may arise during gluing, or they will arise in the future. It is recommended to carry out work in warm, dry weather.
Brief step-by-step instructions
- measure the height of the plastic window opening;
- cut strips of the required sizes;
- clean and sand, thoroughly dry the surface where the strips will be glued;
- We glue it gradually, tearing off a piece of the protective tape and gluing it.
Significant nuance
If you decide to install plastic windows, then keep one simple thing in mind: it is important to remove the outer slope. Otherwise, someday this old slope will make itself felt by causing chips and small, sometimes imperceptible cracks. It is not enough to fill the existing gaps with ordinary mounting foam and completely forget about the exterior finishing, since the foam will eventually begin to deform and crumble under the influence of sunlight. Therefore, special attention should be paid to the finishing of plastic windows in a wooden house, both inside and outside.
Agree, it is unpleasant to find smudges near the windows on a rainy day just because the installation of the window was not completed properly. Condensation may also begin to form, and the thermal insulation with such poorly finished windows on the outside will be worthless.
Read also: How to plant peach in spring
Slopes made of wooden lining
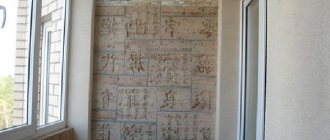
In order to make not just a high-quality, but also an aesthetically attractive design for your plastic windows, you should select a material that would be combined with the style and appearance of the entire house (find out here how to decorate the slopes on the windows).
In a wooden house, slopes created by wooden lining will look most harmonious.
This design should also be chosen because:
- Today there are a huge number of options for colors and sizes of lining that will decorate a building of any color and an opening of any size;
- Lining is an environmentally friendly material, which means it is absolutely safe for you and your loved ones;
- The lining is distinguished by excellent strength and durability characteristics, which will allow it to serve for a long time without losing its presentable appearance.
Advice. If the lining is used for external work, after completion it should be coated with an additional layer of varnish. Then the surface will not be susceptible to pollutants and will not absorb moisture.
Lining in the design of a wooden house
What is casing?
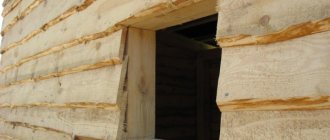
It is known that a fresh log house of a wooden house “shrinks”: it becomes lower, decreases in size and height:
Unlike apartments and stone houses, the installation of windows and doors in wooden houses must be done in casing.
Here is a schematic drawing of our casing with the installation of a foundation block:
About shrinkage
How long does it take for a log house to “shrink”?
OK. This depends on many factors:
- vertical load on the frame: roof, interfloor ceilings
- ambient temperature and humidity
- presence or absence of heating in the log house
It is believed that log houses made of wood with natural moisture actively “shrink” in the first year and a half. Then about another year, after the start of regular heating and the start of operation of the house. And just a little, the house will shrink over the next 3-4 years.
By the way! It will be interesting to know: Decorating a house with Dagestan stone: weighing the pros and cons