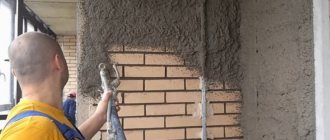
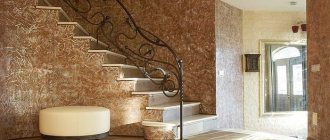
For many, a balcony or loggia remains that part of the apartment where household members rarely enter. But if you are used to spending a lot of time there, you need to think about what materials to decorate the surfaces with. The largest area there is occupied by walls, which can be decorated with different solutions from paint to lining. An excellent option for finishing the walls on the balcony is decorative plaster. It can perform not only an aesthetic, but also a functional role, for example, providing insulation, making the indoor microclimate more comfortable.
If the consumer still cannot decide which finish to choose for the balcony walls, he should pay attention to plaster. It does not take up useful space, looks attractive, is ready to last for a long time and allows you to create unique effects on the walls. The bark beetle refers specifically to this kind of cladding. This plaster, or rather its texture, looks much more impressive than an ordinary smooth wall.
Advantages of decorative plaster
Finishing a balcony with decorative plaster has many advantages.
- Firstly, the composition looks attractive.
- Secondly, it can be selected for difficult operating conditions.
- Thirdly, it may have special properties, for example, biostability, fire safety and resistance to abrasion and mechanical stress.
This wall decoration will be ready to last for a long time, allowing the owners to clean its surface.
Decorative plaster is not a primitive finish that may seem dull and monotonous. Having looked at the photo, you can understand that such wall cladding on the balcony can make the space truly cozy. Using plaster, you can create different effects, create designs and patterns, and also give walls the imitation of various materials, such as fabric, stone or brickwork.
Another advantage of this decorative wall covering is the ability to combine it with other materials. This could be stone or its artificial analogues, tiles and even wallpaper. Everything will depend on the budget, your preferences and the desired result.
Proper care of the walls on the balcony
The decorative coating does not require special care. Almost all plasters repel water, so surfaces can be wiped with wet rags or damp wipes. Do not wash plaster with abrasive agents, which will damage the paintwork and scratch it. If dust settles on the walls, treatment with antistatic agents will allow them to always remain clean. In general, covering a balcony with decorative plasters is a very good solution, since it will not cause unnecessary hassle, and the finished coating will look stylish and attractive.
Types of decorative plaster
When a consumer decides which decorative plaster to choose for a balcony, he should pay attention to the basis of the composition, which can be:
- mineral;
- acrylic;
- silicone;
- silicate.
The first is based on cement, mixes well with water and can be applied to mineral surfaces. They are pre-treated with quartz primer.
Acrylic plaster is made on the basis of a resin of the same name and has water-repellent characteristics, which is ideal for balconies and loggias.
The consumer's choice may fall on a silicone composition, which is versatile, which is why it is so popular. But the silicate mixture contains potassium glass, and the composition itself is rarely used for interior decoration. It is probably better to avoid such decorative plaster in conjunction with a balcony, because the material is most suitable for facades, as it emits harmful substances.
Mineral plasters
When choosing decorative plaster for a loggia, special attention should be paid to mineral mixtures, which may differ from each other in the fraction of the filler and its composition. The mixture can be made from:
- marble;
- granite;
- quartz;
- gold particles;
- cellulose;
- pearlescent particles.
This decorative mixture is good because the craftsman can create an imitation surface with his own hands:
- oak bark;
- traffic jams;
- marble covering.
The material allows you to obtain three-dimensional reliefs and unique embossed images.
Acrylic
When thinking about the question of which plaster to choose for a balcony, you should consider the features of acrylic mixtures. They are good because they are characterized by high impact resistance and the ability to repel dust. The last characteristic is especially relevant for the balcony space, because not a single loggia can be glazed so that dust and dirt do not get inside. Even if the walls become dirty during use, they can be washed. Acrylic compositions can be divided into mixtures for external and internal use. The first type of plaster is suitable for loggias and balconies, which is frost and moisture resistant and also has protective properties. Operation can be carried out in any climate zone.
Silicone mixtures for balconies
Such compositions are offered for sale in a wide range of colors and textures. With their help, you can create unique effects, providing walls with the qualities of wear resistance and reliability. This plaster is suitable even for a beginner, as it is easy to apply due to its plasticity. The layer tolerates temperature influences and high humidity well, but such conditions often persist on balconies and loggias.
Rules of care
Using decorative plaster for interior decoration, moisture-resistant coatings are created that can be washed with a soft brush or sponge. For washing, use warm water with standard detergents. But harsh abrasives or solvents are prohibited.
If we are talking about preventive care that does not allow heavy contamination, then wet wipes will be quite enough.
Decorative plaster on the balcony is a great way to decorate a room with a non-standard texture. All you need to do is choose the right material and texture. The application process itself is simple even for a beginner.
Application of decorative plaster video
We bring to your attention a video on the topic of our article “Do-it-yourself finishing of balconies and loggias with decorative plaster.” You will see the entire sequence of actions to create a structure on the wall.
Decorative plaster in the interior photo
In this section you can see photographs on the topic of our article. All photos are clickable.
Features of plaster for cold glazing
If the house is located in a climate zone with difficult weather conditions, then glazing is unlikely to achieve a comfortable temperature in the space adjacent to the apartment. Therefore, special requirements are placed on finishing materials. Thus, the plaster must have waterproofing and water-repellent properties. The mixture should be able to withstand sudden changes in temperature and humidity. If possible, the created layer should not become a favorable environment for the emergence and subsequent development of biological life.
Walls lined with plaster should be easy to clean, and condensation should not cause peeling and the development of fungus and mold. Taking all this into account, the plaster must be selected in such a way that it has a special purpose and characteristics. Most often, compositions are used for external work, which make it possible to create a layer that can withstand difficult operating conditions.
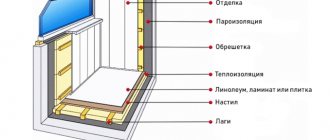
Warm plastering of the balcony
Such work involves the use of mixtures that are suitable for the premises. If the balcony becomes an extension of the room, then it can be covered with decorative plaster, for which there are no special requirements. Usually the composition is laid on a whole pie of insulation, waterproofing, wind protection and vapor barrier film.
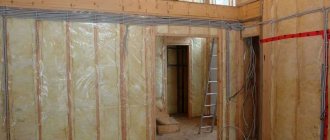
Attention! All other materials under the plaster layer must be selected with special care. For example, insulation should not cake under the influence of moisture and lose its properties. Therefore, it is worth abandoning mineral wool. The thermal insulation must also be rigid enough so that plaster can be applied to its surface.
Expanded polystyrene is best suited as insulation, but you need to take care of the method of attaching it. Installation can be carried out using cement mixture or mastic, but the most suitable option would be polyurethane foam. With its help, it will be possible not only to carry out installation work, but also to fill the resulting gaps.
Before starting work, the walls are treated with special compounds that will be able to eliminate biological formations. All joints are waterproofed using a solution of cement and PVA glue. Additionally, you can use waterproofing tape.
Features of choice
Before finishing a balcony with decorative plaster, you should constructively evaluate all the features of such a room. First of all, pay attention to the following items:
- application surface - brick, concrete or wood;
- sun resistance;
- level of moisture and vapor permeability;
- Is sound insulation important?
- difficulty of application;
- strength and durability of the coating.
Unglazed loggias require the use of finishing materials intended for outdoor use.
The quality of finishing work and visual appeal will depend on the correct choice of plaster. A good option is silicone mixtures. They do not lose their luster and brightness for many years, and are resistant to the most unfavorable external manifestations. Venetian plaster is undoubtedly beautiful and looks rich. But an open balcony may suffer from precipitation.
When choosing, you should focus not only on decorative characteristics (color and texture), but also on technical properties - the proportions of artificial and natural components, antifungal qualities, and others.
Finishing the balcony with decorative plaster
Before doing such work, the walls must be inspected for mold, putrefactive formations and defects. If the surface is uneven, it is better to level it to avoid overuse of expensive plaster. But if the surface area is not so large, you can do without leveling.
All elements that may interfere with the work are removed. Walls should be primed to increase the adhesion of materials. The composition must dry well, only then can you begin plastering.
Technologies for applying decorative plaster
Before work, it is important to decide which application algorithm to choose. To do this, you can use one of four methods, each of which involves the use of:
- roller;
- brushes;
- spatula and trowel;
- fabrics
- films;
- sponges.
Venetian plaster, which is very common among consumers, can be applied with a trowel and putty knife. A small portion of the mixture is applied to the trowel and distributed over the surface.
If you want to get an unusual texture, you can use available tools and materials. The first layer is applied using a trowel, left to dry for a while, and then processed with a textured roller or improvised means.
Surface preparation
Special attention should be paid to preparation. The walls are cleaned, degreased, and dust is removed from them. The walls may need to be washed and left to dry. The priming step is mandatory. This not only increases the adhesion of the materials, but also reduces their absorption.
Attention! For an unheated balcony, it is best to choose a primer with special properties. Mixtures with fungicides and antiseptics are suitable.
The preparation stage may also involve leveling; for this, starting plaster is used. It has particles with large fractions. Then another layer of primer is formed. After it has dried, you can begin plastering.
Application of decorative plaster
Application techniques may vary. If desired, you can create a travertine effect. At the first stage, the composition is distributed over the surface into the thickness of the particle fraction. As soon as the first layer has dried, you can begin to apply the material in strokes, covering individual areas. This allows you to form a characteristic pattern over the entire area.
Finishing
The final step may be staining. Work can be done in one or two colors, as well as using the dry brush technique. To lighten, you can remove part of the paint layer or give the surface the effect of Venetian plaster. In the latter case, you will have to give the wall an imitation of natural stone, for example:
- malachite;
- granite;
- marble.
The technology involves the use of a glazing composition. First, the plaster is painted one color using a long-nap roller. The second color should have a metallic sheen. A common one is silver, which is diluted with a universal primer and, using a small roller, passed over the tops of the texture. At the final stage, the plaster is coated with varnish.
Attention! Painting decorative plaster is no less important stage than the formation of the texture itself. You can complete the finishing decoration of the wall using special rollers and mittens, which create unique effects on textured coatings.
Finishing technology
I think I'm done with the choice of material. Now I’ll tell you how to plaster walls with your own hands.
Tools
Before starting work, I always prepare the necessary tools. Typically used in work:
- plaster trowels and trowels;
- abrasive graters for cleaning treated surfaces;
- trowels for working with plaster mortar;
- spatulas (I have a whole set of such tools, which differ from each other in shape and size);
- a drill with a long attachment, with which I prepare the plaster mixture for work;
- containers in which plaster compositions will be stored (usually plastic buckets);
- brushes and rollers for priming surfaces and subsequent painting;
- texture rollers or stamps (these are special tools with convexities, with the help of which a pattern or relief is formed on the surface of a plastered wall).
Tools for plastering walls.
I also recommend immediately coming up with some kind of device with which you will climb to the top of the wall. I always use an aluminum stepladder. If you build something yourself, make sure that this structure does not collapse (there were precedents in my practice).
Surface preparation
Having prepared all the tools, you can proceed to preparing the walls for plastering. It is from this stage, in my opinion, that the quality of the entire work depends. The scheme here is not too complicated:
- First, I dismantled all the decorative elements, shelves and cabinets on the balcony. If you are going to decorate the room from the outside as well, then you need to remove the window sills, drainage systems and brackets on which all this was attached.
- I cleaned the walls of the remnants of the old decorative finish. I still have a concrete wall that I will apply plaster to. If your material is held too tightly, there is no need to remove it. Even better, you won’t have to level the surfaces using beacons.
Removing old plaster.
- I took a hammer drill with a chisel attachment and used it to process all the cracks found. It is necessary to ensure that there are no areas of crumbling concrete around these defects. If the gaps are narrow, you can file them down with an angle grinder equipped with a concrete cutting disc.
- I filled all the cracks and cracks with the repair mixture. If this is not done, moisture may get inside, which negatively affects the integrity of reinforced concrete structures.
Be sure to seal the cracks before plastering.
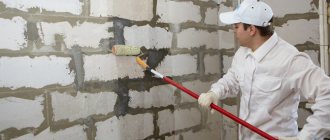
- Primed the surface. I used the composition Ceresit Beton-Contact ST19. This primer is specifically designed for treating concrete surfaces. It improves the adhesive properties of surfaces and facilitates the application of leveling and decorative plasters. By the way, this composition can be used to prime chipboard and plywood too.
Before applying plaster, the walls are primed.
I treated the walls with two coats. Moreover, I applied the second one only after the first one was completely dry.
- I plastered the wall with cement plaster (in principle, you can also use gypsum, since the humidity on the balcony is not too high). I used dry construction mix from Knauf. I did not use beacons, since it was not necessary to perfectly display the vertical. And minor defects will be leveled out by the decorative composition.
The walls must be plastered with cement or gypsum mortar.
If you are going to use, for example, Venetian, it is better to first cover the walls with plasterboard (at the same time you will cover the insulation). In this case, you need to first putty the seams in the gypsum board and prime the surfaces.
- After the plaster had hardened, I took a large paint brush (called a paintbrush) and cleaned the entire surface of the walls from dust and particles of the leveling layer that were not adhered tightly.
At this point the preparation can be considered complete. Below I will tell you how to plaster a wall with decorative plaster.
Application of the composition
To decorate the walls with decorative material, I proceed according to the following scheme:
- Using a drill and a mixer, I mix the decorative plaster until the composition becomes completely homogeneous.
Mixing the plaster with a mixer.
- Then I scoop some of the mortar onto a trowel and apply it to a specific area of the wall (the exact size depends on your working style).
- Using a grater (or you can take a wide spatula), I level the decorative composition so that its layer on the base surface is 3-5 centimeters, no more.
Leveling the first layer of decorative plaster.
- As soon as the composition sets, I level it using a metal grater.
- Then I apply the top coat. To do this, it is better to use a fattier mixture containing less filler, but more binder.
- The thickness of my front layer is 2 mm. But it all depends on the type of decorative plaster you use. In some cases, the thickness of the finishing layer can be no more than half a millimeter.
Formation of surface texture.
We recommend: Foundation made from car tires for light buildings: how to make it yourself
After this, you can begin to form the relief, for which some types of decorative plasters are famous. I had plaster with a mineral filler and I made the relief quite simply - I smoothed the plaster applied to the surface with a plastic trowel. And the quartz granules themselves formed grooves and furrows.
The photo shows texturing plaster with a washcloth.
However, it is not a fact that you will prefer the same plaster as I do. Therefore, I have prepared a small table to help you when forming the surface texture.
| Texture | Processing method |
| Bark beetle | You need to place a flat grater on the pre-leveled decorative plaster, then rub the surface with longitudinal movements (or circular, depending on your desire). The granules included in the decorative material will independently make grooves and form the desired pattern. |
| Venetian | On the base layer you need to apply separate and very small strokes, which are then stretched with a spatula in different directions. The result will be some kind of transparent layers, thanks to which the plastered wall will acquire a depth specific to this type of finish. |
| Textured coating | In this case, the texture of decorative plaster is given with the help of certain devices. In my practice, I used brushes, spatulas with jagged edges, foam sponges, and so on. It all depends on the designer’s idea. |
| Folded covering | To form such a surface, I use plastic film. You need to cover the wall with it, and do it in such a way that the polyethylene forms a large number of folds. After the decorative composition has hardened, the polyethylene is removed. The result is a relief that no one can replicate. Even if he also uses the same method. |
| Textured finish | It is formed using stamps or rollers made of polyurethane or rubber. By running them over a still damp surface, you can make symmetrical or repeating patterns. By the way, this is one of the fastest finishing methods. |
One of the ways to texture a surface.
However, the work does not end with this stage. Still ahead is painting and drying the plastered walls on the balcony. But more on this in the next section.
Final operations
I begin this stage of work after the treated surface has partially hardened.
To give the surface the desired color, I painted the walls. Although this can be done even if the decorative composition contains pigments. But then the purpose of painting is to give the surfaces a specific shine.
The finishing itself is carried out according to the following scheme:
- I first sprayed on the base color (although you could also use a brush or roller). Here it is important to cover the wall so that the coloring composition gets into all the recesses, but is not applied in too thick a layer and does not drip.
Painting the plaster with a base color.
- Then I did what is called a wash. I took a darker color of paint onto my brush and painted it over the entire area of the walls. It turns out that the paint flows into the recesses of the plaster, thus forming peculiar “shadows”.
- Once both paints were dry, I glazed. To do this, I used a roller to paint the wall with translucent paint of a light (relative to the main) shade. You can also use a pigment with a pearlescent or metallic sheen.
Plastered wall after glazing.
- Then all this must be left to allow the plaster to dry completely. During this process, I advise you to ensure that the surfaces are not exposed to external mechanical influences, that there is no draft on the balcony, and that the temperature is at the same level. Otherwise the finish may crack.
Consequences of improper drying of plaster.
- After drying, I treated the plastered walls on the balcony with varnish. You can also use wax, but it must be thoroughly rubbed into the surface. But not all decorative compositions can withstand such exposure.
Varnishing composition for plaster.
Caring for decorative plaster
No special devices are required for this. The wall surface can be washed periodically with water with or without soap. You can even use dishwashing detergent or laundry detergent.
If the surface is damaged during operation, then a smooth plaster layer will be easier to restore. If there is a defect in wet silk, it is enough to apply a new decorative layer, but repairing Venetian plaster will be problematic. If the wall has simply lost its shine, you can apply a new layer of wax and polish the base. Whereas, if you want to change the shade or pattern, you will have to completely dismantle the coating and apply a new one.
In general, wax - artificial or beeswax - can give the surface waterproofing properties and protect it from damage, dirt and dust. If you treat Venetian plaster with this composition, it will begin to shine in a new way. The mixture should be applied in two approaches, armed with a sponge or paint brush. A spatula is also perfect for this purpose. Once the layer has set, it is polished with a soft cloth. You can care for such a surface using the same water or soap solution. But it is better to avoid using solvents.
If, after creating the decorative layer, there is a desire to give the shade more expressiveness, you should purchase a glaze composition. It has no color, is transparent and additionally emphasizes the contour and volumes. Distribution is carried out with the same devices: sponge, rubber spatula, brush. Such a surface can be cared for using detergents and water in which soap or dishwashing detergent is dissolved.
Decoration methods
In terms of its composition, depending on the fractions of the components, decorative plaster on balconies and loggias can be small- or large-relief. While preparing the solution, it can be tinted to the desired color, and after the finish has completely dried, it can be covered with a protective transparent varnish, colored paints, and a patina can be applied.
Finishing loggias with decorative plaster, photo ideas for applying the composition
Coarse-grained is much easier to work with, it is easy to apply with your own hands, does not require perfect alignment of the walls, can be applied to brickwork and concrete, and after drying it resembles natural stone in appearance. Different application methods allow you to achieve interesting solutions:
- antique plaster;
- textured coating, here when applying different tools or improvised materials are used: sponges, crumpled paper, you can form a pattern with your hands.
Finishing balcony walls with decorative plaster with fine-grained filler requires careful leveling of the surfaces; the finishing layer is smoother. With the help of special devices: trowel, roller, brush, stamps, you can achieve interesting artistic effects.
Various designs on the plaster of balconies and loggias can be applied with special tools and rollers
Special abilities
Decorative plaster is a very plastic and pliable material to work with. Texture compositions include various fillers, which, when applied to the wall, allow you to achieve the effect of mosaic, shagreen, oak bark, etc.
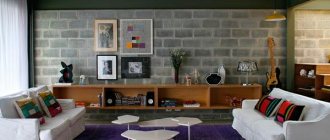
Finishing the loggia, a combination of decorative plaster with stone and wood
Simulated plaster walls on balconies and loggias open up wide horizons for design:
- If the composition includes mineralized pigment, the coating will imitate crinkled fabric;
- Cracks and antique coating are achieved using different tools and methods of applying strokes; the technology for finishing a balcony with plaster is presented in the video below.
- Decorative plaster for loggias and balconies bark beetles is one of the most popular ways to decorate open and closed extensions; such surfaces are easy to paint and can always be renewed if necessary.
- “Soft gold” plaster contains bactericidal fillers - micro-sponges, which allow you to achieve high heat and sound insulation characteristics of the finish.
- Flock plaster for balconies and loggias has two stages of application: first, the adhesive composition is applied to the wall, then particles of dried acrylic paint are pressed onto it, they can be applied randomly or in a pattern, it all depends on your imagination.
- Venetian plaster is used in luxury interiors. This is one of the most expensive and beautiful ways of finishing surfaces. It can imitate marble, malachite, onyx and other stones. And various methods of applying and processing the composition make it possible to achieve the effect of wet silk, craquelure, etc.
In our galleries we have selected interesting ways of how decorative plaster can be applied to loggias.
The photo will help you choose an interesting decoration method to implement the idea in your interior.