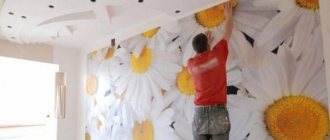
Recently, wide meter-long wallpaper has become widespread, which can significantly reduce the effort required to renovate premises. Since such canvases are quite large, it is very important to work with them correctly. Not everyone is able to cope with this without the appropriate experience and skills. That is why, before you start gluing meter-long wallpaper on the wall, you need to pay attention to the main features of working with it.
Characteristics and preparation for do-it-yourself gluing
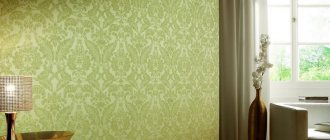
Non-woven wallpaper is a non-woven material consisting of more than two-thirds cellulose fibers with the addition of synthetic binder fillers. They are characterized by a low degree of hygroscopicity and higher strength than paper-based wallpaper. Consist of several layers. The working part of the wallpaper has a smooth surface. The front side is made with various embossing and can have a foam structure.
The width of non-woven wallpaper, in the most popular versions, is 0.5 and 1 meter. But there is an intermediate option - 0.7 meters. In fact, these numbers are not entirely accurate. Each size range has a small allowance. For meter-long non-woven wallpaper it is seven centimeters. A standard 10-meter roll usually has a slight excess in length.
Non-woven wallpaper is divided into two types:
- for painting;
- with complete coverage.
A textured pattern runs along the front surface of the non-woven wallpaper for painting. The canvas itself has a white or slightly yellowish color. In other cases, the color, pattern and composition of the coating can be very diverse.
The main factor when choosing the width of the wallpaper is the spatial characteristics of the room, such as: the surface area of the walls on which the wallpaper is supposed to be glued; the presence of volumetric projections, niches, door and window openings.
But since the general principle of gluing is the same for canvases of any width, you can consider the option of meter-long wallpaper.
What do you need to know to hang wallpaper?
In specialized stores and markets there are all options for buyers. You can make an individual selection for each room.
Types of wallpaper
- On paper. Cheap looking. Various densities depending on the layering. They are environmentally friendly, this is especially important to consider when gluing bedrooms and children's rooms. They have a number of negative aspects: difficulty in cleaning, short service life, susceptible to ultraviolet radiation, absorb moisture and odors.
- On a non-woven non-woven base. They resemble paper in appearance, but differ in their surface layer and density. Having such a density, small irregularities in the walls are hidden. Durable, wet cleaning is possible, during which they will not tear and will remain in their original form. Easy to apply, just apply a layer of base only to the wall. The disadvantage is the non-woven layer itself, which is easily damaged. A cheap option will not live up to expectations.
- On a paper or non-woven basis, with a layer of polyvinyl chloride (vinyl) applied on the front side. Durable, resistant to minor mechanical stress, and resistant to moisture. The vinyl layer does not allow breathing, so fungus can form on the walls. Heavy sticking.
- On a paper or non-woven basis, with a layer of acrylic applied on the front side. Thinner eco-friendly material and acrylic layer allow the canvas to breathe. They are resistant to mechanical stress. Non-moisture resistant.
- Natural material is applied to unbleached rice paper or a non-woven layer - bamboo, cork, etc. The use of environmentally friendly material allows it to be used without harm to health. The thickness masks wall unevenness well. Susceptible to ultraviolet radiation, difficult to apply without experience.
- Paintable fiberglass. Durable, moisture resistant, hide uneven surfaces. The color can be applied several times.
- A woven material is applied on a paper base. Eco-friendly, looks beautiful. They are expensive, not moisture-resistant, subject to mechanical stress, and the smell is easily absorbed.
- A layer of duralumin foil is applied to a non-woven or paper base. Durable, washes well, does not fade. Airtight. Before gluing, the surface must be leveled to perfect condition.
- Liquid - a dry mixture containing cellulose, fibers, glitter. Capable of leveling walls, no joints, environmentally friendly. They don’t wash, dears.
- Self-adhesive film – photo wallpaper. Eco-friendly, washable, do not fade. Dear ones, careful preparation of the surface is necessary before gluing.
What you need for work
Before you start gluing wallpaper with your own hands, you need to prepare the material and tools for the activity.
List of the most required:
- Material, adhesive base.
- Spatulas of different sizes - removing old coating, leveling unevenness.
- Spray with water - for better removal of old material, treat it with water.
- A container for mixtures or solution to level the walls.
- Mixture for sealing cracks and leveling surfaces.
- Grout for walls.
- A solution to treat the surface - primer or primer.
- Tools for dismantling materials attached to surfaces: hammer, screwdriver, pliers.
- Long ruler, centimeter.
- Scissors or knife.
- To measure the vertical, use a plumb line.
- Brushes.
- Roller, plastic spatula.
- Clean, soft cloths.
- If the ceilings are high, a ladder is needed.
To buy the right amount of base, the length and width of the ceiling, the height and width of the walls are measured. The footage is calculated, taking into account that rolls are most often 53 or 106 cm wide.
Glue is purchased based on the same measurements as the base. For each type of wallpaper, a certain type of mixture. There is a universal one on sale. For example:
- For non-woven fabrics use Quelyd . It does not harm the health of humans and animals. Protects against fungus and mold. Easy to apply and takes up to 7 minutes to prepare. The prepared composition can be used within a week.
- Metylan is used for all types, it glues joints well, and is resistant to temperature changes.
Preparation for pasting with non-woven wallpaper
Required Tools
- laser level;
- tape measure 5m;
- special roller with long pile;
- plastic spatula: which should have a soft edge for ideal rolling of wallpaper;
- brush: used for smoothing pasted wallpaper;
- sharp knife for cutting wallpaper;
- a special mesh for removing excess glue from the roller;
- narrow metal spatula;
- two buckets: for glue and clean water;
- foam sponge;
- pencil.
Preparation and marking of walls
First, you need to inspect and prepare the wall surfaces for gluing. An excellent surface for gluing non-woven wallpaper can be: paper, wood, plasterboard, chipboard, plaster, concrete and other similar materials.
Preparing walls for pasting begins with cleaning the surface of old wallpaper, dirt and eliminating defects. It is advisable to remove old paint. As a last resort, carefully sand the painted surface with sandpaper (medium caliber). Be sure to treat the prepared surface with a primer.
Non-woven wallpaper has smooth, high-quality edges. This allows you to use the “butt” gluing method. At the same time, visually adjacent panels look almost seamless, like one panel. Because non-woven wallpaper is most often produced in a wider format, then next we will look at how to glue wide non-woven wallpaper. It is better to start work from the corner of the room. From the corner of the room at a distance of 1 meter, strictly vertically, using a level, draw an approximate line.
The purpose of marking: when gluing wallpaper, strictly adhere to vertical lines. Using a level, strictly vertical lines are drawn along the entire wall in increments of 1 meter. The standard width of non-woven wallpaper is 1.06 m. Therefore, as a rule, when sticking, a certain margin of width is created. Then it is convenient to use it when creating a clear joint in the corners of the room.
Drawing a strictly vertical reference line. Photo — kvotvet.ru
Preparing wallpaper
So, the surface marking for the wallpaper is ready. The next stage is preparing the wallpaper for stickers. We recommend cutting wallpaper blanks for all walls of the room at once. The complexity of cutting depends on the wallpaper pattern.
If joining the pattern is not required, cutting does not cause any difficulties. The only note: before cutting the next piece of wallpaper, measure the height of the wall at different points (for example, after 30 cm). And only after making sure that the height of the walls is the same everywhere, cut the wallpaper blank to the required size.
If you are gluing wallpaper with a large pattern, then the wallpaper will require selection of the pattern. You can find out what size fits your wallpaper by simply looking at the pictogram on the label. When marking, make sure that the pattern matches. To do this, you will periodically have to move the subsequent workpiece up or down. The main thing is to avoid mistakes and prevent you from having to add pieces of wallpaper from the bottom or top.
For example: the fitting size is 48 cm and the room height is 2.5 meters. In this case, according to the cutting rules, the length of each workpiece must be a multiple of 48, but must be greater than the height of the room. For our case: the required length of the workpiece is 2.88 m.
After mathematical calculations, we proceed to cutting. Lay a clean plastic film directly on the floor or wash the floor well. Roll out the wallpaper roll face down. We measure 2 m 88 cm (with a margin for adjustment) and make a notch with a knife. Then we bend the wallpaper along the notch so that the edges of the bent part and the main lower panel coincide. Having checked everything, cut the sheet of wallpaper along the fold line.
We spread the next sheet of wallpaper, turning it on the same side as the previous one. Then we check the fit of the drawings of the two resulting canvases: the lower one, lying on the floor, and the upper one, cut off, bending their edges. To control, we find and visually highlight a noticeable detail of the drawing. Let's try to combine both blanks according to this drawing. If everything is done correctly, we proceed to preparing the next workpiece.
A special table for marking wallpaper. Photo – mega-anunt.ro
Preparing the glue
What kind of glue should I use to glue non-woven wallpaper? To stick non-woven wallpaper, you must choose a high-quality adhesive composition designed specifically for non-woven wallpaper. The technology for its preparation is simple. To do this, gradually pour adhesive powder into a small amount of water as required according to the instructions, in a thin stream, stirring the mixture vigorously. Let the mixture sit for a while, and then stir it again and remove any lumps, if any. The glue mixture is ready.
Batteries
The wallpaper under the window sill is glued last. The work will require patience and accuracy, bordering on virtuosity.
- The wallpaper sheet is cut to the size of the radiator niche.
- Vertical cuts are made in areas coinciding with the battery mounts.
- The glue-coated section is carefully inserted behind the pipes.
- The next task is to straighten the folds formed on the sheet and press it against the wall. Due to the tightness, it is impossible to use a paint roller, so smooth it out using a rag.
- Excess overlap is applied to the edge of already pasted wallpaper.
- Pressing both layers firmly with a spatula, make a vertical cut.
- The joint remaining after removing the cut strips will become invisible when dry.
USEFUL INFORMATION: Installing a socket box in a concrete wall
If such an operation was not possible, cut the wallpaper into smaller pieces and continue pasting the hard-to-reach area.
Marking and fixing a meter sheet on the wall surface, step by step
After the primer has dried, you can proceed to directly gluing the wallpaper to the wall. However, this must be done correctly, having previously marked the plane. The process of marking makes it possible to get a visual representation of the placement of wallpaper on the surface and appreciate the complexity of future work.
The placement of the first canvas is of particular importance. Some people prefer to stick it from the window opening
However, such an action is not always possible, since to perform it the slope must be completely flat and the distance to the wall must be wider than the sheet. Based on this, the best place to mark the first stripe is the corner of the most spacious wall.
According to the plumb line, marks are applied on the wall surface every 15-20 cm. The next strip is measured from the original line, retreating from it by the width of a roll of wallpaper.
It is necessary to glue meter-long wallpaper according to the following principle:
- First, one sheet of wallpaper is cut off, which will be the initial one. It should be 2-3 cm longer than the total length of the wall (all excess will be cut off after rolling the canvas)
- The adhesive composition is diluted strictly according to the instructions. A small amount of the dry mixture is poured into a container with warm water and stirred thoroughly. After 10-15 minutes, the composition should infuse completely and thicken slightly. In this form, it is completely ready for work.
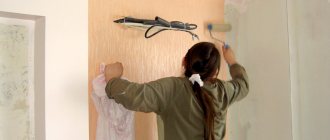
- Using a foam roller, the adhesive solution is applied to the wall the width of one sheet, extending 3-4 cm beyond its edge. Non-woven bases are not smeared with glue, and all other types of wallpaper must be covered with it.
- The upper part of the canvas is applied to the wall according to the markings and pressed well against it. You can leave the bubbles in place for now. The main thing is to set the sheet clearly according to the marks. In this case, it is applied on one side along the entire length and only straightened out over the entire area to the very corner.
- The glued wide sheet is smoothed with a dry cloth and straightened with a rubber roller. As a result, the surface should be completely smooth and free of blisters or voids.
- All subsequent canvases are fixed in a similar way to the opposite wall. In this case, the wallpaper at the corners should extend only 1-2 cm. In addition, the corners should be carefully pressed and rolled with a roller so that glue does not accumulate in them.
The only difficulty in gluing meter-long wallpaper is the size of the canvas, since it is quite difficult to hold in your hands. Moreover, after setting and fixing the first sheet, the work goes much faster.
Useful tips
Before you start working with meter-long wallpaper, pay attention to these useful tips:
- Do not under any circumstances stretch the panels while leveling them horizontally, otherwise, after drying, an unsightly gap will certainly form between the two strips. To avoid this, removing air from under the wallpaper should be done as carefully as possible.
- At the corners of the walls, leave the wallpaper overlapping the other surface. This way, you can reduce the likelihood of them coming off, and also avoid an unsightly gap between the strips in the corner.
- Wipe off any exposed glue at the joints of the wallpaper with a dry, clean cloth as soon as possible, without allowing it to dry out. It must be prepared in advance, since during the work process there may not be time for this.
If you carefully apply the wallpaper, following the rules, they will be able to please you, your family and guests for a long time! Good luck.
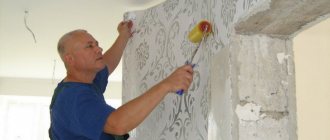
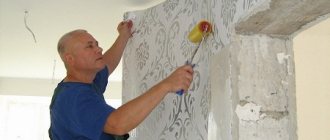
Pasting walls
The gluing method depends on the type of material chosen:
- when working with paper wallpaper, glue is applied only to the material;
- when pasting vinyl sheets, both the strip and the wall are coated with the adhesive;
- When choosing non-woven fabrics, glue is applied only to the base.
Since it is almost impossible for one person to glue meter-long wallpaper, since it is more convenient to hold the canvas on both sides, it is worth inviting someone else to the team. It is better to organize the event in the warm season, when the heating season has not begun, since hot air from the batteries negatively affects the quality of work.
Step-by-step instructions on how to hang meter-long wallpaper:
- Depending on the type of material, it is necessary to apply glue either to the canvas itself using a brush or roller, or to the wall, additionally covering about 20 cm beyond the base markings. In this case, there is no need to coat the wall next to the previous sheet, risking touching it or leaving the surface dry.
- Hard-to-reach places should be coated with a thick layer of glue using a brush.
- It is necessary to glue sections of wallpaper from the ceiling along a vertical guide. In this case, one person should hold the sheet from above and apply it to the junction of the wall and ceiling. The assistant not only holds the bottom edge of the strip, but also checks that its edge line matches the markings drawn on the wall or the joint with another sheet.
- After this, you need to start leveling the wallpaper. The procedure is performed using a plastic spatula or rubber roller. You need to expel bubbles from the center to the edge of the wallpaper.
- After placing the first sheet, you can move on to the next one. The glue should also be applied with a margin of 20 cm.
- The drawings on the canvases must be combined so that there is no noticeable joint.
How to put wallpaper on wallpaper
There may be cases when it is impossible to remove the old, thin paper surface. Then the new canvases are glued on top of the old ones.
For such work you need good glue that will saturate the old surface and give good adhesion.
The new material must be chosen dense, since the old surface can leak its coloring elements. Or treat the walls with a special anti-stain agent.
When choosing this method, it is necessary to take into account that the gluing of the bases may be poor-quality, due to improper drying, both canvases may come off, and it is impossible to align the walls properly.
Rules for gluing non-woven wallpaper
Tips on how to properly glue non-woven wallpaper are relevant for horizontal and vertical surfaces. The technology is applicable for wallpaper with and without a vinyl layer.
Rules:
- Non-woven wallpaper does not stick in drafts and dry rooms. The sticky compound dries too quickly, resulting in blisters.
- The glue is applied to the walls and ceiling without additional coating of the wallpaper.
- The strips of material are laid close to each other without overlapping.
- Air and folds are expelled with a special brush or spatula from the center to the edges, from top to bottom.
- Excess glue should be washed off from the wallpaper with a soft cloth or sponge immediately after smoothing.
- All pieces of furniture must be removed, and it is recommended to cover the floor with film, newspapers or cardboard.
Non-woven wallpaper is glued to a surface that has been primed and cleared of old coating. The measure reduces glue consumption, and appropriate compositions prevent the occurrence of mold.
On the wall
Wallpapering on a non-woven basis begins with preparing the room. Sockets, switches, and heating devices are removed from the walls. If it is possible to remove the baseboards, remove them too. Afterwards the old coverings are removed.
The walls need to be primed. To stick non-woven wallpaper on a wall instead of a special compound, just walk over it with glue. It is diluted according to the instructions, using twice as much water as indicated for gluing.
In the place where you start gluing the meter-long non-woven wallpaper, mark a straight line with a pencil using a plumb line. Experts recommend placing the first canvas in the corner closest to the window.
Wallpaper should first be cut into sheets along the length of the wall. Plain and vertical patterns are cut into strips equal to the maximum height of the room + 6-10 cm. Each subsequent piece of wallpaper with a pattern should be checked with the previous one to make sure that the pattern will meet at the joints.
After everything is prepared, start diluting the glue. In this case, it is imperative to comply with the proportions indicated on the label.
Rules for sticking non-woven wallpaper and procedure:
- Glue is applied to a section of the wall under one strip without gaps. The roller is used for a large space; the corners, areas near the ceiling, floor and future joints are coated with a brush.
- The edge of the canvas is applied to the ceiling, with a slight overlap.
- Smooth out and carefully unravel so that the side matches the pencil mark or the previous canvas.
- The strip is rolled from top to bottom from the center to the edges, expelling air and pressing the material to the surface. It is convenient to do this with a silicone roller.
- Using a pressing spatula, additionally pass along the edges near the ceiling and floor.
- Excess glue is removed from the material with a sponge.
- The allowances are cut using a special tire or spatula using a construction knife.
Cuts are made in the openings of sockets and switches on the wallpaper. You can eliminate the excess after finishing the room. Defects will be hidden under the devices.
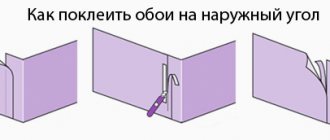
In the corners
To glue the wallpaper evenly in the inner corners, you need to place the canvas with a slight overlap on the second wall and glue it in the usual way. It is worth walking around the corner with the tip of a plastic pressure spatula, achieving tight contact of the wallpaper with the wall surface. The second canvas is glued in the same way with an allowance of about a centimeter on the already pasted wall.
After both strips are carefully glued and aligned, the spatula is pressed tightly against the corner, and the allowances are carefully trimmed using a construction knife. It is advisable to break off the blade before doing this to renew the cutting surface. The trimmings are removed, and the second sheet is rolled again to the corner.
A joint on an external corner is not allowed. For boxes and openings, the wrapping technique is used. The canvas is first carefully glued to one side of the corner. After this, it is carefully stretched and smoothed with a spatula to the second wall.
To the ceiling
The ceiling is treated in the same way as the wall. The surface must be cleaned and primed. It is convenient to apply the glue with a roller with a long handle. The canvases are laid across the room so that the weight of one strip is less.
It is more convenient to work in pairs, since long strips of wallpaper will sag and get in the way. To stick non-woven wallpaper on the ceiling yourself, you will need a long surface, like a table. It’s more convenient if you can glue each piece of wallpaper without moving the table.
Some craftsmen make a special high holder for the free edge of the canvas. You can pre-roll the cut strips like an accordion or a roll with the inside out. The technology completely repeats the steps for walls.
Advantages and disadvantages
The term “meter-long wallpaper” is conventional: under this name you can find 90-centimeter rolls and tubes much wider than a meter. Belgian manufacturers, for example, produce canvases reaching a width of 1.4 m.
Meter wallpaper came to us from abroad, where their advantages have long been appreciated:
- They make the pasting better, reducing the number of joints on the walls by at least half.
- They save effort and time: it’s easier to cut and stick 5 strips of meter-long wallpaper instead of 9–10 standard sizes.
- They are cheaper than traditional material: the price of one wide tube is less than the cost of two standard ones.
Flaws:
- Can only be placed on a flat surface: if there are defects, good joining of the wallpaper panels cannot be achieved.
- Consumption, compared to standard ones, may increase: due to a strip of several centimeters, you will have to buy an additional wide roll.
- It is difficult, sometimes completely unrealistic, to paste meter-long wallpaper alone.
Advantages of photo wallpaper
Those who decide to decorate the walls of their home with photo wallpaper should know about their advantages compared to ordinary wallpaper.
- Using photo wallpaper you can create any picture, with which you can embody any planned style of the room.
- This type of wall material will visually significantly expand the space.
- The easiest way to change the interior of a room.
- Versatility of textures.
- With seamless photo wallpaper you can easily create a seamless picture.
- Resistant to fading and ultraviolet radiation.
- Resistant to mechanical damage.
- With photo wallpaper you can hide uneven walls.
Using photo wallpaper you can zone the space.
Gluing technology and material calculation
Non-woven fabric is wider than paper and weighs more. It can be painted (white or colored), embossed or with a decorative coating (vinyl, textile, paper).
The technique for gluing such wallpaper comes down to eight basic rules:
- The glue must be of the required thickness and viscosity.
- Wallpaper should be glued after puttying and priming the walls.
- Apply the adhesive directly to the walls, and not to the non-woven base, unless the latter is specified by the fabric manufacturer.
- Follow the direction of the pattern, the order of which is indicated by special symbols on the wallpaper packaging.
- Adjust the pattern along the edges: either in a straight line, when the strips are glued in one direction, or reversely - when the strips are glued in the opposite direction.
- Press the wallpaper from top to bottom, smoothing it with a wallpaper spatula or wallpaper brush, and roll the joints with a roller with a rubber base.
- The finishing material should be glued without seams, at the joint.
- Maintain the same temperature in the room, avoid drafts.
The listed rules will help you carefully hang non-woven wallpaper, choose the right pattern, and prevent the appearance of airy areas.
After preparing the walls, including leveling the surface, priming, non-woven wallpaper is glued in one direction, the pattern is adjusted along the edges of the panels
Subtleties of gluing and joining of canvases
To avoid misunderstandings during the gluing process, before starting work, read the instructions for using wallpaper and glue. It is important to choose the right adhesive base - intended for gluing non-woven wallpaper. An unsuitable composition increases the risk of low-quality gluing.
Tips for gluing and the subtleties of joining the canvases:
- Start gluing from the window openings in the direction of the line of sunlight. This way the seams will be invisible.
- Match the wallpaper patterns following the manufacturer's recommendations and the diagrams on the packaging. This way you can get the effect of a seamless pattern.
- For accurate gluing, first fix the wallpaper from the top to the center, then along the edges.
- Don't cut too many pieces at once. Adjust the canvases individually to the place where they are glued, matching the pattern.
- Correctly determine the top and bottom of the wallpaper in the roll. Leave 5-10 centimeters for leveling on top, and align the bottom part with the baseboard.
When gluing non-woven fabrics for painting, you must first wait for the surface to dry completely. And only after that you can start painting the wallpaper.
Gluing plain non-woven wallpaper will greatly simplify the task: it will eliminate the need to adjust the pattern and hide minor irregularities and defects on the wall surface
If you have never covered non-woven wallpaper, we recommend choosing a plain version. This material is easier to work with. The texture without relief minimizes errors and hides minor defects.
How many rolls will you need?
In order to calculate the number of rolls, multiply the height by the length of each wall. Afterwards, the obtained data is added up to determine the total area. The area of door and window openings is subtracted from the resulting amount. This step can be skipped if the window is one or two and small in size. Then the area of the walls is divided by the area of wallpaper in one roll - this will be the required number of rolls.
The result obtained is subject to correction:
- Increase the number of rolls based on the actual number of canvases. You have to divide the length of one roll of wallpaper by the height of the wall to find out how many canvases come out, for example, 10 / 2.6 = 3 canvases of 2.6 m each + 2.1 m left. Therefore, the final number of rolls will have to be increased, starting from the required number of canvases.
- Increase the consumption of material for adjusting the pattern. If the wallpaper is not monochromatic, then the pattern will have to be adjusted. The height of the pattern is called repeat, it is indicated on the packaging. In the worst case scenario, the entire height of the design will have to be cut off in order to properly align the canvases.
As a rule, finishers add two more rolls on top to adjust the pattern. To simplify the gluing of canvases and reduce consumption, choose a plain material without a pattern.
Selecting glue and calculating consumption
A high-quality, durable finish directly depends on the chosen adhesive base, which can ensure good adhesion of the canvas to the walls and does not cause yellowing.
Glue for non-woven wallpaper is diluted to a thick consistency, but when applied it creates a thin layer and does not flow from the surface
Glue for light or heavy non-woven wallpaper is diluted to a thick consistency, applied in a thin layer, leaving no marks or smudges.
Available on the shelves are:
- Interlining moment . It creates good sliding for the wallpaper when joining, has additives against mold and fungi, and retains its properties when diluted. For material with a three-dimensional pattern, it is better not to use glue; it is also difficult to bring it to a homogeneous mass.
- The German “ Methylane Interlining Ultra Premium ” and the French “ Quelyd Special Interlining ” are adhesive bases that work equally well with wallpaper with a three-dimensional pattern, without ornament, and hold light and heavy panels. These lines from the middle price category are selected for smooth, corrugated, light or heavy wallpaper.
Among others, experts recommend “ Kleo Non-woven ” and “ FliziLex ” as the best brands for gluing non-woven wallpaper.
The packaging, which indicates the number of rolls per box of glue, will help you calculate the number of packs. Therefore, it is necessary to divide the area of the walls by the consumption (given on the pack) of glue in m2 and round the total up.
Calculating the number of rolls
All products have standard sizes. The sheet width can be 0.53, 0.7 and 1.06 m. It is most convenient to use meter-long non-woven wallpaper, since the work is done faster and there are fewer joints left. Rolls contain 10.05 m of products. It is worth taking into account the step of the drawing, if there is one. For example, the step may be 64 cm. Now let's start counting:
1. First, determine the perimeter of the room. It is equal to the sum of all the walls. For example: 6m + 5m + 6m + 5m = 22 m. 2. Based on the perimeter, we find out the required number of canvases (strips), starting from the width: 22 m (perimeter) / 1.06 (width of the trellis) = 20.75 canvases. 3. Next, we determine the height of one canvas, it will be equal to the height of the canvas + pattern pitch: 2.8 (ceiling height) + 0.64 (drawing pitch) = 3.44 m. 4. The next step is to find out the number of whole canvases that Available in one roll. To do this, the length of the roll is divided by our ceiling height with a pattern step: 10.05 (footage in 1 roll) / 3.44 (ceiling height with a pattern) = 2.92. Round up, we get 3 canvases (strips). 5. Knowing the total number of panels required to hang wallpaper, as well as the number of panels in one roll, you can calculate the required number of rolls for purchase. It is enough to divide these values: 20.75 (strips per perimeter) / 3 (strips in one roll) = 6.91. Round up to 7 rolls per room with a perimeter of 22 m.
However, you need to take into account that the room has doors and windows. True, experts usually recommend buying material with a 10% margin. Therefore, 7 rolls will be enough, and those 10% of the reserve will be equal to the size of the windows and doors.
What if you have to glue alone?
Sometimes you can do without an assistant when attaching meter-long wallpaper - non-woven varieties of material will help out, because in this case the glue is applied only to the wall. Non-woven fabric will help you easily join seams even in corners. There are no particular difficulties with aligning the stripes. If it is not possible to glue the sheet correctly right away, the panel is removed and the operation is repeated again - non-woven fabric allows this. But meter-long wallpaper made from other materials will not allow this; a partner is necessary in such cases.
A lesson on gluing wide canvases is in the video below.
Tools
You don't need any special tools to stick non-woven wallpaper on walls. It is enough to have a simple pencil, the main thing is that it is not sharpened, otherwise it will tear the wallpaper. You also need a ruler, preferably for the entire width of the roll. Instead, you can use any flat plastic, metal or wooden guide. It is used to indicate the place to be cut. Ordinary scissors are suitable for this. If one of the ends of the scissors has a sharp cut, this will make the procedure easier.
It is best to measure the length and height using a tape measure; it should be at least 3 m. If the walls are uneven, you will need a laser level. A spatula and a utility knife will also come in handy. A ten-liter plastic bucket is suitable for diluting wallpaper glue; for clean water, you can use a smaller container. A roller, foam sponge and a special brush will be needed to directly consolidate the result.
Related Posts
- Wallpaper for the bedroom
- How to glue vinyl wallpaper on non-woven backing?
- How to glue wallpaper: common mistakes in gluing yourself
- How to tear wallpaper off the walls if it won't come off
- How to glue corners with non-woven wallpaper
- How to glue wallpaper on painted walls: water-based, oil and acrylic coating
- How to calculate wallpaper: how many rolls and glue are needed to cover a wall. methods for calculating and determining the quantity of materials
- Technology of painting wallpaper with water-based paint
- How can you glue old wallpaper that has come off the walls and how to do it correctly?
- Which wallpaper to prefer: vinyl or non-woven
- How to glue fiberglass correctly?
- Wallpaper combination: modern options and rules for use in the interior. 105 photos and videos gluing master class
- Liquid wallpaper. types, how to make, how to apply and more
- Liquid wallpaper
- Vinyl wallpaper with non-woven glue
- Is it worth replacing wallpaper with paint in an apartment: what to paint with, is it possible to do the work yourself, and what paint to choose for the wall
- Is it necessary to prime the walls after the starting putty before the finishing putty?
- Repairing ceilings in an apartment: finishing features
- Do I need to apply a primer before wallpapering drywall?
- 3d wallpaper on the wall in an apartment: photos for the living room and all other rooms, how to hang it yourself
- How and with what to glue plastic corners to slopes
- How to properly glue fiberglass to drywall with your own hands
- Choosing paint for wallpaper and recommendations for painting
- How to glue wallpaper on drywall
- How to make a ceiling in a private wooden house and do-it-yourself finishing
Read with this
- Wallpaper for the bedroom
- How to glue vinyl wallpaper on non-woven backing?
- How to glue wallpaper: common mistakes in gluing yourself
- How to tear wallpaper off the walls if it won't come off
- How to glue corners with non-woven wallpaper
- How to glue wallpaper on painted walls: water-based, oil and acrylic coating
- How to calculate wallpaper: how many rolls and glue are needed to cover a wall. methods for calculating and determining the quantity of materials
- Technology of painting wallpaper with water-based paint
- How can you glue old wallpaper that has come off the walls and how to do it correctly?
- Which wallpaper to prefer: vinyl or non-woven
Where to start gluing wallpaper
It is best to start gluing wallpaper from a visible vertical reference. For example, from a window or doorway. Glue the first panel especially carefully, and check everything with a level or plumb line. The rest can be compared to it.
How to choose wallpaper for furniture: useful tips (90 photos)
Buying glue – which one is better?
It’s better not to skimp on wallpaper glue. It should be selected depending on the type of wallpaper and the quantity calculated according to the instructions indicated on the package. It is worth choosing material from a trusted manufacturer and do not forget to check the expiration date.
Where to start gluing
Some craftsmen claim that it does not matter where you start wallpapering. However, this is not entirely true. Still, it is better to start gluing the trellises (especially paper ones) from the window, and in different directions, so that the seams are not noticeable.
Determining the gluing pattern
The wallpapering pattern depends on the type of material. Paper ones are glued from the window in different directions. In all other cases you can glue:
- from the window;
- from the corner (it is necessary to draw a vertical line using a plumb line to mark the place from which the gluing will take place);
- from the door (the reference point in this case is the vertical line of the box);
- from an arbitrary location, from a vertical line.
The main thing you need to pay attention to when constructing a wallpapering scheme is the designation of a vertical line. It must be carried out using a social level, since any inaccuracies in this case will affect the quality of the walls.
Preparing walls (removing old wallpaper, priming)
The first thing to do is prepare the walls. This is the most important requirement, the compliance with which determines the quality and durability of the finish. Wall preparation occurs in several stages:
- Removing old coating. To make removing old wallpaper easier, you can use a metal spatula and soap solution. The walls need to be thoroughly moistened, then all material must be completely removed. Small pieces of wallpaper can be removed by applying a cloth to it and ironing it with a hot iron.
- Primer must be applied to clean walls. This is a mandatory step that affects the reliability of the wallpaper’s adhesion to the surface. Moreover, the primer strengthens the concrete itself, preventing its destruction and the appearance of fungus and mold. For these purposes, you can use primer glue, but there are also more successful compositions, such as acrylic primer.
- Puttying. This procedure is necessary only if there are cracks and other defects on the surface of the walls. Before applying the putty, the dried primer layer must be sanded with fine-grained sandpaper. Before wallpapering, only one layer of putty is needed.
The preparatory stage does not involve any difficulties, so anyone can cope with it. Proper preparation of the walls will ensure the durability and aesthetics of the final coating.