Material advantages
Decorative gypsum brick is practically no different from natural stone. In its production, only environmentally friendly materials are used: sand, cement, water, gypsum. Therefore, this material does not emit harmful toxins and does not cause allergic reactions in consumers.
Its advantages include:
- light weight. This makes it possible to use it even on fragile interior partitions;
- simple processing. If necessary, decorative stone can be easily sawed with hand or electric tools;
- resistance to negative factors. It is resistant to direct sunlight, high humidity, and sudden temperature changes;
- ease of care. It is easy to clean with various means, dust and dirt do not settle on its surface;
- high sound insulation qualities;
- long service life;
- bending and compressive strength;
- pleasant texture that is soft to the touch;
- wide color palette.
Using decorative gypsum bricks, you can decorate a room in any style. The positive qualities of decorative stone include its appearance.
Gypsum tile manufacturing technology
An assortment of shapes and colors of cladding is presented on the building materials market by various manufacturers. In industrial production, plasticizers are added to the raw material mixture to ensure the strength of the products; The gypsum solution placed in the molds is subjected to additional firing.
When purchasing cladding, pay attention to the composition of the products: gypsum should be marked G-16, G-18, G-19, and the presence of plasticizing additives is also desirable.
Insufficient strength is indicated by the shedding of material on the back side of the product with little friction.
You can make decorative elements yourself: the technology is not particularly complicated, and the materials are affordable.
The home manufacturing process includes the following steps:
- preparation of forms;
- mixing raw materials;
- pouring and drying;
- finishing of products.
Preparing forms
Matrices for pouring raw materials can be purchased in specialized stores or made with your own hands:
- assemble the base and formwork from laminated chipboard, secure the connected elements with self-tapping screws and coat the cracks with silicone;
- apply markings and glue to the base of the model (in the form of stone or brick) so that the distance between the sides and forms is at least 15-20 mm;
- cover the surface of the models and the wooden base with two layers (with an application interval of 1-2 minutes) of Vaseline or special lubricant;
- mix the silicone compound with the catalyst and fill the model with the composition;
- within a day the form is ready for use.
Instead of a compound, you can use silicone sealant, but workpieces made from this material quickly lose their appearance and stretch. Acrylic sealant is not suitable for making molds.
Mixing raw materials
- prepare the components in the following proportions: gypsum (6 parts), slaked lime (1 part), warm water (at the rate of 0.7 parts of liquid per part of gypsum);
- Combine dry materials in containers and gradually pour in water, continuing to thoroughly mix the solution with a construction mixer (at low speed) until it acquires a paste-like consistency.
Pouring, drying and finishing
- coat the mold with grease and fill it with the resulting mass, level the surface with a spatula;
- place the matrix with the blanks in a dry, ventilated, darkened room for a day;
- remove the frozen tiles and sand their surface with sandpaper.
REFERENCE! If during the mixing process a large number of air cavities have formed in the mass, carefully move the template several times from side to side, when the bubbles come to the surface, remove the top layer of the mixture with a spatula.
Advantages and disadvantages
Surface cladding made from gypsum tiles has the following advantages:
- the low weight of decorative elements allows installation on any surface;
- environmental friendliness of the material;
- soundproofing properties;
- simplicity and ease of installation;
- if necessary, it is possible to replace individual elements;
- possibility of self-production;
- the thermal conductivity coefficient of gypsum elements is low, which gives a feeling of pleasant warmth upon tactile contact;
- creating a comfortable, soft interior color.
Flaws
- the material is highly susceptible to impact loads and requires careful handling;
- low moisture resistance;
- impossibility of installation on wallpaper.
Finishing moments
To create falsification of brickwork, tiles are made, the parameters of which are 250 × 55 mm (corresponding to the dimensions of the side of the brick). Artificial execution can be diverse - from the image of an aged, collapsed brick to a new material.
Brick tiles are made from gypsum, a mixture of cement and sand with various fillers, clinker clay, and expanded polystyrene. Depending on what material the tile is made of, you need to glue it to a suitable compound.
Reviews of gypsum adhesives from different manufacturers
If you need gypsum adhesive for tiles, then you may prefer Volma Montazh, which contains gypsum binder, chemical impurities and modified additives. Buyers note moisture-retaining characteristics and optimal operating time as the main advantages of this mixture. That is why this mixture is chosen by consumers quite often.
It can be used at temperatures ranging from +5 to +30 °C. At the same time, optimal humidity should be maintained. Buyers like that the glue adheres well to plaster, concrete, gypsum products, aerated concrete and foam block, brickwork, gypsum fiber sheets and drywall.
According to buyers, Knauf-Perlfix glue is also quite popular. It is sold in powder form, and in this case the main binding components are additional elements and binder gypsum. Buyers emphasize that this composition can be used when carrying out interior work.
Tools and accessories for installation
Having decided to use gypsum bricks in the interior of your home, you need to prepare the following tools and materials:
- plastic container;
- pallet;
- hacksaw or grinder;
- plain and notched spatula;
- building level;
- roulette;
- paint brushes;
- file;
- pencil;
- primer;
- electric drill.
Now you can proceed directly to preparing the surfaces to be treated.
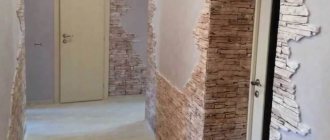
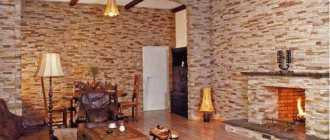
Brickwork in the living room interior
For an unusual decoration of the hall, it is recommended to select monochromatic products, a collection with a color transition on each element. The first type will help emphasize the Scandinavian or loft style. It can be used for cladding 1-2 walls. The second one would be appropriate in a rustic style, chalet. It is recommended to place multi-colored elements on the wall behind the sofa
Because with a different arrangement, the transitions of shades will constantly attract attention and will not allow household members to concentrate on relaxation. The creation of an artificial fireplace will also help to emphasize the comfort and special atmosphere in such a room.
To do this, the owners will need to first assemble a base from plasterboard sheets on which they will lay the stylized cladding.
Specifics of imitation brickwork
Why imitation brick for interior decoration is more profitable than natural stone masonry:
- pressure on the slabs - due to the light weight and thickness of the materials, the load on load-bearing walls is eliminated, which guarantees safe living;
- apartment area - imitation masonry is suitable even for a small square footage, since the volume of the space will be practically preserved;
- price category - this method of wall finishing will cost much less than buying real bricks.
The process of laying materials takes less time and is understandable even to an untrained person. Externally, the surface is almost no different from natural stonework.
"Brick" wallpaper in the living roomSource sense-life.com
Installation of tiles under clinker bricks
This product is waterproof, durable, environmentally friendly and perfectly replicates brickwork, as it is made from natural clay. Due to its good properties, this tile is used for external and internal construction work.
The shade and type when choosing clinker corresponds to the version of the parody of brickwork.
Before laying the cladding, the working wall must be prepared: leveled and dried. The tiles are glued with a special glue, the appearance of which depends on the purpose of the building and the base material.
When adjusting, cutting the material is done with your own hands using a grinder. Otherwise, the procedure for laying clinker is almost the same as for gypsum products.
Technical characteristics of popular adhesives
In the retail chain there are gypsum or cement mixtures, which will need to be diluted before work, in liquid form and reactive ones (suitable for use when mixing two components).
The dry mixture is used on surfaces with cement or gypsum screed and plaster, with brickwork, foam concrete, aerated concrete and other mineral bases. Liquid (dispersion) products are more convenient to glue, but they are less economical. Reactive – indispensable for completing work in a short time.
Preparing walls and laying gypsum bricks
Preparation of the working surface is one of the most important stages of work.
- The treated surfaces are inspected for the presence of: stains, dust, old finishes, moisture, fungus.
- Next you need to get rid of all large irregularities using putty.
- The surfaces are coated with several layers of primer for better adhesion to the material.
- According to the instructions, the tiles are dipped into the primer solution for a certain time.
- A composition of tiles is laid out on the floor in advance. It is better to use bricks from different boxes, mixing them during installation.
- If necessary, we adjust the material to the required size, cutting off excess edges.
Before you begin laying decorative stone, you must carefully read the manufacturer's instructions. All work is divided into the following stages:
- Surfaces are prepared.
- The amount of material is calculated.
- The adhesive composition is selected.
- The material is prepared (sawed and adjusted to size). All cuts are cleaned with a file.
Decorative bricks must be laid only on clean and dry walls. Old finishes are removed and cracks are repaired.
Primer of walls
Before decorative treatment of walls, they must be primed. To do this, the base surface is cleaned of debris, dust and dirt. All cracks and defects are sealed with putty and cleaned. You can apply the material to surfaces using:
- paint brush;
- roller;
- spray bottle.
When working with primer, your hands should be protected with gloves. It is also recommended to wear safety glasses, a respirator or a medical mask.
When choosing a primer, you need to pay attention to the type of base. Walls can be made of various blocks, bricks, monoliths. On top they are treated with cement mortar or putty. For brick, monolithic or block walls, as well as for surfaces treated with putty, universal materials are suitable:
- acrylic;
- perchlorovinyl;
- based on minerals.
The advantages of mineral primers include:
- environmental friendliness;
- quick drying;
- ease of use.
Perchlorovinyl primers are suitable for working with concrete, plaster and metal. They fit well with tiles and gypsum materials. The material is applied to the surfaces to be treated in 2 layers. The drying period is from 15 minutes to an hour.
Acrylic-based primers are universal, suitable for treating surfaces of all types.
Before applying the mixture to the walls, the bottle with primer should be shaken well. Priming is carried out carefully and carefully. After applying the first layer, the material should dry. Then you can apply subsequent layers.
Choosing a mounting mixture
The construction market offers a wide selection of mounting mixtures for decorative bricks. This can be either ready-made glue or special dry mixtures:
- silicone glue;
- acrylic sealant;
- gypsum mixture with PVA;
- liquid Nails;
- cement dry mixtures;
- putty;
- mastic;
- polyurethane foam.
Experts in the construction industry recommend using special gypsum glue or putty for installing decorative stone.
When choosing a mounting mixture, you should consider the following factors:
- wall type;
- tile composition;
- type of masonry;
- scope of application.
If you choose glue, then it is applied to the base of the decorative tiles and to the wall. Thus, better adhesion to the surface is achieved. The gypsum brick is glued with glue within a few seconds.
To glue gypsum stone to brick, concrete or plaster, it is worth using special gypsum assembly adhesives. Their composition is dominated by alabaster and plasticizing additives.
When choosing an adhesive, pay attention to the ingredients from which it is made. It is better to choose mixtures that do not contain white quartz sand. Because it impairs adhesion.
Preparing the mixture
If you purchased a dry mix for styling, it must be prepared according to the manufacturer's instructions. Pour the mixture into a container with water and mix thoroughly with a construction mixer or drill with a special attachment.
The ratio of water and glue should be as specified by the manufacturer. If the proportions are not observed, the consumption of the mixture increases and the strength of the connection decreases.
It is necessary to stir the glue until it becomes homogeneous so that there are no lumps in it. The finished mixture should resemble a thick paste.
Installation technology
U
The laying of gypsum bricks is carried out according to the following scheme:
- Before laying gypsum bricks, preliminary markings are made on the walls. To do this, use a pencil, ruler and level. To lay the material on the walls evenly and neatly, horizontal lines are drawn.
- It is recommended to lay the cut material at the bottom of the walls.
- The installation process starts from the corner and gradually moves to the center of the room. Laying can begin either from the top of the wall or from the bottom. If the stone is laid from top to bottom, the material is less dirty with glue.
- After marking, the adhesive solution is applied to the walls and tiles using a notched trowel. Its layer should be no more than 4-7 mm.
- After this, the material is applied to the working surface and aligned with the markings.
- The brick is pressed to the surface, the remaining glue is wiped off.
- All cracks are sealed with the same adhesive.
The following tiles are covered with glue and attached closely or at a short distance from the rest.
According to the installation technology, gypsum bricks can be laid with or without gaps. If you decide to leave gaps, you will need to use special liners. They can be purchased at the store or made independently from scrap materials.
Do you like gypsum decorative stone?
Sealing seams
Joining the joints gives the wall a finished appearance and protects the masonry from destruction. Since the grout prevents moisture from entering, leading to peeling of the tiles. To seal joints, you can use grout from different manufacturers. It can be colored or white. To seal the seams, it is recommended to use a special gun or you can use a plastic bag. The seams are filled with a thickness of 6-10 mm.
After the composition begins to dry, use a spatula to level the seams to a perfectly flat surface. The grout is left until completely dry, and the residue is removed with a dry cloth or brush.
In conclusion, it can be noted that gypsum brick is an attribute of almost every design renovation. To do the work on your own, you need to stock up on materials and tools, learn installation technology and have some free time.
Popular
Best prices for plaster adhesive in Leroy Merlin
When carrying out interior finishing work, glue is widely used for installing gypsum products:
- gypsum fiber and plasterboard sheets using a frameless method;
- tongue-and-groove slabs;
- ceiling and wall decorative elements;
- small sculptural and architectural plaster structures.
A dry adhesive mixture based on gypsum with fine filler, plasticizing and modifying additives has a number of advantages:
- easily diluted to working condition and applied to the surfaces to be bonded;
- has good adhesion to most building materials;
- hardens quickly, ensuring quick completion of work.
Plaster adhesive can also be used for auxiliary operations:
- correcting unevenness and preparing the base for cladding;
- sealing cracks in walls;
- when laying hidden electrical wiring - fixing the wires in grooves, boxes for sockets and switches;
- repairing local damage to drywall, etc.
Advantages of buying plaster adhesive from Leroy Merlin
Qualified sales consultants in the sales areas of Leroy Merlin construction hypermarkets, widely represented in Moscow and other cities of the Russian Federation, will help you choose high-quality adhesive for gypsum products that is optimally suited in terms of properties and packaging to your requirements.
By receiving original products directly from the manufacturer, we ensure compliance with proper conditions for transportation and storage of dry mixtures and offer competitive prices to our customers.
If you prefer to shop online, you can buy plaster adhesive in our online store with direct delivery or pickup. Shipping costs are calculated automatically when placing an order.
Forming neat seams
To form a beautiful seam, it is recommended to fill it with grout or adhesive solution. Filling is carried out with a special construction syringe. Only this method will provide complete, uniform filling. The opening is aligned with a plastic tube cut lengthwise.
Only after complete drying is it possible to paint. To do this, apply acrylic paint of the desired shade with an artistic brush.
When painting, special care must be taken, since the paint should lie without protrusions on the edges of the slabs.
How to treat after installation?
After finishing the cladding work, drying the solution and cleaning the gypsum tiles, treat the entire surface twice with a hydrophobic solution that reduces the porosity of the material and prevents the appearance of mold and mildew.
To improve technical characteristics and protect the finish, treat gypsum elements:
- oil varnish, presented by manufacturers in various shades;
- acrylic-based varnish with high moisture resistance;
- yacht varnish (the most durable protective coating, but requiring skill in application and long drying time);
Selection Criteria
Construction stores offer a large selection of materials for high-quality tile installation. There are so many of them that buyers are often unable to choose the one they need. But experts can give several recommendations for choosing:
- specialized adhesives based on gypsum (or alabaster);
- compositions for laying products made of selenite;
- improvised mixtures.
The choice of a specific type depends on the characteristics of the base.
The most common mistakes made when installing yourself
When installing decorative stone yourself, you can make a mistake. The most common mistakes made by experts:
- A lot of waste due to improper cutting of tiles;
- An incorrect primer or a violation of the technology for applying the primer;
- Excessively wide or sloppy seams;
- Violation of row levels.
Gypsum brick is a modern and very easy-to-work material that allows you to install it yourself.
Gypsum brick is a modern and very easy-to-work material that allows you to install it yourself. If all requirements are met, you can count on excellent results and long-term operation.
We use liquid nails
Not the most obvious, but practical option. Using liquid nails does not require special skills; the glue is sold ready-made in tubes. You only need a syringe to dispense the glue.
Liquid nails will provide quick and reliable fixation; there will be no accompanying noise or pollution during operation.
But due to the high cost of liquid nails, it is irrational to use glue for gluing large quantities of gypsum stone. It is suitable for spot repairs or restoration when several tiles need to be glued.
How to care for stone
Caring for gypsum stone will not require much effort on the part of the housewife. All that is required is to periodically wipe off the dust from the varnish base. It is worth noting that if bricks with an aging effect were used in the interior, then the dust on them is not visible as on dark varnished bricks. The varnish, in turn, protects the plaster from moisture.
Gypsum bricks for decorating a room are the best budget solution. With the help of such inexpensive materials, you can create a cozy interior in any corner of the house, and all that is required to design an interior solution is imagination, time and compliance with installation technology.
How to treat after installation?
Proper treatment of gypsum tiles after installation will extend their service life. To do this, it is appropriate not only to prime the surface, but also to treat it with special varnishes.
This processing method has its significant advantages:
- varnish protects the material from exposure to high levels of humidity;
- gypsum tiles will not be afraid of mold and mildew;
- it will serve you for as long as possible, maintaining its original appearance;
- you can create a smooth surface that attracts attention with its shine.
These are the main points that concern the processing of gypsum tiles after installation. If you choose the right material, you can achieve incredibly effective repair results.
Glue consumption per 1 m2 and 1 m3
Another important thing to know when starting a renovation is how much glue you will need to apply. Calculations must be made in advance.
Firstly, this will help at the purchasing stage - no one wants to spend money on extra packaging, because if applied correctly, gypsum tiles will last you a very long time. If you buy too little product, this will also become a problem - you will have to urgently buy the missing amount, and glue of the same brand may not be available in the store. It is highly undesirable to use products from different brands together.
Secondly, calculations are also important directly during the installation process - if you choose glue that you will dilute yourself, you need to remember that the finished composition hardens quite quickly. And if you prepare a lot of solution, it will be wasted.
So, on average, 1 cubic meter of decorative stone requires 43 kilograms of dry glue. Approximately five kilograms of gypsum powder are required per 1 square meter. Moreover, the amount of substance depends on the size of the tile. The standard layer is six millimeters. But if you are gluing large tiles (the side of which is more than twenty-five centimeters), then the adhesive layer should be thicker.
Negative points
The material is not very resistant to humidity, that is, it is not necessary to carry out work in rooms that have very high humidity, since gypsum quickly becomes unusable.
Gypsum tiles are used only in rooms with low humidity
At high temperatures, gypsum deteriorates quite quickly. Surfaces located near heating pipes should not be decorated with tiles. It is better not to decorate fireplaces with this material in situations where they do not have an additional layer of protection. It is better to clad the interior; the facades should not be covered with plaster.
Application
The issue associated with covering surfaces in any premises requires a serious approach and responsibility. There are many different finishing materials on the market, each of which is worthy of attention. However, now we should highlight decorative gypsum tiles, which are in great demand. This is the material that can imitate stone, wood or brick.
The advantages of such products include safety for human health and environmental friendliness , while the tiles cope with temperature changes and significant loads, and are quite easy to process. As for the external surface, it can resemble various natural stones or tree species, and this is best suited for modern interiors. Manufacturers often color the material to make the coating look as impressive as possible.