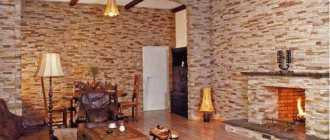
According to architects and designers, brickwork in the interior today is one of the leading trends. It is often used in loft and eclectic styles. Bricks harmonize well with glass, cast iron, and natural wood. However, designers note that this element needs to be used in finishing in doses, because decorative masonry is always a bright accent. However, this decor is characterized by high cost and heavy weight of natural material, which sharply limits its use. Brick plaster is an imitation that has become an excellent way out of this situation.
Ways to imitate brickwork
Purchased products.
There are ready-made products on sale from various materials that can be used to imitate brickwork for interior decoration. This:
- embossed wallpaper,
- plastic panels,
- flexible, ceramic and clinker tiles
- plaster plates.
Self-production.
To reduce the price, decorative bricks are made independently:
- cutting them out of polystyrene foam or corrugated cardboard,
- sawing natural building bricks using a grinder or circular saw,
- casting gypsum plates in plastic molds.
Cutting natural brick is a dangerous task, try to avoid this method of decoration.
The blanks are glued in the appropriate order to the wall.
- The brick-masonry look is also obtained by depicting masonry by applying a pattern to the wall. To do this, use rollers, ready-made or homemade stencils.
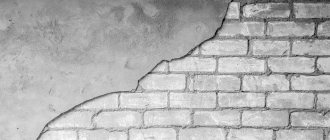
- To obtain the desired decor, plaster can also be removed from the brick walls of the apartment. In this case, after cleaning the wall, the natural texture of the masonry is revealed.
- However, brick imitation for interior decoration is often done using textured plaster. At the same time, large areas are covered with decor quickly and look neater.
Below, videos have been added to the article that show how brick plaster is done with your own hands.
What tools will you need?
Any work begins with the preparation of tools and materials with which the room will be decorated. In this case, you will need to purchase the following set:
- A solution suitable for a specific type of wall to create an imitation of brickwork.
- A container for preparing the mixture, as well as a construction mixer for mixing the material.
- Several spatulas of various shapes and sizes for applying the material.
- To level the coating you will need a level.
- To create seams, prepare masking tape or string.
- If you want to add color, you should purchase color or paint.
Depending on the chosen method of work and type of material, the set of tools may differ slightly; select those tools that will be convenient for you to work with.
You can use brushes or rollers instead of a spatula, and use adhesive tape instead of tape. It is also worth providing yourself with personal protective equipment so as not to get dirty while decorating.
The main advantages of brick plaster decor
Any finishes have their pros and cons.
Decorative plaster brickwork has its advantages:
- Light weight of the coating - compared to natural brick, it does not overload the load-bearing elements of the building structures;
- Imitation brick made from plaster mortars is highly durable and resistant to various types of mechanical damage;
- Making a brick wall with your own efforts is easy and simple. You can save on the services of specialists;
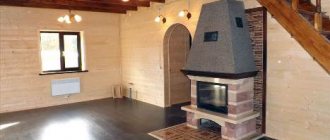
- Imitation brick looks great in the interior of rooms of various styles (from loft to gothic);
- Can be used for interiors or facades;
- During operation, no special maintenance is required;
- Changing the decor when changing the interior is done by painting it in any color.
In the loft style, decorative plaster to look like concrete is found a little less often than imitation brick.
Brick finishing also has disadvantages:
- The need for more frequent removal of dust accumulated by the terrain;
- Ability to perform work only at temperatures above +10 C;
- The need to knock down the relief coating when changing the surface texture.
The following provides information on how to make an imitation brick wall with your own hands.
How to use facade plasters on bricks?
Facade plasters only benefit bricks. It's no secret that brickwork often leaves much to be desired. Even if the masonry is made of façade decorative bricks, but it is crooked and sloppy, the house looks sloppy.
Facade plaster hides defects in bricks and masonry well.
Of course, now there are a huge number of methods and materials for decorating facades, but plaster remains the leader in this matter. Not only because it is accessible, cheap and easy to process, but also because the development of this material also does not stand still: today facade plaster comes in many types. Therefore, it is so important to understand the question of how to properly plaster a brick facade and what types of coating can be used.
What is required for brick plastering?
Naturally, imitation brick with your own hands is a job that requires appropriate tools, devices and building materials.
For any of the wall decoration methods you need:
- containers for water and mixture preparation,
- spatulas for applying decorative mixture to the wall,
- as a rule,
- trowel,
- roulette,
- masking tape,
- brush,
- cutter,
- Master OK,
- marking pencil,
- laser or bubble level,
- mixer for mixing the mixture,
- roller for priming or varnishing,
- brush,
- rags
- cord,
- floor protection film.
Depending on the method in which you create bricks on the wall with your own hands , you may need:
- roller or stencil for brick plaster,
- scraper - a tool used for jointing,
- metal strip for rustication.
It is possible that other equipment may be required, for example, a sponge, a respirator, gloves.
Stages of applying decorative plaster (imitation brick)
Stage one - surface preparation
The thickness of the plaster layer is small, no more than 1.5 cm. Therefore, the wall being finished must be without significant defects. All imperfections must be
, significant defects in the wall must first be puttied. A primer is then used to prevent future peeling of the plaster.
Stage two - preparing the plaster
The composition is prepared in the volume required for a single application. There is no need to prepare a lot of plaster at once. It dries out quite quickly. The mixture is prepared according to the manufacturer's instructions using a mixing device: a drill with an attachment or a mixer. There should be no lumps in the composition.
Dye is added to the mixture, after which everything is mixed until smooth. Another option for using a coloring pigment is possible - applying it directly to the plaster layer.
Materials required for work:
- Spatulas;
- Building level;
- Masking tape;
- Rollers, brushes;
- Stencils.
Stage three - creating an ornament
There are 3 ways to create a brick pattern:
- Using a scraper;
- Using masking tape;
- By gluing stencils.
In the first
method
, the solution is applied with spatulas to small areas and its layer is leveled. After the applied mixture has dried a little, the seams are marked. A long rule is used with a level approximately 1.5 m long. It is applied to the wall, and seams no more than 1 cm wide are drawn along it with a sharp plate.
After marking, a scraper is used, which is carefully guided along the marked seams to remove the plaster. The seams can be different in depth (3-6 mm). It’s quite difficult to work with decorative brick-like plaster, imitation brickwork
it turns out smooth, but the excess mixture forms a “fringe” and must be constantly removed.
Second way
assumes that after applying the primer, the seams are outlined with a regular pencil, after which narrow tape is applied for masking seams. The ends of the tape must be brought outside the boundary of the area to be plastered. After which the composition is applied to the wall, it is allowed to dry a little. Then the tape is carefully removed.
Third way
the easiest in terms of creating a brickwork pattern. The video at the end of our article will allow you to learn the details of applying brick imitation plaster using self-adhesive stencils.
Preparing the wall for work
Before making imitation brick, the base for decorative plaster is prepared:
- Old finishing (tiles, wallpaper, cracked paint, etc.) is removed;
- Check the curvature of the wall surface, if necessary, make a correction by leveling the walls with construction cement or gypsum plaster;
- Chips, potholes and cracks are repaired;
- Apply primer to increase adhesion.
Brick plaster hides minor imperfections very well, but it is unacceptable to leave serious defects such as cracks. All this damage must be eliminated, otherwise it will transfer to the coating itself.
Which material to choose?
The basis for decorative plaster can be a variety of materials: white cement, gypsum or acrylic putty.
To make brickwork on the base of a house, cement-sand plaster is suitable. But ready-made polymer-based compounds are considered the highest quality and most durable: silicate and silicone. They are plastic, easily distributed over the surface and have high adhesion (cohesion), strength and moisture resistance.
To save money, you can make decorative plaster yourself from ordinary putty.
Selecting a material to create an imitation
Decorative finishing is carried out using various mortars. Imitation of white brick can be made of gypsum. A plaster mixture of ordinary acrylic putty with sand is suitable as a textured base for imitation.
In general, in order for the imitation of any brickwork with your own hands to be of high quality, you need a high-quality plaster mixture, with good adhesion (adhesion), workability, and a setting mode suitable for applying relief. Ready-made compositions are available for sale, the binding components of which are silicate or silicone polymers. These compositions are easy to install due to their high plasticity, have moisture resistance and strength, and high adhesiveness. In addition, they contain antifungal and anti-mold additives.
There are also many recipes according to which you can prepare the decorative composition yourself at home. To do this, you need to know how to make plaster for this work correctly. By choosing to prepare the mixture yourself, you can save additional money. Do-it-yourself decorative plaster is prepared in the following sequence: the dry ingredients are mixed, water and color are added to the container, the decorative mixture is mixed with an electric mixer.
You can also use tile adhesive as a base to form the finish.
However, compositions with different astringent bases should not be mixed with each other. This dramatically reduces the strength of the decorative coating.
An example of such a composition:
- 1 part cement
- 3 Pieces of sand
- Per bucket up to 2 liters of tile adhesive. Add glue by eye.
Imitation of brick with decorative plaster
From this article you will learn:
Decorative plaster (imitation brickwork) is a common material for facade finishing. It serves as a durable decoration. Low-cost and at the same time attractive in appearance, it is in demand today in the finishing materials market. From this article you will learn about the advantages of such plaster and get acquainted with the techniques for applying it.
Advantages of decorative plaster with imitation brick:
- Plaster is non-toxic, that is, it is an environmentally friendly material.
- It is applied in a fairly thin layer, which is quite economical.
- Does not require a huge financial investment.
- Suitable for independent use.
Creation technology
Both professionals and amateurs need to know that decorative plaster in the form of a brick surface is performed in various ways.
For example, to create rustications on the base, stuffing is done using a metal strip, the thickness of which is from 5 to 15 mm:
- The applied facade plaster made of cement-sand mortar is marked;
- A strip is placed on the line and pressed into the surface with blows of a mallet hammer;
- Then the rail is removed very smoothly and carefully;
- The surfaces of the resulting large “bricks” are given the texture of stone before the plaster dries.
There is a technique in which a brick wall is created with your own hands from plaster by applying a grid of seams using beating with a thick cord. To do this, the cord is pulled along the future seam (two assistants are needed), the middle of the cord is pulled back and released. A strong blow to the joint with the cord creates a depression.
The methods described above are rarely used; there are more common and less complex techniques:
- Drawing or punching a seam (with a sharp object - a knitting needle, scraper, wooden stick, etc.);
- Forming seams using tape;
- Applying an imprint.
General step-by-step instructions:
- First of all, we prepare the base on which the brickwork will be done with our own hands.
- We mark the wall necessary for the chosen method.
- We prepare a solution for imitation from putty, a ready-made mixture, or we make up a paste mass ourselves. The mixture, ready for use, should be thick enough so that it slowly slides off the spatula, but does not flow or fall off in pieces.
- If necessary, color the mixture by adding color.
- We apply the mortar mass to the prepared section of the wall and process the layer using the chosen method. We plaster the area only of such an area that we can fully process it before the layer dries.
- Let the layer dry and apply the finishing touch.
We will tell you about each stage in detail.
Wall marking
Imitating a brick wall with your own hands using plaster, plaster, tile adhesive or putty requires preliminary marking. Usually, for imitation, the width of the inter-brick joints is 10-15 mm, the dimensions of the bricks themselves are close or equal to the standard ones. But you can imitate masonry with other basic dimensions.
Sometimes preliminary calculations are required. This is done when it is necessary to fit entire rows in height, or to imitate masonry on protruding corners. Then on one wall there should be a long side of the brick, and on the adjacent wall there should be a short (butted) side.
After calculations, a grid is drawn on the base. This can be done with a pencil. As in a real wall, the longitudinal rows must be strictly horizontal. Therefore, when marking, horizontal and vertical seams are ensured by using a bubble level.
The marking work also includes sticking tape. More details about it below. To work with gypsum plaster, stationery tape is suitable. For other compositions, a painting agent is used.
Imitating a brick wall using masking tape
- The surface is prepared (small irregularities do not require cleaning), primed, marked, and masking tape is applied (horizontal, then vertical).
- Mix the plaster mixture or a plain or colored putty solution.
- The solution is applied to the resulting mesh. It is smoothed out and textured.
- When the joint dries a little, the tape is removed and scratches remain on the layer - interbrick depressions. Irregularities are corrected.
- When the layer is completely dry, the finishing is done - painting, waxing or varnishing.
In this way, imitation of brickwork is performed without a special tool - the method is accessible to everyone, without exception, and requires only perseverance and accuracy.
Video of the entire process.
Brickwork made of gypsum plaster in loft style
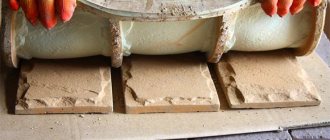
In a cheap and fairly simple way, a finish is created in which decorative stone made from gypsum plaster is similar to brickwork. This method is similar to that described above, with the difference that ordinary tape and a quick-drying gypsum mixture are used for finishing.
To do this, the primed wall is lined out “to fit the bricks” of natural sizes (250 x 65 mm, necessarily taking into account the 1 cm seams between the bricks), using a bubble level.
To create seams, strips of packing tape 1 cm wide are used.
To do this, you can cut a roll of adhesive tape into 4 rings using a grinder with a disc for concrete or ceramics (the metal disc overheats and melts the adhesive tape).
The edges of the ribbons should be uneven to obtain a natural texture. First, horizontal tapes are glued to the wall, leaving spare ends for ease of subsequent removal. Vertical strips are glued on top of them (this is mandatory).
To control the thickness of the gypsum mixture layer, beacon strips are attached to the wall on plaster strokes.
Plastic gypsum mixtures with microfiber are best suited. It is advisable to avoid diluting excess solution. The consistency of the solution should not be too liquid or too thick.
The applied gypsum mass is leveled by the rule, the beacons are removed and the voids after them are also filled with gypsum. A smooth surface is not required. On the contrary, you will need to add additional texture, which is done using a plastic bag crumpled into a ball.
After a short period of time (it is necessary for the plaster to just begin to set), the tape is pulled out perpendicular to the surface. The resulting bricks are rounded with a dampened brush, trying to avoid sharp corners. After drying, the gypsum plaster is painted with PVA in 2 layers.
The entire process is shown in detail in the video.
Using a stencil
A simple but expensive way to imitate brickwork using plaster. Requires a rubber or plastic stencil. concentration and accuracy, because you need to make sure that the horizontal lines are connected and there is no vertical displacement.
The work is done like this:
- A layer of plaster with a thickness of at least 4-5 mm is applied to the base to obtain an expressive texture;
- The stencil is moistened with water so that it does not stick to the solution, applied to the surface of the solution and pressed, carefully removed from the solution with a smooth movement; It is wetted again, applied, pressed in and removed (if necessary, the impression is immediately corrected);
- Finally, the resulting masonry is primed, painted, and waxed.
The second method is to use a "middle" stencil (a bit like the masking tape technique). The stencil itself is cut out of linoleum. The cut mesh is attached to a wooden frame so that it can be used to remove the mesh from the stack. A layer of solution is applied to the base. Align. A stencil is placed on top of it so that the linoleum mesh is adjacent to the surface. A new layer up to 0.5 cm thick is applied on top of the stencil. Smooth and give the surface texture (with a brush, a bag, or your hands). Carefully remove the stencil and correct any flaws. After the solution has dried, the layer is smoothed with a trowel, removing burrs with a brush or grater.
You can make a brick stencil for plaster with your own hands.
A special feature of brickwork is the deepened lines of masonry joints. The stencil for brick plaster should leave them behind.
When making a stencil, two mandatory conditions must be met:
- the seams between the rows of bricks must be strictly horizontal;
- bricks in adjacent rows should be placed with a bandage.
Thus, a stencil imitating a brick wall is a grid of horizontal and vertical stripes. The width of the strips is no more than 10 mm. The dimensions of the bricks can be chosen arbitrarily.
For production you will need sheet plastic (there is a backing for adhesive film, the dimensions of which are sufficient for making a large stencil). The design is transferred to plastic and the “bricks” are cut out using a scalpel or modeling knife. At the end of the work, a mesh remains, which is used as a stencil.
You can cut a stencil from thin linoleum. But such a device cannot be mounted on the wall. Therefore, it is mounted on a wooden frame (in the form of a low-walled box). You will need two people to apply the solution: one to hold the frame, the other to spread the solution.
Brick plaster using a homemade stencil: execution sequence:
- The wall is primed and dried.
- A stencil is attached to the surface of the wall.
- The solution is applied with a spatula over the stencil mesh.
- The surface of the bricks is “shaped” using a sponge, brush or other auxiliary means, giving the desired texture.
- After this, the stencil is removed without waiting for the solution to set.
- The fringed ridges that appear along the edges of the bricks are smoothed with a damp brush while they are damp. You can take your time and clean up the frozen solution later with sandpaper or an abrasive mesh.
If there is a break in work, the stencil is cleaned of any remaining solution. Plastic and linoleum are washed so that subsequently frozen lumps of the solution do not become a hindrance.
Formation of individual bricks
Brick plaster can be done by excavating the joints using a scraper. This finish is very similar to creating wild stone. Formation using a scraper is carried out after a short break, when the applied layer dries a little. You can first mark the seam lines with a pencil using a rule or a strip, or you can make notches right away by applying the rule to the surface and running a scraper along it.
It is recommended to start cutting seams with horizontal lines. Then make vertical seams. Having finished the excavation, remove the remaining mixture from the edges of the bricks with a dry soft cloth.
For this type of decoration, the working composition can be applied to the entire surface of the wall. You can use a narrow chisel as a scraper or make a device by bending a steel strip and attaching it to the handle.
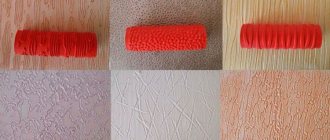
Using a special roller technology + video
Another way to imitate brickwork is to emboss it using a decorative plaster roller. A specific texture is applied to the wall by horizontal rolling of a roller. In one pass, recesses in the form of seams from 2 to 4 rows of masonry can be obtained.
The force when pressing the roller and the speed of movement must be uniform, then a solid canvas is obtained. For better rolling, you can moisten the solution with water before the roller using a spray bottle. When rolling, make sure that each subsequent row has the required offset of the vertical seams. You can purchase a decorative brick roller or make it yourself.
To work with a roller, a “stuffed”, steady hand is required. Practice before working on large areas.
Making a brick roller with your own hands
Brick plaster can also be formed using homemade tools. It’s quite simple to make a simple tool for simulating brickwork with your own hands - a decorative roller to imitate a brick. Such a roller will cost less than a branded one, and production will not take much time. After familiarizing yourself with the manufacturing methods, perhaps you can figure out how else you can make a device from what you have at hand.
Method 1. To make a brick roller, you need ordinary sealant and a roller (new or used), a glass of soapy water, and an auxiliary rod while working with the roller.
- Remove the tubular part of the roller from the handle. We put it on the rod and place it on two supports.
- Apply a layer of sealant to the roller, which is distributed evenly over the roller. You can use a plastic card for this. Having spread the sealant, wet your fingers in soapy water and press down the slightly sharp protrusions of the sealant.
- Having outlined the middle of the cylinder, we apply a strip of sealant that will imitate a masonry joint. We apply two similar strips along the edges of the cylinder. Wet your fingers and smooth out any sharp edges.
- We draw two longitudinal lines, one between the first two rings of the seams, the second - on the diametrically opposite side of the cylinder in the second space between the rings. We also soften the protrusions.
Let the product dry. Remove it from the rod and install it on the handle. Now we can get to work.
Method 2. Purchase a wallpaper (pressure) roller. To work, you will need a metal ruler, a marker, a stationery or breadboard knife. We remove the cylindrical part of the brick roller from the handle, put it on the rod and install it on the supports.
- First, we mark the cylinder, drawing lines of masonry seams and jumpers between them. As in the previous case, the lintels need to be marked on opposite sides to imitate brickwork with a bandage.
- Using the sharp tip of a knife, we make slits 2 mm deep, without going into the jumpers. Our task is to remove the top layer where the brick imprint will be.
- Carefully cut the layer at an angle to begin cutting off the top. Grabbing the edge of the material to be cut and bending it away from the roller, we cut off (like 2 mm thick sandpaper) the plate in place of the brick. We also “remove the skin” at the site of the second brick.
- We correct the place of the cut (remove particularly intruding sharp tubercles).
After installing the homemade product on the handle, the roller is ready.
To apply a pattern to the wall, moisten the roller with soapy water so that the plaster solution does not stick to the stamping part.
Method 3. Prepare a rubber roller, sheet rubber 10 mm thick, and rubber glue for work. The length of the cylindrical part determines how many “bricks” will fit on it. For example, let’s take a roller that can accommodate the prints of two bricks.
- We degrease the rubber surface of the cylinder so that the glued strips hold tightly. We do the same on one side of the rubber sheet.
- From a sheet of rubber we cut 3 strips up to 10 mm wide (for seams). The length of the strips is greater than the circumference of the roller cylinder. Two more strips (shorter) will be used to form jumpers.
- Using a ruler, find the middle of the roller and draw the line of the middle masonry seam. Glue long strips along this line and along the edges of the cylinder. At the junction of the strips, we ensure that the upper part of the strips does not stretch, but joins without tension (we cut off the ends of the strips at a certain angle).
- Glue the jumpers.
- To ensure that the rings and bridges easily come out of the plaster composition when rolling, we cut off the edges of the strips at an angle with a sharp knife.
After the glue gains strength, we can use the roller.
How to finish a brick wall with plaster yourself?
First, let's look at the starting conditions of this technology. Without their observance, the work cannot be completed efficiently.
Preparation
The thickness of the finishing layer imitating brick is relatively small (0.5-1.5 cm). Therefore, a wall intended for such decor should not have large depressions and protrusions. Before starting work, you need to measure the level of curvature of the surface using a long rule. If the deviation of the wall from the vertical exceeds 2-3 cm per 1 m of length, then it must be leveled with a plaster mixture and allowed to dry for several days. Only after this can you start decorating.
Whatever master class on imitation brickwork you watch, everywhere a mandatory operation is to prime the surface before applying the mortar. Without it, the layer of decorative plaster will peel off over time. The type of primer is selected based on the wall material.
There are two technologies for applying brick decor:
- With cutting seams using a scraper.
- Using masking tape to form seams.
We will consider both options and give our comments on each.
Cutting masonry joints with a scraper
The main tool for applying and leveling plaster is a steel spatula 20-25 cm wide. For ease of use, you can use a narrower spatula (5-10 cm) with it. With its help, the solution is applied to a wide instrument, and small protrusions and pits are corrected.
The work is carried out in separate sections - occupations. Their area depends on the amount of solution that is prepared at a time (10-15 liters).
First, gypsum plaster is spread over the primed wall surface with a wide spatula, periodically leveling its layer.
After the solution has dried a little, the seams are marked. It is most convenient to do this work using a long rule (1.5-1.8 m). It is applied to the surface of the plaster and seams are drawn along it with a sharp plate. Their width is chosen within 0.5-1.0 cm.
The “pattern” of the masonry depends on your preferences. In this case, the dimensions of a standard brick should be observed (length 250 mm, height 65 mm and width 120 mm). You can’t draw bricks on the wall haphazardly. When making markings, you need to take into account the dressing of the seams.
After the seams are drawn, the scraper comes into play. This could be a narrow carpenter's chisel or a homemade device made from a bent steel strip.
They are carefully guided along the seams, removing the plaster. The depth of the seams depends on the thickness of the decorative finishing layer and can range from 3 to 6 mm.
Working with a chisel is not so convenient. Excess mortar from the seams forms a “fringe” that constantly has to be removed.
There is another tool for forming seams - jointing. It is used by masons at the stage of finishing masonry. Using jointing, seams can be given a convex or concave appearance.
When cutting plaster, start with long horizontal joints, and then move on to short vertical ones. Having done this work, the plaster needs to be given time to gain strength. Before doing this, you should eliminate all the mistakes and inaccuracies in the drawing, since this will not be possible on the hardened layer.
Excess mortar remaining on the edges of the bricks after cutting the seams is removed with a dry cloth immediately after completion of this work. After this, if desired, you can smooth the edges with a damp sponge.
The last operation is painting an imitation brick wall made of plaster. It is performed in two stages. First, the entire array is tinted with a brush or spray. After this, carefully paint the seams with a narrow brush, making sure that the paint does not get on the surface of the “brick”.
To create an imitation of masonry, many craftsmen use Volma gypsum plaster. Cement tile adhesive should not be mixed with gypsum plaster. Different types of binders do not get along well with each other. Therefore, the finishing layer may peel off from the base over time.
Based on the consumption of the plaster mixture, we can say the following. With a layer thickness of 1 cm, its consumption per 1 m2 of wall is from 8 to 9 kg. In this case, a standard bag (30 kg) is enough for 3.5 m2. With a bag price of 450 rubles, one “square” of plaster will cost 128 rubles (450/3.5). If we add to this the price of primer and paint, then the final cost figure will be at the level of 180 rubles / m2.
Finishing
After the finishing layer has gained strength, you can begin to apply the gloss. Remove all pellets and sharp protrusions and sagging that disrupt the pattern. To do this, use sandpaper. After this treatment, dust is removed with a brush.
Next, they begin priming and painting the surface of the decorative plaster. It is better to do this with a brush, since using a roller may leave unpainted areas. The coloring can be plain or with the seams highlighted in a different color. The bricks themselves can also be made multi-colored. The more color, the closer the false brick is to its natural appearance.
First, general priming and painting of the entire surface is carried out. After the first paint layer has dried, the seams are painted over with a narrow brush. The topmost layer of finishing is varnish. Without it, the decorative coating quickly darkens from dust and absorbed vapors. The varnish provides high moisture resistance, allowing you to wash the wall during use.
How to apply it to the wall with your own hands?
Advice
The plaster is applied to a cleaned, leveled and primed surface.
Fill cracks and holes with Rotband. If the depth of the depression is more than 2 cm, drown the serpyanka in the composition. Apply a rough layer of putty or construction mixture. The surface is primed in 2 layers with a break for drying. When the primer is dry, you can start working:
- using a bubble level and a construction pencil, draw a brick pattern on the wall;
- first set the horizontal lines, then the vertical ones, taking into account the width of the seams of 10–15 mm;
- cut the wide packing tape on the tube with a grinder along the width of the seam to get a torn cut (you can use a cutter);
- stick the tape along the horizontal lines, leaving 10–15 cm of margin on the wall, and cover the vertical lines in the same way;
- mix the plaster according to the instructions on the package, add pigment if desired;
- attach metal beacons to the wall in increments of 1.8-2 m (for 10 sq. m of area you will need 5 beacons);
- fix the beacons by drowning them in the composition;
- throw the mixture onto the surface so that the beacons are completely hidden, fill the entire space;
- having slightly smoothed it out with a spatula, pull off the mantle using a rule, moving vertically from the bottom edge of the wall;
- remove the beacons, cover the holes with plaster;
- walk fragmentarily over the surface with a crumpled plastic bag, leaving small grains;
- wait for the composition to set (40–50 minutes), remove the horizontal, then vertical lines of tape;
- round the edges of the brick with a brush dipped in water.
After drying, you can begin painting and applying a protective coating. To seal, it is advisable to manually rub the seams with assembly adhesive. When calculating the distance between the vertical marking lines, add up the width of the brick and the seam. Remove loose elements and roughness with a spatula; no need to sand.
Important
Try not to level the plaster mark too much so that small drops and flashes form in the composition. The less time the mixture takes to set, the smoother the seams will be after removing the tape.
From the video you will learn how to make a brick wall with your own hands from plaster:
How to paint brick trim
The color of the final paint is selected according to the design of the room. The wall can be white, have a color palette close to natural, or it can have bright, unexpected tones. Most often they resort to mixed dyes containing gray, reddish, red-orange and brown shades.
Alkyd, latex or acrylic compounds are used for painting. You can also use water emulsion. For the finishing coat, acrylic matte varnish is used.
Brick plaster has become a very popular solution for interior decoration in modern homes. The ease of implementation and variety of options allow even beginners to get the job done.
Applying plaster
If your wall is leveled, primed and already dry, you can begin applying the working mixture. To do this, dilute the solution according to the instructions and add dye to it , then mix thoroughly again.
Do not dilute too much solution at once because it will dry out quickly and you will have to throw it away.
Using a spatula, spread the mixture onto the wall and then smooth it upward. To make a brick wall look natural, you should not smooth the surface perfectly, because bricks most often have unevenness and roughness.
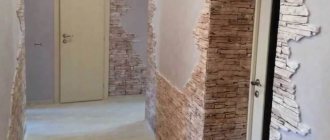
Materials for decorative finishing of a brick hallway
When finishing a hallway “like brick”, wall panels, flexible tiles, decorative tiles made of gypsum, cement-sand mixture, clay, plasticizers, glass fiber reinforced concrete and other materials are used, each of which has its own advantages and disadvantages relative to its analogues.
White brick hallway Source prihozhaya.guru