Nowadays, decorative plaster occupies a leading position among finishing materials. It gained its popularity due to its various effects, durability and reasonable price. A fairly popular method of decorative wall finishing is “rain” plaster, which became known quite a long time ago. In this article we will take a detailed look at the characteristics of rain plaster, methods of applying it and talk about the advantages of such a finish.
Plaster texture
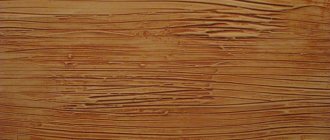
Thanks to a special technology, rain plaster imitates raindrops on the wall. These drops can flow both vertically and horizontally, allowing you to realize almost any design idea. Most often it uses an inclined position. To realize this effect, it is not necessary to purchase special solutions; you can use simple cement-based plaster. For further finishing, you can use gypsum putty. To decorate the walls of rooms with a high level of moisture: a bathroom, sauna or kitchen, we recommend using cement mortar; it will cope well with dampness and protect the coating.
We strongly do not recommend using gypsum mixtures in places with high humidity; such finishing can very quickly become unusable. The result of applying rain plaster diagonally can be seen in the following photo.
Expert advice
Use the following expert advice to simplify your work and extend the life of the coating:
- try creating the design on a separate piece of plywood to practice and avoid mistakes;
- when forming diagonal rain, choose coarse-grained compositions and use a grater;
- try to choose plaster, primer and paint from the same manufacturer;
- When caring for the surface, do not use abrasive detergents;
- in bedrooms or living rooms, use less expensive natural wax as a protective coating;
- It is recommended to paint coarse compositions over the surface - it is difficult to mix the color without damaging the filler;
- in bright and sunny rooms it is not advisable to tint the walls with silver;
- do not allow the plaster to dry artificially, otherwise it will crack;
- diagonal rain requires lining the wall with a construction pencil.
Diagonal rain is more difficult to create, so it is better to work as a team. Vertical lines are easy to create: a stiff brush or polyurethane float is suitable for this. Give preference to specialized compositions “silk threads”. They contain a fraction of the required diameter and have a high density.
Protect coverings in kitchens, balconies, facades and bathrooms with two layers of parquet varnish. In rooms with normal humidity, use natural wax.
Preparing for work
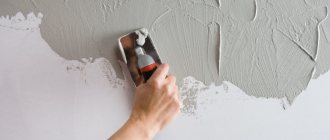
The first step is to prepare the wall. Decorative plaster is usually applied at the very end, when all finishing work has been completed, doors and windows have been installed, and the floor has been made. Preparing a wall for decorative plaster is practically no different from preparing for ordinary mortar.
First, you will need to remove the old coating from the wall: paint, wallpaper, putty. For these purposes, you can take a spatula, a paper clip, and we recommend pre-moistening the wallpaper with water. Try to clean the wall as best you can, otherwise the new plaster will peel off. Sometimes it can be quite difficult to remove paint from a wall. In case of any complications, we recommend using a grinding machine or a hair dryer.
Preparatory stage
To create a rain effect on a wall, you first need to be properly prepared. Decorative plaster cannot be applied to wallpaper or old painted walls. Therefore, you need to prepare the working surface by clearing it of old coatings. The wall should be smooth, but perfect smoothness is not required. Structural decorative plaster will help hide small defects that no one will simply notice. If there are large chips or part of the plaster has crumbled, then it is better to smooth the surface using putty.
Wall primer
After cleaning, the wall will definitely need to be treated with a primer. Before doing this, remove dust and other contaminants from the surface. The primer will not only increase the level of adhesion for subsequent application of plaster, but will also strengthen the base of the wall, which will prevent cracking of the material. The primer will also protect against the formation of mold and mildew. The drying time of the primer solution depends on its type and should be indicated in the instructions on the package. Under normal climatic conditions, the mixture dries in no more than a day.
If a room with a high level of moisture is to be treated, the wall will also need to be treated with a special antiseptic. It will prevent the harmful effects of dampness on the coating. If the concrete walls to be treated have cracks, we recommend filling them with putty to prevent further expansion.
Leveling and grinding the surface
When all the preparatory work has been carried out, you will need to inspect the walls to find out how smooth they are. If the walls are crooked or have defects, we strongly recommend treating them with putty or plaster. This finishing will become the basis for further application of decorative plaster “in the rain.” When applying the solution, be sure to use a reinforcing mesh, which will help increase the strength of the coating.
It is necessary to pre-level the walls only if you plan to apply decorative plaster in a thin layer. If you plan to apply a thick layer or no special defects are found, there is no point in leveling the surface.
After leveling, you will need to sand the surface. Sandpaper is best suited for these purposes. Next, clean the wall again from dust and apply a second coat of primer.
Marking for plaster
Before proceeding to the finishing of the wall, you will need to make a marking depending on the chosen location of the drops - vertically or at an angle. To get it right, draw a line from the ceiling to the floor at approximately three strokes intervals. With the width of the iron being eighteen centimeters, the pitch of the stripes should be a little more than fifty centimeters. The marking process is quite complex, but the beauty of the interior depends on it.
After finishing the marking, you will need to stick masking tape along each line. It is better to start gluing from the upper right corner, this way you will avoid splashes of the mixture on the already treated coating. Masking tape will not only help break up the wall into work areas, but will also serve as a guide for direction.
Applying plaster
It is best to start plastering the wall from the upper right corner. The mixture is applied from right to left in a free motion, so drops of the solution will fall to the left or down on the untreated surface. If you are left-handed, then it is better to start the procedure from the upper left corner of the wall.
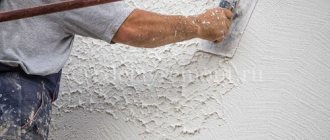
Rain decorative plaster should be applied in a layer of at least five centimeters, the strip should be a meter long and the width of a trowel. To create a rain effect, apply the trowel to the still fresh solution and then remove it. There is no need to press hard on the wall. As a result, the plaster will stick to the trowel and slightly lag behind the wall, thereby creating a raining effect. We process the entire strip using this technique. Next, clean the tool from adhering plaster and run along the treated strip again, lightly pressing the trowel. As a result, you will smooth the needles in one direction and thereby create a raining effect.
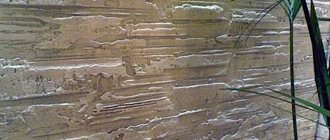
The relief of the finish will depend on the thickness of the applied layer and the pressing force of the trowel. The greater the layer and the pressing force, the clearer the decorative texture of the wall will be. The photo shows horizontal rain.
During work, the plaster can creep onto the tape dividing the wall into zones, so after treating one area, it is better to remove the limiting material from the wall. Thus, the joint between the zones will be smooth and will not require additional finishing. Subsequent layers of rain plaster are applied in a similar way, and they are given a relief structure. Each subsequent layer should be applied with a slight overlap on the previous one.
We do not recommend taking long pauses during the process of applying plaster. If you take long breaks, after drying the joints between the areas will be very noticeable.
After the decorative plaster has dried, the wall will need to be treated with sandpaper. This will remove minor finishing defects and make the surface uniform in height. In the next photo you can see the result of applying rain plaster to the walls.
Technology for creating rain at an angle
This method of creating an imitation of rain differs from the traditional method in that the decorative pattern seems to be turned at an angle. Typically, a slope of 45° is used, so the raindrops look more natural. But this method of creating a pattern is much more complicated, so inexperienced plasterers are unlikely to be able to do it.
The whole process of creating rain at an angle is basically the same as the first method, but there is one very significant difference. To obtain inclined grooves, grouting is also carried out at an angle. It would seem that there is nothing special about this. But still, one difference makes significant adjustments to the entire process: the grooves must be applied strictly parallel for the pattern to turn out beautiful. When grouting vertically, getting parallel strokes is not so difficult, but applying them at an angle and strictly adhering to one direction when working with a trowel is quite a difficult task. This requires experience and dexterity, and this is acquired only with time.
But if you still decide to make decorative rain plaster at an angle yourself, it is recommended to first draw the entire wall with a pencil in parallel lines with an inclination of 45°. They must be applied in increments of 3 trowel widths. These lines are intended to serve as a guide: strictly adhering to them, it is easier to apply the solution evenly.
Masking tape is applied to each line so that its lower edge lies on the mark. Applying the solution should begin from the top corner. The thickness of the first layer is 3 mm, the width is the size of the trowel and the length is 1 m. It serves as a beacon; grouting is carried out along it. To obtain a rain pattern, the trowel is lightly pressed against the surface and then released. By following this recommendation, it is quite possible to master the technique of applying structural plaster.
How to paint
The final stage of applying rain plaster to the walls will be painting it. Almost any paint will work for this: acrylic, latex, water-based and others. The main thing is to follow the basic rules so that the plaster does not lose its basic decorative properties.
If the plaster is painted with one color, the decorative effect may become invisible, so we recommend using different colors with the wash technology. The relief of the plaster in the rain is directed towards the inside of the coating, so when processing such a surface you should be extremely careful.
To paint rain plaster, we recommend using a long-haired roller. It is better to choose moisture-resistant paint, especially for a bath or kitchen. Before you start painting, be sure to prime the wall again to improve the adhesion of the paint to the wall and reduce material consumption.
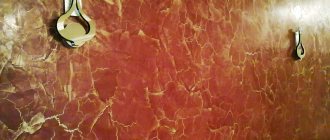
Painting with wash technology is quite complex, but only it will help emphasize the decorative effect of the surface. For this treatment, take dark-colored paint and cover the entire surface of the wall with it. Wait a little so that the solution has time to dry. Next, take a damp cloth and wipe the wall, this way you will partially remove the paint and the color will become more faded. In this case, the paint in the recesses of the relief will remain and will stand out significantly against the general background.
After washing, we recommend treating the wall with several layers of varnish. It is better to use a water-based varnish, first diluting it in a one-to-one ratio. If the solution is too liquid, you will need to apply two layers. To process, use a brush and do not pause so that the color is uniform over the entire area of the wall. The result of painting rain plaster can be seen in the following photo.
How to make rain plaster coating with your own hands?
You can make decorative rain plaster in different ways. As a rule, compositions with large grains are used, which develop a pattern when grouted with a float. In this case, we consider the technology of creating a pattern using a stiff brush and a profile decorative coating “silk threads”.
Preparatory stage
Before applying the leveling layer, it is necessary to clean the surface and dismantle the old finish. Stock up on latex gloves. For work you will need:
- plastic container for mixing;
- construction mixer;
- metal beacons (4–5 pcs.);
- nylon roller;
- H-shaped and trapezoidal rule;
- laser level;
- a brush with hard bristles;
- porous sponge;
- painting spatulas - 70 mm and 180 mm;
- plastic spatula - 160 mm;
- universal deep penetration primer;
- metal trowel;
- interior water-dispersion paint;
- decorative coating “Silk threads”;
- rotband Knauf;
- starting putty.
In this case, the Parade “Silk Threads” decorative coating and acrylic primer, also from the same manufacturer, are used. Features of surface preparation:
- treat the paint with an acid remover, then remove it with a scraper;
- the plaster is wetted, then cleaned off with a hammer and chisel;
- wallpaper is removed the old fashioned way - with a spatula or chemical or heat treatment;
- cracks are filled with starting putty solution;
- the recesses are filled with putty, in which the serpyanka is embedded;
- the serpyanka is covered with a second layer of composition;
- when the fragmentary rough finish dries, apply 1 layer of primer;
- After waiting 12 hours to dry, apply a second one.
When the soil is dry, you can begin to create a leveling layer . If the base is concrete, give preference to concrete contact rather than primer. Soil consumption averages 80 ml per m2.
Step-by-step application technology
Rain decorative plaster can be applied to a pre-leveled, primed, dry surface. The technology involves two methods: diagonal and vertical. Below we discuss the technique of creating a vertical pattern.
Wall alignment
Before leveling, measure the height of the wall in increments of 0.8-1 m to identify problem areas with significant differences: metal beacons will be installed there.
For 10 m2 of area you will need 5 pieces. It is best to level the walls with gypsum rotband. Before this, the surface must be primed and dry. Stages of work:
- using a mixer, mix the gypsum in a plastic container according to the instructions on the package until the lumps are completely eliminated;
- Using a spatula, transfer the composition to the trowel, at an angle of 45 degrees, create a plaster marking for fixing the beacons;
- profiles are installed in increments of at least 1-1.5 m, the density of the braid must correspond to the thickness of the beacons;
- drown the profiles in the plaster and cover with the compound to securely fix them;
- use a trowel to sketch out the composition, filling the space between the profiles, making jerky movements with a characteristic slap;
- At the lower base of the wall, set an H-shaped rule and level the tent with a vertical upward movement 2-3 times;
- after 10–15 minutes, remove excess solution with a wide spatula, moving horizontally;
- correct defects by smoothing them with a trowel, tighten the mortar using a trapezoidal rule in 1–2 approaches;
- after 25–30 minutes, pry up the upper end of the profile with a spatula, dismantle it with a smooth vertical shift;
- fill the cracks with plaster, smooth with a trowel, remove excess mortar with a wide spatula;
- after 20–25 minutes, moisten the porous sponge in water and “wash” the mantle in a circular motion;
- Having treated the entire surface of the wall in the same way, leave it to dry completely for 24 hours.
If you have a grinding machine, it is recommended to sand the finished surface to eliminate roughness. Use attachment No. 240 or 320. After installing the beacons, check their vertical position with a laser level.
Base layer
Pre-prime the wall in 1-2 layers with a break for drying.
Dark-colored water-dispersion interior paint serves as the base for thin-layer polymer coatings. It will reduce the absorbency of the surface and increase the setting speed. It is better to use a fur roller. Stages of work:
- pour paint into the tray, dip the roller;
- roll lightly until the roller is sufficiently wet;
- apply paint using vertical movements, moving from the top edge of the wall;
- process the wall area, avoiding gaps;
- the overlap may not be rolled in, since the paint will be covered by a layer of decorative coating;
- leave to dry completely for 2-4 hours.
Conclusion
Using decorative plaster you can achieve very impressive results. This type of finish has long been used by professional designers due to its cost-effectiveness and good durability of the coating. Rain plaster will make the room feel cozy and you will be in a good mood. The solution itself is made from environmentally friendly components and will not cause any harm to humans or pets. Due to its harmlessness, such cladding can be used even in a children's room or in special institutions. A variety of decorative plaster will allow you to realize almost any idea, and further painting will give the room bright colors. To see the process of applying rain plaster, we recommend watching the following video:
Recommended Posts
Derufa – decorative plaster
Decorative plaster Ceresit
Pebble decorative plaster Ceresit
Decorative plaster: seamless texture
Decorative plaster for the bathroom
Consumption of decorative bark beetle plaster per 1m2
Rain on the walls. How to make decorative plaster with a similar effect?
Using decorative plaster you can imitate any texture, including rain. Thanks to selected colors and lighting scenarios, such coatings emphasize a classic or minimalist interior setting. The application technology is not complicated and is suitable for finishing interior spaces with normal humidity. The scope of application of decorative plaster is practically unlimited. The “rain” texture is the same effect of the bark beetle, only done in a slightly special way.