Is it possible to paint decorative plaster?
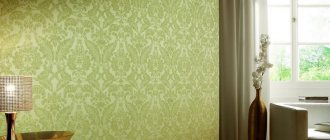
There are smooth coatings - Venetian, Moroccan decorative plaster, and there are textured ones - differing in the volume of the pattern. Venetian and Moroccan plasters already have a coating created during manufacturing. In this case, there is no need to paint the decorative plaster a different color. Textured ones usually need painting.
Typically, the plaster solution is colored before use by adding various pigments to the solution. You can also purchase ready-made mixtures in the chosen color. Painting is another way to add color to plastered walls. Decorative plaster is a finishing material that easily accepts other coatings - varnishes, waxes and paints. Naturally, in order for the paint applied to the plastered surface to lie smoothly, not come off, hold firmly, not crack, not fade, and retain its appearance for a long time, you need to use suitable paint compositions and follow certain rules.
Benefits of painting plaster
The plaster material used for finishing has a number of positive properties. Experts highlight the following advantages of its choice:
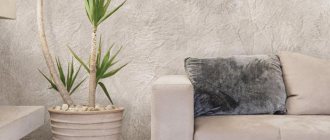
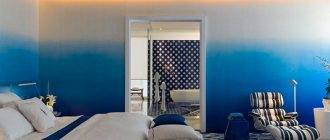
- Painting textured plaster helps to obtain a unique coating; each application adds its own images due to technology, so each finish will be unique;
- Some types of mixtures can cover surface defects; we are talking about minor defects; if the defects are serious, they are treated in advance with special mixtures;
- Noise and heat insulation effect;
- Eco-friendly composition, the components are only elements that are safe for humans and nature;
- A variety of coating options. Methods for applying the solution can be different; the only limitation is the imagination of the master; improvised materials and special rollers and stencils can be used. This helps to realize any design ideas.
Painting textured plaster helps create a unique finish.
Paint for decorative plaster
Coloring compositions are produced on various bases and are divided according to their area of application into:
- façade;
- for interior work.
These two classes of paints and varnishes differ in their “tolerance” to the conditions in which they have to serve.
Compositions for outdoor conditions must withstand temperature changes, exposure to rain, hail, wind, solar ultraviolet radiation and reliably protect the plaster layer from them.
Well suited for facade work:
- moisture resistant acrylic,
- very elastic, durable silicone,
- perfectly washable silicate.
They delight with the richness of the palette, allow the walls to breathe and last a long time, forming a durable film coating. Most often, commercially available facade paint compositions are white, which can be easily changed to the desired color by tinting.
The following paints are suitable for painting interior spaces:
- based on water-emulsion dispersion (requires two-layer application, forms a matte film),
- acrylic (a water-soluble composition of copolymers - vinyl, silicone and styrene can withstand frosts down to -30 ° C without cracking). There are three types: glossy, special and glyphthalic. The most popular are glypthal ones, which contain acrylic resin;
- latex (does not contain the above copolymers), water-soluble with latex binders. They dry faster than acrylic ones, but have disadvantages that they do not have. They are afraid of sudden temperature changes, have peculiarities in application, are less durable, but are much cheaper than acrylic ones.
In order not to confuse latex and acrylic paints when purchasing, you need to pay attention to the percentage composition of acrylic. It should be like this: 100% acrylic latex.
Which paint to choose
For finishing facades, decorative plasters “bark beetle”, “American” or “fur coat” are used, which are most often painted in one color. Acrylic, silicone and silicate coatings are suitable for painting them. They are resistant to moisture and, unlike oil and alkyd paints, create a vapor-permeable film on the surface.
Facade paints tolerate temperature changes well and reliably protect the plaster from precipitation. They are sold in the form of a white composition, which is tinted in a special machine or independently in accordance with personal preferences. The consumption of different types of paint for decorative plaster is slightly different. For a single-layer coating with acrylic paint you will need approximately 170-200 g/m², silicate paint - 150-300 g/m².
When working indoors, use water-based, acrylic or latex paints. The water-based emulsion requires a two-layer application, after which the plaster acquires a matte surface.
Acrylic coatings are used mainly in rooms with high levels of humidity - bathrooms or kitchens. They are more wear-resistant than water-based paint, so they are also used for finishing textured plaster in corridors.
Latex paints have practically no different technical characteristics from acrylic paints. They are universal and fit well on any base, including cement and gypsum textured plaster.
From a technical point of view, the choice of any of these paints is not fundamentally important - the range of shades allows you to implement a variety of design ideas, so customers are mainly guided by the price of the coating. The only thing you should pay attention to when painting the facade of a building is whether the paint is suitable for exterior use.
Tinting
The purchased plaster mixture, which has a white or slightly grayish color, is often tinted before use. This way, uniform painting of the entire surface of the wall is achieved, not only over the area, but also over the entire thickness of the layer. Therefore, even with scratches and small chips, the color of the plaster coating is preserved and minor defects are not so noticeable to the eye.
For tinting, one or more coloring pigments are added to the plaster mixture in the amount required to obtain the desired color. The mixture is mixed with a mixer.
As the plaster solution dries, it usually becomes lighter in color. Therefore, when adding color, it is advisable to check the color of the working composition with a test dye.
Tinting can be done in a store by selecting the color and pigment content using a computer program. It is advisable to prepare in advance as much plaster of the same color as is required for the entire surface to be treated.
Technological process of application
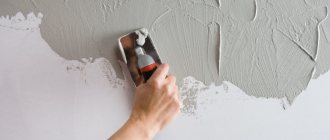
Unlike other plasters, textured finishing does not require special preparation of the base, since its relief well hides defects on the walls where the material is laid. In this regard, the following preparatory work is being carried out:
- Clean the wall surface from paint and varnish coatings or other remnants of finishing material. If the surface requires this, it must be treated with a solvent to remove oil stains, after which the treated areas must be washed with soapy water.
- Next, the wall structure is covered with a primer.
- If necessary, the cracks are expanded and filled with gypsum or cement mortar.
- Lay the base layer, which is used as an acrylic primer. But it is not applicable for all types of plasters. For certain types of textured composition, other options are sometimes used, for example, deep penetration putty-primer.
Before laying the textured composition, a test is carried out on a small piece of the wall to select the appropriate consistency of the composition. If the composition is prepared according to technology, then it should not be liquid and flow from the surface, but thickness is also not welcome.
To apply the solution and create texture, these will be useful (any application method requires tools):
- set of spatulas;
- metal iron;
- large porous sponge;
- unnecessary solution container;
- bucket with water.
When performing textured finishing, you need the help of a partner: one applies the solution, the other needs to quickly form the decorative texture.
The mixture should be applied using a spatula in a uniform layer, the thickness of which should be about 2-3 mm, and for a coarse-grained composition it should be equal to the cross-section of the grain.
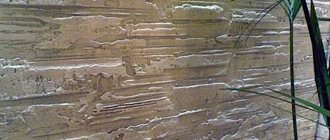
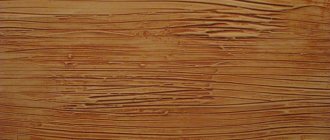
Bark beetle is the most popular decorative plaster coating for facades. And not only for them: it is often used as wall decoration and inside residential and public buildings.
This popularity is explained primarily by the simplicity and speed of application, and not the need for special skills to create the coating. But there is one difficult point in this matter regarding how to paint the bark beetle plaster.
The texture of this decorative plaster is two-layer: during the leveling process, solid mineral granules move through the mortar, leaving behind traces reminiscent of the chaotic passages of a bark beetle.
These furrows can have very different shapes, change direction, and their depth is determined by the diameter of the granules. It is they who create the problem when painting.
So:
- If you take a roller with short pile and try to save paint, the recesses will remain completely or partially unpainted. It's not just ugly. Quality suffers, since the plaster remains unprotected from external influences.
- A roller with a fairly long pile, thickly saturated with paint, easily reaches the bottom of the recesses, but it does not dry instantly, so it flows down along the grooves. To avoid this and prevent the finished coating from looking sloppy, you have to pick up drips with a dry brush or other roller, wasting time, effort and your own nerves.
What to do? Is there a guide to work around these problems? Yes, and not alone.
Tools
The chosen tool also depends on the chosen technique for applying the paint layer.
The following tools and accessories may be needed:
- brushes (of different shapes and sizes - fluted, small-haired, long-haired);
- rollers (with different coats for different surfaces, taking into account the depth of the relief recesses);
- foam sponges;
- spray gun (for painting large surfaces);
- masking tape (to limit the area to be painted and protect adjacent areas);
- trays for coloring compounds;
- mixer;
- scaffolding for painting facades, or a stepladder;
- containers;
- rags.
Materials that will be needed for work
Tools: paint container, rollers, paint mixer and drill.
- Decorative coating.
- Color for water-based paint.
- Water-based paint, preferably washable.
- Various additives to add bright and colorful accents to plaster.
Tools for work:
- Mixer for mixing plaster and paint.
- Drill.
- Container for mixing compositions.
- Rollers (necessarily with long pile, you can even take the façade version), brushes, sponges for applying paint.
- Protective clothing.
Return to contents
Preparing the surface for painting
A dried plastered wall must be properly prepared before painting.
This is done for several purposes:
- reduce material consumption by clogging the pores of the decorative coating,
- ensure the coordinated work of the paint and plaster coating,
- create conditions for the correct application of varnish or paint, which ensures high quality and long service life of the finishing layer.
The surface of the walls to be painted must be cleaned of dust and small pellets left as a result of plastering. If the walls are smooth with a slight relief, they can be cleaned using a sponge or rag.
For more pronounced relief, these funds are not enough. It's better to use a vacuum cleaner.
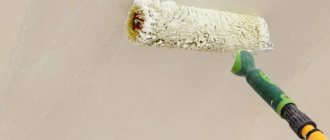
The wall, cleared of dust, must be primed. Thereby:
- a primer composition that is cheaper than paint fills numerous pores of the plaster coating,
- roughness is formed, which is necessary for greater adhesion (adhesion) of the wall and the paint film,
- The adhesive substances of the primer additionally fasten the surface of the plaster and protect it from possible cracking.
Since the work involves dyes, you need to take measures to protect the floor and nearby areas of walls, trim, window sills and ceilings from drops and paint smears. The floor is covered with film, adjacent sections of the wall are sealed with masking tape.
Tinted plaster - two in one
Tinted plaster is one of the newest materials in the field of finishing both building facades and interior work.
The production of modern building materials does not stand still and work is constantly underway to ensure high cost reduction of various materials and ensure minimal costs during the production of work. In addition, some new building materials make it possible to significantly reduce the time required to complete work and even eliminate some types of work, while ensuring high quality, durability and excellent consumer properties of objects in the construction of which the latest finishing materials are used.
An example of one such material is Limex tinted plaster, the quality of which and ease of use are appreciated by many construction organizations and private developers. Tinted plaster is a ready-made decorative plaster that, already during the production process, is made in the color at the request of the customer. Using tinted plaster allows you not only to save money when performing work, but also to eliminate some of the work, which also saves time. Finishing the walls with tinted decorative plaster allows you to avoid such tasks as painting. Since the decorative plaster is already painted in the color you need, you do not need to do work such as priming before painting and the actual painting itself. You save significant money because you do not need to buy primer, paint, masking tape, which is used to cover some elements to avoid paint getting in, as well as brushes, rollers, gloves and solvents for cleaning tools after painting. With the money saved, you can purchase a lot of different things for repairs or decoration, and in special cases, a gift for your beloved mother-in-law.
It should also be noted that tinted plaster is much more resistant to external factors and retains its color regardless of the depth of scratches or the strength of wind and rain, since it is completely painted in one color throughout the entire thickness of the layer. In addition, aggressive factors such as rain, hail, and strong wind can, over a long period of time, damage the paint layer and the lower layer of plaster of a different color will be visible on the damaged area of the coating. In rooms where the walls are finished with tinted decorative plaster, minor damage to the decorative layer is not noticeable and allows you to go without repairs for a long time. Damage can occur during transportation of furniture, accidental damage to parts of the interior, as well as in the presence of small children and heavy toys, dogs and cats, well, let’s hide it, they also sometimes test the strength of the finishing of our homes.
Like all other building materials of the LIMEX
, tinted plasters of this brand are received only by positive professional builders who have been successfully using Limex tinted plasters for quite a long time, as well as various other paints and varnishes, fungicides, varnishes, and decorative paints for surfaces.
Paints and varnishes and finishing materials of the Limex brand are among the highest quality materials among domestic manufacturers, which is facilitated by modern production, highly trained specialists and strict quality control of both raw materials and the finished product. All products undergo serious testing to ensure compliance with all requirements of both domestic and foreign quality standards. Year after year, there are more and more professional builders and individuals who are happy to use Limex materials and receive excellent results and high quality that meet the most modern requirements.
A variety of surface textures, manufacturability of the process, plasticity, durability and safety of the finished coating are the distinctive qualities of San Marco finishing materials.
To apply the color composition immediately, at the stage of preparing the mixture, it is tinted. Some types of mixtures do not require dyeing in the mass. In such cases, they are painted after applying a variety of interior or facade paints to the surface. In addition to painting the white surface, some areas are tinted to create certain design effects.
How to paint decorative plaster with your own hands
Based on the texture of the decorative coating, as well as the desired result of the painting work, you can use one of several methods:
- painting the wall one color,
- two-color painting,
- using a dry brush,
- highlighting by removing paint,
- creating a Venetian effect.
All these methods are quite easy to learn. Using them you can paint the walls with your own hands. Read more about each method below.
One color
The simplest and most famous method is one-pass dyeing. The wall is covered with an even layer with a brush, roller or spray gun. At the same time, they try to shade the excess paint applied.
When applied with a roller, the coloring composition is transferred by vertical rolling, overlapping adjacent tapes by approximately 3-6 cm. After which the excess is shaded by horizontal rolling of the roller. With a brush, the paint layer is also applied with vertical strokes, and the excess and smudges are shaded with horizontal movements. This way the entire wall is painted evenly (section by section).
Painting decorative plaster in two colors
This technique is most often used when the recesses of the relief need to be given one color, and the protruding parts of the pattern another. This technique is used in painting decorative plaster resembling a world map.
There are several ways to get a “two-color” wall.
- First way. A paint composition of a different color is applied to the colored decorative plaster using figured rollers or using a stencil. Typically this method is used for smooth plaster coatings.
- The second method is also used for painted plaster coatings that have texture. Using a foam roller, only the protruding areas of the relief are painted with a composition that differs in tone or color. As a result, the relief is emphasized by tone. The same operation can be done using a sponge, which is used to tint the protruding parts of the relief.
- In the third painting method, the depressions of the textured plaster layer are first painted with the first color. If they are deep, then a roller with long-haired sandpaper is used for the first pass. They treat the entire surface, leaving no unpainted areas. After two hours, apply the second color with a foam roller (or sponge) in the same way as in the previous method. As a result, the wall surface turns out to be two-color.
- <By tamping with a sponge, using silver paint of the same tone or lighter, you can apply a speckled pattern to the smooth surface of colored plaster or plaster painted in one pass.
Dry brush technique
To enhance the “depth” of the surface of textured plaster, a special “dry brush” painting technique is used. The output is recesses and projections painted in darker tones, distinguished by lighter tones. This method differs only slightly from the third method described above.
The white paint composition is tinted in the desired color. Since it is necessary to indicate the hollows of the relief with a darker color, the tone of the tinted composition should be dark. Using a roller with a long-haired coat, paint the entire surface in the chosen color. After applying the paint, the surface is dried.
Prepare the composition of the second color. To do this, less dye is added to it than to the first. The color should be one or two shades lighter than the previous one. The second layer of paint is applied with a short-haired roller or brush to the raised parts of the pattern. To prevent the coloring liquid from flowing into the recesses when applied, a minimum amount of it must be applied to the tool. Pre-dry the tool by passing it over any surface, removing excess paint.
You can add metallic or pearlescent powder to the second coloring composition. This creates an excellent effect of a slightly aged, noble surface.
Removing paint for highlighting
First, the entire surface of the wall is painted with light paint in one pass. This is done with a long-haired roller or brush. After this layer has dried, a new layer is applied in the same way, painting everything without gaps with a darker composition. Having applied it, begin to remove the undried mass from the protruding areas of the coating using a rag or sponge. It is not completely removed; partly the light color remains on the convexities of the plaster and the dark color remains completely in the depressions. At the same time, convex places are lightened.
A variation of this method is its second option. It is used on tinted plaster. The dried surface, painted in one pass, is sanded using sandpaper. As a result, the coloring matter remains only in the recesses, and between them appear cleaned plaster protrusions that have their own color.
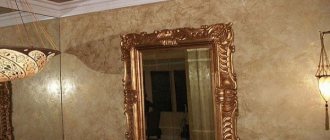
Venetian plaster effect
Imitating a Venetian with the help of coloring compounds requires preparing a flat wall. The wall must not only be leveled, but also properly primed in order to secure the top layer of plaster with the primer and increase the adhesion of the paint film to the plaster.
The “for a penny” method. We create marble for pennies using water-based paint for interior work. You will need two colorful compositions: white and brownish color. Small and Japanese spatulas, stainless steel trowel with rounded corners.
Do not forget to regularly clean the spatulas and trowel from working material.
- Apply a base coat (first coat). To do this, apply two paints simultaneously (little by little with a small spatula) to the trowel. The first, white, is applied along the entire edge of the trowel, the second (brownish) is applied on top of it, but the amount taken is less. Transfer the paint mass to the wall using multidirectional (cross-to-cross) movements, just as a plaster composition is applied to the wall. The mass falling on the wall is blurred when the tool passes again at the borders of the colors.
- Apply the second layer with a Japanese spatula, onto which you pick up a very small amount of just one brownish paint. In small separate strokes, it is first transferred from the spatula to the wall. When the spatula is empty, use it to blend the short strokes applied earlier. After finishing applying this layer, you need to wait a little.
- Apply the third layer in the same way. This is done with white paint. A very small amount is applied to a Japanese spatula. Since the brown has not yet dried, a small amount of mixed color mass forms on the spatula after a few movements. It needs to be removed and thrown into the third container.
- Already at the end of applying the third layer, the layer becomes glossy in places. The final gloss is applied to the wet coating. This is done with a trowel. The coating is iron-clad. There is no need to press very hard so that there are no dark spots left. The pressure should be light. Gradually, during ironing, the color of the coating becomes darker. At the end of the work the surface has a mirror gloss. Places you don't like can be corrected by applying another layer of paint locally and glossing it over.
Method “2 colors on a spatula”
- The first layer is applied in the same way as in the previous method with shading.
- Having reduced the amount of color in the paint composition, apply a second layer. This achieves lightening or darkening of the previously laid layer.
- Using a thin brush, paint veins or cracks.
- After drying, wax or varnish.
A method for creating an imitation using fabric and a brush
- The water-based emulsion is tinted to the desired tone. It is applied to the selected area of the wall with a brush or roller. (usually a wall section of up to 3m2 is treated).
- A rag soaked in water and well wrung out, which is kept crumpled, is passed over the fresh paint in a wave-like manner (in the direction in which you want to get marble stains).
- After applying the main stains, they are shaded with a soft brush to form a gradient transition of colors.
- Paint the next 2-3 m2 as in step 1 and continue as described.
- After the first layer has dried, you can apply the second in the same way, continuing to develop and deepen the pattern. For effect, you can add a different dye, a little metallic or mother-of-pearl to the coloring mixture.
- A glossy polishing effect will be given to the resulting “stone” by a coating of acrylic varnish.
Review of popular manufacturers
There are many manufacturers of paint and varnish products on the modern market. Typically, a company's product line includes several types of paints, including those for painting plaster. The most popular manufacturers today are:
Tikkurila . The products of this brand are distinguished by their performance characteristics. The paints have good vapor permeability, are not susceptible to ultraviolet radiation and dirt, and are absolutely safe.
The only drawback is the high cost of production.
Belinka .
The Slovenian brand has an impeccable reputation and constantly introduces new technologies. Automation of the production process makes it possible to produce products of identical color in each batch. A nuance of using manufacturer’s paints is considered to be strict requirements for the preparation of walls, since if they are violated, the compositions may peel off from the base.
Finncolor .
Has a long service life without changing external qualities. It resists adverse weather conditions and is not susceptible to the development of fungus and mold, therefore maintaining high technical and aesthetic performance.
Alpina .
It is often used when painting decorative plaster because it is very easy to use. It allows you to achieve the ideal surface color, repels moisture, does not prevent steam from escaping from the inside, and is not susceptible to the formation of pathogenic microorganisms.
Dulux .
The brand is known all over the world. Offers the richest palette of shades, among which it is easy to find the right option. It is distinguished by ideal quality of the European level, which is confirmed by relevant documentation and inspections.
There are many other domestic and foreign manufacturers offering their products. Before you decide, you should carefully study all the characteristics of the paints, as well as the reviews and reputation of the manufacturer.
How to repaint decorative plaster
If you decide to modify the interior and need to change the color of the decorative plaster, then this is not difficult to do if you do not need to remove the old coating. Then it is enough to paint the walls with a white acrylic-based primer. The texture of the decorative plaster will be preserved, and it can be painted using one of the above methods.
Don't forget to do a test dye to choose the right new color.
If you need to make a lighter one from a dark Venetian, then it is covered with white pearlescent glaze, which has an acrylic base. After drying, the glaze becomes half transparent. The old Venetian can be seen through it.
If the old coating is no longer suitable, it is removed by first wetting it and keeping it wet for some time. If you can use a steam generator, the task will be much easier. After removing the old coating and priming, the wall surface is dried before painting again.
In cases where none of the methods described above is suitable, you will have to resort to mechanical removal of the coating using abrasive materials (sandpaper, brushes, special tools). In this case, there is a high probability of damage to the main layer of plaster.
Structural plaster: features
This type has a heterogeneous granular composition, which includes additives in the form of granules or fine-grained pebbles, as well as pieces of quartz. This finish is made on a cement-lime base using a special synthetic latex. It is also diluted with water or organic solvents.
For plastering inside a building, the most suitable option is water-based mixtures. They do not contain foreign impurities with a smell, which means that when finishing the apartment there is no need to remove all residents from it.
The main advantage of structural plaster is its plasticity, which makes it very easy to work with. The work is simplified due to the fact that the solutions are already sold ready-made and no special preparation is required before use. It goes on sale in iron containers or buckets weighing 15-25 kg.
Return to contents
Wax
One of the final coatings for painting decorative plaster is wax. It protects the plaster finish from moisture and increases its decorative effect, adding shine and enhancing the brightness of tones. Tinted waxes can change the color scheme of a Venetian or Moroccan, or tint the indentations of a relief surface. Wax compositions can be made with natural wax or synthetic. There are different ways of waxing. Depending on the consistency and texture of the coating, the wax is applied with a rubber spatula, sponge or soft cloth. The wax film can be adjusted within four hours after application.
Advantages and disadvantages of various staining methods
Each painting method is a way to implement a specific design idea. If we take the “dry brush” and “blur” techniques for comparison, then the second method is more complex in execution and is more time-consuming and physical.
To implement it, a layer of paint with a darker shade is applied to the main background of the surface, which dries for a certain time, after which the top layer is wiped off the convexities of the plaster with a damp cloth. As a result, dark paint remains only in the depressions and a three-dimensional pattern is created.
Complex effects are obtained by using several different paints.
Varnish
Another final coating that strengthens the plaster surface and protects it from moisture and mechanical damage is varnish. It makes the appearance of the decorated walls more advantageous, giving it a semi-matte or mirror-like shine. Acrylic water-soluble varnishes are used for finishing rooms. Varnish compositions based on organic solvents are used for facades. The main types of varnishes used (according to decorative qualities): giving a durable mirror gloss, forming a soft matte surface, craquelure varnish (for artificially creating cracks).
Before use, glitter or desired pigments can be added to varnish compositions. Be sure to mix. The varnish coating is applied with a brush, sponge or foam roller in one layer.
The above methods of painting plaster can be varied and combined. This way you will get new effects. You can strictly adhere to these technologies. In any case, a fantasy place can always be found. A home painted with your own hands is always sweeter and dearer to the heart.
Additional compositions for plaster
The processing method forces you to choose a suitable auxiliary composition. Methods of applying paint and varnish material play a role. Most often used:
- Wax. It can be liquid, natural, or in gel form. The material will help create an additional effect and will protect well from water. It is suitable for any technology and allows you to obtain the perfect Venetian masterpiece.
- Varnish. This is the final layer that will strengthen the paint and save the plaster from damage and moisture. Acrylic varnishes are used for rooms. Varnishes based on organic solvents are suitable for the façade.
- Glaze. This is a glazing composition, a translucent finishing material for painting. The substance is suitable for any walls. It is applied with a sponge or mitten. You can achieve the perfect color transition and precise paint selection.
Preparing the walls
Is it possible to paint decorative plaster with paint? The answer to this question is obvious. Of course yes. However, before using such a product, the surfaces themselves must, of course, be prepared in the most thorough manner.
Whatever paint and varnish material is chosen for the decoration of premises or facades, the plastered surface must be primed before using it. Otherwise, the paint will subsequently begin to peel and peel off quickly.
You should start painting decorative plaster only after the primer has completely dried. A product that increases wall adhesion is applied to the surface, usually in two layers.