Textured plaster is widely used as a finishing coating for house facades and indoor walls. It provides surfaces not only with high aesthetic qualities, but also protects them from external influences. The level of this protection directly depends on the technical characteristics of each specific composition.
From this article you will learn how to make and apply different mixtures yourself. You can also get acquainted with mixtures of different types and watch a video about textured plaster.
Invalid Displayed Gallery
Composition of decorative plaster
Manufacturers add putty, clay, and acrylic to ready-made mixtures as the main binding material. In order for the plaster to leave peculiar grooves on the surface during application, tiny fragments of stone chips, mica, and silicate glass are added to the mixture.
The following types of decorative material are popular:
- Mineral;
- Limestone;
- Polymer;
- Silicate;
- Silicone mixture.
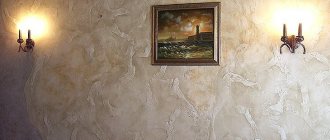
Using different techniques for applying textured plaster, you can achieve an elegant coating with the effect of silk, velvet, or velor.
Rules and stages of application
At the very beginning, you need to look at the options for ready-made coverage and make a choice. Then comes the purchase of the plaster itself and all the necessary tools.
The next stage is preparing the working surface . It is necessary to remove all fasteners (if any) and additional elements from it. Surface unevenness, cracks and potholes are carefully sealed using putty. Then you should remove dust from the prepared surface and apply 2 layers of primer. When choosing a composition, it is better to give preference to a deeply penetrating one, which will ensure stronger contact between the plaster and the surface. Do not forget that the floor covering, decorative items and furniture should be covered with a special protective film.
Applying textured plaster with your own hands is a simple process, the main thing is to approach the matter carefully. Basic work begins with preparing the solution, if the choice fell on a dry mixture. To begin with, it is best to carefully read the manufacturer's instructions, which are printed on the packaging itself. Following it will help you get a high-quality coating with good characteristics.
Next, using a wide spatula, the composition is transferred to the prepared surface. Maintaining uniform application is not so important; the main thing is to apply the mixture over the entire wall area.
Then you need to smooth the plaster using a special smoother. To create a high-quality and beautiful texture, the layer of material on the wall should be approximately 1.5 millimeters. You need to work especially carefully with the corners of the surface so as not to miss anything and preserve the structure. Apply and spread the plaster over the wall using narrow spatulas.
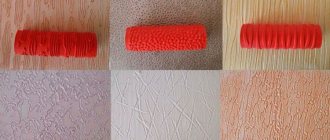
At the next stage, the texture is created. There are many tools and different techniques for this, but the simplest and most popular are special rollers, stencil stamps and trowels.
Creating texture using a roller is the easiest option . You can use a tool with long or short bristles, or you can take a closer look at curly rollers. They allow you to create a pattern on the surface in one go. In this case, the entire surface is completely in the hands of the master.
A trowel and a notched spatula allow you to create a texture that will imitate a stone surface. It also allows you to create plaster that will copy fabric or leather materials. For such effects, you need to go through the instruments in a certain or chaotic order. They can also be used to create complex designs and patterns, but this will take more time.
Stencil stamps look like rubber or polymer fabric with a clear relief pattern. They are applied to the surface, after which an imprint of the pattern remains on it. The complexity of the process lies in the fact that they constantly need to be washed, and during application it is necessary to correctly distribute the pressing force. If you press unevenly, the pattern will be deeper in one part and unclear in another.
After the texture has been created, the surface must be given time to dry. This stage depends on the type of plaster, because some dry faster, some take longer. When the surface has dried, it is covered with a layer of primer and painted. The most common way is to apply two coats of paint, with the second coat being slightly lighter than the first. If you use plaster to which dye has already been added, the painting process can be skipped. At the last stage, the finished surface is treated with varnish or wax.
Making your own plaster
Textured plaster made from ordinary putty with additional components will be an excellent alternative to a store-bought mixture. Depending on the type of components, the composition of the finishing material changes. In any case, it should have a thick consistency to avoid sagging when applied to the walls.
From putty and PVA glue
Water is poured into the container in an amount reduced by 10 percent than indicated on the pack of dry fine-grained putty.
- Then bring it to 100% volume by adding PVA glue.
- The dry mixture is poured into the resulting water-adhesive solution, stirring it with a construction mixer.
- You can add decorative elements to the resulting composition of decorative plaster: small shells and pebbles.
Cement-lime
When diluting such plaster, it is necessary to use gloves and a respirator, since lime is a caustic substance.
The composition includes the following components:
- Lime - 1 part;
- Sand - 5 parts;
- Water - 3:1 in relation to lime;
- Cement - 1 part.
If necessary, the proportions are changed. For a stickier consistency, increase the amount of lime, and for a harder consistency, increase the amount of sand.
Limestone
You can independently prepare textured plaster using only sand and lime mortar in a 3:1 ratio. It is first necessary to prime the surfaces to be coated, especially where there are metal parts. Priming will help prevent rust from appearing on them.
Cement-sand
The composition of decorative plaster made of cement and sand is resistant to high humidity and temperature changes. Therefore, it is often used for exterior decoration.
- To dilute the solution according to the standard proportion, you will need 1 bucket of dry cement and 4 buckets of sand.
- Pour water and mix the solution thoroughly to the desired thickness.
- The listed methods for making textured plaster are the most common.
- By changing the ratios, you can weaken or strengthen the strength.
To produce optimal density, marble or quartz chips of different fractions are added to the plaster mixture.
Kinds.
Applying textured plaster with your own hands, a master class is simply necessary, but you need to start it not with practical tasks, but with theoretical familiarization. Before applying textured plaster, you need to select it. More often, quality depends not on price and manufacturer, but on content and type. FS can be:
- Acrylic;
- Silicate;
- Silicone;
- Mineral;
The type is determined by its components. They make it possible for the plaster to stick to the wall correctly and efficiently. Also, the components form a mixture of different types, it can be a wet mass, loose, or solid.
- Acrylic plaster will have different prices per square meter, since this type is most often produced by manufacturers of finishing materials, so the cost is always based on the brand. The main components of plaster are acrylic resins. This type of resin is used to form polymer compositions, which are the contents of the bags. The material is sold ready-to-use. It does not need to be diluted with water or combined with other solutions, so immediately after opening the package, you must use all its components. You need to store the acrylic mixture in a closed package, but it is better not to leave the plaster, but to use it all at once.
- The silicate type has liquid glass as its main component. This type of textured concrete-like plaster is used because it has high vapor permeability and adheres well to any walls, therefore it is considered the most popular. The most important property of the material is wear resistance and resistance to damage of any kind.
- Do-it-yourself plasters made from silicone filler can be applied both indoors and outdoors. Stable components of the composition and synthetic resins can be used for facades and are excellent for cladding a house. This type of material tolerates all atmospheric influences, withstands rain, wind, and drought. The shelf life of plaster for the external walls of a house is long, so it can replace any other common material for finishing the facade of a private house. Application of silicone texture will have a different price per sq.m., depending on the manufacturer.
- Another type of decorative plaster is mineral. It is made on the basis of mineral concrete. The package contains a dry mixture, which must be diluted with warm water and brought to a homogeneous mass before use.
Technology of applying textured plaster
Decorative mixtures for finishing with textured plaster are distinguished by a variety of compositions.
- Using them, you can achieve an imitation of velor, silk, and relief structure.
- Each option will require a special composition and tool.
- The application technology is basically the same and includes several stages.
Base layer
Prepare the solution following the manufacturer's instructions on the packaging. It is important to choose the right portion - it must be selected in one application, because even despite special additives that slow down drying, the solution can begin to set (harden) directly in the container.
The creation of textured plaster begins with applying the solution over the entire wall to be plastered (or part of it, in order to have time to create the texture before the solution hardens) in the required layer using a trowel.
No special precision is required here; the main thing is to achieve uniform thickness with small errors. The thickness of the applied layer is selected based on the instructions for the solution and the desired result. It should be taken into account that the height of the pattern (texture) can add another 1-1.5 mm to the total thickness of the layer.
Applying the base layer
Test application will allow you to avoid many mistakes and better “feel” the applied plaster
Before applying the entire base layer, you should try on a small area to evaluate the characteristics of the mortar and the wall, select the required thickness of the base layer, and also test the method in which the pattern will be created.
Preparing the walls
Any plastering work is carried out on a prepared surface.
- Remove peeling paint and clean surfaces from dust.
- Large cracks are covered with putty or filled with foam using a construction gun.
- The base is washed and left to dry.
How to prepare a wall for applying texture plaster.
Textured plaster requires a dense base. New walls are prepared with conventional (coating) compounds - cement-sand, lime or gypsum plasters.
Previously plastered ones are cleaned, dusted (washed with water), and coated with primers.
The importance of acrylic primers should not be ignored - their purpose is to increase adhesion. An unprimed wall “bonds” worse with the decorative, textured layer.
Applying plaster mixture
The mass can be applied in one layer or two, depending on the chosen technique.
- For example, decorative plaster with a velor effect is a multi-layer coating, but “furrows” can be made from a single layer.
- Each layer requires complete drying before applying the next.
- The last stage is painting the surface with a transparent varnish, as a result of which the coating becomes more attractive.
In the photo of textured plaster applied to the surface of the wall, you can see how the varnish coating shimmers.
Do-it-yourself decorative plaster of walls: main stages
For work you will need: a set of different spatulas, a grater, a plaster trowel, an angle spatula, a trowel, a level, a plumb line, a rule.
Basic tools for working with decorative plaster
Preparing the wall
The area to which the plaster will be applied is carefully protected from the remnants of the previous coating - wallpaper, paint, remnants of plaster. Exfoliated areas are removed, cracks and cracks are sealed.
Different plaster requires different degrees of surface leveling; for example, Venetian plaster will require an almost perfect surface. This is due to the fact that leveling will require a large amount of very expensive plaster. Then the surface is primed and allowed to dry.
Plaster should be applied to clean walls
Spatula and trowel
These tools can be used to imitate stones of different types, lay Venetian stones, and highlight the texture.
- Use a spatula to take a portion of plaster, apply it to a trowel and distribute it over the wall in circular and multidirectional movements.
- The trimming technique is worthy of attention, when a trowel or spatula is pressed tightly onto the applied mortar and quickly removed, forming a kind of fur coat.
This effect can be used in individual areas as small fragments.
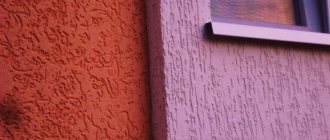
Types of plaster for facade work
Today there are several types of plaster on the market, which differ in composition and connecting link.
| Kinds | Description |
Mineral | The composition includes a mixture of quartz chips, marble, lime hydrant, light mineral aggregates, plasticizers and Portland cement. The advantage of this material is high strength, moisture resistance, long service life and low price. To decorate the material, pigments or marble chips are often added to the mixture, which allows you to play with the design of the walls. |
Acrylic | In addition to sand and coarse cement, acrylic resin is added to the composition, which gives elasticity and high strength. This plaster is quite easy to work with, it can be leveled, and has good water-repellent properties. But there is also a serious drawback. Plaster is highly flammable, so it is not recommended to use it near mineral wool insulation. |
Silicone | The main connecting link here is natural silicone, which gives extraordinary plasticity to the material. Despite the fairly high price, silicone plaster has a number of unique qualities (insensitive to UV rays, plasticity, strength, high adhesion, resistance to mechanical damage and a wide variety of colors). Another advantage is the speed of operation. The composition contains antiseptic substances, so preliminary priming of the walls before application is not required. The only drawback of this mixture, perhaps, is the complexity of finishing. That is, the walls should already be fairly well prepared before application, since silicone plaster is applied in one layer. |
Silicate | The main connecting link here is liquid glass, which imparts excellent astringent properties. Silicate plaster has a high rate of fire resistance, so it can be used on almost any surface. This is one of the most durable finishing materials, with a service life of more than 50 years. |
Cement-sand | One of the most common types, which differs from plaster only in grain size. |
Oily | It can be classified as a very exotic option for a building material that is not often found on sale. The manufacturer here uses drying oil as the basis for the thickener. It is highly resistant to moisture and is excellent for treating walls before painting. |
Epoxy | The base here is epoxy resin, which makes this building material very versatile in use. It can be applied to concrete, metal, plastic, drywall, wood. It has a very high degree of strength and resistance to external factors. |
Latex | Latex is excellent for both external wall treatment and interior use. The base is regular latex, which gives the material high elasticity. With this composition it is easy to seal all cracks and potholes on the surface. The plaster sets quickly, dries and does not form cracks. |
Prices for popular types of plaster
Plaster
Roller
Beginners are recommended to use a roller for textured plaster. You can buy a tool with ready-made ornaments or make them yourself.
To do this, a rope or coarse cloth is wrapped around the roller.
- The plaster mixture is applied to the surface with a layer of 4 mm.
- A velor roller is rolled from one edge of the ornament to the other, achieving a distinct impression.
- It is necessary to apply equal pressure so that the depth of the relief remains the same.
- Use a wet trowel to rub the hardened decorative plaster.
Final stage
After allowing the plaster to dry completely and harden (this will take at least 24 hours), it is recommended to treat the plaster with fine sandpaper - this will remove excess mortar.
Sanding a hardened textured coating
To highlight the relief of the plaster, to give it depth and clarity, coloring is used. Initially, the entire surface is painted with a long-haired roller (brush) in a darker tone. When the first layer of paint has dried, use a short-nap roller (a simple rubber roller) to apply paint of a lighter tone to the tops and protruding parts of the texture.
Painting with a lighter tone significantly enhances the “volume” effect of decorative plaster
The textured plaster in the corridor is subject to significant mechanical stress, so in order to preserve the original texture, it is protected by applying colorless varnish.
Varnishing textured plaster will greatly extend its service life.
Brushes
A simple and economical way to decorate wall surfaces.
- The mixture is applied in a thin layer, creating texture during application.
- For work, compositions with marble chips, sand, etc. are used.
- When applying the mixture with a brush, mineral fillers perfectly complement the texture and give the applied coating additional roughness.
Features of using textured finishes
In addition to decorative plaster, you can also use a variety of modern fillers that allow you to make the design more vibrant and original:
- To make the “bark beetle” option, granite chips or polymer granules are added to the plaster. The composition is applied to the wall with a trowel; as soon as the plaster has set, the wall is treated with a trowel. Due to the scratching of granules on the plaster layer, original stripes (grooves) appear on the wall;
- Granules with paint are added to the plaster mixture. When brushed over them, the paint is squeezed out and the wall is painted in the desired color;
- You can get the effect of additional smudges by using a liquid composition.
Advice! When choosing an ornament option, remember that dust will accumulate on the relief surface, so it is advisable to cover the wall with a protective varnish in order to admire the fresh look of the coating for a long time.
Sponge, cloth
To obtain an unusual visual effect on plaster, you can use a natural sponge. The texture of images when applied is arbitrary. To create an original design, the sponge can be cut and applied with the inside of the product.
Tamponation is done with light movements. The veins from the sponge come out to have unpredictable shapes and random sizes. To achieve a polychromatic effect, it is recommended to apply several multi-colored layers. When using a natural sponge, a light, spotted pattern is obtained on the surface.
You can also use a synthetic sponge, but the pattern will be smaller. The reason is that the artificial sponge has fine porosity and a round shape.
Applying decorative plaster to surfaces is a fascinating and creative process. The most important thing is to adhere to the technological description of all stages of plastering work.
Types of binders for textured putties
Conventional putty is not always used to make a decorative textured layer. Its thickness, as we have already said, plays an important role. And if a rather impressive layer is needed to mask wall defects, then cement is used as a binding material. Such plasters can be used for facades, and not just for interior work, since they have good adhesion to the mineral base. Cement plasters are also resistant to moisture, but have a rough texture.
Epoxy and polyurethane textured putties are highly resistant to chemicals and fire. Therefore, they can also be used for external facade work. They have some limitations in use, dictated by their origin - they can be harmful and have a specific odor. In addition, polyurethane and epoxy resins can release toxins when exposed to minimal heat.
The best option is plasters based on acrylic, styrene-acrylic and polyvinyl acetate. They are diluted with water, do not threaten health and, like cement plasters, are not afraid of moisture. For the price, this is the most worthy option.
Photo of textured plaster
Sequence of work when decorating with plasters.
Solutions with large fillers.
Textured flat plaster is a mixture with coarse filler. The nature of the future surface depends on its structure, diameter, material and shape.
The most common plaster is commonly known as “Bark Beetle”. Externally, it is a surface covered with grooves, reminiscent of the passages of the larvae of a grinder beetle in wood.
To create a coating, a mass containing large (3-4 mm in diameter) marble particles - marble chips - is applied to the prepared base. Leveling.
Without allowing the layer to dry, the textured pattern is engraved: using a polyurethane smoothing iron or a trowel, the solution is smoothed out with light pressure. As the stones roll behind the tool, they leave deep grooves.
Textured imitation bark beetle plaster can be made in several variations:
- A vertical pattern is formed when the grater moves from bottom to top;
- Horizontal drawing;
- Combined texture : horizontal and vertical movements of the tool alternate.
- Chaotic lines . The grater is used in different directions, in circular and elliptical movements. The furrows form a complex, unusual topography.
It is important to avoid excessive pressure on the ironing iron so that the design turns out “clean” and neat. There should not be too many lines, otherwise the stones will begin to fall out of the mortar, and the unusual textured plaster will turn into a dirty amateur job.
After complete drying, the wall can be painted and coated with a protective compound.
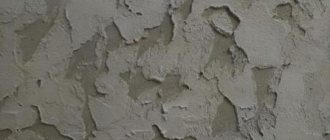
Texturing textured coatings without large fillers.
To create a micro-relief coating, you can use mixtures without coarse fillers. Apply in one or two layers.
Single layer finish.
The solution is applied to the wall and smoothed with a trowel.
The layer should not be thick. Without allowing the finish to dry, they apply the texture: using the poking movements of a decorating tool, the pattern is knocked out (the effect of “fur coat” plaster). Different textures can be obtained by using terry rollers, short bristle brushes, hard and soft brushes, crumpled rags, and plastic bags. This textured plaster can be done by any level of plasterer.
The texture of the plaster is seamless; the formation of obvious joints and fragment boundaries should not be allowed. To do this, when applying the solution, its edge is left uneven and shapeless.
So the texture of the plaster, applied at different times, is seamless and uniform, looking like a solid monolith.
The texture of decorative plaster especially should be smooth and seamless. To avoid the formation of boundaries, it is prohibited to apply the solution in even spans.
Double layer finish.
To obtain a more voluminous relief, it is necessary to apply a second layer (the previous one can be smooth or finely textured). Work is carried out only when the preparation is well set.
Apply a solution no more than 4-5mm thick. Spatulas or trowels are used. The second layer is necessary to create a relief, achieved through its thinning or complete absence in some places.
This is achieved in two ways:
- Full application. The decorating solution is applied completely, without any special leveling. Then wide “holes” are made in it, reaching the depth of the substrate layer.
This is not an economical or convenient way. However, this textured plaster is relatively popular.
- Partial application. The second layer is not applied with a spatula over the entire surface, but in shapeless spots, the area of which occupies approximately half the space.
This decorative plaster has a heterogeneous, uneven and seamless texture.
The decorative effect in both cases is achieved by leveling the inserts: after waiting for the layer to partially dry (when the solution at the base becomes strong and the tops of the relief are still plastic), the layer is leveled. The result is a flat-relief texture.
Only experienced specialists are able to achieve a high-quality decorating effect immediately, without waiting for the right moment. For a beginner, it is better to level it after a while, when the lower layers have set. This allows the job to be completed cleanly.