27377 0 2
Andrey October 27, 2016Specialization: facade finishing, interior finishing, construction of dachas, garages. Experience of an amateur gardener and gardener. We also have experience in repairing cars and motorcycles. Hobbies: playing the guitar and many other things that I don’t have time for :)
Currently, there is a new wave of popularity for such a piece of furniture as a fireplace, which has always been considered a symbol of family hearth and comfort. Of course, apartment residents do not have access to a functioning fireplace for a number of reasons, however, this does not mean that the idea of decorating their home with a portal will have to be abandoned. In this article I will tell you how to make a fireplace from plasterboard with your own hands - step-by-step instructions are presented below.
Decorative fireplace made of plasterboard
Various shapes and designs
False fireplaces can be of different geometries and different designs, from simple (made of plasterboard) to individual (made of brickwork).
Today, you can easily purchase ready-made fireplace portals, since their production has long been mass-produced, but you can easily make a false fireplace yourself. In addition, the manufacturing and installation features of such “apartment” fireplaces allow them to be installed in an already built and/or renovated room, and the structure itself is very mobile; if necessary, you can change its location. In this case, no special repair team will be required, and the financial costs will not hit the family budget too much.
Options for placing a homemade fireplace decoration
Decorating a room with a fireplace can be done in very different ways. The pseudo-fireplace is not “tied” to the chimney or hood, so its installation is permissible anywhere - near the wall, in a corner, in the middle of the room, as well as in any niche.
Near the wall
A structure placed near a wall usually becomes a zoning element or a “starting point” from which the rest of the interior is built. It is advisable to install the object near a completely empty wall, in its center.
Before installing a wall decorative sample, you must make sure that the wall is level.
In the corner
The corner product has a triangular, pentagonal shape. It does not interfere with movement around the room and allows you to use space that is usually left unattended for storing things, books, and souvenirs.
A corner decorative hearth is ideal for rooms with a small area, as it takes up little space.
Ostrovny
This option is performed extremely rarely - its installation will require a lot of space, approximately in the middle of the room. This is a suitable idea for spacious studio apartments and combined spaces. The false fireplace serves here to zone the area.
Its peculiarity is that you can approach the heat source from any direction, but you will not notice any discomfort or tightness.
In a niche
Placing it in a niche allows you to decorate such an unfortunate architectural element. To “construct” such a hearth, a minimal amount of material will be required, since the borders are already there - all that remains is to glue on the decorative details.
In this case, the fireplace will highlight the harmonious design of the room.
Preparatory activities
Drywall is considered one of the most versatile building materials. It is unpretentious, easy to use and can take on almost any finishing touch. In addition, the cost of this finishing material is acceptable for many people. In most cases, it is used for finishing apartments.
Drywall is used to create the frame of a false fireplace; it is attached to a metal profile, and then the exterior finishing of the resulting structure is carried out. This type of construction is very convenient, because if you decide that an imitation fireplace made of plasterboard should look different, then there will be no particular difficulties in changing the finish, and you can easily change its appearance.
The main decorative element in the room
Step-by-step instructions for building a fireplace from plasterboard with your own hands are as follows:
- Preparatory work, purchase of tools and materials.
- Assembling a structure from a metal profile and plasterboard.
- Carrying out finishing work and creating a finished look.
It is worth noting that the preparatory work will be largely decisive and greatly influence the result. They should start by choosing the appropriate type of false fireplace and drawing up its sketch. You can always view drawings of fireplaces made of plasterboard or other materials on the Internet; simple designs and more complex systems are posted on various portals.
Having decided on the appearance of the false fireplace, making sure that it will look harmonious in the interior, it is necessary to carry out measuring work on the ground and adjust the drawing of the false fireplace in size
This is done not only in order to build the structure correctly, it is important to know how much materials to purchase. Once you have a detailed drawing of a plasterboard fireplace with dimensions, you can easily calculate the budget for future construction
The simplest fireplace drawing
Now that you have the initial data, you can begin to select and purchase materials. First of all, you will need drywall, which comes in different types. The finishing will help you decide which type to choose; it determines which drywall to buy. For example, if the cladding will be made with ceramic tiles, then it is worth taking a moisture-resistant option (GKLV), but if painting will be done, ordinary hypocardboard (GKL) will do.
Classic types of drywall
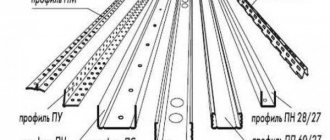
Another important material will be the metal profile. To assemble the frame we will need guides and racks. The frame elements are fastened with metal screws, often called “bugs”, and the drywall is sewn to the profile with wood screws. The metal profile is attached to the wall with dowel nails or the same wood screws.
Types of metal profiles
Depending on the chosen style of fireplace structure, finishing materials should be purchased. To bring the product to perfection, putty will be useful; with its help you can level the joints of sheets and cover up the recesses from self-tapping screws. The primer will help to more firmly fix the finishing material, which can be wallpaper, paint, tiles, plastic panels, and other options. Each finishing material will need its own glue:
- for plastic panels - mounting;
- for wallpaper - wallpaper;
- for ceramic tiles - dry mixture, as well as grout for joints.
The amount of materials is calculated based on the dimensions and design of the plasterboard fireplace. A correctly drawn up drawing will help you calculate how much it will take to build a fireplace with your own hands from plasterboard.
In addition, you should make sure that you have the right tool for the job. What you will need:
- To draw up a drawing and apply markings - a pencil, a marker, a tape measure, a corner, a level, a plumb line.
- To work with drywall and profiles - metal scissors, construction knife, jigsaw, screwdriver, hammer drill, screwdriver.
- For finishing work - spatulas, brushes, sealant gun, containers, glue.
Think about what work you have to do to make a homemade fireplace, and in accordance with this plan, select the right tool.
Finish options
It is advisable to know exactly what kind of finish the false fireplace will have before its construction, since this approach will help you choose the right building materials. For example, if you want to cover the surface of the fireplace with ceramic tiles, then it is better to use moisture-resistant drywall marked gypsum board, but if painting or finishing with plastic panels is planned, then it is quite acceptable to use the most common gypsum board, gypsum board.
What finishing options are most popular today:
- Painting with water-based or acrylic paint, usually white.
- Pasting the building with wallpaper that matches the canvases used on the walls or contrasts with them. Using wallpaper with imitation brick and stone.
- Decorating a plasterboard fireplace with gypsum stucco, similar to decorating plaster fireplaces. An alternative option is polyurethane stucco.
- The use of plastic panels with imitation stone, brick, wood, leather, or whatever.
- Using decorative stone to create a classic look.
- Facing with porcelain stoneware or ceramic tiles in order to obtain a status structure.
The simplest finishing option is simple painting. Before painting, you should achieve even shapes and prime the drywall. The color can be made white, or you can use color and give the tone some shade. It should be painted in several layers so that the surface has a uniform tone.
An original solution can be considered wallpapering the fireplace. You can choose vinyl wallpaper with high-quality relief, on which imitation brick, stone, or arbitrary ornaments and patterns will be painted. Wallpaper looks impressive on a false fireplace and goes well with the paintings on the walls of the room.
Gypsum finishing of false fireplaces allows you to achieve a high level of aesthetic appeal for the structure. If you are still thinking about how to decorate a dull plasterboard fireplace box so that it looks elegant and luxurious, then feel free to take stucco molding and glue it to it. It’s gratifying that if you don’t find a suitable stucco molding in stores, you can always make it yourself from plaster. This process is not only simple, but also exciting.
Note that in stores you can find stucco molding made of polyurethane, a modern analogue of gypsum. This option for finishing material would be quite appropriate because, unlike gypsum, it is lighter in weight, more durable and does not turn yellow over time.
However, if you want to glue stucco molding to the fireplace, you need to prepare the surface by carefully plastering it. In the future, after installing the stucco molding, the entire structure should be painted to give it a finished look. When painting, it is better to use acrylic paints, since water-based compositions with a high water content can soak the gypsum elements and slightly deform them.
One of the most attractive and beautiful ways to decorate imitation fireplaces is decorative stone. In appearance, the artificial analogue of real stone is no different, so when decorating surfaces, an excellent result is obtained. At the same time, the installation of this finishing material is carried out according to a simple scheme and without unnecessary difficulties. Decorative stone adheres well to drywall using liquid nails or special glue.
Porcelain tiles are not the cheapest finishing material, but their most important advantage is their stunning appearance. In fact, such tiles are very similar to various finishing materials. You can make a finish similar to:
- brickwork with various bricks;
- stone with an interesting texture;
- regular paint;
- mosaic
The material has high strength and, as a result, durability. Porcelain tiles are glued to a plasterboard surface in the same way as regular ceramic tiles.
When the finishing of the external part of the artificial fireplace is completed, you should move on to the internal one. Here you can go two ways: either make an imitation of fire in the fireplace, or put decorative elements in the firebox. Each person chooses what is closer to him, but the easiest way is to put firewood, natural or artificial, inside the fireplace.
DIY plasterboard fireplace: choosing a design
Installing a full-fledged fireplace in an apartment not only requires large financial costs, but is also accompanied by other difficulties. But an indoor stove of this type creates a unique atmosphere in the house, so many owners decide to install a decorative plasterboard fireplace with their own hands. Photos of apartments with fireplaces indicate that this element often becomes part of the interior and makes it unique. The photographs will also help those wishing to acquire a false fireplace decide on the design and choose the most suitable option.
The dimensions and design of the imitation furnace are determined according to the following rules:
if you intend to install a fireplace that will have medium dimensions, you can place a small plasma TV inside it. This solution will allow you to simulate flames without installing gas burners and ventilation pipes;
A decorative fireplace in the living room and surrounding accessories attract attention and make this composition the highlight of the interior.
- To simulate flames in a small device, you can use a regular LED photo frame. It will perform the same function as a plasma TV (picture transmission);
- To get as close to a natural device as possible, it is recommended to install an electric heating system in the decorative stove. In this case, you can get not only a decorative interior element that imitates a flame, but also a full-fledged heater.
False fireplaces can also be used as a stand for a plasma TV. Using a structure in this way is a fairly common practice.
The shelf above the false fireplace can be used as a TV stand
How to decorate a plasterboard fireplace: materials and execution
02/20/2017 3722 Pechnik (Moscow)
Many people want to see one of such original elements as a fireplace in their house or apartment. In order for this unit not only to fully fulfill its heating function, but also to become a harmonious addition to the overall interior, it is necessary to choose the most suitable style and design. If you don’t know how to decorate a plasterboard fireplace, then in this article you can find useful tips and recommendations that will help you make the right choice.
Decorating the fireplace
External finishing of such structures is the final stage of construction. Today, several types of facing materials are increasingly used to carry out such processes:
- Moldings and decorative stucco molding made of polyurethane. These products can only be used for fireplaces that do not get very hot and are not directly affected by these factors. Perfect for creating columns, arches and other unique elements. To add originality, stucco molding can be painted to match the interior design.
- Decorative tiles. The segment of these materials is very huge and universal. There are products here that tolerate heat well, which allows them to be used both in imitation and standard fireplaces. The design of tiles is very diverse, but today elements that imitate natural stone, brick, marble and many others are very popular.
A corner fireplace is a unique design that brings warmth, comfort and original beauty to the house. When creating them, don't be afraid to experiment and use different materials, as this is a testament to individuality.
16photos
Choosing tools and materials
After all the calculations have been made, you can begin making the fireplace itself. To do this, we will need basic tools for working with drywall and a standard set of materials.
Tools and materials for creating a fireplace box from plasterboard:
- Screwdriver;
- Grinder or painting knife;
- Metal scissors;
- Hammer drill;
- Metal wall profiles and guides;
- Sheet plasterboard (gypsum plasterboard or, preferably, fireproof gypsum plasterboard);
- Screws 6 x 60 and dowel-nails.
If it is not possible to buy entire profile strips, you can use leftovers, or even assemble a frame from slats or wooden blocks. For finishing work, you will definitely need reinforcing sickle tape, painting mesh, putty and spatulas for working with it, a sandpaper grater, and reinforcing corners.
How to make a portal for a fireplace with your own hands from plasterboard (video)
Indeed, a beautiful fireplace is an important part of any apartment. It is not just a piece of decoration or a component of your wealth or greatness. A fireplace means home comfort, warmth and family evenings. And it’s important not just to put this fireplace in your home, it’s important to be able to make it together with your family, so that all members of your family can join in the making, installation of the fireplace, and choosing the best decoration and design options. Drywall is the easiest to work with, so you don’t need to turn to specialists, but you can do everything yourself and give your nearest and dearest the warmth that is so scarce in city apartments.
What can you make a fake fireplace from with your own hands?
It is possible to make a pseudo-fireplace from almost anything - the choice of material depends on the imagination of the master, the availability of space for placement, the possibility of subsequent dismantling, etc.
Drywall
A plasterboard object requires the preliminary creation of a metal or wooden frame, which must be sheathed with gypsum plasterboard sheets.
Drywall is the most popular material for creating a decorative fireplace.
Brick, stone
The construction of a fireplace made of stones and bricks requires an additional foundation (for the first floors) and strengthening of the floors (when placed on the second floor and above). The product is often lined with decorative brick.
To make a false fireplace from brick or stone, you need to ensure the high quality of the materials used.
Made from polyurethane
A polyurethane pseudo-fireplace usually consists of moldings used for ceiling decoration. Less commonly, ready-made three-dimensional portals are purchased, which are glued to the wall or decorate a niche.
Polyurethane allows you to make a very durable and fire-resistant decorative hearth.
From chipboard or fibreboard
It is also easy to imitate a fireplace using chipboard and fiberboard lumber. The material is cut using a hacksaw, jigsaw, and fastened with perforated corners and self-tapping screws.
The technology is very similar to making a decorative fireplace from plasterboard.
From cardboard boxes
From a box from a washing machine, computer, refrigerator, it is also easy to create some kind of fireplace. The required part is cut off from the box and a hole is cut. The portal is decorated with plastic stucco, photo wallpaper, colored paper, and self-adhesive films.
A decorative fireplace cut out of a cardboard box is so easy to make that even children can help you.
Made of wood or plywood
The wooden fireplace is decorated with voluminous carvings and overhead perforated elements. Additionally, iron grilles and textile curtains with tiebacks are installed inside the portal. The product is varnished or painted so that the carved parts appear even more voluminous. A false fireplace made of plywood is also covered with wooden parts; the upper shelf is decorated with a wooden plinth with a beautiful profile.
When creating a fake fireplace, plywood, chipboard, timber and other materials can be used as wood materials.
From old furniture
An old bedside table, the remnants of grandma's bookcase, will find new life, becoming a modern fireplace. Excess shelves are removed from the object, the top is decorated with a board, the walls inside and outside are sanded, puttied, painted or lined with stone or foam stucco.
Decoration methods vary depending on the type of fireplace, its size, purpose and style of the room.
Unusual hearth made from books
You can also make a dummy fireplace using books. Thick, hardcovers are usually used. Side racks are made from them - books are simply placed on top of each other, with a narrow board becoming the top shelf. The interior is decorated with a drawing of a fire and a large photograph of it. Printed publications are also stored in the portal itself.
You can use lit candles for decoration.
From stucco (gypsum)
For a stucco structure, a base made of plywood, chipboard, and plasterboard is pre-installed. It is covered with a layer of gypsum, after which elements pre-cast in molds are installed on the tile adhesive. The finished structure is painted manually - with a brush or using a spray gun.
An artificial fireplace, unlike a real one, can be installed not only in the living room, but also in any other room.
Styrofoam
It is permissible to sheathe a wooden or plasterboard frame with polystyrene foam. Less often, the item is made entirely from it. To do this, the material, which is sufficiently thick, is cut to the shape of the bricks from which the masonry is made. The parts are held together with glue and painted by hand with water-based paints.
Such an imitation of a hearth will delight not only the owners, but also the guests of the apartment.
Installing an electric fireplace, how different types of electric fireplaces are installed
Special plugs will hide the cut point, but if you want to move the fireplace to another room, the baseboards will need to be replaced. The wiring is the same for all cases, so we will not dwell on this manipulation each time, but simply remind you of its necessity. Using a hammer drill, make 3-4 holes. They should be enough, since the weight of hanging fireplaces ranges from 10 to 20 kg.
Using 6x60 mm dowels, secure the strip. When finishing the walls with plasterboard, you will have to worry about the future fireplace in advance, reinforcing the attachment point with a wooden beam. Otherwise, you will have to use bolts with large area washers and increase their number for one strip. Don't forget about connection.
It is best to run the wire under sheets of drywall. Let’s immediately look at the process of making the portal. It also involves assembling the body, covering with sheets and finishing.
Depending on the dimensions of your electric fireplace, the dimensions of the portal will be. Its depth should correspond to the hearth, which is a good 70 cm. The width is twice as large as the linear dimensions of a fireplace without a portal.
Holes are made in the area of the hearth for air circulation. Without them, the device will constantly overheat from the accumulation of warm air. Although it is believed that an electric fireplace can be installed in any part of the room, due attention should be given to this issue. When equipping a room, you try to ensure that every little thing has its place. An electric fireplace cannot be called a trifle, so even its decorative function requires thoughtfulness in the installation method, external decoration, and control capabilities.
It is necessary to take into account a number of nuances. One of the main advantages of electric fireplaces, which is ease of installation, does not mean that installation requires no effort at all. Proper installation of an electric fireplace is a difficult and very important stage. The master will have to solve a number of key organizational issues.
They can be divided into two groups: questions regarding the installation location and the choice of fireplace.
Making a wall-mounted false fireplace
As with any construction work, the first step is to select a location, take measurements and draw up a project. To make a false fireplace with your own hands from plasterboard, you can choose only 2 places. This is a corner in the room or one of the straight (front) walls.
After choosing a location, measurements are taken, which must be transferred to the drawing.
It is important to take into account the dimensions of the electric fireplace, of course if it is installed, the width, height and depth of the future structure. This knowledge will make it possible to correctly calculate the amount of material needed
Approximate drawing of a fireplace
It is important to consider that if your false fireplace will perform not only a decorative function, but also a heating function, then it is advisable to use fire-resistant material for its manufacture; if this is not provided, then any drywall will do. The project will also help you make an even, decorative-looking fireplace from plasterboard with your own hands.
So this stage should not be overlooked.
The project will also help you make an even, decorative-looking fireplace from plasterboard with your own hands. So this stage should not be overlooked.
Construction of a base from metal profiles
(Erection of frame)
The construction of the “skeleton” begins with marks that will show the location of the future structure. The frame can be assembled separately and then installed in the chosen location. Experts recommend carrying out assembly at the installation site.
DIY installation of a decorative-looking fireplace frame from plasterboard with a stand:
Fastening the guide profile
- Placement of guides on the working surface. We mark the mounting points, then drill holes in the wall for the dowels. We fix the guide profile. Now we use a plumb line to mark the level at which the lower guide profile will be located, we also drill holes in the wall and fix the profile.
- Attaching vertical guides. We attach the plumb line to the horizontal guide, and mark the location of the vertical guides on the floor. You can mark points more accurately using a laser level. Having noted the location of the vertical guides, we attach them to the lower and upper profile.
- So we got the frame, now we need to make a compartment in it for installing an electric fireplace, if it is, of course, included in the design.
This is how a frame for a fireplace is constructed, made with your own hands from plasterboard and attached to the floor. But the frame can be made without fastening to the floor.
The process of making a frame that is not attached to the floor:
- We fix the jumper at the level where you plan to place the heater. Next, we fix the guides on the plane. We get a rectangle, which is the bottom of the frame and has a niche for the heater.
- To make the structure more durable and reliable, use additional jumpers. We attach a few more guides to the wall.
Let's start cladding the structure.
Sheathing the frame
This work begins with cutting out the material. We cut the drywall according to the dimensions in the drawing. Frame covering:
- Covering a niche for a heater. The first step is to sheathe a niche on the manufactured frame. Using appropriately sized pieces of material, we line the niche and install a heater there. If mistakes are made when constructing the frame, the fireplace may not fall into place. In this case, you will have to go through the frame and re-attach everything.
- External cladding. Only after the inside of the fireplace has been sheathed and the heater has been installed, do we proceed to sheathing the base. Sheet material is fastened using special self-tapping screws. The distance between the fastening elements should be within 15-20 cm. In this case, it is worth recessing the screws a little into the drywall.
This is how you make a false fireplace frame from plasterboard with your own hands, for a structure that is installed on the wall. Now we’ll tell you how to make a corner fireplace with your own hands from plasterboard, and finally we’ll tell you about finishing the sheathed device.
Covering the frame of a false fireplace
To sew up the finished frame of a plasterboard dummy fireplace, it is necessary to cut the plasterboard slabs.
The material is cut in the following order:
- A long rule or ruler is applied along the cut line.
- Using a sharp knife, an incision is made to the required distance.
- The sheet is neatly broken and folded.
- To finally separate the cut part from the back side, you need to cut the cardboard with a knife.
Cutting complex shapes involves preliminary drawing of the outlines of the elements on a plasterboard sheet. The cutting itself is best done with a jigsaw. The finished cladding fragments are fixed to the frame using self-tapping screws (fixation step - 10-15 cm). If the portal is equipped with an electric fireplace, the device itself must be placed inside it to check the correct operation.
The subsequent progress of work looks like this:
- Drywall joints on the same plane are equipped with a 5 mm wide chamfer.
- All joint areas are covered with strips of sickle mesh for additional reinforcement.
- The product is impregnated with a primer in two layers. It can be applied with a paint brush or roller. The second layer may be applied only after the first has completely dried.
- When the primer has dried, all joints and places where screws are screwed in are sealed with a layer of starting putty.
- After allowing the mixture to set, the entire portal is puttyed with the finishing mixture. As a rule, a high-quality finish is achieved in two layers.
- Grinding of the dried putty is carried out with a grater and sandpaper No. 100-120, to eliminate all irregularities.
- At the end, the entire surface of the decorative fireplace is cleaned of dust and re-primed.
Decorative fireplace made of plywood: photo report
An electric fireplace with imitation flame was purchased. It was decided to make the frame for it from plywood. Furniture plywood 8 mm thick was used. The homemade portal was made in a few hours, its finishing took almost two days.
Electric fireplace
A frame was cut out of plywood to fit the dimensions of the fireplace front panel. The frame is 10 cm wider at the bottom and 7 cm wider on the other three sides.
Frame cut out
The side parts are cut according to the outer dimensions of the frame. The electric fireplace screen should be slightly “recessed” into the structure, and these parts should be the front part of the portal.
Cut out the side parts of the portal
We collect all three parts into a single whole. To do this, you will need a 10*20 mm block and strips of plywood, 7 cm wide. From all this we assemble the front wall of the false fireplace.
Assembling the front wall
We make the rest of the frame under the existing front panel. To add rigidity, we place jumpers at the top, along the upper edge of the front panel. We also install a block below. The platform for the fireplace body rests on it. We cover the side walls with pieces of plywood cut to size.
Frame rear view
Front view
Actually, the decorative fireplace with your own hands is almost ready. Finishing work remains. Two types of ceramic tiles were chosen for finishing: gray “stone-like” and white “brick-like”. We begin to glue it onto liquid nails. The work progresses slowly - you have to cut it into small pieces.
Start of finishing
Partial cutting can be done with a tile cutter, but often you have to use a grinder, which is dusty and requires concentration - you can’t saw off more, and the edge must be even. The edges of the cut tiles that remain open are sanded. And it's time again. Therefore, cladding takes a lot of time and the work is tedious.
Portal cladding for a decorative fireplace
Almost halfway through the work, an insight came: in order for the tiled corner to look neat, the edges of the tiles must be ground down at 45°. It is very inconvenient to cut at 45° with a grinder; it is much easier with a circular saw (I found it from a neighbor). Then the joint turns out, if not perfect (due to chips), then much more attractive.
All the seams between the tiles were sealed with grout of a suitable color, the joints began to look great. A tabletop is installed as the top panel. It turned out to be a false fireplace and at the same time a TV stand. I was pleased with the result.
DIY decorative fireplace finished
Decorative fireplace manufacturing technology
To make a portal for a fireplace with your own hands from plasterboard, you should go through step-by-step instructions: drawing work, designing a frame, covering the fireplace and decorating.
Project preparation and marking
To make a decorative fireplace you need to answer several questions:
- In what part of the apartment will the fireplace be located?
- What size will this structure be?
- What decorative elements will be components of this design?
Stages of installing a plasterboard fireplace
When choosing a location, it is, to a greater extent, the living room. In the largest room of the home, the fireplace can be along a “blank” wall or in a corner. It all depends on the dimensions of the room and its interior. In a small room, a fireplace and a TV place are connected. Where the base for the TV is the upper part of this structure.
And also, if the fireplace is small, the TV is hung on a bracket above the fireplace. This not only saves space, but also has a noticeable design approach.
After choosing a location, you should take measurements for the future drawing. They will be based on the size of the fireplace in height and width. A niche for a fireplace can be made in small sizes, which will also look original. But, if the room allows, you can produce a portal of natural sizes. It will not only be beautiful, but also functional. The drawing of a fireplace covered with plasterboard is made progressively, recording each measurement and placing each point.
Drawing with dimensions of a plasterboard fireplace
The basis of the fireplace is a metal frame, creating it with your own hands, you can give the fireplace a shape different from the standards.
Tools and material
To make a fireplace from plasterboard, you should purchase a number of materials:
- profiles for metal structures for plasterboard;
- GKL;
- screws or self-tapping screws;
- dowels for concrete or others (depending on the base coating);
- primer for drywall;
- painting mesh;
- serpyanka ribbon;
- sandpaper for grouting;
- putty “Start” and “Finish”;
- decorative materials – artificial stone, ceramic tiles, paint, modeling.
If you want to “make a real fireplace”, first there must be a foundation (chimney, etc.). The purchased materials must be heat-resistant and fire-resistant. You need to buy heat-resistant drywall for the fireplace. The required material is calculated from the dimensions and drawing. This depends, first of all, on the size of the structure.
Design options for a plasterboard fireplace
- Screwdriver Set;
- drywall knife and blade;
- screwdriver;
- roulette;
- spatulas;
- scissors for cutting metal;
- drill with drills.
You may need nails, a hammer, a hacksaw.
Frame assembly
Before installing the frame made of metal profiles, markings must be applied to the base. Points and lines are drawn from the finished drawing, in compliance with all pre-made dimensions. Do not neglect millimeters, they can ultimately play an important role. Precise measurement transfers exactly to a corner or wall, as well as to the floor. All transferred lines must be clearly straight.
To do this, it is best to use a level and a corner. The intersection of straight lines passes at an angle of 90 degrees.
Otherwise, the structure will become curvature, which can lead to fragility and fragility. Basically, marking the fireplace frame takes a lot of time and patience, but it is worth it because this stage of the work is basic.
An example of assembling a frame from a profile for a plasterboard fireplace
After marking on a basic basis, you should start attaching the main profiles. Dowel nails are used for this. The profiles are attached to the wall according to the markings, using a level for evenness. Two NP (guide profile) attached vertically and 2 horizontally. In this case, the lower horizontal profile determines the height of the parapet.
Making a frame from a false fireplace
The frame is an integral part in the construction of a fireplace structure. Here we need to create a false fireplace with our own hands, i.e. a strong foundation (more on this in a separate article). For those who plan to use an electric fire instead of a live fire in the future, electrical wiring should be done to hide all the wires to which the electrical appliance will be connected. If you suddenly plan to use an imitation fire (candles, bio-fireplace), then you will not need a power supply.
Installation of a fireplace can be divided into the stages of constructing a frame, covering it with plasterboard and decorating the finished portal. Step-by-step instructions for installing a gypsum plasterboard structure are as follows:
- Along the lines marked on the wall, you need to fasten the profiles to form the back wall of the artificial firebox. The fastening is done using dowels, ensuring the strength and stability of the entire structure. When installing profiles, you need to carefully check the horizontality and verticality of each element.
- Separately assemble a frame of the same size for the front wall of the portal. Based on the dimensions in the drawing, install 2 sections of the profile on the sides of the firebox mouth. Screw to them the parts that limit the opening at the top and bottom. If you want to make an arched vault of the hearth, then the upper profile should be attached at the highest point of the arc. If desired, you can notch the sides of this segment and bend it along the desired radius.
- Attach the resulting frame with the firebox opening to the back of the structure. To do this, cut off parts of the profile with a length equal to the designed amount of the portal protrusion above the wall plane. With a small size and rectangular shape of the fireplace, 4 parts will be enough for mounting in the outer corners of the portal.
- 2 more of the same parts need to be fixed at the level of the firebox. To give the hearth strength, you need to screw 1-2 segments to them, the length of which is equal to the width of the portal. Fastening is done using self-tapping screws. This is especially true if you plan to install an electric fireplace or lay down logs to simulate a flame.
- The frame for the chimney is made in the same sequence, but its front wall does not have holes, so the frame can be a simple rectangular shape, trapezoidal, inclined towards the wall, etc. If the chimney must be high, then it is necessary to install crossbars in increments of about 50 cm .
- Install the podium along the lines marked on the floor, if required by the selected design.
The result will be a metal frame as in the photo above. When installing frame profiles, you must constantly monitor the verticality and horizontality of structural elements. Straight corners can be made using a construction square or a school protractor. For the mantelpiece, it is best to use a thick board or sheet of foam.
Sheathing the gypsum board frame
For this part of the installation, you will need to cut the sheet material into parts corresponding to the sidewalls, top panel, bottom and front part of the portal. If gypsum board trim is used for cladding, then some parts will have to be made from separate pieces. In this case, additional profiles must be installed at the joints of the parts. The edges of the gypsum board patterns should meet in the middle of the auxiliary element. The parts should be fastened using self-tapping screws with a recessed (countersunk) head (photo below).
To successfully complete the curved elements of false fireplaces (arch, podium, chimney), you will need a cutter. Using a toothed roller, you need to make holes in the paper covering on one side of the gypsum board part. Wet the part thoroughly so that the water penetrates the plaster layer, but does not wet the other layer of cardboard. Wait 12-30 minutes and try to bend the workpiece. Soaked plaster usually bends well.
Bend the workpiece along the required radius on a pre-prepared template and secure it to it. Any object with a suitable rounded surface can be used as a template. If necessary, you will have to make the mandrel yourself: from plywood or other material.
How to choose a place for a plasterboard fireplace?
Before you move on to studying the instructions, which tell you how to make fireplaces from plasterboard with your own hands, you need to decide on the choice of place for it. If you plan to install this device in a large living room, then the best solution would be to place the fireplace at a point that corresponds to the middle of the longitudinal wall.
If desired, you can also make a decorative chimney, which will give the structure the most realistic appearance. The main thing is to decide on the size and design to create your own fireplace from plasterboard. Photos of structures equipped with a chimney will help assess the feasibility of such a solution and the possibility of installing a chimney in your room.
Experienced craftsmen do not recommend installing fake fireplaces in hard-to-reach areas of the room. This rule especially applies to structures that are equipped with heating devices. Hard-to-reach places include:
- space in front of the heating radiator;
- points located near the doorway;
- places near cabinets and other bulky structures.
The fireplace should be located in a place where it will be accessible to everyone
Project work
Before you make a fireplace from plasterboard, you need to draw up a drawing of it.
Structural design requires consideration of the following issues:
- Where will the fireplace be located?
- What size will the portal be?
- What will be the shape and appearance?
Most often, fireplaces are located in the living room: if there is enough space, then this can be the central area of one of the walls of the room. In small rooms, it is better to choose an option with a corner imitation fireplace made of plasterboard. Due to the external similarity, a decorative fireplace is often combined with a TV area: for example, the screen can be hung above the portal. In order for the false fireplace to play not only an aesthetic, but also a practical role, it can include shelves and drawers for storing small items. Another option is to use the structure as a TV stand.
Such recommendations are not the rule - sometimes the portal and the TV are mounted on different walls. Having decided on the location of the decorative fireplace, you need to calculate its dimensions and make a drawing of the product. In this case, it is not necessary to achieve structural identity with the real device. The main thing is that it is beautiful in appearance and fits harmoniously into the overall interior design. The basis of the structure is a metal profile frame. The profile is very convenient in this regard, since with its help you can build any suitable structure.
Sometimes, when creating a drawing of a decorative fireplace from plasterboard with your own hands, problems may arise. In this case, you can view ready-made projects on specialized sites: ready-made drawings can be adjusted, adjusting them to the specific architectural situation in your home. For example, if you plan to install an electric fireplace inside a decorative portal, then when constructing the structure you will have to take into account the dimensions of a household heater. It is most convenient when sketches with several options for the final design of a plasterboard fireplace with your own hands are attached to the finished project: in this case, the fireplace fits as organically as possible into the interior of the room. A detailed list of the dimensions of each part is also important.
Preparatory stage
Before starting work, you need to think about where it is better to install the fireplace so that it does not take up much space, but at the same time illuminates the room well. Experts advise installing the unit in a corner when the room is small, and in the center of the room if the parameters are large.
The shape of the portal and its dimensions depend on the choice of location. It is impractical to install a huge fireplace in a small room. Instead of comfort, this will create a visual effect of cluttering the space. To make the fireplace look as real as possible, experts advise placing it near the wall. Of course, decorative options with open fire and special lighting are also used, which are installed even in the center of the room. But this option is not suitable for a false fireplace.
Don’t forget to choose a rational location for the fireplace. Read more: do-it-yourself false fireplace.
Corner placement saves space well. In the room, in addition to the fireplace, you can make several zones, thus arranging furniture, freeing the center from unnecessary elements. Then the light from the fireplace will create additional coziness and comfort. The corner portal in this case should be triangular, not rectangular.
As for the power supply, this should be thought about in advance. Even if you make a fireplace for an electric fireplace with your own hands, the fan will require current. When the effect of naturalness is important, the socket must be hidden. There is no need to place the fireplace far from the power source. It is better to use the option with an outlet near the fireplace.
You cannot hide the socket in the portal, as this can lead to damage if the heating is actively used. The ideal option would be to install it with a special switch. As for calculating the parameters and designing the fireplace, here all the data is entered into the drawings and the project. Experts advise first making a trial version in electronic form so that you can correct the details and remove unnecessary things. After this, all the necessary calculations are carried out, the model is transferred to the real world for the final project.
Also, don’t forget to think about the power supply.
Portal with plaster finish
Decorative plaster allows you to turn a wide variety of design ideas into reality. With its help, the surface of the fireplace portal can be finished to resemble wood, brick and other materials.
First step
Assemble the base of the structure. The technology is extremely simple - first a support beam is installed, after which it is sheathed with chipboards.
Chipboard sheets attached to the frame
Second step
Prepare the slabs for finishing and decorate them.
It is best to finish the slabs before installing them, so that all elements can dry properly while lying on a horizontal surface. During drying, the parts must be covered with polyethylene.
Before finishing, carefully sand the slabs, putty them and cover them with parquet varnish in several layers.
For additional decoration, apply neat grooves to the walls to imitate brickwork.
Third step
Complete the decoration of the fireplace portal at your discretion. To do this, use decorative plaster. You can simply cover the surfaces of the portal with it, or you can perform an unusual finish using special decorative elements, modeling, imitation masonry, etc.
Prepare the mixture based on the manufacturer's recommendations, but with minor changes so that the finished mixture is slightly thicker than the manufacturer advises.
The use of decorative plaster in finishing a fireplace
The consistency of the mixture should resemble plastic pottery clay. Using pre-prepared forms, you can make a wide variety of shapes from such plaster and decorate your fireplace with them.
The result will be a very original and elegant design with only one drawback - the plaster decor is quite fragile, so you need to handle such a fireplace portal with extreme caution. This is only a small part of the existing design options for fireplace portals. If you wish, you can make your own changes to the proposed instructions or even create original author’s designs - the flight of fancy in the case of fireplace portals is practically unlimited
If you wish, you can make your own changes to the proposed instructions or even create original author’s designs - the flight of fancy in the case of fireplace portals is practically unlimited
This is only a small part of the existing design options for fireplace portals. If you wish, you can make your own changes to the proposed instructions or even create original author’s designs - the flight of imagination in the case of fireplace portals is practically unlimited.
Decorative fireplace manufacturing technology
The process of making a fireplace from plasterboard includes several stages.
Next, we will get acquainted with all the nuances of working on each of them.
Project preparation
In the process of designing a fireplace, it is necessary to decide on the following points:
As for the choice of location, the fireplace is usually installed in the living room. If the room is large, it can be placed in the center of one of the walls. If the room is small, a corner false fireplace would be an excellent solution.
Corner decorative fireplace
It must be said that designers, as a rule, try to combine the fireplace area and the TV area. Those. both of these interior items are located side by side, for example, the panel can be installed above the fireplace.
A fireplace in an apartment can be not only a decorative element, but also a functional one. For example, it can be equipped with shelves or drawers for storing all kinds of small items, or used as a TV stand.
Decorative fireplace with shelves
Of course, it is not at all necessary to strictly adhere to this rule. If desired, you can place the TV and the portal even on different walls.
Once the space for the fireplace has been determined, you should decide on its dimensions and make a design drawing. I would like to note right away that it is not at all necessary to make a decorative fireplace identical in size and design to the real one. The main thing is that the portal turns out beautiful and harmonizes with the surrounding interior.
The basis of the design is a frame made of metal profile. Using it as a constructor, you can create a frame of any size and shape.
An example of the simplest fireplace design
If you can’t create a project yourself or you can’t decide on its appearance, you can use a ready-made project from our website or other resources on the Internet.
If desired, you can make your own adjustments to the finished project, for example, if you need to change its size or appearance. For example, if you are making a portal for an electric fireplace, you will probably have to adjust the dimensions of the niche to the parameters of the device.
Fireplace assembly
Then we are expected to assemble the box (frame). According to the calculations in the drawing and markings, a metal profile of the required length is cut on the floor and walls. Then, using self-tapping screws and a screwdriver, it is assembled into a single structure, according to the selected geometry of the false fireplace.
If the design plan provides for the design to have an arch above the visual firebox, then to obtain such an arch it is necessary to notch the profile in several places and bend it slightly.
It is worth noting that at this stage it is quite important to firmly connect the parts of the cut profile to each other, since the stability of the entire structure as a whole depends on this. The presence of all kinds of small-length jumpers contributes to the strength
Craftsmen advise first assembling the structure itself from profiles and only then attaching it to the wall and floor, since installing individual parts in the reverse order will be inconvenient; the screwdriver may simply not fit between the wall and any structural element.
But in any case, when assembling the frame, you should use a building level as often as possible to check the correctness of the assembly.
Installation of the firebox, installation of the frame
The fireplace insert is finished with plasterboard directly at the installation site. Therefore, first they install the equipment and only after that they begin to install the frame:
- A porcelain stoneware slab is installed using mastic or special glue. Time is given to harden.
- A firebox is installed on the stove. We should not forget about the technical gap between the wall and the equipment of 100 mm.
- The dimensions of the future structure are marked on the base and wall, and a frame is assembled from guides and rack profiles. All work is carried out strictly to the level. The frame is fixed to the wall and floor using metal dowels. The profiles are fastened using press washers.
As you can see, assembling the structure for drywall should not cause any difficulties.