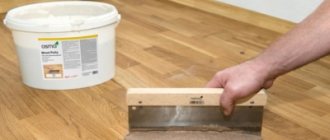
Plastering walls with your own hands is the most common way to level surfaces and prepare walls for subsequent processing and finishing. This technology is very versatile, suitable for working with both flat planes and surfaces with obvious depressions, cracks or bumps. Plaster can eliminate any defects and curvature. In addition, it is an additional protective layer against external influences: excessive humidity, ultraviolet radiation, temperature changes.
The classic technology for plastering surfaces is the use of beacons to set the desired plane. But sometimes this procedure is skipped. This happens in cases where a perfectly flat surface of the walls is not important.
Thus, we can highlight the differences between the two technologies:
- When placing beacons you use more material because you need a thicker layer of plaster. We can say that when using the second technology you save significantly.
- Placing beacons will require more time from you, that is, the second method of plastering walls is less time-consuming. You don’t have to measure and place beacons, or wait for them to dry completely before continuing work.
- If you decide not to bother placing beacons, know that you will not achieve perfectly smooth and even walls. Do-it-yourself plastering of walls without beacons is shown in the video below.
We will consider in detail two methods of plastering walls: with and without beacons.
Choosing beacons
Guides for applying plaster are now made from various materials. It will be difficult for an inexperienced builder to make a choice without our practical guidance.
- The metal elements are small in width, made of galvanized steel, and have holes that replace limiters. If you follow the rule along the holes, the excess solution will be removed from the surface. Such guides are produced with a length of 3 m and different depths: 3 mm, 6 and 10. The fasteners are screws. The disadvantage of such guides is the need for dismantling after the plaster has dried. Nevertheless, walls are still plastered in this way, with metal beacons being used; builders are in no hurry to abandon them.
- Gypsum beacons are superior to metal beacons in two respects: installation time and solution consumption. They do not need to be dismantled, which is the main advantage. To create guides of this type, you need to screw dowel screws into the working surface, align them, put a profile (metal/wood) on their heads, place a plaster mortar on it, remove the excess and remove the profile.
- Plastic elements are highly durable, but are fragile and are susceptible to strong impacts. The installation process is in all respects similar to metal beacons.
Is it necessary to remove beacons after plastering?
After the plaster has hardened, it is recommended to remove the metal guides. When grouting with a solution, it usually slides along the beacons and tears off the galvanized layer; subsequently, rusty spots may appear. The beacons are pulled out using X-shaped movements. The edges of the grooves are passed with a spatula blade, protruding irregularities are removed. The recesses are covered with the same solution as the main layer.
YouTube offers various options for plastering walls using beacons with your own hands; video tips will help you choose the most optimal method for the best quality of repair. We invite you to watch another video with instructions for applying cement-sand plaster.
All stages of applying plaster with beacons
The introduction to the theory is completed, which means it’s time to tell you how to plaster walls with your own hands using beacons. This process is multi-stage, full of nuances and secrets. Get ready to remember, or better yet, write down.
Stage one: preparatory
It has already become commonplace that work begins with preparation. Lighthouse plastering of walls begins with the following steps:
- We clean the wall of debris with a vacuum cleaner/broom, fasteners and other foreign objects.
- We inspect the surface and check its evenness using a level. We mark places that are too crooked with a marker. The surface must be examined lengthwise and crosswise so that not a single problem area is missed.
- Now we mark the wall for installing beacons. We retreat approximately 30 cm from the corner. The first lighthouse will be located here. We retreat from it a distance that will be several centimeters less than the length of the rule. Usually it is 1.6 meters. The distance between the beacons when plastering walls can be changed individually.
- It is better to divide the wall into equal parts; in this case, plastering the walls with your own hands along the beacons will be convenient.
- We cover the surface with a primer of the type that will suit the wall material. For this process you will need a brush or roller. You can't miss a single centimeter. Leave to dry, the required time is indicated on the packaging.
Stage two: installation of beacons
Beacons can be installed on a dry wall. This process requires care and scrupulousness. All further plastering of the walls with mortar depends on the correctness of this stage; the beacons will have to be given increased attention. The work is carried out as follows:
- The profile is applied to the marking, the upper fastener is screwed in and a plumb line is attached to it. We mount the remaining fasteners plumb.
- A correctly installed profile will not adhere to the surface along its entire length. There will be a lag in depression areas.
- All profiles must be in the same plane. Until this condition is met, you cannot proceed to the next stage.
- We apply a small amount of plaster to the locations of the beacons. These should be separate points; there is no need to plaster the entire length. This process will secure them. We check the position of the beacons again with a level and, if necessary, make adjustments.
- The wall is left for some time until the plaster is completely dry. It is important for us to tell you how to properly plaster walls using beacons, so all recommendations must be strictly followed. If the plaster does not dry completely, the guidelines will get lost and you won’t get a smooth wall.
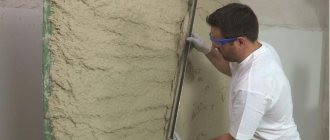
Stage three: plastering
The work with the guides is completed, which means that the walls can be plastered using beacons. The start of work depends on the chosen plaster. A ready-made mixture may be selected, to which you will need to add water and mix thoroughly. In the case of cement-sand plaster, you will first need to combine sand with cement (3:1), stir the dry mixture and only then add water. PVA can be added to such a solution.
If there are no issues with the mortar, we will tell you how to plaster a brick wall using beacons. This how-to guide is suitable for all types of surfaces.
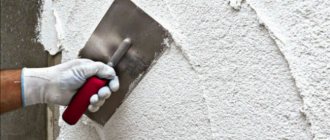
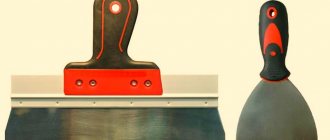
- To apply the plaster you need a wide spatula. There should be a little more solution than needed. In this case, depressions will not form.
- The applied plaster must be leveled. A rule is used for this. It falls on two neighboring lighthouses. This is where the requirement to strictly maintain the distance between the guides becomes clear.
- The rule needs to be moved from the floor to the ceiling. There is no need for haste here. The rule is to move it so that all the cracks and depressions are well filled. To distribute the solution evenly, you can generally shake it a little. The technology of plastering walls using beacons requires repeated use of the rule. You will have to repeat moving the rule several times until the treated area is level.
- If the plaster is applied in two layers, then you need to let the first layer dry. Plaster is again applied to the dry surface and leveled using the rule.
- The second coat must also dry well before further work is carried out.
Plastering the walls with cement mortar on the lighthouses has not yet been completed, there is very little left.
Stage four: dismantling the beacons
This step is not always performed. To understand whether it is necessary to remove the beacons after plastering the walls, you will need to study some features.
- Finishing with ceramic tiles does not require the removal of metal beacons.
- The metal will show through paint and wallpaper after a while, so it’s worth removing the guides.
- Plastic and plaster beacons will not spoil the decorative coating, so they do not need to be removed.
Have you figured out whether it is necessary to remove the beacons after plastering the walls? Now let's study the dismantling process:
- We remove the fasteners that hold the beacons.
- We take out the guides.
- We lay plaster into the resulting voids and level it using the same spatula.
At this point, plastering the walls with gypsum plaster along the beacons is considered complete. Laying the tiles can be done without any preparatory work; you just need to wait for the plaster to dry. Before gluing wallpaper or applying paint, it is necessary to cover the surface with putty, which will make the surface perfect and hide even the smallest imperfections.
Preparing walls for plastering is an important stage
Beacon leveling technology requires high-quality wall preparation. It is optimal if you remove the entire layer of old plaster down to the very base. If this is not possible, you should carefully tap the wall with a hammer to identify defects that will have to be removed without fail (areas where the old coating is clearly peeling off or “playing”).
If there are deep depressions on the wall, they need to be leveled to the surface. This is easy to do with a layer of plaster. And the protruding parts on the wall can simply be cut off. The maximum permissible height difference on the wall surface is 1.2 cm. It can be difficult to visually install it. Therefore, it is recommended to check the surface for evenness with a laser level.
Comparison of deep depressions with the surface
It is clear that not everyone has this level at home. There is no need to buy it. You can make a simple device with your own hands to check the magnitude of the height difference on the wall according to the following scheme:
- screw the screws in from above on both sides of the wall;
- lower plumb lines from them;
- stretch a thread, at the ends of which sliding knots are tied, between the plumb lines;
- pull the thread and lead it down.
Such a simple design, made by yourself, will absolutely correctly tell you where on the wall there are protrusions or depressions larger than 1 cm.
Construction made of thread and screws
After preliminary leveling of the wall, you will need to vacuum it (or simply sweep it with a broom), treat it with a primer (this way you will get a guarantee that fungus and mold will not appear under the layer of plaster over time). It is better to strengthen the walls in the kitchen, as well as in rooms with high humidity, with reinforcing mesh for plaster. It is secured with mortar or dowels.
What about the corners?
The most difficult place to apply plaster is the corners. Even an experienced builder will say so. Corners always take a lot of time and effort. We have made this work as easy as possible so that this stage does not become an impossible problem for you.
- Without beacons you can't even hope to do this job. Landmarks should be located no further than 15 cm from the corner, and preferably 10 cm.
- Initially, a liquid mortar is poured on, time is given to set, and then the main plaster is applied.
- The thick layer is divided into several stages.
- Corners are not made along with the main plane. Only after the walls are leveled do they tackle the corners.
- The mating walls must be aligned one by one. There's no need to rush.
- A large metal square is a convenient tool that makes work easier.
You know how to plaster the corners of walls using beacons, so go for it. You're unlikely to get a perfect result the first time, but don't despair. Practice and practice again.
Installation of beacons for plaster - video and detailed description of the technology
Each type of guide has an individual installation method; next we will look at how to install beacons for plaster.
From solution
After the walls have sagged, an even strip is installed along the heads of the screws; it can be replaced with a rule. The resulting gap between the lath and the surface is filled with a solution, after it has hardened, the plank is carefully removed, the hardened solution will serve as a guide for subsequent plastering. This operation should be repeated throughout the entire marking.
How to place beacons under plaster walls: video and step-by-step instructions for installing metal and PVC guides
Metal and PVC beacons are displayed on stamps - these are cakes made from a quickly hardening solution and glue. If plaster is not your thing, first we make markings and sag, as described above, then we make marks from the solution using the heads of the screws - cakes approximately 50-80 mm in diameter.
We apply the beacon and press it strictly vertically using a level. First we install the outer strips, then the intermediate ones, it is important to monitor the horizontal geometry: there should not be even minimal gaps between the rule and the beacons. After the marks have hardened, the planks are firmly in place, we fill the gaps between the wall and the guide with mortar.
Beacons made of plasterboard under plaster are installed according to the same principle as metal ones. It is better to attach strips 40 mm wide to starting putty. They are not used for outdoor work.
To clarify the technological nuances, we bring to your attention a video lesson on plastering walls using beacons with your own hands, which shows the entire process of installing guides step by step and in detail.
Modern mount for beacons under plaster
The listed technologies for attaching beacons under plaster require time and skill. After installation, you will have to wait until the solution dries thoroughly. Taking into account all the nuances, the modern market responded with a new proposal - mounting for a lighthouse.
Holes are drilled along each marking line at a distance of 300-500 mm. Dowels are inserted, usually 6*30, into which SHSGD self-tapping screws are screwed, their length depends on the thickness of the plaster layer. The level caps are twisted into a single plane. A special device is put on the self-tapping screw - a PVC mount with a groove into which the guide is inserted. After installation, the strip is secured with a plug.
Modern fasteners for lighthouses under plaster
What to do with wooden walls?
Plastering walls with rototbands for lighthouses, which are made of wood, is carried out according to a different scheme. Guides are not needed here, but you will have to fill the strips and shingles. A similar scheme is used to level individual areas of the surface. The filling of shingles is divided into two stages:
- the first layer consists of planks that are located at an angle of 45 degrees;
- for the second layer, the strips are placed on top of the first layer at the same angle, but in a different direction.
As for applying the plaster and its further leveling, there are no differences between wooden, brick and other surfaces.
For large surfaces it is convenient to use panels that are mounted on the wall. Plaster application consists of three layers.
Required tools and materials
Lighthouse plaster requires some tools and supplies. To carry out this event you will need the following:
- The plaster itself, the primer, the beacons.
- Dowels and screws for wood.
- Perforator and mixer attachment for making mortar. You will also need a set of drills.
- Construction level and plumb line.
- Screwdriver and hammer.
- Metal scissors, grinder.
- Typically, a smoothing iron, a paint brush or roller, spatulas.
- Mixing container, protective gloves, tape measure.
At first glance, the list may seem too long, but the master may already have all these tools and materials, the most important thing is the presence of a hammer drill, everything else is inexpensive.
VIDEO:
What to do with semicircular walls?
A lot has been written about working with straight surfaces, including by us. But few people know how to plaster semicircular walls using lighthouses. Although such surfaces are increasingly found in new buildings, new-style private houses and other objects. Initially, this work seems difficult, but everything is much simpler. You will learn how to plaster a brick wall along beacons if it has a semicircular shape from the practical instructions below.
- We carry out preparatory work, the essence of which is always the same. Their list is given above. We prime the surface and wait for the material to dry.
- If there are straight sections, then they are the first to come into view. If they are not there, then we simply start work from one of the edges.
- In a straight area, it is necessary to set the guides along plumb lines and carry out plastering. It is necessary to secure beacons on both sides on a rounded plane.
- We leave the plaster under the lighthouses to dry. During this time, we prepare a template that will replace the rule. To create it, you can use plywood, chipboard, OSB and other options. The template should be hard, with a smooth edge and not crumble. We make a template according to the dimensions of the rounded wall.
- The template should also cover flat areas where there is already plaster.
- On the plastered area you need to make a limiter that will facilitate the process of leveling the solution.
- We throw the solution onto the semicircle and draw a rule template from below, removing excess mixture and leveling the solution. One end of the rule must rest against the limiter.
- We treat the dried surface with a grater.
In this way, it is possible to plaster surfaces with an internal and external radius.
Do-it-yourself plastering of walls using aerated concrete beacons in the case of rounded surfaces can be done in a different way. The guides must be positioned horizontally. In this case, it is convenient to use plastic pipes that can bend and, therefore, easily bend around a semicircle. Plastic beacons have also been created to solve such problems. The guides are fixed on the surface near the ceiling and floor. Another beacon can be placed between them. The usual rule can be used here, because it will move on a flat vertical surface.
We told you how to plaster walls under a lighthouse, you know whether you need to remove the lighthouses after plastering the walls, we hope that there are no questions left. And if there are any left, we will definitely consecrate them in other articles.
Marking
Before starting plastering work, using a laser or conventional level or plumb line, it is necessary to identify deviations in horizontal and vertical lines. Hanging the walls is done carefully; this will help to lay the plaster evenly and reduce the consumption of the mixture.
The starting point is the most convex section of the surface; the thickness of the beacon should be added to it (depending on the model 3-10 mm), this is how the thickness of the plaster layer is determined.
If the difference is too large relative to other surfaces, then in order to save materials and time, it should be knocked down with a hammer.
Diagram of how to properly screw in self-tapping screws for attaching beacons
How to hang walls
We start hanging the walls from the vertical. At a distance of 150-200 mm from the ceiling and corner, we hammer in a dowel, which should protrude from the wall 10-15 mm more than the most convex place. We attach a thread with a plumb line to it, drive in another dowel, tighten the thread and fix it, then check the geometry, tighten the self-tapping screw until the level is completely level. Using the same algorithm, we fasten the thread in the opposite corner.
For horizontal sag, we pull the threads diagonally, at the intersection we have the middle of the plane, where we screw in the self-tapping screw. From there, using a level, we make horizontal markings to the corners, here we also screw in self-tapping screws, tighten the thread, and then again check the geometry with a water or laser level. When the fishing line comes into contact with the surface, you should remove the unevenness or adjust the threads by unscrewing the screws.
Scheme of how to make wall sagging
According to building codes, intermediate guides are mounted at a distance of 2 m from each other. If you are installing beacons under plaster yourself, then the distance between the rails should be 150-300 mm less than the length of the rule. Watch a video with instructions on how to plaster walls using beacons with your own hands; the video will help you understand the intricacies of wall hanging technology.
If the unevenness is insignificant, then plastering the walls with your own hands without beacons is acceptable. The solution is thrown onto the wall and leveled with a long rule. A level is applied, gaps are identified, which are refilled with mortar and smoothed. Plastering without beacons requires skills; then we offer a video with detailed technology for applying the solution and leveling it.
How to place beacons under ceiling plaster
Hanging the ceiling is done using a long rule or a water level. The lowest point of the ceiling is determined, the first self-tapping dowel is fixed here, and the next mark is set from it at a distance of 100 mm in level, and so on across the entire surface. Instead of self-tapping screws, you can use markers - squares cut from plasterboard, which are attached to a quick-fix solution. To provide our readers with comprehensive information, we have selected many thematic videos for this article on how to install beacons for plaster; the video will help you understand all the intricacies of the process.