Drying the plaster layer is one of the most important processes in this type of work. Moisture should leave the layer evenly. But don't let it dry out too quickly. If the necessary conditions are not created, the coating will not acquire the required strength. Shedding, delamination, cracks on the surface - these problems are most often caused by non-compliance with technology. A good master always knows how long it takes for the plaster to dry.
It is quite difficult to give an exact answer. There are many factors that influence the drying speed of plaster, including: the quality of the solution, the thickness of the layer, and even temperature and humidity.
Factors affecting drying speed
How long the walls should dry before finishing depends on factors that must be taken into account when carrying out the work.
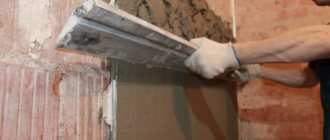
The compositions are applied to the surface in two ways: mechanical and manual. Machine plaster creates an even layer, improving the quality of mixing and application to the surface. Only when the plaster has completely dried can you begin to putty before wallpapering or other finishing.
Factors influencing the drying time of the coating when plastering the walls of a room:
- Composition of the mixture and purpose. Each plaster mixture requires a different drying time. This depends on its base: gypsum (dries fastest), cement (longest drying time) or lime-based mixture (medium drying time). The drying time of decorative plaster, which is used as a finishing material, varies greatly.
- Wall material. The bases can be made of heavy concrete with a low ability to absorb moisture or materials that easily absorb moisture: brick, gypsum sheet, wood.
- Coating thickness. It is permissible to apply a solution with a thickness of 5-100 mm to materials. The drying time will depend on the thickness of the applied layer.
- Surface area. With an increased volume of work in the room, the humidity increases and the drying time increases.
- Number of application stages. For large unevenness, the work is carried out in two or three stages, taking into account the thickness of each layer, drying is carried out.
- Indoor conditions. Drying time also depends on the temperature in the room, the ability to regulate humidity by ventilation, opening windows and doors.
- Outdoor application. Finishing the facade for better adhesion to the base requires an air temperature of at least +10 degrees, humidity - 75%.
The moisture content of the mixture layer affects the quality of the subsequent finishing and the timing of the next stage of repairs in the house.
How to plaster external walls - technology for finishing work
When preparing to plaster the facade, carefully study the technology requirements. It provides for the following stages of work:
- Choice of finishing material.
- Preparation of the external surface of the walls.
- Installation of guide elements.
- Applying the plaster mixture.
- Clean finishing.
Each stage has its own characteristics. Let's look at them in more detail.
Choosing material for plastering external walls
- performance properties;
- shelf life of the plaster composition;
- manufacturer rating;
- reviews from professional builders;
- adhesion of the finishing mixture.
Also analyze the adhesive properties of the material and the need for additional preparation for application.
Preparing walls for applying finishing mortar
You should take responsibility for preparing the surface of façade walls. Their condition affects the quality of plastering activities.
Prepare the surface of the walls according to the following algorithm:
- Remove old plaster with a chisel and hammer or use a hammer drill.
- Clean the surface from finishing residues, sweep away dust, and remove grease and oil stains.
- Cut the brick joints by widening and deepening the joint areas.
- Remove the bumps, seal existing cracks and level out elevation differences with putty.
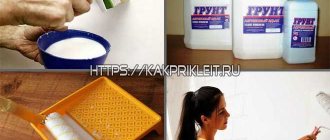
- Apply a deep penetration primer to the wall surface and wait until it dries.
- Attach a plaster mesh with square cells with a side of 20-25 mm to the outer surface.
Fixation of special beacons
Beacons are made of metal profiles and are securely fixed to the walls at certain intervals. Guides allow you to smooth out the plaster mixture using a rule, ensuring a flat finish.
To install beacons, you must perform a number of operations:
- Check the verticality of the walls by level or plumb.
- Cut the beacons to the height of the walls.
- Step back 20-30 cm from the edge and draw a vertical line.
- Apply a thick solution to the marking at intervals of 0.5-0.6 m.
- Place the guide along the markings and press into the solution.
- Adjust the verticality of the beacons according to the level.
- Remove any solution that has floated onto the surface of the guides.
- Fill the cavities under the beacon after the solution has set.
When determining the distance between guides, consider the length of the rule. The optimal interval between beacons is 1.5-1.8 m.
Applying external plaster to the facade of a house - finishing rules
Plastering technology involves sequential application of the material:
- First, a liquefied solution is poured. You should add polyvinyl acetate glue to it and add water until it reaches a creamy consistency.
- After drying, the main layer of plaster is applied. It is necessary to evenly distribute the finishing composition over the surface, ensuring a layer thickness of no more than 50 mm.
- Grouting completes the finishing activities. A wooden or foam trowel is used to smooth out uneven surfaces and seal cracks. Grouting should be done in a circular motion.
Start finishing after 5 days, when the plaster is completely dry.
How to properly plaster external surfaces - protecting problem areas
- thoroughness of sealing defects on the surface;
- uniform filling of cavities with plaster mortar;
- flatness of the finishing composition after grouting.
Grouting must be done correctly. First, make spiral-shaped leveling movements and, starting with a small diameter, gradually move to a larger circle.
Exterior wall finishing - finishing operations
At the final stage of work, finishing is carried out. Possible options:
- creating decorative spray;
- painting the surface in the required color;
- formation of a rough surface.
Influence of plaster layer thickness on drying time
It is worth paying attention to the fact that there are two concepts of drying time:
- Time until work can continue.
- Time until completely dry.
It is advisable to wait until the treated surface is completely dry, but often the owner does not have time for this.
To achieve the required coating thickness, manufacturers recommend applying the solution in layers with a thickness of 5-30 mm. Depending on how long it takes for the plaster to dry on the walls in the room, after some time the following stages of work are carried out.
Regardless of the composition of the solution, the required time to dry 1 mm layer is 24 hours.
Manufacturers offer formulations with additional additives for faster drying, when using which you should adhere to the maximum drying times indicated on the packaging. It is not advisable to stay in the room until the plaster has completely dried.
Lime mortar for plaster
Solutions using lime have high plasticity and prevent the appearance of fungi and mold. The coating surface is strong and durable. This finishing method is inexpensive and easy to use.
The next layer of plastering can be applied after 7 hours. Lime composition is used for lining furnace equipment. The coating dries completely within 5 days.
When using lime, the following must be observed:
- Do not add water with a stream, but use a sprinkler.
- Thoroughly clean the surface before plastering.
- Remember that lime increases in volume significantly when slaked.
The drying of the surface is indicated by the whiteness of the surface of the walls.
How long does it take to dry gypsum plaster on walls?
Gypsum-based mortar is a common composition used for finishing ceilings and walls indoors. Gypsum plaster has a light and uniform structure, lays on the base softer and dries faster than cement mortar with sand.
For good adhesion to the base, several conditions must be met:
- On the first day when finishing with gypsum solutions, it is necessary to exclude temperature changes and the use of heaters.
- It is necessary to protect the fresh coating from direct sunlight, since the mixture dried in the sun will crack and lose strength.
It is better to carry out work in the summer (in the cold season, when the radiators are turned on, the air in the house is dry, which does not contribute to uniform drying). If you open the windows for ventilation, the humidity in the room will increase unevenly, and the gypsum composition will not have time to adhere well to the base.
How long it takes for the plaster to dry depends on the following factors:
- mortar layer – (minimum permissible – 5-10 mm);
- temperature;
- humidity.
A 5 mm layer of gypsum mixture solution at an air temperature of 15-20 degrees and normal humidity of 60% dries for at least 16-24 hours. Accordingly, the thicker the layer on the base, the longer the drying process. Builders recommend setting aside one day for complete drying for every 10 mm of layer.
How to influence the process
It is impossible to say exactly how long it takes for a certain type of plaster layer to dry, since the process is influenced by different factors. To get a durable and smooth coating, you need to follow some rules:
- eliminate the influence of drafts;
- protect the surface from direct sunlight;
- comply with the conditions prescribed for performing plastering work;
- Avoid forced drying of the coating.
Fresh mortar should be protected from drying out too quickly and protected from exposure to unfavorable conditions (scorching sun, draft, etc.).
In winter, plastering work is allowed in heated rooms. Forced, excessively intense ventilation is unacceptable. But air exchange is still needed to maintain normal humidity in the room. Although if there is prolonged rain outside, there is no need to open the windows indoors.
How long does it take for cement plaster to dry on walls?
A solution of cement and sand with a heavier structure is universal. It is suitable for both external and internal walls. Cement mortar is durable when applied correctly. It is not susceptible to moisture and temperature fluctuations, but if it is not dried properly it can peel off during use.
For better adhesion, the solution is applied to a reinforcing mesh attached to the wall with self-tapping screws.
Sand-cement plaster is applied at a temperature of +5-25 degrees, from 5 to 30 mm at a time, depending on the unevenness of the walls. The time to gain strength for every 10 mm is 6-8 hours, respectively, a 30 mm thick layer applied at a time will gain strength within a day (this time will not be enough for complete drying). After drying, to completely level the base, the solution is reapplied.
Grouting of a 10 mm thick coating is permissible 5 hours after applying the composition.
But even ideal conditions - temperature +15-22 degrees and humidity 70% - will not ensure complete drying of a 10 mm thick solution before 10-14 days (see the formula at the beginning of the article). Applying several layers increases the drying time to thirty days or more.
How long does it take for plaster to dry under different conditions:
- Street. The optimal conditions for working with cement mixture are the off-season, when the air temperature does not exceed +20 degrees. At high humidity, the applied mixture 3 cm thick will dry completely within a month.
- Room. It is necessary to plaster in the summer, then it will take ten days to dry a layer 30 mm thick (subject to constant ventilation of the room). After this time, begin finishing grouting or puttying. But the solution will gain full strength after 1 month.
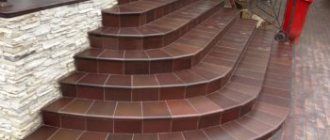
Particular attention should be paid to the humidity level before laying the tiles: undried composition will quickly fall off under additional load.
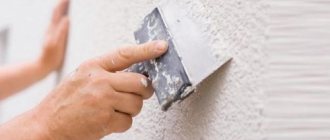
Puttying walls
If, after leveling, textured plaster is applied for painting, then the wall, after its application, can be painted. When you plan to get a perfectly flat wall, the surface needs to be covered with putty:
- Starter (coarser-grained), contains sand, applied in a layer of 4–5 mm;
- The finishing agent, which eliminates the smallest roughness, does not contain sand, the layer does not exceed 2 mm.
Apply both mixtures (sequentially), or the finishing mixture immediately. Before purchasing the material, it is recommended to read the instructions on the packaging, which indicate the areas of application, characteristics, and method of preparation. The cost of the composition depends on its type and purpose.
Such compositions are packaged in 25 kg bags and sold in hardware stores. Finishes can be produced immediately ready for use (they should be mixed with a mixer before application).
The technology for working with putty is as follows:
- mix the solution (according to the instructions on the package);
- work is carried out with two spatulas (wide and smaller);
- on a large instrument the composition is applied with a small one;
- using a wide spatula, cover the surface to be finished with the mixture (control the layer to 2 mm), this should be done carefully (leave a minimum of streaks);
- the coating should dry for a day (or longer);
- can be sanded to smooth out minor imperfections.
This is no more difficult than plastering drywall for painting. You can see all the flaws if you shine a lamp along the wall in all directions. If unevenness is visible, the surface should be rubbed more thoroughly.
If small flaws remain on the surface after sanding, it is recommended (according to the technology it is required) to apply a finishing layer. This solution is applied in a similar way. To achieve perfect smoothness, the treated and dried surface must also be sanded.
Any finishing mixture can be applied and sanded repeatedly to achieve the desired result. When the required quality is achieved, it is necessary to clean the coating from dust. It is recommended to use a vacuum cleaner. The surface should be primed again and allowed to dry. Then the paint adheres better. Adhesion also increases, and the wall is protected from the development of fungi and mold.
Drying time for decorative plaster
The answer to the question of how long decorative plaster should dry is simple - it depends on the texture of the coating - the more textured the application, the longer it takes to dry. Complex decorative reliefs take ten days to dry.
Venetian mixture refers to smooth coatings. This composition is applied in several stages, but each layer should have a thickness of no more than 1 cm. Drying time for Venetian coatings: 6-12 hours. Full set of hardness – at least a week.
Structural mixtures (for example, bark beetle) take 24 hours to dry. It takes 7-9 days to dry completely.
Textured plaster, which has a relief surface and “on the wave” reaches a thickness of 5 cm, takes longer to dry, the coating is dried for 36-48 hours.
Important: all mixtures are applied to primed walls. For each type of base, the required composition is selected, and after drying, it is advisable to prime the surface again.
The period of complete drying of the plastered surface
In the construction industry, repair times play an important role. When planning a major renovation, you need to take into account the time for a technical break between the individual stages of construction activities. The process of plastering the surface of the walls is a prerequisite for their new decoration. It ensures leveling of the surface and creation of a high-quality rough foundation for decorating walls with any facing material.
Information about the drying time of the plaster composition is indicated in the manufacturer's instructions. This is an approximate indicator that depends on other external factors:
- type of rough foundation;
- type of plaster mortar;
- microclimatic conditions indoors;
- thickness of the applied plaster ball.
Optimal conditions for quick drying
Construction mortars are designed for application in a temperature range of +10-25 degrees and humidity in the range of 65-75 percent. These indicators are suitable for uniform and high-quality drying.
Manufacturers, with rare exceptions, do not recommend additional drying devices. The best way to dry the coating is to slightly ventilate the room without heat sources.
It is almost impossible to achieve ideal conditions for drying by ventilation, so builders practice several ways to speed up the process.
Drying Features
There is a difference between the influence of the external environment on plaster outdoors and indoors. Situations often arise when streams of rain spoil the damp coating, and you have to redo it, spending additional time.
In room
The plaster in the apartment dries faster even in winter. It is enough to maintain the required temperature and humidity in the rooms. The gypsum will dry completely after 4 days, the solution with the addition of lime hardens in a week, the cement-sand mixture will take 30 days. It must be remembered that cement mortar shrinks.
On the street
Plastering work is recommended to be carried out in summer, at low humidity and a temperature of at least 15 degrees. If you do not pay attention to this rule, the drying speed will noticeably decrease and the strength of the finish will deteriorate.
How to dry walls after plastering
The quality of work and the comfort of further living in the house depend on how long the plaster on the walls takes to dry.
Unpleasant consequences of damp rooms:
- The integrity and strength of the coating suffers. Excessively wet coating becomes covered with cracks. Their integrity is compromised, and subsequently they can peel off partially or in entire layers.
- Uneven drying. It forms cavities in the coating that negatively affect the integrity and durability of the plaster.
- Mold formation. Coatings with high humidity are susceptible to the formation of fungus, which is difficult to remove and has a negative impact on health.
When carrying out complex work indoors, it is almost impossible to dry surfaces naturally during the off-season and in winter. If any defects in the plaster appear, don’t worry, they can be corrected. Read more about plaster repair on our website.
Drying methods used by builders:
- Natural. This is through ventilation of the room. But in too hot weather in the summer, the likelihood of the surface drying out quickly increases, and during rain and in the cold season, a draft will do more harm than good.
- Heat guns. Used to heat rooms when the temperature drops below +10 degrees. To dry the solution, maintain a temperature of + 20 degrees in the room for 24 hours. It is forbidden to direct streams of warm air onto the surface, this will lead to cracking of the plaster and a decrease in the quality of adhesion to the base.
- Heater or fan heater. It acts gently and speeds up the drying process. This method is similar to the effect of a heat gun and is used only to maintain the room temperature within +15-25 degrees. Ventilation is necessary to regulate temperature.
- Air Dryer. The best option is that the device does not dry the air in the room, but only absorbs excess moisture and condenses it in a special container. The dehumidifier is adjusted to the required parameters and area of the room. This method will reduce the time by 50%. A coating layer of 1 cm at low humidity will dry in 12 hours.
Methods for drying plaster
The best option is to carry out work in the summer and ensure air circulation in the room, then the solution will take longer to dry, but in a natural way.
Drying time depending on the type of substrate
How long it takes for plaster to dry on a wall depends on the base material. The materials used in the construction of walls have different coefficients of absorption and retention of moisture, which is released during drying, which affects the drying time.
Monolithic
Smooth surfaces do not absorb moisture. The concrete is covered with plaster 5-30mm thick in one layer. If it is necessary to apply a thick coating of 4 cm, a reinforcing mesh is needed. A layer 5-10 mm thick is dried at a temperature of +20 degrees and normal humidity 65-75% for at least 2-6 days. When the temperature drops to +10 degrees, it is not recommended to use additional heat sources; it is better to double the drying time. Details of the technology for plastering concrete walls.
Wooden
To ensure strong adhesion of the applied composition to the wall material, they are pre-sheathed with shingles. Wood is a porous material that retains air humidity, so a mixture thickness of 9-20 mm at a temperature of +15-20 degrees will require 1-5 days of drying. The correct technology for applying coating to wooden walls is also described on our website.
Brick walls
Plastering brick walls has its own nuances. The material quickly absorbs and releases moisture, so the surface is primed before starting work. The thickness of one layer is 2-2.5 cm, which will dry at a temperature of +20 degrees in 10 days. For uneven walls, additional layers 1.5-2.5 cm thick are applied, the drying time for re-coating increases to 10 days for each layer.
Plasterboard walls
Drywall is rarely plastered, but if finishing work in the form of tiling is necessary, then a 1 cm thick composition is laid on a reinforcing mesh. When tiling walls, it is necessary to completely dry the composition to the base; the drying time is 24-36 hours at room temperature.
Expanded clay blocks
A heterogeneous and porous surface that absorbs moisture well will dry quickly, but it is worth paying attention to the initial moisture content of the material. A single application is 1.5-5 cm, the surface dries depending on the thickness (on average 3-7 days) at room temperature and normal humidity. To avoid cracks due to high humidity, the plaster is periodically wetted and always primed.
Aerated concrete blocks
The porous surface of the block facilitates rapid drying of the solution. The mixture is applied with a thickness of 1.5-5 cm, the minimum values dry within a day, but when finishing the base for facing with ceramic tiles, the time is increased to 48 hours. The thickness of a single layer is 5 cm, which dries at a temperature of +15-20 degrees for 5 days. Read the detailed technology for plastering aerated concrete blocks.
The drying technology is similar to expanded clay blocks: primer, moistening the solution during the drying process.
Ceiling and walls: is there a difference in drying?
Under equal conditions, the ceiling will dry faster. Air circulation works here. Warm air rises, becomes saturated with moisture, and is replaced by warmer air.
But in practice, walls and ceilings are made of materials that absorb moisture differently. Therefore, plaster on a concrete ceiling may take longer to dry than on a red brick wall.
Note that plastering ceilings is becoming less and less common. This is being replaced by suspended ceilings and suspended ceilings made of gypsum plasterboard.