A specialized material for finishing rooms with moisture - moisture-resistant plaster - becomes an excellent solution. The smooth plane of the walls and ceiling, moisture-resistant plaster for interior work ideally hides various unevenness and firmly resists moisture.
Even entire streams of water are not able to disrupt its integrity for a long time. In addition, different types of moisture-resistant coatings have an important common advantage - they “breathe”, which creates a good microclimate. This finishing material acquires such properties due to its special composition with the inclusion of various ingredients and fillers.
Requirements for wall surfaces under tiles
Tile is the best option for wall covering in rooms with high humidity. The technology for gluing walls with tiles is as follows:
- tile adhesive is applied to an area of 1 - 2 m²;
- the mixture is leveled with a notched trowel;
- The tiles are installed in rows, the seams are leveled with crosses or SVP systems.
Even minor unevenness with ceramic tiles is very inconvenient, especially on the wall, for a number of reasons:
- the plaster is leveled along the beacons, and the tile adhesive is applied by eye with a notched trowel;
- starting mixtures for leveling the verticality of walls are much cheaper than tile adhesive;
- As the thickness of the layer increases, the tile “floats” and slides, falls over and flies off under its own weight.
The main requirements for the base for gluing ceramic tiles are:
- smooth walls without cracks, bumps and holes;
- verticality of walls;
- presence of water-repellent properties;
- high adhesion of wall material or leveling mixture with tile adhesive;
- the strength of the base should be higher than that of tile adhesive;
- The angles should ideally be 90°.
SP 15.13330 allows the use of pressed ceramic bricks, hollow blocks, hollow ceramics, cellular concrete, gypsum boards, sand-lime bricks for the manufacture of walls and partitions of combined/separate bathrooms only subject to tiling or complete waterproofing.
Quote clause 9.1.1 from SP 15.13330: “... Sand-lime bricks, partition blocks and slabs in bathrooms, showers, and bathtubs are used subject to vertical waterproofing or tiling of the inner surface.” This means, provided that you are tiling the walls, waterproofing the walls is NOT NEEDED.
Possible collapse of corners, lack of flatness, wavy line where walls meet the floor and ceiling, opening of cracks, sagging of mortar in masonry joints, lack of right angles.
The blocked corner must be corrected before finishing work begins.
In order to properly level the surfaces of vertical bathroom structures, it is necessary to take into account the composition of the plaster mixture. Although, when tiling, waterproofing is not required, it is nevertheless better to use materials with water-repellent properties: cement-based plaster, CBPB, moisture-resistant plasterboard, or prime gypsum plaster very well.
In showers, you can use cement-based waterproofing mixtures; they are applied in a thin layer on top of the plaster. Perhaps this is the best choice, since such mixtures have adhesion similar to tile adhesive.
Which material to choose
- If you are laying ceramic tiles, the priority is the strength of the base; minor cracks do not matter. The optimal solution is cement or cement-polymer plaster.
- If the surface is to be painted, the slightest defect will be noticeable. Therefore, it is worth stopping at gypsum.
- The same rule applies to the ceiling, where finishing inaccuracies are especially visible.
- If you need to do without additional finishing, decorative plaster in a waterproof version is suitable.
You should not choose decorative plaster with deep grooves, such as bark beetle, for wet rooms. Colonies of microorganisms will quickly colonize them and mold will appear.
“Bark beetle” with grooves and a damp room are incompatible things
How to line the walls in the bathroom
Cement plaster
The best option for leveling bathroom walls is cement-based plaster mixtures. They create a durable, waterproof coating. But their disadvantage is that they take longer to dry than gypsum.
To save time, avoid adding excess dirt and avoid confusing the composition, novice craftsmen are advised to purchase ready-made dry mixtures.
But if you decide to prepare the solution yourself, then for this you need: Portland cement grade M400 or M500, washed fine-grained sand and a plasticizer.
The materials are mixed in the following proportions:
- M400: sand - in a ratio of 1:4;
- M500: sand - in a ratio of 1:5.
A plasticizer is added to increase the elasticity of the mixture, facilitate plastering, increase the adhesion of the solution and reduce cracking. Its amount depends on the concentration; you must see the instructions from the manufacturer. The plasticizer can be replaced with a liquid detergent by adding it to the water before mixing the plaster solution in an amount of 0.5-1% by weight of the resulting cement.
Plaster: can it be used, how to protect it from moisture?
Gypsum-based plaster mixtures are not recommended for leveling surfaces in bathrooms, toilets and other rooms with high humidity. But sometimes finishers still choose this option - the setting time is faster than that of cement-sand, and it is easier to apply.
Gypsum plaster is protected from moisture by applying 2-3 layers of deep penetration primer. It creates a water-repellent film on the surface.
This waterproofing provides additional benefits:
- increasing the adhesion strength of materials and coatings;
- reduction of porosity;
- preventing the development of fungus or mold.
Subsequent finishing is important to protect gypsum plaster from moisture. The best option is tiles, but it is also possible to paint with latex-based water-based compounds, for example, Tex, Dulux, Dali, etc.
Drywall
Another way to make the walls in the bathroom smoother is to finish it with moisture-resistant plasterboard (green sheets). It is attached to a frame made of metal profiles or glued with special gypsum glue. The disadvantage of the feather method is that it reduces the size of the room from each wall by 10 cm, but if the curvature is significant, then this is the only possible method.
The frame is mounted from two types of profiles - rack-mount and guide. It is attached to the wall with dowels, and hangers are additionally installed to increase strength. The gypsum boards are screwed to the profile with self-tapping screws, and the joints are taped with sickle tape. The fastener caps and mounting tape are puttied.
The walls are pre-primed for the glue. Glue is applied pointwise to the sheet and applied to the prepared surface. Check the position with a bubble level and level if necessary.
Leveling with plasterboard is easier than plastering walls, but it needs good waterproofing. This method is suitable for tiling.
How to prepare a solution for plastering walls
Preparation of the solution begins with sifting the dry ingredients. Screening removes large particles of impurities. Regardless of the composition of the binder components, the solution requires thorough mixing. The first thing to do is dilute the slaked lime with water. It is sold in stores under the name calcium hydroxide.
The solution is prepared from 1 part cement and 3 parts sand. Before pouring diluted slaked lime into the sand and cement, mix them well. If the solution is thick, add water. The solution should look like sour cream in appearance.
Additional Information ! To speed up the hardening process, plasticizers are introduced into the solution. Any chemical intended for cleaning or washing can slow down setting.
Algorithm for leveling walls under tiles
The cheapest option for the owner is to line the bathroom walls with tiles in a new building without finishing. During major and ongoing repairs of secondary real estate, time/costs arise for the removal of existing cladding. The preliminary preparation of walls looks like this:
- dismantling tiles and old plaster;
- removal of loose, peeling, loose bricks;
- primer before leveling with plaster.
The alignment method depends on the following objective factors:
- use of cement or gypsum plaster - only for open communications or recessed into walls, with small flatness defects and slightly obstructed corners;
- the use of gypsum plasterboard systems - for hidden wiring of engineering systems, in case of serious defects in the geometry of walls and their connections.
Plastering work is facilitated by special beacons made of galvanized steel, along which the mortar is leveled using a rule. The construction of gypsum plasterboard systems makes it possible to increase the productivity and manufacturability of work. However, you will need electric and hand tools:
- hammer drill and screwdriver;
- lace, plumb line, level;
- metal scissors;
- spatulas and knives for gypsum boards.
The structure of the profiles must be aligned vertically at a single level without distortion. In combined bathrooms, false panels are the only way to install a wall-hung toilet and installation for this plumbing fixture.
Plaster
Most manufacturers produce gypsum plasters for wet rooms. For Unis it is Teplon, for Knauf it is Rotband, respectively. The application technology does not differ from standard plastering with cement-sand compositions:
- installation of beacons;
- throwing the solution with a ladle;
- alignment by beacon rule;
- grouting the slightly dried layer.
You can also use cement-based plasters, but this is not necessary, and working with them is much more difficult.
By analogy with plasterboard, waterproofing is necessary, even for compositions that have water-repellent properties.
There are no other methods, other than plastering and making false panels from sheet material, for leveling walls under tiles.
Main difficulties and nuances of use
The main requirement for finishing in places with high moisture content in the air is its moisture resistance. Water on surfaces can cause mold or mildew if standard leveling agents are used, and in addition, the created leveling layer can simply collapse under the influence of water. Therefore, only waterproof plaster is used for wet areas.
At the same time, the result that you want to achieve using this or that composition is also important. For example, decorative plaster for wet spaces allows you to create an immediately finished surface that does not require further finishing, and simple leveling mixtures allow you to obtain only a flat plane for subsequent work - gluing tiles, puttying and painting or decorating with other materials.
General information
Now there are a large number of different mixtures for plastering walls. The choice depends on where they will be used, indoors or outdoors. If plaster is needed for facade work, then the climatic conditions of the area are of great importance. Another important factor is the indoor temperature, humidity and much more.
Another point is the surface material on which the plaster will be applied. For concrete walls, a simple cement mortar is used; for wooden walls, a mixture of gypsum, lime and other components is used. If the walls are made of stone, then even more complex solutions are used.
In addition, if the thickness of the plaster layer is more than 2 cm, you cannot do without a reinforcing mesh, which prevents cracks in the coating.
What is leveling plaster?
The technology for carrying out facing work requires careful preparation of the base. If the walls in the bathroom do not have strong differences in height, leveling plaster is performed as preparatory work. It is made from moisture-resistant mixtures. Special requirements are placed on the strength characteristics of leveling compounds. They are explained by the fact that the bathroom is often tiled with ceramic tiles. Any tile material glued to the wall creates a colossal load on the vertical surface. In addition, tile adhesive, when dry, has the ability to shrink. By contracting, it pulls the tiled module toward the center. The layer of leveling plaster should easily cope with such influences. If a poor-quality mixture is chosen, the tile will simply tear it off and fall to the floor along with a layer of plaster.
What mixtures can be used to level bathroom walls?
The choice of plaster mixtures is quite wide; sellers cannot always give the right advice on choice. Therefore, before going to a hardware store, you need to try to figure out for yourself how to plaster the walls in the bathroom under the tiles. The best way to solve the problem is by elimination. We are moving in the following direction.
- Firstly, you should immediately stop using gypsum compounds, even those that say “moisture-resistant mixtures” on the packaging. Remember, tiles are not laid on gypsum plaster. And all because gypsum will, in any case, absorb a large amount of moisture from the same tile adhesive, so after drying it will crack and lose its strength. Gypsum moisture-resistant mixtures can be used to level the walls in the toilet, but only if the plumbing unit is not combined with the bathroom.
- Secondly, any specialist, answering the question of how to plaster the walls in the bathroom, advises choosing cement compounds. But you also need to take a closer look at them and carefully study the composition of the plaster. Sometimes manufacturers add lime to cement mixtures. It improves the plasticity of the material, but reduces the water-repellent properties.
- Thirdly, when choosing a material for leveling the walls in the bathroom, you must give preference to moisture-resistant compounds intended for tiling. It is better to leave materials with universal properties for other types of construction and repair work.
And a couple more tips: you don’t need to save money in this matter, it’s safer to buy plaster from a brand of a well-known manufacturer that can guarantee the quality of its product; before purchasing, be sure to find the date of manufacture of the mixture on the packaging and check it with the expiration date (every plaster mixture must have one) .
Note! You should not buy expired materials; experts assure that both cement and plasticizers lose their properties over time, so even the most expensive bathroom plaster for tiles will not be able to prevent the cladding from collapsing.
The composition of the plaster must be selected taking into account the quality and structure of the wall. For plastering brick walls, you need to choose cement mixtures that contain coarse sand. For concrete walls, mixtures are ideal, the compositions of which, along with cement, contain an additional filler - fine quartz sand. If you choose the wrong material, performing the type of work described will be extremely problematic.
How is leveling plaster made?
The leveling layer is applied when the base has been sufficiently carefully prepared: all weak layers have been removed, cracks have been sealed with a repair compound, and all protrusions have been knocked down. Then you need to prime the base twice, and only after the primer has dried can you begin the final leveling.
Note! Many apartment walls are painted with oil paint. Whether to remove it before leveling or not is a rather difficult dilemma. If the paint peels off and does not adhere well, it must be removed. In old houses, a layer of oil paint was often placed on a wall that had been treated with drying oil. In this case, peeling off the paint layer will be extremely problematic. But you cannot put a new layer of plaster under the tiles in the bathroom on such a surface under the tiles. What to do in what situation? Experts recommend using a hammer drill to knock off the paint along with a layer of old plaster, re-level the walls in the bathroom and only then lay tiles on them. There are commercially available primer mixtures that have highly adhesive properties. Manufacturers assure that after treating painted walls with it, you can plaster the walls in the bathroom under the tiles. But an experienced master will still prefer to get rid of the layer of oil paint. This is the only way to guarantee the quality of facing work.
A layer of leveling plaster is applied at a time; its thickness should not exceed three centimeters. If to level the walls it is necessary to apply a layer six centimeters thick, the composition is applied in two stages, the brick walls are reinforced with steel or polymer mesh, and steel guides are pre-installed on the concrete base. It is important, after completing the described work, to obtain a flat, not necessarily smooth, surface, the error in height difference of which is no more than 2 mm. Larger errors cannot be eliminated using tile adhesive. If you make serious mistakes at this stage, the tile will fall after the glue dries.
Criterias of choice
Among the key points when choosing plaster products for the bathroom are:
- hydrophobicity parameters of the solution. For rooms with special microclimate conditions, exclusively waterproof finishing options are used;
- The composition for plastering walls is selected depending on the base material. For example, when arranging wall blocks, the priority is a solution with a filler made of fine sand; in the case of brickwork, preference is given to the version made from coarse sand;
- it is necessary to make sure that the shelf life of the product corresponds, check the storage conditions, otherwise it is difficult to predict the results of finishing work.
When choosing plaster for a bathroom, you need to take into account the parameters of hydrophobicity.
Priority is given to offers from well-known brands in a competitive environment. Waterproof plaster for the bathroom in Moscow and other regions is represented by a number of domestic and foreign manufacturers. It is worth remembering that purchasing relatively inexpensive products from new companies risks questionable quality of the product, the need for new repairs and additional investments.
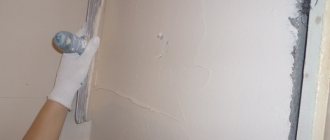
Plaster application technology: sequence of work
The quality of the plastering finish will correspond to the properties declared by the manufacturer only if the work is carried out in strict sequence in compliance with the technology.
Preparation of the grounds
The surface of the wall in the bathroom must be carefully prepared. Before you begin plastering, you will have to complete the following steps.
- Carefully inspect the base: it should not crumble, have traces of grease and dirt. If necessary, clean the walls of old plaster, paint, dust and any dirt. Rinse the wall with water.
Tip: to remove old paint, you can use a blowtorch or a special chemical solution sold in hardware stores.
- If the wall in the bathroom is made of brick, it is necessary to widen and deepen the seams and clean off all efflorescence with a steel brush. If there is a lot of efflorescence, you can make your work easier by using an angle grinder with a brush attachment.
- If the walls are too smooth, make a notch to improve the adhesion of the mortar to the base. This is especially true for concrete walls.
- Treat the surface with a primer specially designed for this purpose.
- Install beacon strips on the walls. They should be positioned strictly vertically, the outer ones should be at a distance of 30 cm from the adjacent wall. The rest are placed along them at a distance of approximately 1.2 m. The slats are attached to the wall using plaster mortar applied to the wall in 20 cm increments.
- Instead of beacons, you can use another method. Using a plumb line, determine the required thickness of the plaster layer. To indicate the required thickness, hammer nails into the corners of the walls under the ceiling so that their heads are located in the same plane.
Spray stage
A day before the start of the main work, it is necessary to carry out a spray, which serves as the initial stage of the plastering process. Spraying can significantly improve the adhesion (adhesion) of the solution to the base. At this stage, a more liquid solution with a creamy consistency is used. The work is carried out as follows:
- the base is wetted with water;
- the solution is “thrown” onto the wall using a wide spatula or trowel so that the layer thickness is approximately 5 millimeters.
- No need to level the layer!
Waterproofing compounds
Some building mixtures additionally include special substances - water repellents, which help to achieve complete waterproofness of the coating. Usually these are liquid glass, latex, asphalt - these components are added to the plaster in small quantities. Such compositions are especially recommended for application to gypsum tongue-and-groove slabs, from which partitions in bathrooms are often created.
Liquid glass is used as a water repellent
How to choose a mixture for plaster under tiles?
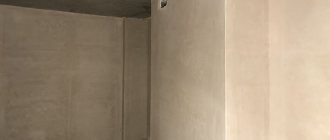
Plastered walls in the bathroom under tiles
Before choosing a mixture for finishing under tiles, you need to take into account the fact with what layer you plan to cover the surface. You also need to pay attention to the types of binding materials that manufacturers mix into the composition.
For living rooms, it is best to use gypsum solutions, because in such rooms not only the aesthetic appearance is important, but also the environmental friendliness of the materials used.
For rooms with high humidity levels, it is better to choose a cement-based solution, which will act as a barrier and will not allow excess moisture to penetrate deep into the base of the wall.
Before you start preparing the mixture, you do not need specific knowledge and skills; the process looks elementary. To do this, pour sand into the container, add cement, mix the dry ingredients and add water a little at a time until the desired thickness and uniform consistency is obtained.
If you follow these simple rules, the tiles will be laid more efficiently, which will ensure long life and good durability of the cladding.
Advantages and disadvantages
Let's consider the main advantages of moisture-resistant solutions:
- Universal mixtures are suitable for working with wooden, concrete and brick bases.
- The material is resistant to temperature changes.
- The coating does not crack and has minimal shrinkage.
- The solution is economically consumed.
- Plastic plaster is easy and convenient to apply.
- Eco-friendly materials do not cause harm to health.
Such mixtures can be used for decorative wall decoration.
The disadvantages include:
- relatively high cost;
- some types of solutions take a long time to dry;
- the components of such mixtures are suitable for application to a specific type of base.
Therefore, before finishing you need to choose the right type of solution.
High level of plasticity ensures easy application
Features of work in problem areas
Plastering a wall in the bathroom
In places where various communications are laid, laying plaster becomes too problematic.
In such areas, it is necessary to install several beacons, cut out a stencil or template, and only then can you begin processing. Templates can be cut out yourself from any available metal sheet, but if the work is carried out in an area under a pipe, then you should forget about convenience. Such work will have to be carried out using any object that can fit into this hard-to-reach place.
Now you can start finishing the corners of the walls. These areas are often left for dessert, because they need to be finished with special care. One strip can be plastered along with the finishing of the entire wall, but the adjacent one (the one that forms the corner) is processed only when the first one is completely dry.
All subsequent actions are no different; the walls also need to be checked using the rule and made sure that the angle is even. To do this, just bring the level to the structure, and if there are no protruding or sagging areas, you have done everything right.
We plaster the walls under the tiles
Considering that the walls were plastered before laying the tiles, the beacons should not be removed, and grouting of the plaster mixture need not be done. Even if you still have small defects or irregularities, you don’t need to eliminate them until they are completely smooth, because they don’t pose any problems during laying the tiles.
The main requirement is to wait until the plaster mixture has completely dried before laying the tiles. If the work falls on cold days, make sure that the air in the room is not lower than +160C.
What is the difference between moisture-resistant plastering?
In conditions of high humidity in interior spaces, bathrooms, kitchens, special mixtures with additional additives are used to protect against the appearance of fungus and dampness on external walls. A distinctive feature of moisture-resistant plaster for exterior use is that it protects the surface from the penetration of excessive amounts of water while simultaneously allowing vapor permeability, which allows the walls to “breathe.” This property is achieved through the use of hydrophobic components. The polymer mixture prevents the appearance and development of microorganisms on any treated surface.
The main characteristics of the material include:
- strength;
- durability;
- additional heat and waterproofing;
- aesthetics;
- large selection of composition and colors.
There are leveling and decorative mixtures, in dry form and ready-to-apply solution. The advantage of the material is that it is easily applied to any surface: brick, aerated concrete, wood.
Control
The following defects are allowed on plastered surfaces prepared for laying tiles:
- per 1 meter of surface the deviation from the vertical and horizontal is no more than 3 mm; the maximum deviation over the entire height of the building is no more than 15 mm,
- number of defects per 4 m2 maximum 3 pieces;
- the depth of the depressions should not exceed 5 mm;
- base humidity percentage is not more than 8.
Plaster is divided into three types according to quality: normal, improved and high-quality. The tolerances for deviations from the norm depend on this. A simple one is used under the tiles. The remaining two types are used in residential buildings, children's institutions, theaters and other premises.
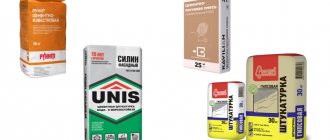
The best manufacturers
Among the many manufacturers, we need to highlight the VGT brand and its Gallery product. The cost of 1 bucket weighing 18 kg is 1500 rubles. This decorative mixture has a high degree of viscosity. Its components have a large fraction, so the solution is convenient for creating relief coatings.
The following types of base are suitable for application:
- plastered surface;
- Brick wall;
- concrete base.
There is no need to thoroughly prepare the wall before application. The solution is suitable for leveling and is distinguished by its ability to hide serious defects.
The Weber company produces a ready-made Pas Extraclean mixture that costs 3,200 rubles. This plaster is suitable for creating a fur coat effect and can be applied to external and internal surfaces. The solution does not require mixing; it is sold ready-made.
Litotherm Factura plaster from the Litokol brand. The dry ready-mix weighs 25 kg and costs 630 rubles. This is a light powder that is used for dry rooms and rooms with high humidity. This plaster can be used by beginners who do not have enough experience to work with high-quality compounds.
Many companies are engaged in the production of plaster mixtures