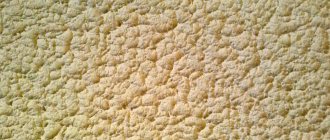
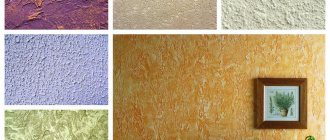
The decorative capabilities of the material called “Wave” from the “Optimist-Elite” series can be guessed from its name. Due to the special properties of this decorative plaster (resists regular exposure to moisture and salts), it is ideal for finishing buildings on the sea coast. However, most often it is used in interior work. Textured wave plaster will allow you to create a wide variety of designs. Different application methods can lead to the creation of an imitation of ripples on water or a raging sea.
Features of the material
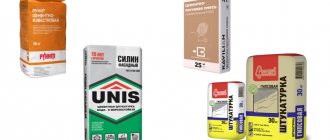
The range of domestic finishing materials "Volma" is quite rich: there are no fewer products on store shelves than products from famous foreign brands. Many craftsmen call the brand the “answer” to the German “Rotband”, which costs an order of magnitude more. Among the Volma product line you can find plaster for any type of work: there are rough leveling, finishing and even decorative materials.
The composition of the plasters includes only environmentally friendly components that are safe for humans and the environment. Among them, the main share is occupied by mineral substances, but there are also modern synthetic ingredients, as well as fillers and binders. Some plasters can only be applied by hand, others are designed for machine application.
Types of plaster
All types of plaster of this brand can be divided according to the main component, which forms the base of the building mixture:
- gypsum - contain gypsum, with some exceptions they are recommended only for interior work;
- cement - ideal for all types of work, considered universal.
Depending on the purpose, all plasters can be divided into those that are suitable for rough (preparatory and leveling) work, for maintaining the microclimate in the room, for increasing the strength of surfaces, etc.
Here are examples of the range of Volma brand products:
- "Layer". A gypsum mixture based on a light binder with the addition of chemical components to increase adhesion and optimize water-holding capacity.
- "Titanium Layer". High-strength gypsum plaster with increased adhesion to surfaces.
- "Layer Ultra". A material that does not require putty, based on gypsum.
- "Canvas". Dry lightweight mixture for manual application with mineral and synthetic additives.
- "Plast". A special material for easy leveling of walls and ceilings, plastic, can be used for decorative finishing.
- "Lux". Super lightweight thin-layer plaster for aerated concrete, also suitable for foam concrete.
- "Start". A starting gypsum material suitable for walls and ceilings inside heated rooms with normal humidity.
- "Title". Gypsum material for finishing work that does not require subsequent puttying.
- "Gloss". Material applied for subsequent finishing putty.
- "Aqualite". Dry plaster mixture for finishing rooms with high humidity, suitable for application under tiles.
- "Aqualayer". Cement leveling material with modern polymer and mineral additives and modifiers.
- "Bark beetle" and "Fur coat". Decorative plasters to create a unique texture contain white Portland cement, microfiber, modifiers and fractional stone chips.
- "Case". High strength cement plaster. Designed for finishing the base and carrying out other external work.
- "Gypsum asset". Mixture for professional machine application. It has a variety - “Gypsum Active Extra” with increased resistance to cracking.
- "Tandem". A universal mixture that can serve as plaster and putty.
Surface preparation
Due to the peculiarities of the composition of the plaster mixture, decorative plaster is able to hide minor defects, such as small cracks, cavities, and chips. Therefore, most often, surface preparation comes down to degreasing and removing dust from the surface.
In case of detachment of fragments of the wall being treated, it is necessary to remove the parts that have separated from the surface. If after this there are large and deep chips left, we fill them with putty, and it is not necessary to achieve a smooth surface - decorative plaster conceals irregularities up to 2 mm deep. After drying, move on to the next step.
Next you need to apply a deep penetration primer. The treatment will prevent the occurrence of fungus under the coating in the future. Also, the soil evens out the absorbency of the surface and increases adhesion (the ability to adhere, stick layers together).
If the surface on which you plan to apply decorative plaster is dark or bright in color, it is recommended to treat it with a covering primer, which increases adhesion and creates a white matte finish when dry.
This completes the preparation of the surface for applying decorative plaster Volna, let’s proceed to the creative stage.
Scope of application
Volma brand building compositions can be selected for any situation. The range includes products for rooms with different types of humidity, including bathrooms, showers, kitchens, saunas and swimming pools. "Volma" is suitable for application on all types of building bases - brick, concrete, aerated concrete, gypsum plasterboard, foam concrete, chipboard, OSB, cement-lime coatings.
Plaster can be used to decorate different rooms, applied to walls, ceilings, partitions, niches, arches. Many products are suitable for facade work, cladding plinths, and unheated buildings.
Specifications
Volma plasters may differ from each other in technical parameters, which depends on the components included in the composition. There are also average characteristics. Thus, the time until most mixtures dry completely is 5-7 days, and the recommended temperature for working with them is +5...+30 degrees. After hardening, the plaster layer tolerates temperature changes within the range of –40…+60 degrees. The initial setting time of the layer is 20-40 minutes, the final setting occurs in 180 minutes.
Compound
Volma plasters are made on a cement or gypsum base. Also, to increase strength, stickiness and other positive properties, stabilizers, modifiers, plasticizers, frost-resistant additives, anti-caking agents, etc. are introduced into the composition of materials.
Shades
The mixtures are presented in gray, beige, light yellow versions. They are usually used to level various surfaces. Those Volma plasters that are intended for finishing are sold in white. White mixtures can be tinted with dry pigments, but this is only required for decorative plasters. If desired, after drying, they can be painted with any silicate, silicone, or acrylic paints.
Layer thickness
The recommended layer thickness when working with these types of building materials is 5-30 mm. The permissible thickness of the plaster layer is 6 cm, but only with preliminary reinforcement. The minimum layer that can be applied is limited by the grain size of the filler, and in its absence - by 3 mm.
Adhesion and strength
All Volma plasters are characterized by a high degree of adhesion to building materials. Their compressive strength is 3.5 MPa, and their flexural strength is 1.5 MPa.
Frost resistance and water absorption
Thanks to the presence of special additives that increase resistance to low temperatures, some plasters can withstand up to 75-100 freezing and thawing cycles. Most of them tolerate temperature drops down to –40 degrees, and some mixtures (for example, “Bark beetle”) - down to –50 degrees. All compositions are characterized by a low degree of water absorption.
How to create deep, sculpted waves
You may have seen photos with beautiful deep relief. This is not plaster, but decorative 3D panels made of gypsum, solid wood of various species, and MDF.
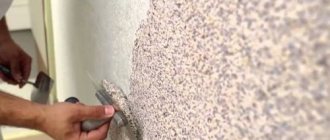
But a similar effect can be achieved by using a rotband, creating waves on a wall of decorative plaster yourself. The design is formed by the still liquid composition using spatulas, palette knives, brushes, and some modeling can be used. The permissible relief height is 2 cm. In a similar way, a world map relief is created from plaster.
The third way to obtain deep relief is counter-relief. It is also possible to take a rotband as a basis. Apply a layer of up to 5 cm to the surface. After the plaster begins to set, cut out the required pattern from the mass with a scraper or knife. You can correct with brushes or a damp sponge. After complete drying, sand with sandpaper and liquid putty.
Tips for using plaster
When working with plaster mixtures, it is necessary to ensure optimal environmental conditions (temperature within +5...+30 degrees, humidity not higher than 80%). If the humidity in the room is too high, the plaster layer will swell or peel off. You cannot treat walls if they are frozen - you will have to wait until the temperature rises outside or indoors.
The solution is diluted in small portions, because after 20 minutes the top layer of gypsum in the container begins to set, and you need to have time to apply the mixture to the surface. The substrate is prepared carefully, since poor quality of the base reduces the adhesion of the plaster. Before painting plaster walls or wallpapering, it is important to make sure that the plaster is completely dry.
Preparation of the solution
The exact proportions of the dry mixture and water are always indicated on the plaster packaging. On average, 1 kg of powder mass requires 0.6 liters of clean, cool water. First, a measured volume of liquid is poured into a plastic container, then the powder is gradually poured in, thoroughly mixing the product using a construction mixer.
Before applying to the walls, the plaster should have the consistency of sour cream, without lumps or foreign inclusions. If the mixture spreads, it means it is not prepared correctly and there is too much water in it.
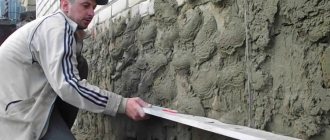
Surface preparation
Before plastering begins, prepare the base - a wall, ceiling or other area. It is cleaned of the old coating, flaking, crumbling pieces of paint and putty are completely removed. Dirt, grease and oil stains are wiped off with a solvent. Metal parts are treated with anti-corrosion compounds, otherwise they will quickly rust under a layer of plaster. In addition, the following are taken as preparation measures:
- clean the walls from traces of mold and mildew, treat the entire surface with an antiseptic (this is especially important if the work is carried out in a damp room);
- remove traces of efflorescence (salt deposits);
- large depressions are covered with cement mixture, cracks are opened and also coated;
- apply 1-2 layers of primer (only Volma Layer does not require preliminary priming, as indicated on the packaging).
As a primer, it is better to use compositions that are produced by the same Volma-Contact for highly absorbent substrates, based on acrylic dispersion and mineral additives. You can also use the Volma-Interior primer, which is suitable for preparing surfaces for painting and applying decorative plasters.
Tools for work
Volma gypsum plaster is applied using standard construction tools that are suitable for working with any mixture. For manual plastering you will need:
- spatula, trowel, trowel or trowel for applying the product to the wall;
- “H” shaped rule for leveling the plaster layer;
- a wide spatula or a trapezoidal rule for cutting the mortar;
- construction foam plastic grater, polyurethane for mashing the composition;
- large metal spatula for glossing;
- metal scissors and beacons for leveling walls using beacon technology;
- level for determining plane deviations.
Consumables may include fiberglass mesh, rags, and masking tape for protective gluing of various surfaces.
Test application
At the very beginning of work, craftsmen advise diluting a small amount of the mixture for a test application. This will help determine the exact setting time of the composition, its consumption for a certain area, and the labor costs for leveling. The layer thickness is also set at this stage in order to later comply with this indicator.
Sequence of operations
Surface treatment with gypsum or cement plasters of the Volma brand is carried out as follows:
- Leveling the base. Throw the mortar onto the wall using a trowel or trowel. Level the plaster layer using the rule, moving it from top to bottom between pre-installed beacons. Excess mortar is removed and removed, and any recesses that appear are filled with it.
- Trimming. After about 40-60 minutes, when the plaster has set, small roughnesses are smoothed over with the rule. If you plan to decorate the walls with tiles, further steps are skipped.
- Smoothing. Immediately after cutting the mortar, spray the wall with water and rub it with a construction float until “milk” appears on the surface. Even the smallest roughness is thoroughly polished and pores are smoothed out.
- Glazing. A wet metal float is used to process the surface to make it perfectly smooth.
- Padding. If you plan to paint the wall, apply a layer of suitable primer to the plaster.
Tools required for work
As already noted, with due persistence, patience, several training sessions on tablets and on an inconspicuous section of the wall, it is possible to create waves on a wall made of decorative plaster yourself.
One of the main conditions will be to use the right tools, which include:
- stainless steel Venetian trowel;
- spatulas of different sizes;
- rubber or velor pressure roller, as well as fur;
- foam sponge;
- paint tray;
- a plate made of hardboard, glass or plywood for rolling out;
- hammer drill or drill with a “mixer” attachment;
- various textured rollers, spatulas, stamps.
The Venetian trowel is the main tool for applying the plaster mixture and creating a design.
It differs from the usual one in the metal of the working surface (high quality stainless steel is used), the surface is carefully polished, the corners are rounded, and the edge is chamfered. Metal spatulas will be needed to apply the plaster to the trowel.
A fur roller is needed for painting and glazing the finished coating.
Velor and rubber rollers are used for partial shading of the relief.
A foam sponge will be needed to rub the glaze composition, which will ensure uniform coverage and hide the joints of the grips.
As mentioned above, with the help of special devices (rollers, stencils, stamps, spatulas, sponges, brushes) a varied relief of the freshly plastered surface is created. The boundaries here are set only by imagination and courage.
Material consumption
To calculate the exact consumption, you will have to take into account many different factors - the type of plaster, the thickness of the layer, the degree of curvature of the surface, the type of base material, the technique of applying the composition. This can be done using online calculators, although it is easier to look at the approximate consumption on the packaging of the building mixture and buy the material with a small margin.
Examples of consumption of Volma plasters per layer 1 cm thick, depending on the specific type, are as follows:
- “Layer” - 8-9 kg/sq. m;
- "Plast" - 10 kg/sq. m;
- "Canvas" - 9-10 kg/sq. m;
- “Socle” - 15 kg/sq. m.
Advantages and disadvantages
The advantages of Volma building mixtures include:
- frost resistance, resistance to temperature changes;
- high degree of adhesion with most materials;
- environmental cleanliness;
- low consumption;
- ease of application and subsequent operation;
- optimization of the microclimate in the house;
- obtaining a flat, smooth surface;
- plasticity, elasticity of the material;
- absence of shrinkage of the plaster layer, its cracking and detachment;
- preventing the development of fungus and bacteria;
- affordable price and high quality.
The only downside is that sometimes plaster packages may contain large mineral particles that can ruin the finishing layer if they are not removed. Some types of plaster are a little more expensive than other domestic analogues, although they are better in price compared to foreign brands.
Photos of interior options
The following is a description and photo of examples of interiors decorated with “wave” decorative plaster:
- An option where the ceiling in the kitchen is not flat, but textured, and the walls are smooth, one or two colors, will look creative. You can recreate painting motifs or clouds.
- Decorative brick with a smooth surface creates an effect of style and atmosphere.
- Concrete plaster is often used in kitchens. In the apron area, you can use transparent or mirror wall panels.
- The living room is a mirror of the entire living space in the apartment, so soft colors, smooth surfaces and small-sized patterns are suitable for this area. To visually increase the space, decorative plaster of light shades with a granular texture is used. You can create a small pattern in the center that will attract attention with its originality.
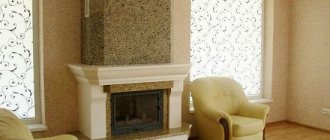
- If the room has a fireplace, then the cladding is suitable in the style of brickwork. Under such a coating, chips and cracks on the surface will be hidden.
Textured ceiling:
Decorative brick:
For concrete:
For the living room:
Brickwork in a room with a fireplace:
Decorative plaster in waves can be combined with any type of interior. It can be used in combination with patterns or laid as a single-color coating. You can recreate the effect of waves with a trowel, roller and medium-sized brushes. The work is carried out independently or with the assistance of craftsmen.
Conditions and shelf life
Packs of dry plaster should be stored only in dry rooms where contact with moisture is prevented, placing them on durable wooden pallets. It is advisable to immediately use packaging whose integrity has been compromised. You can also pour the mixture into a strong bag and tie it tightly. The shelf life of Volma plaster is 12 months.
Despite the huge selection of construction and finishing materials on the modern market, many choose the Volma brand, since it has long earned the respect of professionals. The products from this company are high-quality and wear-resistant, so it is quite reasonable to give your preference to them.