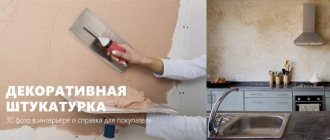
Decorative plaster is a granular mixture that includes various types of fillers in the form of stone or marble chips. There are several types of such plasters: structural plasters based on cement or lime, latex ones based on latex, and silicate plasters based on potassium silicate.
Among the main advantages of decorative plaster for walls are the following:
- air and steam passage;
- easy to wash and clean;
- resistant to fading and does not change the initial texture;
- durability;
- quick application;
- will easily hide small unevenness and defects of the wall.
When using plaster, creative people and people with great imagination can create masterpieces with their own hands. At the same time, textured decorative plaster easily accepts all other finishing materials, such as panels, wallpaper, tiles. But all this will not give the expected results until you carefully watch the video lessons or master class on applying decorative plaster:
Application methods
If you want to create beauty in an apartment or house with your own hands, then you can’t do without a video and a master class. There are two main ways to apply the presented material.
Method using rustication. Here rustication is used, and the pattern is applied to already hardened cement. You can learn this example by watching a video master class about decorative plaster.
Method when using stamping. In this case, various types of stencils are used. Each of these methods requires special attention and accuracy from the person who carries out this process, because the slightest mistake can ruin the whole picture.
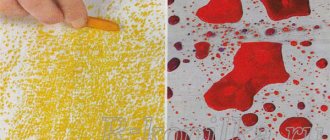
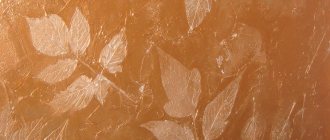
For example, let’s consider an option that, after the final result, presents incomprehensible, as if fairy-tale flowers, which are applied in the same way that frost paints on the windows in winter. If you also choose the right colors for all this, matching both your tastes and the rest of the interior of the apartment, you will end up with a pattern called “Wave”.
Lime-sand plaster
The presented type of decorative plaster is the cheapest of all types. But despite the fact that the price is relatively low, its quality is no worse than all other types. Application can be done in various ways, but it is important to properly prepare the surface. To fully prepare it yourself, you need to completely get rid of the old coating; it is advisable to degrease the entire surface of the wall, and then prime it.
When decorating the walls in the kitchen, in addition to the already obligatory degreasing, complete removal of dirt is also added. We suggest you watch how to prepare the surface in the following video master class:
Due to frequent cooking in the kitchen, the walls become very dirty, and applying primer is only possible on a clean surface. It is necessary to begin work only after the plaster has completely dried: the waiting period is about 12 hours.
Textured plaster is one of the most common and used methods for applying decor. The process is carried out using the usual methods, you just need to start from the corner and plaster in parts. Application can take place in two ways: in one layer or two layers. It is necessary to approximately calculate those sections of the wall that will be most hidden after installing the furniture. It is in these places that it is desirable to make connections between sections.
Any solution of the presented type is applied with a spatula. If there are small grains, you can use a pneumatic sprayer. In order to add density to the already applied plaster, you can take graters and half-graters. If you do not carry out the compaction process when working with your own hands, then over time small cracks may form. Texture, with this type of decorative plaster, can be added in several ways:
- processing using plastic solution;
- processing using semi-plastic solution;
- spray application.
Semi- and plastic types
Texture in both cases is added after complete leveling of the decorative plaster. The movements should be as long and sweeping as possible, or the second method is in circular movements. You need to wait about 2 hours for it to set. The relief is created by following special rules, and the final result in the form of a drawing will depend on the correctness of the work.
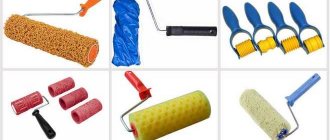
To add texture, you can use a variety of materials:
- special blades are sold;
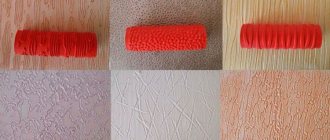
- plaster rollers;
- or use an ordinary broom.
All your fantasies will be realized depending on what you want. Modern designers offer ready-made methods for interior decoration. A pattern can be applied to the surface in 2 different ways. The first method involves applying a new layer. The second method is to carefully cut out a pattern from existing plaster. When using the second method, you must clearly know that more than 5 mm cannot be cut.
Features of application with filler
When purchasing this type of decorative plaster, you only need to apply it to the wall, following the rules. After all, it gives texture to itself after complete drying. Application should be done in an even layer of 2 to 5 mm. But the movements must be cross and continuous.
Application is carried out using familiar tools, and if there is excess, it is better to remove it immediately using ordinary water. If the plaster has had time to dry, then removal is carried out mechanically.
When applying it yourself, the texture is added with a spatula using, for example, wave-like or circular movements. The work requires 2 people. One applies the decorative plaster itself, while the second paints immediately behind it. Watch the video master class:
The drying process takes place within 2-8 days, depending on the size of the layer. After complete drying, you can proceed to painting.
You can make the mixture yourself
Since in the absence of experience the work will progress rather slowly, it is advisable to add water-retaining additives to the plaster, which will make the work easier and allow you to take your time when applying the mixture. Cellulose esters such as Mecellose® from South Korea are very effective for this purpose.
If you are not going to paint the wall in the future, then the colored pigment can be added directly to the plaster mass. Tinted plaster will not lose its decorative appearance in the future even if chipped or scratched. When painting plaster in the paste, various additional ingredients are added to the mixture to enhance the decorative effect. These additives are added to the dry mixture before adding liquid and mixed thoroughly.
When you independently add pigment to the plaster mixture, there is a danger of uneven combination of the color with the plaster or “multiple tones” of shades with different batches of the plaster mass.
Therefore, most often plastered walls are painted. Moreover, the use of various modern dyes, including those with a mother-of-pearl effect or mosaic inclusions, will give your wall an original look.
Decorative plaster is applied using a spatula, roller or trowel. And if you are completely uncomfortable using these tools, then you can apply the plaster mass by hand, wearing a pair of thick rubber gloves.
We recommend practicing before applying.
DIY decorative plaster works best if you practice on a fairly large piece of drywall before applying it. And it’s best to start the main work from those places that will later be draped with curtain fabric or covered with the surface of furniture cabinets. In this way, you will gradually develop a certain algorithm of movements and acquire the necessary dexterity.
Freedom for creativity! We create a unique surface
The next stage is the most creative. Using purchased or homemade rollers, special hard brushes, combs, or using other technological techniques that your imagination or decorative plaster video tutorials suggest, we form the texture of the wall. Using a regular trowel, you can also add an interesting roughness to the surface; just simply lean the tool against a wet wall and sharply “tear” it off. The resulting torn relief can be slightly smoothed with circular movements of the same smoother or rubber sponge.
Another way to create texture is to apply a thicker mixture in small, irregular strokes onto the plastered surface. However, this method is quite complicated for beginners. For this application technique, the movements must be practiced, and it is very difficult to correct unsuccessful places. The appearance of the surface depends on the nature of the master’s movements: wide, sparse strokes will create a calm relief, and more energetic and frequent application of the material can give the surface greater expressiveness. It is more convenient to apply decorative plaster together: one master applies the plaster mass, and the other, behind him, forms the surface texture.
Dyeing process
Coloring can also occur in various ways. There are special brushes and rollers for this, and you can also use mittens. To create effects, such as scuff marks, rub a damp sponge over the painted surface. After the decorative plaster has completely dried, if small protrusions have formed, then the best colors for them will be gold or silver, and the best coating will be azure.
If you want to repaint it in other colors, then this will not be a problem, and the texture will not be disturbed. To further increase the longevity of the process, special waxes are sold. After purchasing, applying it yourself and completely drying, in addition to long-term durability, you will additionally receive the effects of slight shine and shimmer. This kind of work should still be entrusted to a professional. But if you want to try to do it yourself, then you should watch the video tutorials and master class on coloring:
Master class on making Venetian marbled decor
Before applying a decorative layer under Venetian plaster, it is necessary to very carefully and efficiently level the surface of the wall. In this case, this is the central condition of the master class.
In the future, the plane of the wall will acquire the specific shine of polished marble stone, on which all the flaws and curvature of the decorative plaster will be visible. Leveling is done with a Venetian trowel and finishing putty with marble filler.
Subtleties of work
During puttying, small color spots and micro-bulges are formed, imitating the multi-colored and roughness of natural marble. After the layer has dried, be sure to check for possible scratches and tool marks. If there are any, they are rubbed down with your own hands using 180-grit sandpaper. The layer of the cleaned surface is treated with a deep penetration primer.
Italian Venetian plaster Grassello Extra is applied to the surface prepared in this way. Its difference from other materials lies in the highest quality of the resulting decorative coating. To give a marbled shade, PUFAMIX toner concentrate was used.
Important! In this case, the master class recommends not to skimp on quality; by overpaying for quality, you benefit as a result, since with minimal consumption of Italian decorative plaster you get a guaranteed result, which cannot be said about cheap and not always high-quality Chinese substitutes.
Immediately before applying the Venetian, you can adjust the viscosity of the mixture using a small amount of water. For a quality application, it is important to maintain the correct movement of the trowel. A small (10-20 g) amount of the mixture is applied to the surface of the instrument and rubbed over the surface in a circular motion, as if describing a figure eight. Excess mixture is removed.
After applying the entire volume of decorative plaster, they proceed to polishing. In the master class, polishing is performed with two passes with a trowel at 10-minute intervals. Polishing a decorative Venetian is similar to carefully smoothing a plastered surface with a trowel. As can be seen from the master class, when polishing is performed correctly, the surface after drying acquires a characteristic pattern and shine.
The final step is to apply a special wax to the Venetian plaster; as recommended by the master class, it is better to use Cera Antica Venezia (Extra). You need to work quickly, as the surface layer of wax dries quickly. The average consumption is 30-35 g per m2. The waxed surface is polished with a cotton cloth. At this stage, it is possible to make adjustments to the color scheme of the decorative plaster if you add the same toner to the wax composition as for the plaster itself. Often the wax coatings are made darker than the main part of the decor, which allows you to get an interesting “deep” effect, but these are the subtleties of the master class.
Important! Before tinting wax, there is always a risk of making a mistake in the exact shade, making it lighter or darker. It is difficult to correct the painting after the wax composition has dried due to the zero absorption of any polishes into waxed plaster.
This tutorial does not provide color correction tools, but they exist. Most often, correction is possible by re-applying wax, heating the surface and re-polishing the wall.
Interesting volumetric decorative plasters
In addition to “Venetian”, you can use a very simple and easy-to-use version of decorative plaster called Travertino. A simple method of application and a sand-lime base make it possible to obtain very expressive relief designs, often even two-color with silver or golden inclusions. One of these worthy options is shown in the master class on video
Decoration and effects tools
Quite different tools can be used for different designs, effects and decorations. The main ones will be:
- application tools;
- roller;
- rope;
- additional homemade materials.
Textured elements should be coated with two colors, sometimes even selected from the opposite spectrum. To do the work yourself, watch the video master class on applying plaster:
Whatever method of applying plaster is adopted, the main thing is to be careful and accurate. And you will succeed!
Recommended Posts
Derufa – decorative plaster
Decorative plaster made from putty
Pebble decorative plaster Ceresit
DIY decorative bark beetle plaster
American – decorative plaster
Consumption of decorative bark beetle plaster per 1m2
Creative process
Considering the amazing results of the work obtained with textured plaster (Figure 2-8), it may seem that such creations were made by first-class specialists with extensive experience. However, there is nothing tricky about this, and anyone who wants to can cope with such a creative process. In addition, on our website you will find several interesting master classes on making textured plaster with your own hands. Thanks to them, you can decorate walls in living rooms, bathrooms, pools, as well as ceilings, columns, and facades with interesting reliefs. Only for work in swimming pools and outdoors should you use a special material that is resistant to moisture and temperature changes.
methods of applying textured coating (Fig. 1)
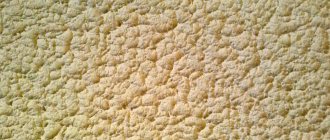
rice. 2
rice. 3
rice. 4