The term “plaster” usually brings up the idea that: “well, this is a material that is used to patch up different, not very smooth walls, to seal cracks, joints and other defects.” But if you add dye to the material, you get a unique and beautiful version of modern room decoration. Today there is a large selection of a wide variety of decorative plaster. If you are interested in the nuances and photos of each type, come here. But today we will talk about such a variety as antique decorative plaster.
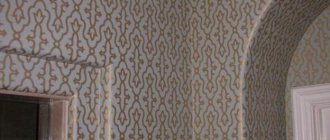
This plaster gets its name due to its rough and slightly worn appearance. Thanks to latex (which is included in its composition) and a special application technique, the material acquires a slightly light tint in places with the greatest friction. It is worth noting that this finishing option looks very noble.
Antique plaster can be used not only for interior work, but also for finishing the facade (Venetian plaster, for example, cannot do this). The material is available in 4 or 5 liter cans. It is applied to a primed surface and, after drying, forms a special film that has good resistance to mechanical stress. Moreover, the plaster does not contain toxic substances and is not flammable.
Features of the material
Antique plaster is used to decorate the external and internal surfaces of walls.
The material is resistant to fire; when it dries, it forms a film on the surface that provides high performance characteristics of the coating and protects against mechanical impacts.
The plaster mixture is considered universal due to the components it contains that create the effect of cracking and abrasions. With its help, defective places on the walls are easily hidden and the room is given a “vintage” look.
Antique renovation methods
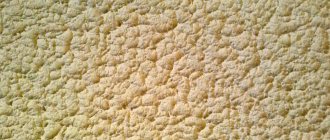
The relief is applied using a metal spatula. After about a day of drying, the surface of the “antique” walls can be polished with colored grouts. Plasters with the so-called “bark beetle effect” are widely popular today; the surface of the wall will subsequently appear subject to numerous grooves and pits.
- Using antique latex paints
Such materials, when repairs and antique finishing are carried out, have become most widespread. Their main advantage is that these materials are absolutely non-toxic and can be applied directly to unplastered wall surfaces.
Having a special latex in its composition, during friction the surface of the walls can be lightened or vice versa. In order to apply antique latex paints to the surface of the walls, however, it is recommended to repair large defects, if any, on the walls in the form of cracks, peeling layers of plaster, etc.
- Use of wood with antique effect
Wood imitated as antique has become no less widespread today. Particularly beautiful in this case are shabby wooden portals for windows, doors and fireplaces, as well as massive antique wooden chests and columns.
Today there is a special technology that can be used to artificially age wood. To do this, soft fibers are first removed from the wooden surface, and then the surface treated in this way is given a special relief that imitates antiquity.
In general, as you can see, there are a huge number of ways to carry out repairs and antique finishing. All these methods are different and require completely different approaches and financial investments. By choosing the right way to decorate a house or apartment in an antique style, you will get a unique design in your home, which will always be a pleasure to be among.
As can be seen from all of the above, decorating a house in an antique style is an excellent solution to add some zest and originality to the interior of the house, thereby expressing and feeling all the beauty of our life.
Of the many ways to decorate walls, antique decorative plaster also finds quite wide application. It is used not only for interior work: finishing facades using this method is also quite popular. Antique decorative plaster allows for creative imagination and requires a subtle approach. The “antique” coating bears this name due to the effect of an old noble coating. On the wall, decorative antique plaster looks rough and has slight abrasions, which visually ages the coating. Artificial latexes in the composition and application characteristics give the plaster a lighter shade in places of greatest friction. For painting use a brush with long bristles. Any primed surface is suitable for applying this material. Dried plaster forms a microporous film, and because of this the surface becomes resistant to mechanical stress (scratches, chips, etc.). The paint is applied in a circular motion and where the brush pressure is stronger, a “worn” effect occurs. But the final stage of this type of decorative finishing is rubbing the surface with a regular foam sponge, brush or cloth. After the paint has dried, the surface of the wall is covered with wax, making it shiny and smooth.
Advantages of antique decorative plaster
This type of decorative finishing has a number of advantages, thanks to which it has become widespread: Antique decorative plaster is suitable for interior decoration and facade decoration. Easy care. Any detergent that does not contain a solvent is suitable for washing this material. Possibility of use in wet areas. Resistance to various weather conditions, mechanical damage, abrasion. The material is non-toxic and fireproof. Sequence of work The first thing you need to do is prepare the surface. There should be no damage, cracks, or bumps on the wall. The surface must be dry and clean. It is not necessary to putty it. One layer of a special primer will be sufficient, the drying period of which is about four hours. Applying the coating itself. The paint should be applied with a long bristle brush. The application technique involves using a brush in a circular motion to achieve the desired antique effect. You can apply two layers of different shades. The last stage of performing antique decorative plaster is applying a layer of white wax. After the coating has dried, it is cleaned with a sponge (you can even use fine sandpaper) and coated with a layer of white wax to add shine and smoothness.
One of the options for finishing wall surfaces is decorative plaster. It creates not only a reliable surface that perfectly protects against many types of influences, but also gives the interior and facade an unusual and stylish appearance. Do-it-yourself decorative plaster is applied using different techniques. The choice of composition determines what appearance the surface will acquire after finishing work. Plaster can imitate natural wood, metal, fabric, and create an unusual, but very fashionable today “antique” effect. The work itself is complex and requires some experience to complete it.
Advantages and disadvantages
The material has the following advantages:
- fits perfectly into the overall interior of any style;
- used when decorating the walls of dry rooms or in rooms with a high moisture content in the air;
- environmentally friendly raw materials are used in the preparation, the plaster does not cause allergenic reactions, it is recommended for finishing rooms for children;
- does not create any difficulties in maintenance, can be easily cleaned with detergents that do not contain solvents or abrasive additives;
- perfectly resists mechanical influences, natural phenomena and abrasion;
- Due to various fillings, it is used on surfaces made of chipboard, plasterboard, wood, fiberboard, concrete, brick, etc.
As a disadvantage, masters note the difficulties that arise when working with certain textures.
Where is it used?
When finishing interior walls, Venetian decorative plaster with an antique effect is most often used. It consists of various components that allow you to recreate a variety of textures and effects:
- durable marble stone of natural origin;
- luxurious shine like mother-of-pearl, gold and silver;
- cracked walls;
- internal section, etc.
The unusual performance indicators of the decorative plaster composition explain its demand for decoration:
- some elements in the interior, made in different design solutions - columns, fireplaces, niches and cornices;
- bathrooms, kitchens, sanitary units - the plaster solution provides reliable vapor permeability, resists exposure to a humid environment, and can be easily washed with a damp cloth;
- bedrooms and living rooms, rooms for children - mixtures consist of components of natural origin;
- buildings for commercial purposes - offices, hotel halls, restaurant halls, cafes, shopping and entertainment centers.
A room decorated with Venetian plaster retains its attractive appearance for a long time.
Antique effect plaster range from San Marco
The wide variety of Italian manufacturer San Marco and their application techniques allow you to create almost any antique style effect you like. For example, you can create the effect of aged marble, crumbling plaster, baked clay or metal oxide using plasters or, and the appearance of natural shell rock or a surface damaged by a bark beetle will help or.
Venetian plaster is an ancient decorative technique that was used in ancient Rome. Marble dust remained during construction and was used as the basis for the plaster mortar. This decor found its rebirth during the Renaissance in Venice.
Stone chips are diluted with slaked lime. Pigments, natural and artificial, can be added to the solution. The coating is applied in several very thin layers and rubbed to a glossy state. When hardened, plaster can replicate the color and texture of solid marble. It is not afraid of moisture, has antibacterial properties, and looks elegant. To add shine and depth, the finished surface is coated with wax. Today we will teach you how to decorate walls yourself in this way. Step 1: Begin your work by applying and thoroughly mixing Venetian plaster onto a steel trowel.
Tip: To reduce unevenness on your surface, round the corners of your putty knife with 100-grit sandpaper or sanding paper. For a smoother edge, use 400-grit sandpaper. Step 2: Start at the top corner and make vigorous strokes while holding the putty knife at a 15-grit angle. 30 degrees.
Step 3: Distribute the material all over the wall using long and short random strokes. The surface should be without plaster only in some places. Continue the plastering process until the wall is completely covered. Allow the first coat to dry (at least 4 hours) before applying the second coat.
Tip: To prevent your touch from affecting the plaster, wipe the spatula frequently. Step 4: Returning to the top edge, thinly apply a second coat on top of the first. Hold the tool at a 60-90 degree angle and use long and short overlapping strokes.
Step 5: Fill voids and depressions completely.
Step 6: Smooth out any raised edges or bumps. Continue these steps until the entire wall is covered.
Tip: Allow the second coat to dry for 24 hours before polishing the surface or applying the final plaster. The final coat is recommended to be applied over Venetian in areas with high humidity or high traffic. Polishing must be completed before applying the final coat. Topcoat Step 1: When you are ready to apply the final plaster to the prepared area, use a clean, flexible 4-inch (or larger) steel trowel. Hold it at a 60-90 degree angle and use long and short overlapping strokes. Let the layer dry for about a day.
Tip: Apply only a thin coat of final plaster to avoid bubbles forming in recessed areas, which can create a milky appearance on the surface. Polishing Step 1: If you are polishing the surface, use 400 or 600 grit sandpaper or a steel spatula. Rub the area to be treated in a circular motion until you get it to the look you like. For larger surfaces, heavy-duty sandpaper can be used.
Tip: Allow the plaster to dry for 24 hours before starting the polishing process. Finish within 7 days of application. Step 2: Wipe the polished surface with a slightly damp cloth to remove any plaster dust. Step 3: Repeat the process until the job is finished.
Video on applying Venetian plaster Application technology Step 1: Let's learn little tricks. Always try on a sample piece first to hone your technique. If necessary, remove visible white spots from the base coat of plaster applied to the wall. Scrape with a spatula to obtain a clean, smooth surface. If you have no one to help you, use an electric sander. Step 2: Preparing the walls. Prepare the walls for painting, apply a base coat and let it dry. If necessary, choose a similar color to the tinted Venetian plaster to eliminate white spots. Step 3: Apply plaster. Moisten the surface so that the thick layer adheres better. Apply enough plaster to the trowel to cover a sufficient surface area (approximately 6 by 6 feet). Don't worry about white patches. This will give contrast later, so 80% coverage of the working surface is enough for the first layer. A roller is a quick way to apply plaster, but be sure to use occasional strokes with the trowel to even out the surface. Continue in this manner, scraping with a putty knife to achieve a clean, smooth surface.
Step 4: Create a texture. Allow the plaster to dry for 4 hours before applying the second (and final) coat. Fill the patches with more plaster and bend the trowel slightly to reduce scratches. Apply the plaster in an overlapping or circular motion to create the illusion of texture. The goal is to fill the gaps so that 100% of the work surface is covered. If you want to plaster a large area, you will need help. Be sure to let the plaster dry. Step 5: Sanding and polishing the walls. Sand the walls in small circular motions with 400-grit sandpaper, then wipe with a damp cloth or rag. Use 600 grit sandpaper to buff the surface in the same manner. The more you sand, the more color contrast you will achieve. Wipe off the dust as you did before. You should see texture between the first and second layers of plaster. If this is not enough, hold the putty knife almost flat against the wall and polish the work surface as above. This will create warmth and roughness, resulting in a distinctive sheen.
In ancient buildings you can always find the mysterious charm of bygone eras and an atmosphere of real magic. Even today, the monumentality and reliability of walls pushes world-famous designers to create distinctly antique interiors in modern houses and apartments. There are many materials that can be used for this. However, the most spectacular among them is antique decorative plaster. It helps to easily recreate the atmosphere of the distant past, giving an excellent appearance and a feeling of completeness and completeness to many interior styles. Decorative plaster with the effect of aged walls is an ideal option for classic interiors: it makes them more aristocratic. However, she looks no less impressive with ethnic styles. For example, the effect of plaster cracked by time will be a wonderful bright accent in a room decorated in African style and bright warm colors. It is very important, when using this material in the interior, to combine it with other decorative elements. For example, if in the kitchen the decoration of one of the walls is made of plaster that imitates aged marble, you can install a marble countertop - the result is a win-win tandem that makes the ordinary process of cooking more meaningful and sublime. Classic interiors, in the design of which decorative plaster with the effect of cracks was used, will be complemented by artistic painting or stylized frescoes. Due to its unusual nature and excellent performance characteristics, this material has found widespread use not only in the design of private houses and apartments, but also in the finishing of hotels, restaurants and other public buildings. It attracts attention and makes any entertainment venue more memorable. A wide variety of decorative plasters and their application techniques allows you to decorate any interior in such a way as to show all the features of the chosen style. This can be the effect of baked clay, crumbling plaster, natural shell rock, metal oxide, aged marble and a surface aged by a bark beetle. Moreover, they are all distinguished by soft chromatic transitions and a rich range of textures and shades.
How can you make your almost student-looking apartment finally look more respectable? Objects with history are the secret of a deep, intelligent interior! Find out how, without buying antiques, you can inexpensively and tastefully add a noble trace of time even to an ordinary apartment.
Tools and materials
Aged plaster is applied in various ways, so the work requires not only standard, but also special tools and devices.
The list of everything needed is as follows:
- spatulas of different widths with which the solution is applied;
- trowel and trowels - they are used to level the applied layer;
- a plumb line with which the surface is leveled vertically;
- Master OK;
- graters;
- textured rollers, soft-elastic stamps, sponges - they are used to apply relief patterns;
- containers made of plastic or stainless metal for preparing the plaster mixture;
- electric drill with mixing attachment.
If you plan to do plastering work on an ongoing basis, it is recommended to purchase relief rollers that have a durable coating made of Teflon or polyester material. For a one-time job done with your own hands, an inexpensive polyethylene tool will be enough.
When purchasing sponges for rubbing, keep in mind that for an elite finish, the natural marine version is best suited. True, such a sponge is quite expensive, so they often use a two-layer analogue for washing dishes instead. The rough finish is applied with the hard side, the finishing side is applied with the reverse side made of soft foam rubber.
How to apply?
The effect of antiquity is achieved with “Crackelur” plaster mortar. Acrylic-based paint is applied to the wall, treated with a primer, and stretched with a roller in an even layer. After four to six hours, craquelure varnish is applied using a brush or roller.
Note that the direction of tool movement in the future determines the location of the cracks. It is allowed to work with a roller vertically or horizontally, or in different directions in turn.
The thickness of the varnish layer determines the depth of the cracks that form during the drying process of the surface, which requires time from forty to one hundred and twenty minutes. After final drying, apply Venetian or structural plaster with a spatula with a wide blade in a layer of no more than two millimeters, performing multidirectional movements. Instead of plaster, it is allowed to apply acrylic-based paint, making a layer of no more than 1 mm. The paint dries faster, cracks appear after just five minutes, and its application requires skill and speed. It is better to work in a vertical direction, without leaving smudges at the joining areas. The surface finally dries out after a day. With different types of mixtures, follow a certain algorithm of work:
- Antico paretto is a transparent mixture containing components of mineral origin, which are crushed at the time of application. The composition is stirred and applied in cross-shaped movements with a flat brush or short strokes. After treating a small area, it should be smoothed using a plastic putty. Movements can be multidirectional; it is advisable to distribute inclusions evenly over the surface;
- antique structural plaster compositions - the desired effect is achieved by forming a textured surface of the applied layer of plaster with fibers. The mixture is applied with trowels, its layer should not exceed three millimeters, after which the texture begins to form. The work is performed with the surface of the trowel close to the end part. Applying a small amount of mortar to the working surface with a spatula, press the trowel to the surface and slightly lift the plaster layer, preventing it from coming off. The mortar mass will be pulled behind the tool; it is formed with a trowel, performing arc-shaped movements in different directions. Thanks to the fibers of the mixture, the mass is pulled out into bizarre shapes behind the trowel. After about thirty minutes, when the surface has “set”, it is smoothed with a trowel. Sharp, rough areas are removed with sandpaper after complete drying, and the dust is swept away with a brush.
Venetian plaster for finishing
Venetian plaster has a soft transparency and radiant shine.
Venetian plaster, which has a special transparency and a soft, radiant shine, has recently become popular. It is made from marble flour, which creates the illusion of natural marble. In addition, the composition includes slaked lime and a special water emulsion.
Decorative plaster can only be applied to a perfectly flat surface; it can be tinted with paint of any color, depending on the effect you want to achieve. This plaster is waterproof, it is very durable, resistant to sudden temperature changes and sudden heating. One of the advantages it should be noted is that the composition dries quickly.
Venetian plaster is applied using the following technology:
- first the base of the wall is leveled, it must be perfectly even and smooth;
- after this, a special layer of primer is applied to the surface, intended only for working with Venetian plaster;
- the dried surface must be tinted in the chosen color in thin layers; after drying, the wall must be cleaned to eliminate all unevenness. There can be many such layers of paint - from 5 to 12. It all depends on the result you want to achieve;
- Using sandpaper in a circular motion, the surface is again cleaned, after which a layer of wax is carefully applied.
Return to contents