Decorative plaster, which is used for exterior work, is a great way to make your home beautiful and spend a little money on it. Any facade needs finishing. And the point is not only that it is the calling card of any home. Finishing protects the walls and structure from the negative influence of external factors such as moisture, ultraviolet rays, wind and mechanical impact. Why is façade plaster so good, what kind of plaster should be used and how exactly is the work carried out?
Characteristics of high-quality facade decorative plaster
In order for the material to really perform all the tasks assigned to it, you need to choose it correctly. There are a number of factors that need to be taken into account when purchasing facade plaster.
Characteristics:
- Vapor permeability. To ensure that the greenhouse effect does not form inside the room and the structure is ventilated, this parameter is indispensable. This is the only way to create an optimal microclimate inside.
- Easy to apply plaster to the wall, which simplifies the decorating process.
- Resistance to mechanical stress.
- Ability to withstand static load.
- Resistance to external influences: precipitation, wind, ultraviolet rays.
- Resistance to temperature fluctuations.
One more nuance: decorative plaster for the facade of the house is selected in accordance with the overall interior of the building, because the decorative component is very important. This includes color, texture and material quality.
Technology of applying facade decorative plaster
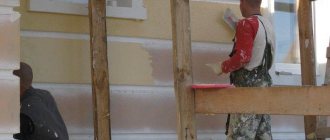
With detailed instructions, most will be able to finish the exterior of a house using plaster. Much depends on the choice of material. However, I would like to note the surface on which the mixture will be applied. She plays an important role. The application technology varies depending on what material the building is made of.
Finishing facades made of aerated concrete
This is an ideal surface for applying the plaster mixture (the same applies to brick). The entire work process boils down to normal surface preparation (leveling and applying primer) and plastering. The exception is the use of thin-layer materials. Then, using a roller, the walls are treated with primer and pigment; its shade is selected depending on the future color of the plaster.
Step-by-step instructions for applying decorative plaster to aerated concrete manually:
- If a dry plaster mixture is used, it must be prepared. Facade decorative plaster for exterior use is mixed with water. The ratio is indicated on the packaging. Everything is thoroughly mixed with a construction mixer. After kneading, you need to let the mixture sit for 15 minutes, so it will reach readiness.
- If necessary, the composition is tinted in the selected color.
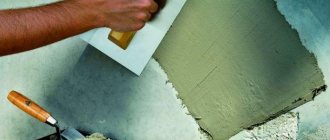
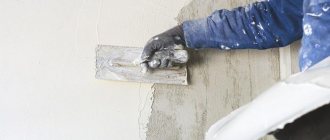
- The plaster is applied to the surface using a trowel. Using a spatula from the container, spread the mixture onto the edge of the trowel.
- The trowel with plaster is applied to the surface at almost an angle of 90°, after which a movement is made from bottom to top, while the angle decreases as the trowel passes until it completely reaches a parallel position. This way the composition will be evenly applied to the surface.
- With virtually no pressure, the tool is guided along the wall. This way the decorative plaster will be stretched into a layer with the required thickness.
- Having treated a surface of approximately 1.5 m2, it must be rubbed using a plastic grater. This will give you the desired texture.
All manipulations are repeated 3 to 6 times until the entire surface of the house outside has been treated.
Advice! As experts have noted, it is better to work immediately by area, and not by square meters. This will make the surface uniform in texture. If it is not possible to plaster the planned area at one time, then the joints are sealed with masking tape. You can’t stop halfway, having processed only half the wall.
Brick facade finishing
The work is also simple. Technology for creating exterior decoration of a house:
- Prepare the solution following the instructions on the package. If these are ready-made mixtures, then simply open the plaster.
- Bring the solution to the construction site.
- Take measures to prime the brick wall to improve adhesion. The work is done with a roller and brush.
- Metal beacons are fixed to the wall. Plastering on beacons is more convenient and easier for beginners.
- The wall is wetted to increase the drying time of the plaster after application.
- The plaster mixture is mixed to a homogeneous consistency.
- The solution is sprayed onto a brick surface separated by a lighthouse.
- Using a spatula, the surface is leveled with movements from bottom to top.
- Having processed one section of beacons, all defects are eliminated using a long rule. The surface turns out to be perfectly flat, since the beacons serve as a guide in working with the rule.
- While the surface is damp, small grooves are created using a scraper. They are needed to improve adhesion with rolling, that’s what the next layer is called.
- When the first layer has dried, you can begin to form the decorative finish.
At the end, the plaster layer is smoothed and leveled.
Plastering on insulating materials (mineral wool, polystyrene foam)
It is more difficult to plaster such a surface; it is not so strong and stable. Therefore, before application to the façade, a special reinforcing mesh is installed. Many people make a mistake in this matter - they apply the adhesive only on top of the mesh.
The correct technology looks like this:
- An adhesive composition must be applied to the facade. The treated area at a time is from 1 to 1.5 m2. The reinforcing mesh is fixed to the treated area and secured in the corners using thin sticks, as shown in the photo.
- A wide trowel (more than 30 cm) needs to be drawn along the surface of the mesh in different directions. You need to press lightly so that the adhesive substance comes out through the holes of the mesh, almost completely hiding it underneath.
- The edge of the mesh that hangs over the base is folded down and glued in the same way. To get a perfect bend, you can use a carbon spatula. All walls in the house are treated in the same way.
- When the glue dries, a second layer is applied, the mesh is hidden entirely.
- After which the surface requires priming. Then it is covered with a decorative composition for exterior use. Final plastering of the surface over the prepared layer is the same as with aerated concrete walls. It is described above.
This is what the facade of the processing field should look like in section:
Finishing of wooden facades
If you work with wooden walls (timber, chipboard, OSB), then there are two ways to finish the facade. The first of them is identical to working with insulation, as described above.
The second plastering technology is as follows:
- The outside of the facade is sheathed with special paper for this work (construction paper). This will enhance surface protection. It is fixed using a construction stapler.
- A metal facade mesh is laid on top of the paper layer. It is used for plastering work and has large cells. It is also fixed with a stapler. The inclination of the mesh and the level of its contact with the wall depends on the evenness of the walls.
- To treat a wooden facade, the plaster layer will be thick. In view of this, an aluminum profile is fixed at the bottom. It will serve as a limiter.
- The first layer is applied. It is made thick enough to practically hide the mesh. You need to wait for it to dry, and then apply a second layer of plaster. It will be leveling.
The finishing is carried out according to an identical algorithm, the same as with a gas silicate surface. The process is described above.
Wood is characterized by hygroscopicity. Moisture has a negative effect on the surface, and as a result, the façade may begin to crumble. To prevent this from happening, wood impregnations and hydrophobic primers are used.
Technology
In this article we will look in detail at the technology of applying facade decorative plaster and painting it, because in many ways the aesthetic appeal and operational properties of the building’s facade depend on the correct execution of plastering work.
It is important to know!
To ensure the best adhesion between the applied layers of primer, plaster and paint, as well as giving the building façade optimal performance characteristics, it is necessary to use products from the same company.
Material consumption
To find out the composition consumption, you need to consider several nuances. The first of these is the type of filler, the second is the binder, and the third is the quality of the surface. Typically, the material consumption is printed on the packaging, which, according to the requirements, each external decorative plaster must have.
Average indicators:
- mineral products – from 2.3 to 3.7 kg/m2;
- acrylic products - from 1.3 to 2.8 kg/m2;
- silicone products – from 2.2 to 3.6 kg/m2.
Advice! When calculating the required amount of solution, you need to add 5–10% in reserve, taking into account the loss of substance.
Price
| Name | Price |
| Installation of insulation | from 250 rub/m2 |
| — Glue for insulation | from 110 rub/m2 |
| — Facade dowel | from 50 rub/m2 |
| — Mineral wool 50 mm (insulation) | from 275 RUR/m2 |
| Dust removal, priming | from 50 rub/m2 |
| - acrylic primer | from 15 rub/m2 |
| Plaster and adhesive reinforcement on fiberglass mesh | from 350 rub/m2 |
| — Fiberglass mesh | from 50 rub/m2 |
| — Plaster-adhesive mixture | from 150 rub/m2 |
| Decorative plaster application: | from 400 rub/m2 |
| — Acrylic primer | from 30 rub/m2 |
| — Decorative plaster | from 110 rub/m2 |
| — Facade paint | from 50 rub/m2 |
| Materials | from 840 rub/m2 |
| Job | from 950 rub/m2 |
| Turnkey work, total | 1890 rub/m2 |
How to choose the right decorative plaster for the facade
Before choosing one option or another, you need to consider the following parameters:
- Flexural compression and strength characteristics. The ability of the decorative material to fight the formation of cracks depends on them. Under heavy loads, the plaster on the surface will not collapse.
- Color of decorative material. There are products on sale that are already painted in a certain shade. This is Ceresit plaster. But, there are basic white compositions that need to be tinted at the mixing stage. This is a better option than painting over an already applied surface after drying. After all, the paint layer is thin and if damaged, the base color of the decorative plaster will be visible. And if you tint it, the shade will be throughout the entire structure of the material.
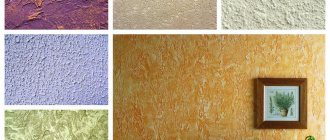
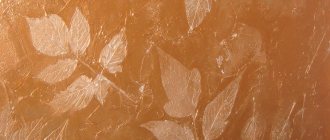
- Texture. Decorative material has different textures, which creates an imitation of different surfaces and materials (stone, wood), as well as relief (fur coat, mosaic surface, bark beetle). The packaging indicates what decorative texture will be obtained after application.
- The basis. Having compared all the advantages and disadvantages of the types of decorative products, you need to choose the best one for yourself.
- Drying. Depending on the type, from 1 to 3 days.
- Layer thickness (maximum and minimum). For wood, brick or concrete, decorative plaster is needed for exterior finishing of walls of different thicknesses.
- Shelf life of the finished mixture. For beginners, an important indicator is that the longer the period, the longer he can apply the prepared composition.
No less important are consumption, frost resistance, adhesion to the surface and method of application (manual or mechanical).
Types of drawings
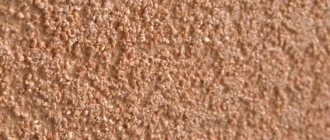
The coating pattern depends on the texture of the plaster, the grain size and the direction of grouting. The most popular in Russia are grooved decorative plaster “bark beetle” and pebble decorative plaster “lamb” with fraction sizes of 2.0 mm and 2.5 mm.
These types of plasters have similar performance properties and differ only in the resulting structure.
When rubbing the “bark beetle”, the inclusions of mineral chips contained in the plaster roll, forming grooves of varying lengths, widths and depths. The resulting pattern depends on the direction of movement of the grater.
Thus, there are several main patterns of decorative plaster with a bark beetle structure:
Vertical pattern
Horizontal pattern
Circular pattern
Cross pattern
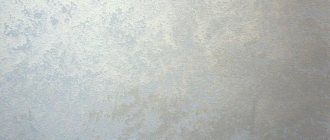
Grout the lamb plaster with small circular movements until the mineral chips are evenly distributed, but do not press the grater too hard to avoid the appearance of grooves.
Structure of façade plaster “Lamb”
To give the facade plaster a more original and impressive look, paint of a different shade is applied to the “bark beetle” using a short-pile roller in one layer, which allows you to highlight the structure of the plaster. In this case, you should not press the roller too hard to avoid painting the coating structure. Thus, the paint is applied only to the protruding relief part of the design, and a decorative pattern is obtained in a combination of two colors:
Bark beetle coloring in two colors
When painting plaster, it is necessary to use paint on the same basis as the surface to be painted (acrylic paint is used for acrylic plaster, silicone paint is used for silicone plaster, etc.).
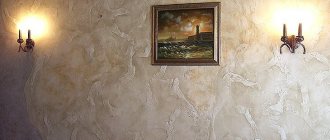
Finishing the facade with decorative plaster
In addition to the usual leveling finish, you need to make a decorative layer with a certain texture. This is fur coat, bark beetle, mosaic plaster. There are many such plasters on sale for exterior use.
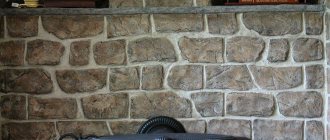
Bark beetle
A popular option that imitates tree bark after being eaten by a beetle. Bark beetle application technology:
- The main thing is to create furrows, like a tree. This is possible thanks to the introduction of mineral grains into the decorative plaster, with a fraction of about 2 mm.
- The layer is applied to the surface and then rubbed over.
- Thanks to inclusions, the texture of bark beetles is formed. The movements can be chaotic, circular, up or down, it all depends on personal preference.
Fur coat
One of the simpler options. After applying the decorative layer of plaster, a texture is formed using a roller. You need to roll it over the undried layer. Alternatively, use a trowel, pressing and pulling back. The result is a rough surface.
Alternative decoration - using a broom or a rough brush (spray)
Tips for working with plaster outdoors
Facade finishing is carried out under the following weather conditions:
- at a temperature not lower than +5оС and not higher than +30оС (this does not apply to winter plasters),
- in dry weather,
- at air humidity not higher than 70%.
In dry, hot weather, the plaster should be sprayed with water to prevent it from cracking. Plastering work should begin when several days without rain are expected. The treated area should be protected from sunlight.