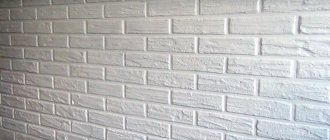
Wooden floors fit perfectly into any interior; they are environmentally friendly, safe and easy to repair. But, unfortunately, such a floor has a short service life. Therefore, to protect your wooden floor from moisture, scratches and chemicals, and to give it a beautiful and fresh look, it is recommended to varnish it.
How to varnish a wooden floor
Varnish selection
The first step is to choose a suitable varnish. Solvents can be water, acetone (solvent 646) and white spirit (kerosene). Varnishes containing acetone and white spirit are toxic and have a strong, unpleasant odor. Acetone varnishes dry faster than white spirit varnishes. Water-soluble varnishes are more expensive, but better in all respects - they are non-toxic, have almost no odor and dry faster.
Varnishes are also divided into many types according to the type of resin used in them:
- Polyurethane varnishes are expensive, but the best in performance varnishes, especially water-soluble ones, which are environmentally friendly, durable and resistant. Waterless varnishes are especially resistant to moisture, abrasions and chemicals. Disadvantages include fragility, attraction of surrounding dust and change in the tone of the wood after application. So, light-colored floors become yellowish after it.
- Varnishes based on artificial resins are the most elastic, but are susceptible to external influences. They also take longer to dry than other varnishes and, like polyurethane varnishes, change the tone of the wood.
- Varnishes based on formaldehyde resins are the most economical option. They are resistant to external influences and quite durable. The big disadvantage of such varnishes is the content of harmful substances in it. In addition, over time, such varnishes begin to turn yellow.
Video - How to varnish a wooden floor
General information
Such a protective coating can be called a moisture-resistant, wear-resistant floor varnish, which, due to its chemical composition and qualities, can be applied to both concrete and wooden floors. There is a wide variety of building materials and paint coatings on the modern market, which is why buyers cannot make a choice for a long time.
How to choose a varnish
When choosing a product (varnish) to cover a floor, the buyer usually tries to catch three birds with one stone:
- Give the flooring a noble color.
- Create a protective layer that will prevent damage to the wood.
- Choose a varnish that will match the interior.
Moisture resistance and wear resistance of varnish for a wooden floor are of great importance, and when choosing it for protection, consider the following points:
- Possibility of post-processing.
- Has the wood been pre-prepared and treated?
- Tree species.
- Compatible with old paintwork.
- Terms of Use.
Regarding operating conditions, you should pay attention to how much traffic there will be in the room and what level of humidity. For heavy loads, you should choose a floor varnish that is moisture-resistant and wear-resistant.
When reading the composition, you can determine the protective properties of the varnish, for example, alkyd floor varnish is a kind of protector against high levels of humidity, alkyne-urea varnish makes the coating durable and reliable, petroleum-polymer or oil-based is excellent for places with heavy loads and traffic.
Parquet varnish, which is used to cover wooden floors, is extremely popular among buyers - it can be acrylic, alkyd and water-based.
When choosing a floor varnish, you should decide which one will be best for you based on the three criteria described above, as well as on gloss and shade.
An equally important role is played by the lighting of the room, architectural features, color of the ceiling and walls, since it is precisely for these data that you can choose a varnish of a certain color, as well as choose a matte or glossy sheen according to your preference.
For a light floor, matte floor varnish is perfect, where there is good lighting and the room is spacious - a wonderful shade and shine will highlight the beauty of the wood. It is better to choose a glossy floor in rooms with poor lighting and small size, since gloss can visually add volume and reflect light.
Due to the development of modern technologies, there are also floor varnishes that also have a certain shade. Yes, these are colored floor varnishes that appeared relatively recently, but the designers immediately liked the interesting solution of the manufacturers and was appreciated, giving them the opportunity to realize the best and newfangled ideas.
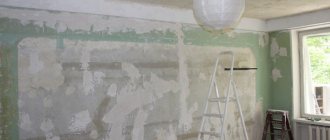
Preparing the floor for varnish application
Preparing the floor for varnish application
Now that the varnish has been chosen, you should prepare the floor for its application. If the floor is completely new and smooth, then no preparation is required, except for cleaning off dirt. But if the floor is made of soft wood, then preparation, processing and sanding are necessary in any case.
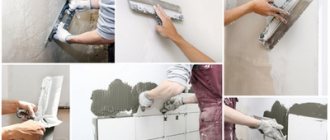
To prepare a wooden surface, you should do the following:
- clear the floor of furniture and other things;
- to make the wood smooth before sanding, remove all protruding nails, splinters, knots, etc.;
- if there are old damaged boards, they should be replaced;
- walk with putty intended for wood along the cracks between the boards;
- Seal holes in the boards with a special mixture. You can make your own paste from wood glue and wood sawdust;
- Coniferous wood may contain resin on the surface. To get rid of it, you should treat the surface with gasoline;
- If there is a layer of wax on the wood, then it should be removed using a special product, otherwise the sanding belt in the sanding machine will become very dirty.
Video - Varnishes for wood
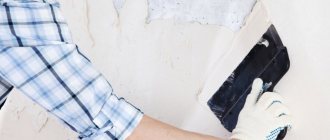
Floor sanding
Floor sanding
After preparation, you should sand the floor to remove various irregularities, rough spots and snags. Sanding will also give the floor a fresh look.
So, to sand the surface, you should:
- clean the floor using coarse sandpaper;
- level the floor surface using medium-grain sandpaper;
- For the last stage of grinding, use fine-grained sandpaper;
- Upon completion of sanding, it is recommended to apply an antiseptic to the floor. This step is optional, but if you want to protect the wood from mold, mildew and insects, it is better to treat the floor. The antiseptic dries in about a day;
- Vacuum the floor thoroughly, and then use a wet microfiber cloth to completely remove dust.
The water should be warm, you can add detergent. However, you should be aware that wood containing tannin becomes purple when exposed to detergent, so it is better to test the wood’s reaction on a small area before washing. Oak and chestnut should also not be washed with water and detergent. After this, rinse the surface with clean water.
Application of primer impregnation
Application of primer impregnation
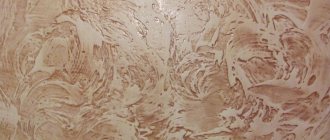
The last preparatory stage is the application of primer impregnation. It is optional, but it can increase strength, change the color of the wood, or emphasize its texture.
- Tannins in some types of wood (for example, oak) cause the wood to darken after applying polyurethane varnishes. Therefore, the wood is treated with a special primer impregnation.
- Beech is a capricious wood, it easily reacts to changes in external conditions, and therefore also requires covering with a special type of soil.
- It is important to treat exotic woods before applying varnish to neutralize the essential oils they contain. Some types of wood contain substances that can slow down the hardening process of the varnish, so primer treatment is necessary in this case.
Preparatory stage
Old surfaces and softwood coverings will need to be sanded and treated.
If you decide to varnish a wooden floor yourself, then you need to properly prepare the surface for processing. If your floor is completely smooth, level, and new, then no special preparation is needed. The only thing you need to do is clean it of debris and dust. Old surfaces and softwood coverings will need to be scraped and treated.
List of preparatory activities:
- Removal of furniture and other interior items from the premises.
- Before removing the worn protective layer from the old floor, it is necessary to remove nails and other protruding elements from it.
- Now the old varnish layer is removed using a grinding machine.
- A wooden floor should be repaired (worn elements need to be replaced, loose boards need to be fixed more firmly).
- All cracks between parquet flooring should be filled with a special compound for woodworking.
- Holes in the dies can be sealed with a specially designed compound or a mixture of sawdust and wood glue.
- If the wooden floor is made of coniferous wood, then the surface must be treated with gasoline to get rid of resinous deposits.
- It is better to remove the old wax layer not with a grinding machine, but with the help of a special tool. Otherwise, the sanding tape will quickly become clogged.
Rules for doing grinding yourself:
- First, the surface is treated with a coarse-grained disc.
- Then the old protective layer is removed and leveled using a medium-grain sandpaper.
- At the end of sanding, a fine-grained disc is used.
- After this, it is recommended to treat the wooden floor with an antiseptic. This step is not mandatory, but it will protect the surface from rot and insects. This coating will dry in a day.
- Before applying the varnish, the floor should be thoroughly vacuumed and cleaned of remaining dust using a damp microfiber cloth.
It is important to know: you should not add detergent when washing a wooden surface without varnish. Otherwise, some types of wood may change their color.
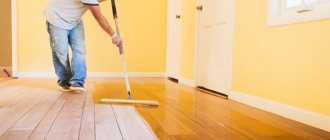
Applying varnish
Applying varnish
After careful processing, it’s time to proceed to the main stage - applying varnish to the floor. To do this, take into account the following:
- using a respirator is important in any case, even when using water-based varnish;
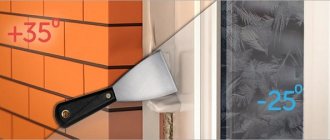
- the temperature in the room where the work is being carried out should not be lower than plus 12 or higher than 25. Under such conditions, the varnish dries quickly and lays down as it should;
- The varnish can be applied with a roller or brush. But it is best to use a special varnish brush, since a roller may not be suitable for some varnishes. The width of the brush should be about 10 centimeters, with soft hairs. After use, brushes should be kept soaked in varnish thinner to prevent them from becoming useless before the first coat has dried;
- Don’t forget to keep a rag nearby to clean the boards from dust;
It is important to think about how you will apply the varnish in order to be able to leave the room without hindrance. Otherwise, you will have to step on the freshly painted floor and ruin the work done. Usually the floor is varnished from the wall opposite the doors and towards them.
- if you did not use primer impregnation, then the first layer of varnish should be diluted in a ratio of 1 part varnish to 3 parts solvent to 1 part varnish to 1 part solvent;
- With a brush, the varnish should be applied with movements along the entire length of the board so as to touch the adjacent layer. If you choose a roller, you should apply the varnish with crosswise movements, and then level the resulting layer with lengthwise movements. The first layer does not need to be made thick, otherwise the floor will look sloppy later;
- It is best to paint the floor without shoes or socks. Shoes bring dust with them and leave marks on the floor that will have to be thoroughly washed each time before applying varnish;
- Each layer should be applied only after the previous one has completely dried. Depending on the varnish you choose, drying time may vary: from several hours to a whole day;
- Softwood floors tend to become lumpy after the first layers dry. To restore the smoothness of the floor, you should treat the floor with fine-grained sandpaper. This treatment will also remove unwanted errors such as bubbles trapped in hairspray and dust. The scratches remaining after sanding will disappear under a new layer of varnish, so there is no need to sand the last layer. After treatment, be sure to clean the floor from dust with a wet cloth;
- Depending on the type of wood, a different number of layers of varnish are applied. So, soft wood requires three layers of varnish. Three layers are also necessary in high traffic areas. In other cases, two layers of varnish are sufficient.
Staining wooden floors
To prevent bubbles and cracks, apply paint in thin layers. This way it will be spent more economically. Wash painted floors with warm or cold water. There is no need to add soap or soda to the water, as the paint may lose its shine and strength.
Please note that the floorboards must be strong and not sag, otherwise cracks will appear in the seams between the boards and the putty will begin to crumble.
Simple floor painting
The prepared new wooden floor is coated with paint in one, or better yet, two layers.
- Apply paint evenly along the boards and distribute it thoroughly on the surface.
- The second layer is applied to the well-dried first one.
- After drying, wash the floor with warm water.
During the first week, it is recommended to wipe the floor with hot water to remove traces of drying oil. Soon the coloring will become more durable and all dirt will be easily removed. The floor does not need to be washed, but simply wiped with a damp cloth.
Improved floor coloring
Wooden floor
- Apply drying oil or primer to the floor.
- Wait until the surface is dry.
- Apply oil or varnish putty to problem areas.
- Clean the dry surface with sandpaper.
- If there are places where the putty has shrunk, reapply the putty to them.
- Carefully sand off the final layer of putty.
It is recommended to make the putty colored - to match the color of the paint. This is easy to do - add 100-150 g of dry or grated paint per 1 liter.
High quality floor painting
There are two options for high-quality staining:
First:
- Cover the floor with drying oil and dry.
- Apply putty to the surface two to three times.
- Thoroughly clean the first layer of putty.
- Apply a second layer of putty, level, and dry.
- Clean the putty again and prime the surface. Wooden floor
- After this, apply paint in two or three layers.
Second:
- Clean off the first layer of putty.
- Apply a thinner putty as a second layer.
- Place gauze tightly over the surface.
- Press the gauze into the putty using a putty knife.
- Wait until the surface dries.
- Clean the surface and apply a third layer of putty.
- Dry the surface again and clean thoroughly.
- Prime and paint in three layers.
After two weeks or even a month, it is recommended to cover the painted surface with a special floor varnish in one or two layers (do not confuse it with parquet varnish!).
Difficulty applying varnish
Difficulty applying varnish
- Air bubbles may form on the surface of the varnish after application. To remove such bubbles, rub the brush tip over the surface several times.
- If, after the varnish has dried, the floor seems sticky, then a soap solution will come to the rescue.
- If the varnish does not dry after the time indicated on the label, then there are several explanations. Perhaps the varnish itself was chosen incorrectly (some types of wood require a certain type of varnish), and in this case the room should be heated to 20 degrees Celsius. It is possible that not enough hardener was added to the varnish, and then the entire applied layer will have to be sanded. In some cases, there is simply not enough ventilation in the room.
- If whitish spots appear on the varnish, this means that moisture has accumulated on the floor. In this case, you will have to treat the stained areas with a solvent and reapply a layer of varnish. Before applying it, do not forget to thoroughly dry the room and raise the temperature in it to avoid re-appearance of stains.
- To get rid of varnish that has gotten on your skin, you should wipe it with the solvent that was used to dilute the varnish, be it white spirit or acetone. These solvents are corrosive to the skin, so wipe with small amounts and with caution. After this, you can wash your hands with washing powder and apply moisturizer to your skin.
- The main question that arises after the work done is getting rid of the persistent odor. The room should be thoroughly ventilated here.
Varnished floor
Finishing a floor with varnish has its own nuances, but it is worth it, because after that you will be able to admire a new, shiny wooden floor that will last you much longer than usual. And to refresh and give the former shine to a dull layer of varnish, you can use a composition to revive the old coating.
The tiger also likes a beautiful varnished floor
Floor painting tools
To successfully complete the job you will need the following tools:
Roller for painting
For the bulk of the painting work, use a short to medium nap roller. Only with the help of a properly selected tool can you apply paint in an even and thin layer. Also, the roller is much wider than the brushes, which will help you paint the surface faster. For greater convenience, use a roller with a telescopic handle.
Paint tray
A necessary and very convenient thing. As a rule, a painting tray is sold together with a roller. Use it to apply and remove excess paint from the tool. There is no need to reinvent the wheel and try to adapt any container for these purposes.
The paint tray will not tip over even if you accidentally hit it. This is provided by its design
. Set of brushes
Flute brushes
To paint a wooden floor, you will need flat brushes of different sizes. They are the most indispensable assistants for painting joints, corners and baseboards.
Putty knife
You will need a metal spatula to remove old paint from the floor, and with a rubber spatula you can putty the cracks.
Chisel
A chisel is useful for removing knots if there are any on the surface, as well as for cleaning cracks from old putty.
Scotch
Masking tape
Painting tape is necessary to protect surfaces adjacent to the floor - walls and baseboards - from paint or varnish. You can also use tape when creating a floor design if you use paints of different colors or shades. The surface covered with tape will be reliably protected from paint.
Respirator, goggles, rubber gloves
When working, use PPE - personal protective equipment.
Tips and tricks
For good and high-quality work on painting the floor, there are tips and recommendations from experts:
- start painting the floor strictly after the primer has completely dried (it should not stick to your hands or feet);
- use odorless paints in residential areas;
- the tools used must be of several types;
- to avoid staining the wall, use masking tape around the perimeter of the walls;
- When choosing paint, consider the flooring material;
- if the room is subject to frequent contact with water, it is better to use acrylic paints;
- quick drying depends on the type of paint and ventilation of the room;
- wooden floors made from coniferous trees are better cleaned of resin using gasoline;
- to obtain a glossy effect, it is necessary to apply varnish over the paint layer;
- To dry the floors faster, open the windows and doors, and you can also turn on the fan.
See the next video for more details.
Working with cork flooring
Cork is quite soft, so you need to choose a varnish for soft wood
Cork floor coverings can be either interlocking or adhesive. In the first case, the finished floor will look like laminate or parquet. Its installation is carried out using locks with which all elements are equipped. This coating should only be laid on a flat and clean surface. Any differences will not allow you to assemble all the elements normally. As for what varnish to cover a cork floor with, the peculiarity of such a base is that it absolutely does not require additional varnish treatment, since the panels are sold completely ready-made.
As for the adhesive floor, it can be laid out from ordinary cork parts. In order to save money, they are often purchased in an untreated varnish version. In this case, after all the elements of the cork floor have been laid out, you need to treat it with high-quality transparent varnish. There is no need to wait for the surface to cure; you can immediately begin applying the finishing layer. For this you can use the same varnish as for the pine floor.
Advice! Cork is quite soft, so you need to choose a varnish for soft wood.
Cork floor structure
Classification by resin type
The type of resins contained in the varnish also affects its quality. Taking this characteristic into account, the following classification was created:
- Polyurethane. Pros call them the best, they provide an optimal level of coating resistance to mechanical stress and are highly environmentally friendly. But it is worth considering that their price is quite high, especially waterproof types.
- Polyurethane-acrylic. The use of acrylic resins reduces the cost of production, but also degrades quality. These varnishes, not so durable and less elastic, are suitable for use in rooms with low traffic levels. They are easy to work with due to their good spreadability, so a home craftsman can easily apply the varnish on his own.
Acrylic floor paint - Acrylic. Being subject to abrasion and not having high strength, they still have their advantages. This type is environmentally friendly due to its water base, inexpensive, elastic, and has a good level of fluidity.
- Urethane. If we compare them with polyurethane products, then urethane products will be inferior in one indicator - abrasion. They do not have the effect of gluing on parquet planks and are used in rooms where significant changes in humidity are typical.
- Urethane-alkyd. They are similar to the previous ones, however, alkyds increase their level of strength, so the coating will be little affected by mechanical stress.
- Alkyd. Their performance does not rise above average, but these products dry well.
- Acid-curing. These coating materials are considered the most durable. Before starting work, a hardener is added to such products. When applying them, you must use protective gloves and a respirator. Since the hardener contains acids, the working life with finished varnishes is limited to 8 hours.
- Epoxy. They are acid-curing, but stand out from the group due to their inherent high toxicity. The emission of harmful fumes continues for at least 3 days after the floor has been varnished, but in the future the treated wood will serve you for a long time.
- Urea-formaldehyde. They are another group of acid-curing products, but it must be mentioned that these types are quite dangerous. Toxins will remain in the room for 4 days, and later the environmental friendliness and safety will not be up to par.
- Alcohol. Their advantages include good adhesiveness, strength and aesthetic appearance of the treated floor. A serious disadvantage can be considered insufficient water resistance.
Painting the floor with oil paint - Oily. They are common because they are cheap, and when dry, they form a durable film of various shades of yellow and brown.
- Petroleum polymers. Compared to oil-based ones, they are significantly better, not being subject to damage and wear. This group is good not only for its practicality, but also for its price category.
How to paint the floor
If all the tools and materials are ready, then you can proceed directly to painting the floor. Below are step-by-step instructions for this process, following which will not only speed up the work, but also prevent the occurrence of common errors.
Step 1
Clean the floor surface from dust and dirt, paying special attention to the cracks between the floorboards. Insufficient cleaning may cause the paint on the brush to mix with remaining dust and spread across the floor surface.
Clean the floor surface
Gaps in the wooden floor
Step 2. If dry cleaning the floor is not enough, wash it thoroughly with plain water (you can add detergent). Wait until the floors are completely dry.
Do a wet cleaning
Step 3: Open the paint can and add a small amount of thinner. This will allow you to increase the amount of paint, and it will be difficult to work with a thick composition, so you can’t do without a solvent.
Thin the paint with solvent
Step 4. Thoroughly stir the paint until a homogeneous substance is obtained. You need to stir until the colors and streaks disappear. An ordinary wooden stick is suitable for mixing.
Stir the paint
Step 5. Apply masking tape to the walls around the entire perimeter of the room to protect them from paint getting in during the process. The same must be done with stationary furniture, if any.
Apply masking tape around the perimeter
Step 6. Pour some thinned and mixed paint into the deep part of the paint tray. You should not add a lot of paint, as this may complicate further work.
Pour some paint into a special tray
Step 7: Using a small brush, carefully go around the perimeter of the room, painting all the baseboards. To prevent paint from dripping onto the floor while painting, press the brush against the ribbed surface of the paint tray each time you dip it in paint.
Paint the baseboards indoors
Step 8: Paint the rest of the floor using a large brush, carefully spreading the paint over the surface of the floorboards. You can also use a roller instead of a brush. During painting, it is advisable to lightly press the roller against the floor so that the paint gets into all the existing recesses (see How to seal cracks in the floor) and fills them safely.
Paint the entire floor with a roller or wide brush.
Pay attention to every floorboard
Step 9. Start painting the floor from the far wall of the room and smoothly move towards the exit.
You need to start painting from the far wall
Step 10. The work of painting the wooden floor is completed. Now you can enjoy the finished result.
The floor is completely painted!
For the floor to dry completely, you need to wait a few days (if it’s warm outside, the paint will dry in a day). After drying, the floors must be washed with a solution of water and a small amount of vinegar. Only then paint the room again, applying a second coat of paint. This kind of washing significantly speeds up the drying process of the paint, and with the help of vinegar, all traces of oil are removed from the surface.
Clean the floor with vinegar and water