Drywall is a popular finishing material widely used in modern construction. It consists of a two-layer cardboard sheet, a core with gypsum filler and a number of additives that regulate the properties of gypsum. Specialists from the Master Tibot construction hypermarket have prepared an informational review for you that will help you choose the right plasterboard sheet for finishing work.
Why drywall is not the best choice for walls: comparing alternatives
It’s rare that a redevelopment can be done without erecting new partitions, unless you decide to make a studio and are just tearing down the old walls. New walls can be built from piece materials, such as brick, slabs and blocks of various compositions - we have already talked about them in the article “From brick to glass blocks: what to build interior partitions from.” Or use sheet materials. There are three most popular today, and we are ready to tell you about all their pros, cons and features so that you can choose the best one.
What is better and cheaper, to plaster the walls or cover them with plasterboard?
Which building material is more preferable when leveling walls - plaster or drywall? This is one of the most pressing repair issues that must be resolved in advance so as not to encounter many problems that are inevitable with the wrong approach. Both materials show excellent results when leveling walls and ceilings and look great after finishing work is completed, but both of them have disadvantages, and working with each of them has its own nuances.
To answer the question of which is better - drywall or plaster, it is worth comparing their characteristics and considering the pros and cons.
Advantages of drywall
Thermal insulation properties
The first advantage of drywall is its excellent thermal insulation characteristics. Drywall, of course, is far from brick, but it is quite a bit behind it in its thermal insulation abilities. And if you insulate it with foam plastic or mineral wool, then this design will allow you to significantly save on heating costs in the cold season.
Flexibility and lightness
The second advantage of drywall is its flexibility and ease of use. With the help of this material you can bring to life the most interesting and unusual ideas. You can create any shape from it - from rectangular cascades on the ceiling to semicircular arches. It can also be used for making various types of niches or installing built-in lamps.
Fire resistance
Another important advantage is the good fire resistance of the material. In the event of a fire, only the top cardboard layer will be exposed to fire, and even then only on the side of the fire. In addition, you can use not standard, but special fire-resistant plasterboard sheets that are not afraid of fire at all.
Water resistance
Special moisture-resistant plasterboard sheets do not absorb moisture. Thus, they can be safely used in the kitchen and bathroom without fear of deformation and destruction of the finish.
Hiding communications using drywall
Easy hiding of communications is another advantage of drywall. The space that is created after installing the panel is great for hiding unnecessary wires or other communications. But it is worth considering that if you do not make special inspection hatches, then if it is necessary to repair communications, you will have to remove the entire panel in search of a breakdown.
Disadvantages of plasterboard walls
Seemingly massive and durable plasterboard structures are actually not so if they are directly impacted. They can easily be destroyed with an ordinary carpenter's hammer, making a through hole in the sheet with one blow. This drawback will be significant when planning the installation of heavy hanging furniture on a wall or partition. Ideally, this should be thought through at the stages of creating the frame, investing wooden blocks or additional profiles into the guide and rack profiles. If this is not foreseen in advance, then you should abandon the idea of hanging a large plasma TV on the wall. Otherwise, you may end up with new repair problems and get rid of the equipment.
Breach of drywall with bracket
An ordinary brick wall or a foam block wall with a thickness of at least 15 cm can easily cope with the loads placed on it. All kinds of brackets, hinges and even simply screwed screws are held perfectly in the foam block, securely fixing the TV shelf. But due to the lack of perfection of the geometry of the blocks and the shortcomings of the master, and even the large weight of the masonry material, a partition made of blocks may become impossible or undesirable. Useful information on choosing what is best to make interior partitions in an apartment from.
When choosing a material for constructing thin walls and partitions, you should take into account a lot of parameters and weigh them carefully. But still, in most cases, drywall is the best solution, because only from it can truly unique and inimitable design creations be made.
Drywall: types and applications
Drywall is a universal building material, often used instead of plaster. It consists of plaster covered on both sides with sheets of cardboard. It also contains starch and surfactants. Standard dimensions of gypsum board sheets are width 1200 mm, length 2000/2500/3000 mm, thickness 9.5 or 12.5 mm.
Depending on its operational properties, plasterboard is divided into the following types:
GKLO . Contains mineral fibers and special. additives. Resistant to fire, used in facilities with increased fire safety requirements.
GKLV . Impregnated with water-repellent components, this allows it to be used in rooms with high humidity - baths and toilets. It is worth considering that with prolonged contact with water, the material may still suffer.
Regular gypsum board . Widely used in residential premises for leveling walls and ceilings, and creating decorative elements.
You can find out how to plaster drywall in our article.
Positive qualities of gypsum board
- Excellent for leveling walls with large deviations from the plane , serious chips and defects. The sheet of drywall itself is an ideal plane.
- Less dirt during renovation compared to wet finishing. GKL sheets are easily cut with a construction knife and attached to the sheathing with self-tapping screws. If the walls are smooth, then the drywall can be glued directly to them using an adhesive solution.
- Simple and quick installation - covering walls with plasterboard occurs in a matter of hours. It allows you to level surfaces with your own hands, without resorting to the help of hired craftsmen.
- When using a frame under gypsum plasterboard, it is possible to lay electrical wiring, install insulation or soundproofing material between the wall and the sheets.
- And the main advantage of gypsum boards is the ability to create multi-level ceilings and various decorative elements. The easiest way to make interior partitions is also from plasterboard.
Fastening sheets
Before leveling the walls with plasterboard without a frame, it is necessary to clarify the operating features of the room. Drywall is hygroscopic, which is why its use for leveling surfaces in non-permanent homes is not recommended. It is also not advisable to use drywall in rooms with high humidity (bath, toilet and kitchen).
Open the gypsum board.
Sheets are fastened to the wall in two ways: along guides (with differences of up to 40 mm) and with an adhesive composition (with differences of up to 4 mm).
When working with guides, adhere to the following algorithm:
- in accordance with preliminary measurements of the curvature, guides made of plasterboard strips 150 mm wide are fixed to the wall. Self-tapping screws or adhesive are used to attach the strips. The distance between adjacent guides should not exceed 400 mm;
- sheets of drywall are cut to size;
- An adhesive or polyurethane foam is applied to the guide strips, after which gypsum board is applied. When choosing polyurethane foam, it is necessary to choose a material with the lowest expansion coefficient, which will ensure reliable adhesion;
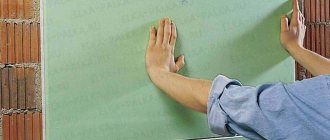
- Pressing the sheets with your hands to achieve alignment. If necessary, use a rubber mallet;
- after the solution or polyurethane foam has dried, additional fixation of the gypsum boards to the guides is carried out using self-tapping screws.
Working with a mallet on drywall is only possible until the adhesive or polyurethane foam has completely dried, otherwise the resistance exerted by the hardened mixture will lead to cracks or chips on the plasterboard.
As guides, you can use not only strips of plasterboard, but also a metal profile or plywood.
When using drywall installation with adhesive directly to the base, perform the following steps:
- Having measured the deviations of the vertical wall, a line is drawn on the floor along which it is necessary to orient the sheets of drywall during installation. If necessary, string is pulled diagonally, which also serves as a limiter and guide for installing the gypsum board;
- the adhesive composition is prepared;
- along the width of the sheet fastening area (the sheet is vertical), apply the adhesive in small piles, 25-30 mm thick, every 150-200 mm. To securely fix the plasterboard, you will need to prepare three strips along the width of the sheet;
- at the junction of the wall and the floor, install a 15 mm thick lining;
- a sheet of plasterboard with its lower edge rests on the lining and is pressed against the wall. Alignment of the sheet along the limiters is done by pressing it by hand. If necessary, use a rubber mallet.
When installing drywall without guides, it is recommended to use Perlfix glue as an adhesive.
If differences of up to 30 mm are found on the wall and the method of installing drywall without guides is used, the thickness of the piles of mortar applied to the wall for attaching gypsum boards should be at least 40 mm.
When working with aerated concrete bases, you should remember that polyurethane foam cannot ensure reliable adhesion of this material to drywall, so adhesives are used to attach gypsum boards.
Horizontal sheet fastening.
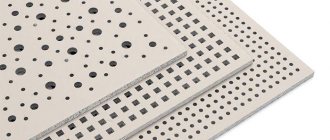
Cement particle board (CSP)
DSP is the golden mean between wood and stone in its properties. Made from cement, wood fibers and liquid glass (stationery glue). There are slabs for interior decoration and for facade (FCSP). Size of one slab: 2700 x 1250 or 3200 x 1250, and thickness to choose from 8/10/12/16/20/24/36 mm. For interior partitions, widths of 10 and 12 mm are most often used; the weight of slabs of this width is 46 and 54 kg, respectively. It is better to choose the widest frame, metal or wood. The final width of the wall will be about 12 cm.
Price:
800-900 rubles per slab 2700 x 1250 x 10 mm.
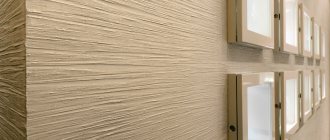
- The assortment includes DSP with a three-dimensional decorative pattern imitating brick, stone, wood, etc. Such DSPs are more expensive, but do not require finishing.
- Moisture-resistant material, can be used in bathrooms even with direct contact with water.
- Non-flammable: can be used in saunas, baths and around fireplaces and stoves.
- Does not rot, very durable.
- You can make many other elements from DSP, besides walls: use it as a top layer to level subfloors, make window sills, steps.
- On a butterfly dowel it can withstand up to 50 kg.
- The partitions are strong, but easily chipped.
- They are easy to install, except that due to the weight it is more convenient to do it with two people.
- Good sound insulation.
- There are 1-2 mm joints between the plates, which cannot be avoided. So, either use this material in rooms whose length does not exceed the width of the slab (in bathrooms, storerooms), or cover the joints with wood or metal overlays.
- Not the lightest weight, complicates installation and puts an average load on the floors.
Types of plaster
Plastered walls and ceilings are an ideal base for painting or wallpapering. Types of plaster for leveling surfaces:
- The most economical option is a cement mixture, which provides a durable coating with high heat and sound insulation and fire protection characteristics. The composition can withstand high levels of humidity, but is heavy, which makes it difficult to apply to walls and especially ceilings. It requires puttying and sanding before painting or laying tiles, but if properly leveled it can last a very long time.
- Cement-lime plaster has antibacterial properties, protecting the room from the appearance of mold and microorganisms.
- Gypsum is a dry mixture consisting of gypsum powder with plasticizers. Gypsum plaster is plastic, vapor-permeable, environmentally friendly, lightweight compared to cement, compatible with concrete and brick surfaces, and does not require putty before painting or wallpapering.
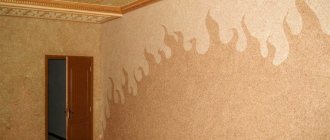
- Decorative plaster - can be silicone, mineral, silicate, used for finishing, allows you to create unusual and unique surfaces. It makes no sense to compare such exclusive types of this material as travertino, Venetian, Moroccan plaster with plasterboard, since their cost significantly exceeds the most expensive types of gypsum plasterboard along with finishing.
Pros and cons of plaster and drywall
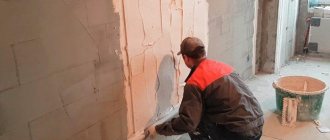
Leveling the walls may involve the use of different materials, and this is not only drywall, but also plaster. Before starting work, you should consider all the advantages and disadvantages of these solutions in order to make the right choice. As for drywall, its installation is simple and does not require the specialist to have special qualifications, which cannot be said about applying plaster. Although the plastic mass does not steal free space from the room, it is applied according to a certain algorithm. Even if you familiarize yourself with it theoretically, this does not mean at all that the finishing result will meet your expectations and will be aesthetically pleasing.
GCR is good for leveling walls also for the reason that the material is cheaper than the described opponent. For some, this factor comes first when the budget is very limited. This comparison is especially relevant if you have to work with wooden walls, because they also require additional preparation before applying plaster, which makes repair work more expensive.
Another disadvantage of the latter is the long period of drying of the surface after finishing. But drywall can be immediately coated with a finishing layer after installation is completed. The evenness of the walls is also important when choosing a material. Drywall allows you not only to level out unevenness, but also to hide communications. But if you finish with a plastic mass, you will also have to additionally prepare the walls by leveling them.
From a practicality point of view, plaster has a clear advantage, but plasterboard has its drawbacks in this regard, because heavy objects cannot be hung on it, in addition, the surface is quite fragile.
Attention! When considering the pros and cons of drywall and plaster, you should also pay attention to the ability of the materials to hide communications under their thinness. The first finishing option can even hide pipe routing from view, but under the plaster you can only hide thin wires.
Before finishing your walls with drywall, you should evaluate your construction abilities. If you have no previous experience in repairs, it is better to choose drywall. Although working with it is longer and more monotonous, it allows for errors that can be dealt with at different stages of installation of the material, which cannot be said about plaster.
Materials: Psychoanalysis, fairy tales and
Drywall is a collective concept
In the minds of many, drywall is synonymous with something unreliable and cheap. A kind of surrogate. However, different materials are used in frame partitions, and serious manufacturers spend a lot of money to improve them. Heating, air supply and intake into rooms, air conditioning, electricity, low currents, the Smart Home system, home theaters, heated floors - these are all components of a modern comfortable housing.
And all this needs to find a place, be able to be serviced, replaced in case of breakdown or obsolescence. Frame partitions make it possible to do all this in an optimal way. Installing an additional outlet or wall sconce on a frame partition is easy. But in this case, the brick partition will require cosmetic repairs. 1
. The frame partition has a thickness of 100 mm, and the brick partition with a layer of plaster is 150 mm.
Now calculate the linear meters of walls in your apartment or house and multiply by 50 mm. Check how many meters are wasted. Many doors are designed as standard for a wall thickness of 100 mm, and for installation in thicker walls a special addition is needed to the standard frame.
These are also additional costs.
Installation
The plasterboard sheets are attached to a pre-prepared base, so before leveling the walls with your own hands, you need to take all measurements and make calculations. In addition, the following tools will be required for installation:
- laser level;
- roulette;
- plumb line;
- hammer;
- Bulgarian;
- metal scissors;
- screwdriver;
- plane;
- rail;
- knife;
- spatulas;
- sandpaper;
- container for priming and preparing putty;
- rollers and brushes.
To level the walls using drywall, you should also decide on the installation method. Today, both the frameless option (plasterboard is fixed with glue, cement or plaster) and frame technology, in which a wooden or metal frame is made, are widely used.
Both methods are good and equally allow you to eliminate an uneven surface, but if you do the work yourself, it is important to properly fasten the sheets so that the installation is of high quality. Therefore, step-by-step instructions will help beginners with this.
Installation without frame
First of all, the surface of the walls is checked; it must be strong, dry and have no flaking elements. If the base is covered with oil paint or enamel, then it is thoroughly cleaned of the old finish. Since the material will be attached with gypsum glue or a cement-polymer mixture, the overlap is additionally coated with a primer.
This technique is only suitable if small level differences are noticed in the walls. It will also be necessary to insulate the structure; in this case, polystyrene foam is used as thermal insulation.
The main advantage of this method is that the work requires a minimal set of tools, the sheathed wall will not reduce the living space and the surface will serve as excellent sound insulation. After the base is prepared, glue is applied evenly over the entire base of the drywall and the sheet is fixed to the wall.
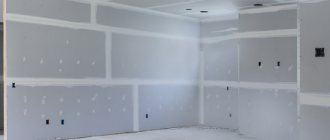
Installation with frame
It is the most reliable and high-quality option for leveling walls. First of all, the frame of the structure is made using wooden beams or metal profiles. As a rule, the frame method is chosen if you need to cover surfaces with large flaws or create complex compositions in the form of arches and niches.
To prepare the metal frame, special profiles made of galvanized steel are used; they are equipped with through holes and a notch, thanks to which fixing the parts is convenient and quick.
The main disadvantage of frame installation is that it is carried out using a large number of tools. But the metal frame on which the plasterboard structure is attached is moisture-resistant and durable. And also under the sheets you can lay not only a layer of thermal insulation, but also hide all communications.
As for the wooden frame, it is made from smooth and dry timber, which is characterized by good sound insulation, strength and excellent thermal insulation. After assembling such a frame, the beams must be treated with a special impregnation; it will protect the wood from bugs, mold, moisture and rot.
The first step in frame installation is marking the walls. To do this, measure the distance from the corner, leave a gap of 5 cm and draw a vertical line. A similar procedure is performed with the opposite wall, then a strip is taken and the resulting lines are connected to a point on the floor and ceiling. After this, vertical markings are made from the corner and lines are drawn; the distance between the marks should not exceed 60 cm.
Measurements must be taken accurately, as the slightest mistake will cause incorrect installation. Additionally, the lowest point of the ceiling is also determined and lines are drawn from it on the walls
It is important to measure the distance between walls at the inner corner. When installing a frame, the wall will “take up” a usable area of 4 cm, this should be taken into account, and if the room is small, then it is best not to choose this method
The next step will be to attach the profiles along the marked lines. They are fixed along the entire perimeter of the wall using self-tapping screws. The final stage is covering the frame with plasterboard. To do this, depending on the level of humidity and temperature, a certain type of material is selected, and it is attached to the frame using screws. Then all joints are sealed with putty and the surface is primed.
Dry bending
You can bend drywall without much effort
The entire sheet or part of it can be bent by simple mechanical action. There is nothing difficult about this, since dry bending drywall can be done with a minimum of effort. If you overdo it, the material will simply crack. Obviously, this method is only good in cases where we are talking about smooth lines and slight bending. The radius of possible bending directly depends on the thickness of the sheet.
| Table of bending radii of drywall | ||
| Sheet thickness | Minimum dry bend radius | Minimum wet bend radius |
| 6.5 mm | 100 cm | 30 cm |
| 8 mm | 155 cm | 38 cm |
| 9.5 mm | 200 cm | 50 cm |
| 12.5 mm | 275 cm | 100 cm |
The table shows that the capabilities of the dry method are not as extensive as those of the “wet” method (we’ll talk about it a little later). So how to dry bend?
- First of all, it is necessary to make a frame along which the sheet is bent. It can be constructed from a metal profile or plywood. This frame must clearly follow the contours of the required bend.
- One edge of the sheet is attached to the edge of the frame using self-tapping screws with a press washer (so that the sheet does not tear out). After this, the material is slightly bent and screwed in the next position. Next, the sheet is again gradually bent and screwed. This is done until it completely follows the contour of the frame. With a partner, work will go faster and easier.
Gradually bending, we attach the drywall to the frame
The material is left in this position for a day and then removed. The shape given to the drywall will not go anywhere, and the sheet can be used for its intended purpose.
Before bending drywall using this method, you need to make sure that the resulting radius is within acceptable limits and nothing will crack in the process.
The created frame can be either small in shape (for thin strips) or have impressive dimensions so that the entire sheet can be bent.
Which material to choose
Before you begin a renovation, there are several important factors to consider to decide which of these materials is right for your particular application.
- If the speed of work is important and the repair must be completed quickly, you should give preference to drywall.
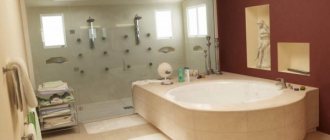
- It is better to level walls in rooms with high levels of humidity with cement or cement-lime plaster, which is an excellent base for all types of tiles and heavy wall structures - shelves, mirrors, water heaters. Plastered surfaces in the kitchen, bathroom and toilet will last for several decades.
- It is much more profitable to level surfaces with large differences with plasterboard rather than plaster. When using gypsum plasterboard, the curvature of the walls does not matter; when using a plaster mixture, you will have to use up a lot of material.
What is cheaper – plaster or drywall? The cost of the plaster mixture is lower than the cost of plasterboard, plastering work will also require lower costs, but if a really good experienced craftsman does the plastering, his work will be paid higher. In this case, the price of work with these materials will be approximately the same.
- If the ceiling or walls need to be insulated, it is better to choose plasterboard.
- When choosing paint as a finishing material, you should prefer gypsum board, since microcracks will not appear on it.
- It is advisable to finish the walls in new buildings with gypsum or cement plaster to minimize cracking of surfaces during shrinkage of the building.
- In a small room, it is better to plaster the walls and ceiling so as not to waste space due to the plasterboard frame.
- In the kitchen or other rooms where heavy cabinets or other items will hang, it is more advisable to choose plastering.
Installation of plasterboard sheets - rules and features
Leveling surfaces with differences of up to 4 mm is performed as follows:
- Using a (notched) spatula, apply lines of gypsum putty to the center of the wall and along its perimeter.
- It is advisable to install additional elements. They are made from pieces of gypsum board left after trimming and glued along the perimeter of the wall surface.
- Place a sheet of drywall on additional spacers (or directly on glue), check the level of correct installation of the product, and press it into place using a rubber mallet.
Do not try to save adhesive. Apply it in a fairly thick layer.
If the walls have unevenness of 0.4–2 cm, a stronger adhesive mixture will be needed. It is applied in heaps onto a sheet of drywall. The easiest way to perform this operation is with a trowel. The diameter of the piles should be kept approximately the same. And the distance between them is taken around 0.3 m.
Adhesive mixture for plasterboard sheets
Then gaskets are installed on the wall (along the perimeter) (they are mandatory in this case), on which the gypsum boards are installed.
Leveling differences of 2–4 cm is carried out according to a more labor-intensive scheme:
- Cut strips from the remaining drywall after cutting it.
- Glue the strips onto the wall surface in increments of 0.4 m.
- Wait 48–72 hours.
- Use putty to combine the strips and drywall into one structure.
As you can see, installing gypsum boards using frameless technology will not cause you any particular difficulties. Everything is objectively simple and clear. But you can also further facilitate the alignment process if you follow the following advice.
Drill holes in the wall, install dowels in them, and then insert them level into the last stainless steel screws. Now finishing the surface with plasterboard sheets will go without a hitch. The caps of the screwed-in hardware will protect the plasterboard from going deeper. This means that the drywall will be installed perfectly in the vertical direction. Self-tapping screws are always used in cases of leveling wooden walls. Moreover, as a rule, no preliminary markings are applied to such structures.
After installing the gypsum board, you will need to putty the caps of the hardware, as well as the entire resulting surface if you plan to paint the walls. If you plan to finish the drywall with wallpaper, puttying the entire wall area is optional.
Leveling by gluing drywall
Minor unevenness can be corrected by leveling the walls with plasterboard without a frame.
Preparation
In this case, you first need to prepare the walls. Wallpaper, tiles, plaster or any other decorative covering are removed from them. The vertical surface is sanded and cleaned of any crumbling finish. The largest damage, cracks and depressions are roughly sealed with starting putty.
If the room is damp and there is mold in it, it is necessary to remove it and treat the surface with a disinfecting solution. If necessary, you can coat it with a water-repellent emulsion. Once dry, the room is primed to improve adhesion. After completing the preparatory work, you need to wait for the primer to dry completely.
Gluing process
Before gluing the sheets, you need to determine the vertical surface. This is done using a plumb line. Nails with wide heads are driven in at the level of the motionlessly hanging thread. This is necessary so that the sheet lies flat on them. The vertical distance between the caps is 60-70 centimeters, horizontally - up to 50, depending on the degree of curvature.
Drywall is laid with special glue. It is mixed and applied to the wall. In this case, you need to take into account that you need to lay a continuous layer around the perimeter, and on the rest of the plane it is enough to sketch them randomly.
The approximate distance between the cakes should be 8-10 centimeters, and their thickness should be 4-5 millimeters greater than the distance between the guide nails and the wall.
After the plane is covered with glue, a sheet of drywall is applied to it. First, it is baited, and then, using a level and hammered nails, it is leveled in such a way as to form a perfectly flat surface. For convenience, the procedure should be carried out by two people.
After the glue has dried, the seams and joints between the sheets are sealed with putty. After it has dried, you can begin finishing the walls.
Leveling walls with plasterboard without a frame is an easy way to solve the problem
Installation is much simpler, because there is no need to construct a structure from aluminum profiles. The work takes less effort, time, money and material.
- Construction spatulas of different sizes;
- Rubber hammer;
- Marker or construction pencil;
- Measuring tape;
- Metal brush;
- Rule (2 meters);
- Construction level (hydraulic or laser);
- Painting knife with a set of blades;
- Regular fishing line;
- Roller (necessary if the wall has a porous surface);
- Electric jigsaw;
- Plasterboard sheets (regular or moisture resistant);
- Dry gypsum mixture;
- Special glue;
- Container for preparing the solution.
It is not used as widely as installation using a frame. The sheets are fastened using specially prepared glue. Measurements are made using a tape measure. It is important to know exactly the dimensions of the room so as not to make mistakes when purchasing building materials.
First, take measurements, apply marks with a marker or pencil on a sheet of drywall where they are needed. Make a small cut with a paint knife on one side, and then continue along the entire length along the marked line.