Wall insulation is a necessary procedure aimed at maintaining heat in the house for comfortable living.
It has been proven that in the cold season, about 30% of all heat loss occurs due to uninsulated or improperly insulated walls.
No matter how powerful and modern the heating system is, without proper insulation of the walls, the effect of its use will be minimal.
There are two ways to insulate a house - outside and inside.
Internal insulation is applicable in cases where it is necessary to preserve the original appearance of the building (for example, an apartment in a high-rise building, or a unique facade of a house). One of the most effective materials for insulation is mineral wool.
If for some reason mineral wool is not suitable for you, you can choose insulation from these materials:
- Styrofoam;
- extruded polystyrene foam;
- penoplex;
- penofol;
- penoizol;
- polyurethane foam.
Features of internal insulation
Unfortunately, internal insulation is not as effective as external insulation of premises, but with the right approach it can be a good way out of the situation. The main problem with this method is that the load-bearing wall itself, bordering the street, does not become warmer.
IMPORTANT!
The so-called “dew point” (the boundary of the cold wall and the insulation layer) shifts to the surface of the finishing layer , which inevitably leads to the appearance of dampness and the eventual destruction of the wall and finishing layer. These negative consequences can be avoided during internal insulation by using special hydro- and vapor-tight membranes.
At the same time, despite its disadvantages, insulating walls from the inside also has its positive aspects:
- such work can be done with your own hands;
- insulation of internal walls with mineral wool can be done at any time and in any weather;
- there is no need to complete all the work at once - it can be done gradually;
- Insulation with such a device plays the role of sound insulation and prevents extraneous street sounds from entering the home.
Pros and cons of insulation methods
High-quality insulation of a wooden house from the inside
Construction science recommends external insulation of buildings, since in this case the dew point is located outside the room in the insulation or in the outer layer of the walls.
With such insulation, moisture will not condense on the walls in the rooms. But there are still cases when insulating a wooden house from the inside is the only right solution. For example, if the owner of the house wants to preserve the beautiful appearance characteristic of houses made of rounded logs, or the laws require preserving the historical appearance of the building.
Modern construction science makes it possible to do internal insulation of wooden houses, but for this you need to use the right materials and follow the technology.
Mineral wool
Mineral wool as a building material used for insulation has been known for quite a long time.
Made from natural basalt fibers, it is environmentally friendly and retains heat well inside a wooden or brick house.
There are 3 main types of mineral wool, depending on the intended use:
- lungs . Used in frame insulation. Their density ranges from 10 to 90 kg/m3;
- heavy . This type of wool is used to insulate building facades. Its density is 90 kg/m3;
- technical _ They are used mainly for insulating industrial premises and equipment where high and low temperatures are observed.
Mineral wool also comes in several types according to its composition:
- glass wool - produced by melting quartz sand or broken glass into thin fibers. When adding binders, it acquires the usual yellowish color. This material does not burn and does not change its properties when it gets wet;
- slag wool - made from industrial slag waste. The use of such wool when insulating residential premises is unsafe from an environmental point of view;
- basalt wool is the most common material for home insulation. It has an increased thermal conductivity coefficient.
- stone wool is one of the most technologically advanced options. It is practically free of drawbacks and is often used in construction; this option is recommended for internal insulation.
Comparative characteristics of insulation materials
Step-by-step work on insulating walls with mineral wool from the inside
Let's say the owner of the house decided to install mineral wool thermal insulation inside the rooms and cover this structure with plasterboard. Then he should not violate the technology, but perform the work in the order indicated below.
Stage one. All previous decorative coverings are removed from the wall. It can be:
- wallpaper;
- dye;
- decorative plaster.
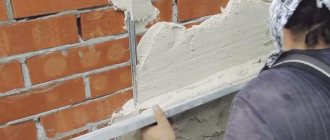
You will need to get either to a reliable plaster coating or to the wall base. You can clean the wall in different ways. It is best to soak decorative plaster and wallpaper at first, so that these coatings can then be removed without difficulty. But you will have to tinker with the paint. First, it is heated with a hair dryer, after which it is removed with a spatula. You can wash off the dye using a solvent. Sometimes it is advisable to do mechanical cleaning if you have an electric hand-held machine.
Stage two. When the wall is cleaned, and dust and all kinds of small particles of construction debris are removed, all surface flaws will be revealed. It will be necessary to “treat” her. You may find:
- mold colonies;
- cracks;
- deep recesses.
To treat such a surface, deep penetration soil with antiseptic additives is used.
Stage three. Need to do some marking. Vertical lines are marked on the insulated wall. Guides are installed along them to further mount the frame for drywall. Between these lines there should be a distance of 40 cm or 60 cm, because it will be easier to attach gypsum board sheets, the width of which is 120 cm. The lines are planned to be positioned in such a way that adjacent sheets of drywall are joined along them.
Stage four. Lines are broken:
- on the ceiling;
- on the floor;
- on adjacent walls.
Marking the ceiling for the starting profile
Along these lines, the frame under the drywall will subsequently be installed. How accurately the lines on the floor and ceiling are drawn will need to be checked using a plumb line. On the side walls, vertical lines should connect them.
Along these lines, guide profiles (PN 28/27) can be mounted at the same time. Next, you will need to install vertical racks in it.
Fastening the guide profile
Stage five. You need to attach straight hangers to the wall. Their location should correspond to the axis of the broken vertical lines. These hangers are installed at a distance of 40-50 cm from each other. And the perforated side strips will need to be bent perpendicular to the wall.
Profile hangers for plasterboard
Stage six. Basalt mineral wool slabs are laid. It is best, as already mentioned, to attach the slabs with special glue. The adhesive mass is diluted with water and brought to the desired consistency, as indicated in the instructions.
Stage seven. It is necessary to first try on each slab to the place where it will be installed. Where necessary, you will have to make cuts so that perpendicularly bent perforated strips of direct hangers can then pass along them.
Stage eight. Glue is applied around the perimeter of each slab, and in the center you can apply it in slides. However, if the wall is pre-leveled very well, then it is easier to apply the glue with a notched trowel. Ridges 1 cm high spread out, evenly covering the entire area of the slab.
Applying an adhesive composition to a mineral wool slab
Stage nine. The adhesive composition has been applied. Now you can “prick” the slab onto the hangers, passing it through the cut slots. Next, you will need to press it tightly against the wall, with its entire surface. And those excess glue that protrudes on the sides are immediately removed.
The slabs should be laid without gaps, that is, they should fit one another quite tightly.
Stage ten. The frame is mounted. Vertical posts are cut to the required sizes. Their ends are placed in control profiles. After this, using fasteners (preferably self-tapping screws), they are attached to the profiles and to the perforated strips of direct hangers that protrude through the mineral wool. When the racks are fixed, the planks will need to be bent to the sides and pressed into the mineral wool.
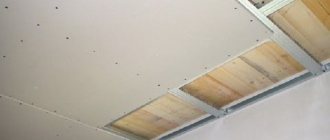
The wall is covered with insulation
Stage eleven. A vapor barrier is formed. The membrane is attached to the frame controls. It is enough to use double-sided tape. If the frame is wooden, fastening is done with staplers.
The final stage. After installing the vapor barrier layer, you can begin installing drywall. Next comes decorative finishing.
Prices for mineral wool
Video: How to properly insulate walls with mineral wool and plasterboard:
Advantages and disadvantages of mineral wool
The spread of mineral wool is primarily due to its advantages:
- low thermal conductivity;
- non-flammability;
- mechanical stability - does not change its properties when exposed to it;
- soundproofing characteristics;
- resistance to temperature deformation;
- biochemical resistance;
- convenience and ease of installation.
However, despite the impressive list of advantages, building regulations do not recommend using ordinary mineral wool for insulating premises . This is caused by the presence of phenol in its composition, which has a detrimental effect on human health. For internal insulation, craftsmen advise using ecowool or stone wool.
If installed incorrectly, exposed areas of mineral wool come into contact with the ventilation system, resulting in hazardous particles being released into the surrounding air.
NOTE!
When working with mineral wool, it is mandatory to use gloves and a respirator!
Installation methods
There are several options for attaching mineral wool to the insulated surface. There are three main ones:
- frame method;
- for direct hangers;
- on mushroom-shaped dowels.
On the frame
To do this, you need to assemble a frame of wooden blocks on the wall, floor or ceiling. Precisely from wood, because wood, in contact with the surface, will not create cold bridges, like a metal profile. Of course, the bars will have to be treated with an antiseptic.
Pay attention to this point - the distance between the sheathing bars should be slightly less than the width of the roll or mat of mineral wool. This is done so that the insulation fits into the frame with tension, pressing tightly against the bars.
If plasterboard is used for finishing, you will have to take into account the dimensions of this sheet material. Then between the bars it will be necessary to leave a space of 1200 mm (this is the width of the drywall) with the installation of one or two more intermediate elements.
Since the main manufacturers produce mineral wool with a width of 610 mm, the frame for plasterboard will be with the installation of one bar in the middle. And 10 mm will play the role of that very sealing layer that will press the insulation to the frame.
For direct hangers
This option for installing mineral wool is usually used when it is necessary to insulate a ceiling on which a suspended structure made of plasterboard, plastic panels, and so on is mounted. Consider the option with drywall.
To create a suspended structure on the ceiling, it is necessary to install direct suspensions on it, to which profiles will then be mounted. After the suspensions are installed, it is necessary to attach stone wool slabs to them along the entire ceiling. You can also use a roll version, but it is more difficult to work with it under the ceiling.
To do this, you need to make holes in the mineral wool slab through which the ends of the hangers will be squeezed. If a suspended ceiling were installed, then the suspension tendrils would simply need to be bent in different directions, thereby securing the insulation. This cannot be done for a suspended structure under plasterboard, because the frame profiles must be attached to the hangers.
To prevent the mineral wool slabs from falling below the required level, you can stretch a strong thread through the holes in the suspension antennae (and this is a perforated part), or insert a plastic or metal rod (for example, wire) into each element.
On dowels
This is the simplest option for attaching stone wool. Most often it is used to insulate facades. The thing is that often inexperienced craftsmen cannot create the required installation density in this way. Therefore, there may be gaps between the thermal insulation boards that need to be filled with foam.
The installation technology is quite simple. To do this, a heat insulating mat is applied to the wall and two holes are made through it in the insulated surface. Mushroom-shaped dowels made of plastic are then inserted into them. This is how the fastening occurs. In order for the fasteners to be as reliable as possible, these dowels are also installed in the gap between the plates, two on each side.
Drywall
Today it is difficult to imagine renovation without the use of drywall. It is multifunctional and is used for finishing walls, ceilings, creating partitions, and various decorative elements.
Some types, due to their water-repellent properties, are used in finishing bathrooms and toilets.
Before using drywall, you need to understand its positive and negative characteristics in order to understand the specifics of handling it.
Advantages of drywall:
- Flexibility and lightness . The use of this material allows you to implement the most daring design solutions. It is easy to make various geometric shapes from it - from banal rectangular to complex semicircles, arches, columns;
- Thermal insulation properties;
- Fire resistance . Drywall doesn't burn. When it is exposed to fire, only the top paper layer suffers.
- Water resistance . Special types of gypsum boards have been developed that are recommended for use in rooms with high humidity.
Disadvantages of drywall:
- The main disadvantage is its fragility . A sheet of drywall can easily be damaged during transportation, installation, and subsequent operation;
- Soundproofing characteristics . Drywall does not have soundproofing properties. Behind a simple gypsum board partition all sounds will be heard.
Drywall
Installation of insulation
- Installation of insulation begins with clearing the wall of all protruding hanging elements. It is necessary to remove all brackets, window slopes, window sills, etc.
- Inspection of the wall, assessment of surface quality. If there are cracks or other defects, they should be filled with putty; the cracks are first expanded with a spatula, since they may be much larger inside than outside.
- We mark the wall for installing direct drywall hangers. The usual profile pitch is 60 cm, the axes of the guides are outlined. Each axis contains 4-5 suspensions.
- Hangers for plasterboard guides are installed.
- Insulation is being installed. The material is laid in dense rows in one layer, or several, so that the joints overlap with solid sheets of the upper rows. There should be no gaps or cracks. The petals of the suspensions pass through the joints of the insulation.
- All detected cracks are filled with polyurethane foam. The wall plane must be completely covered with insulation. Window slopes are also covered with mineral wool up to the line of contact with the frame.
- Guides for plasterboard partitions are installed on top of the mineral wool sheet. To do this, the outermost strips are installed plumb, control cords are pulled between them, making it easier to adjust the plane, after which the remaining guides are installed.
Attention! For the installation of more rigid slab mineral wool, the installation of guides is carried out first. The insulation boards are tightly fixed in the spaces between the planks.
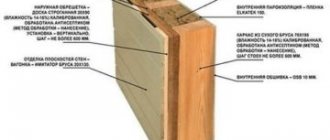
Construction of a wall pie from the inside
In construction, the totality of all structural elements is usually called a pie. In relation to internally insulated walls, the structural pie looks like this:
- external load-bearing wall;
- waterproofing;
- insulation layer - mineral wool;
- vapor barrier membrane;
- drywall frame;
- finishing plasterboard sheets;
- finishing finishing material.
wall pie
Vapor barrier - description and installation
An important step in the process of internal wall insulation with mineral wool is the installation of a vapor barrier. During the operation of a residential building, steam is constantly released during cooking, using the bathroom, and using the kettle.
In this case, steam easily penetrates through the layer of drywall into the insulated partition. If the surface of the mineral wool is not covered with a vapor barrier membrane, you may encounter the fact that the insulation, which has absorbed a large amount of moisture, will become a constant source of dampness and mold.
The vapor barrier is installed on top of the frame with a layer of insulation. There are 2 types of material designed to create a vapor barrier under drywall, the first of them is polyethylene film . It is the most budget option. However, in addition to retaining steam, it does not allow air to penetrate into the partition space, which is fraught with the formation of a greenhouse effect and eventual dampening of the drywall.
Mineral wool vapor barrier
Membrane film is an innovative material in this regard . This film easily retains moisture, but does not interfere with air ventilation. The membrane film “works” only in one direction. This is important to consider when installing it.
The film covers the entire surface of the finished partition. The canvases should be laid overlapping, the joints should be taped with mounting tape.
Why is wall insulation done?
The problem with cold walls is not so much the lack of comfort as the formation of condensation and wetting of wall materials. If this happens, the moisture in the thickness of the wall will sooner or later freeze and begin to expand, causing the destruction of the material. This can only be avoided with the help of insulation.
There are two ways:
- External method. The insulation is located on the outside, cutting off cold outside air from the wall materials. At the same time, the temperature of the walls increases significantly, heat loss is reduced, and the formation of condensation stops. In addition, the inner surface of the walls remains intact.
- Internal method. The insulation is installed from the inside, cutting off warm internal air from the wall material. Only the insulation layer is responsible for maintaining heat. A problem is created with the removal of steam, since it cannot be allowed to penetrate into the insulation under any circumstances, so a continuous vapor barrier film impenetrable to steam is needed. This significantly increases the air humidity inside the room, which requires the organization of high-quality ventilation.
It is believed that the best option is external insulation, but often this option is not possible. For example, the external surface is inaccessible (upper floors, prohibition on changing the appearance of the building, nearby structures, etc.). In this case, you have to insulate from the inside, which in some sense is more convenient - for example, you can work at any time of the year and in any weather.
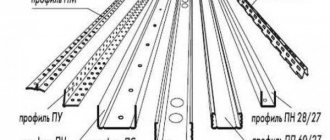
Lathing under mineral wool and drywall - features and installation
Traditionally, you can create a partition sheathing for attaching drywall from two materials:
- wooden slats;
- galvanized profile.
The wooden frame is distinguished by its massive, bulky design. Before installation, wooden slats are treated with an antiseptic to prevent the possibility of rotting.
When installing drywall, it is more advisable to use special galvanized profiles.
They are designed to be attached to each other, in addition, they are provided with mechanisms for attaching to walls - brackets, with which you can adjust the thickness of the partition.
A brief diagram of the installation of lathing for gypsum boards can be presented as follows:
- The thickness of the partition is determined depending on the selected thickness of the insulation;
- a guide profile is attached to the sides of the vertical adjacent walls, along the floor and ceiling;
- the edge from which the plasterboard sheets will be installed is determined;
- Considering the width of the sheets is 120 cm, markings are made every 40 (or 60) centimeters;
- U-shaped brackets are attached along the markings at intervals of 50 cm;
- the supporting posts are inserted into the guide profile in accordance with the markings;
- using a stretched string, level the supporting posts and secure them with brackets;
- Transverse posts are attached to the load-bearing posts to ensure structural rigidity;
Mineral wool lathing
Insulation is laid under the resulting plane.
Features of cladding and insulation of house walls with plasterboard
With the help of gypsum plasterboard it is easy to level the walls.
Using plasterboard sheets for wall cladding, you can simultaneously achieve an ideal microclimate in a wooden or any other private house, as well as level the surface of the walls for finishing.
Surprisingly, even on their own, without insulating material, plasterboard sheets are capable of insulating a house (of course, only if they are well reinforced and there are no gaps between the sheets). This property is inherent in plasterboard for the reason that it has low thermal conductivity - 8-10 times less than, for example, a reinforced concrete slab.
If you do not limit yourself to just plasterboard, but strengthen it on a metal frame and additionally install a mineral wool board in the gap between the wall and the sheet, then the thermal insulation properties will increase several times more.
Insulation of walls from the inside with mineral wool plus plasterboard
IMPORTANT!
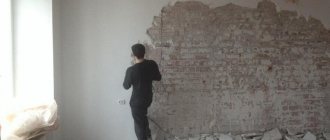
Any thermal insulation work should begin with surface preparation.
All irregularities and depressions must be plastered and filled. Walls that are to be insulated are treated with anti-mold preparations and primed.
Insulating a brick wall from the inside with mineral wool:
- Using the method discussed above, a sheathing is created in addition to securing the load-bearing posts;
- insulation is being prepared. The method of its fastening depends on what kind of mineral wool you are dealing with . It is convenient to string cotton wool in the form of mats onto brackets installed in the wall. Laying should be carried out so that there are no gaps between the mats. ;
- after filling the walls with insulation, load-bearing racks are installed;
- If mineral wool is purchased in rolls, its installation can be done after installing the racks. It is easy to fill the space between the racks and the wall;
- the surface of the insulation and sheathing is covered with overlapping rolls of vapor barrier membrane. The membrane joints are glued with mounting or plumbing tape .
Insulation scheme
Laying the material
This way there is a prepared surface for mounting plasterboard sheets.
Insulation without frame
Insulating walls with plasterboard from the inside is not always possible with the assembly of the frame. You can carry out insulation without a base.
Initially, the walls are prepared for fastening insulation sheets. All fragile areas are restored, and surfaces are treated with an antiseptic.
Application of antiseptic
Polystyrene foam or cotton wool is attached as in the previous version, that is, an adhesive mixture and plastic dowel nails.
Sheets of plasterboard are mounted using a gypsum mounting mixture of the “perlfix” type. The glue is prepared by adding water and thoroughly mixing with a mixer. The mounting mixture is applied pointwise to the surface of the plasterboard, and the material is pressed against the insulated wall. Additionally, fixation is provided with self-tapping screws.
Insulation of walls without installing a frame made of profiles
However, this method of covering with plasterboard with insulation should be used only as a last resort. The presence of a frame base ensures a higher level of structural reliability, despite various influences: humidity, tension and other loads.
Waterproofing
The need for waterproofing arises in wooden houses with log walls with cracks and cracks. In order to prevent contact of street air with the insulation layer, wooden walls are covered with a layer of hydro- and windproof membrane.
This film reliably protects the insulation layer from moisture from the street. It is attached using a stapler and overlapping staples, the joints are glued.
Wall waterproofing
Installation of drywall sheets
The installation diagram for drywall is simple:
- The sheets are fastened to the frame using metal screws. The standard length of gypsum board is 250 cm. If the height of the room is greater, a piece of the required size is cut from a new sheet. In this case, the installation of sheets is carried out staggered - so that the position of the segments alternates.
- If necessary, a second layer of plasterboard is installed.
- The drywall is being cleaned.
Installation of gypsum boards
Technology of thermal insulation of walls with plasterboard from the inside
The technology of insulating the walls of a room with plasterboard from the inside does not require special training of workers or expensive equipment. General construction skills and a universal tool are enough.
Tools and materials
During the work you will need:
- guides (metal profiles or wooden bars);
- gypsum boards;
- insulation in slabs or rolls;
- double sided tape;
- vapor barrier membrane;
- screws, dowels and other fasteners;
- anti-mold agents;
- putty;
- drill;
- screwdriver;
- hand tool.
The floor in the room must be cleared of debris and foreign objects.
Design
At this stage, the type of insulation, gypsum board and guides is selected.
If you are insulating a kitchen or bathroom, you should choose moisture-resistant plasterboard. For the boiler room, it is recommended to use fire-resistant.
Wooden guides are cheaper, but they are at risk of drying out and deforming in the event of temperature changes. The metal profile does not have such disadvantages. The number of guides is calculated based on a standard step of 60 cm.
When calculating the volume of materials purchased, a 5% reserve should be made in case of damage to gypsum boards and for cutting complex elements of walls and ceilings.
Stages of work execution
At the first stage, it is necessary to perform a number of preparatory work:
- clean the walls from dirt and mortar drips;
- dismantle all protruding objects: fasteners, remnants of fittings, sockets, lamps, etc.;
- fill all cracks and irregularities;
- treat with a composition against fungus and mold;
- dry the surface.
Next, marking work begins. Use a plumb line or a laser rangefinder and a chop cord
special attention should be paid to:
- parallelism of the marking of the mounting points of the guides;
- marking in corners and junctions of building structures: arches, window and door openings, columns, bay windows, ceiling beams.
After marking, they proceed to the installation of frame guides.
- The starting profile is glued to the floor using double-sided tape; the adhesive tape will improve sound insulation and protect against drafts;
- vertical profiles are attached to the starting strip with metal screws, and to the wall with screws on dowels.
The process of insulating walls with plasterboard.
A very important stage is laying insulation into the guides. The quality of insulation will directly depend on the accuracy of the work:
- insulation sheets are placed in the guides from bottom to top;
- they should fit between the profiles without gaps, with some effort;
- the sheets are additionally attached to the wall with adhesive or disc-shaped dowels;
- All cracks and gaps must be tightly filled with scraps of material or sealed with foam.
Now it's time to install a vapor barrier:
- penofol is mounted with foil inside the room;
- The vapor barrier membrane is attached with the rough side inward; double-sided tape is used for installation.
And the final stage is the installation of drywall sheets. They are mounted horizontally, from bottom to top. Before screwing the sheet to the guides, you need to use markings and a level to make sure that it is positioned strictly horizontally. After the first layer is secured along all the guides, the next one is installed on top of it. Here you also need to ensure that the position is horizontal and that the gaps between the sheets are minimal.
As a rule, the size of the room does not allow installing only whole sheets of drywall. Pieces have to be mounted in corners and under the ceiling. Drywall should be cut on the floor, in a horizontal position, on a flat surface. It is enough to cut through the top layer of paper with a mounting knife. Now the cut piece can be broken off along the cut line.
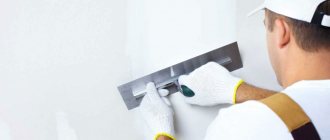
Upon completion of installation, all joints between the sheets should be thoroughly puttied. After the composition has dried, it is leveled with fine sandpaper, achieving a completely flat surface of the wall or ceiling.
Now the surface of the insulated wall is ready for final finishing. Two main types are used:
- wallpaper;
- water-based paint.
When insulating rooms with high humidity with plasterboard, moisture-resistant types of plasterboard with special hydrophobic and antifungal impregnations are used. These panels are easy to distinguish: they are painted green. In wet rooms it is also necessary to arrange supply and exhaust ventilation to prevent air stagnation and mold formation.