Brickwork - the surface is not smooth, often far from perfectly flat. And if the brick wall is also old, it has chips and chipped seams. Plastering brick walls will help to monolith and level the “pockmarked” surface.
The owner of a brick house being built or renovated requires various information about plastering. They are presented in this article. Let's start with the question of what is better to plaster a brick wall. Therefore, we will consider the types of plaster compositions for a brick wall.
Preparing a brick wall for plastering
Plastering work on site begins with preparing the base, since it is necessary to ensure strong adhesion of the finish to the wall. In addition, by covering the wall with a monolithic covering, you hide the wall structure from view. Therefore, the wall is repaired before plastering.
Inspection and assessment of the evenness of the wall allows you to:
- correctly outline the vertical plane of the future wall surface (often walls, partitions, ceilings need adjustment),
- calculate the consumption of finishing materials.
The preparation of brick surfaces for new and old brick walls differs in a number of nuances.
New wall
Even a new brick wall, built in accordance with building codes, needs to be prepared for plastering.
The main concerns of the plasterer are to ensure strong adhesion and “healthy” conditions for the brickwork:
- embroider the masonry seams (deepen by a centimeter);
- scratch the surface of the bricks with a wire brush;
- treat with bioprotection agents;
- remove traces of fat and grease from the surface.
Cleaning bricks from dirt
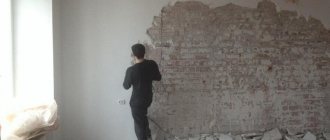
old wall
“Veterans” usually carry multiple “wounds” and “sores” on their bodies.
Masonry mortars, especially carelessly executed and used without coating protection, often:
- partially crumbled;
- individual bricks become loose;
- there are chips and cracks on the wall;
- the walls inside the house may have nails, screws, or other metal fasteners;
- full of oil, salt, rust, and fungal stains.
In addition, the old walls in the room are covered with plaster and other types of finishes. Old walls are more likely than new ones to be crooked or slanted. All this is a front of preparatory work.
Therefore, the old masonry:
- cleaned of unusable finishing coating;
- the weak mortar is removed from the seams, the masonry is crumbled (embroidered where necessary), large gaps are filled with DSP;
- loose bricks are either replaced or removed, put back after cleaning the brick and nest on the central heating center;
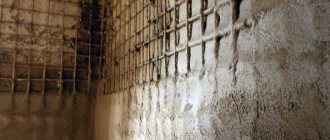
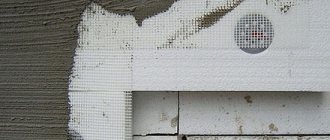
- cracks and large chips, after cleaning from dust, are sealed with a solution using reinforcing mesh;
- the stains are washed and treated with special products;
- foreign objects are removed, the remaining metal parts are painted with oil-based paint.
Cleaning the wall from unusable finishing coating
Replacing bricks in masonry
Sealing cracks in brickwork
After this, both types of walls are cleaned of dust, primed, and dried. Preparatory work is completed by measuring, installing beacons, and attaching reinforcing mesh (if necessary).
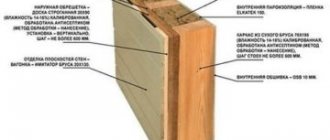
Facing brick
This material has a completely smooth surface, so the plaster will not lie on it. In this case, wall sheathing made of facing bricks is used. This is done very simply and any private owner can cope with this procedure. You just need to drive nails between the bricks, then hook a wire onto them, which will create the conditions for the adhesion of the plaster to the wall.
If you need to treat a small area, you can use tile adhesive. You need to apply a thin layer of the substance to the masonry and let it dry. This may take 20-24 hours. After which you can begin to apply the plaster mixture to the wall.
Advice. Before plastering the facing brickwork, it is good to attach a special reinforcing mesh to the wall.
Tool
To apply plaster to a brick wall, prepare:
- Master OK;
- ladle;
- steel spatulas (wide, narrow);
- grater;
- rule;
- trowel (for decorative work);
- level, plumb line or construction laser;
- roulette;
- pencil;
- mixer;
- containers;
- rags;
- masking tape;
- devices or tools for removing old coating;
- individual protection means.
Possible difficulties
Many people are trying to find out how to quickly complete plastering work without spending extra time and money on it. In a hurry, repairmen neglect some rules, and the consequences after this become very dire.
It would not be superfluous to talk about the mistakes made by beginners who do not have proper experience in plastering work. This mainly relates to the process of preparing the mixture, observing the ratios of the components used for this. If you add more cement than is required according to the norm, you will get a solution that does not have the necessary plasticity. This means that at the drying stage, during shrinkage or under the influence of unfavorable factors, cracks will appear on the surface of the layer and its partial collapse will begin.
If an inexperienced craftsman, in pursuit of the goal of saving money, adds more sand to the solution than is required according to the norm, the composition does not adhere well to the surface, and after drying a lot of dust will form in the room.
The problem can be determined visually using a spatula - a mixture with excessively added sand does not stay on the tool, and plaster with excess cement sticks to the working surface and is difficult to clean off.
It is recommended to carefully examine the previous covering layer of the surface. The cement mixture is applied boldly without preliminary cleaning if the coating was previously made of a similar material.
Please note that this plaster composition is not used on gypsum or lime coatings.
It is important to first apply a layer of spray to the wall surface if painting is planned in the future. If this condition is not met, the mortar mass dries unevenly, shrinks, and all defects become clearly visible after applying paintwork materials.
How to plaster a brick wall with your own hands
Next we will talk about how leveling plaster of a brick wall is performed using cement-sand mortar. Information on plastering the ceiling can be found separately.
Brief step-by-step instructions include the following steps:
- Preparing the surface of the walls.
- We take measurements, calculate consumption, and determine the location of future surfaces.
- We select and purchase materials.
- We install beacons.
- We reinforce.
- Prepare the solution (mix the solution for each layer separately before application).
- We apply spray, primer, and cover in sequence.
- Rub the top layer.
- We remove the beacons, cover the grooves, and rub them.
- Dry the coating.
Work is carried out at humidity up to 65%, positive temperature range 5-35°C. Before starting work, the electrical wiring is de-energized, the recesses for sockets and switches are sealed with masking tape. Protect window and door frames with tape.
How to prepare a mortar for plastering a brick wall
The second factor on which the quality of the plaster coating depends is the correct preparation of the solution. To properly prepare a solution for plaster from a dry mixture, it is enough to strictly follow the manufacturer’s instructions.
If you mix a solution you made yourself, you need to do this:
- clean, sifted sand is poured into a dry container;
- spread the required volume of cement evenly over the top;
- mix dry ingredients;
- cold water, to which a plasticizer has been added (liquid soap or PVA), is not completely poured into the container - some of the water is left to adjust the thickness of the dough;
- mix the components, adding water if the mixture needs to be thinned;
- let it brew for 10-15 minutes, then stir again.
The second step-by-step scenario for filling the components for preparing a plaster mixture using a mortar mixer. Water is poured into the rotating bulb, plasticizers are added, then sand is poured in, and cement is added last. The viscosity of the dough is adjusted by gradually adding water. The prepared mass is used until setting begins.
Primer
Is it necessary to prime brickwork and why? Brick is a porous material, so when applying plaster mortar it immediately begins to draw water out of it. As a result, the cement paste is dehydrated, and the remaining moisture becomes insufficient to ensure the chemical reactions of crystallization of the binder. The solution partially sets, and the components that have not reacted simply dry out.
The strength of the cement coating is reduced by half or more. Therefore, the brickwork is coated with a primer that fills the pores and forms a waterproof film on the surface of the wall. The second purpose of the primer is to increase adhesion.
The primer for bricks under plaster is selected depending on:
- type of brick (for silicate bricks use primers that provide increased adhesion);
- surface condition (for old walls you need a deep-acting strengthening agent);
- conditions of the foundation site (for facades and damp rooms, use antiseptic, moisture-proof primers).
The best choice is universal water-soluble compounds based on acrylic or silicone, which are suitable for any type of brick.
Prime the surface of the walls twice. For work use a brush or spray gun. Make two passes, drying each layer for at least a day.
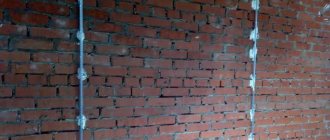
Reinforcement
To increase the strength of the plaster coating, reinforcement is used.
To do this, the mesh is selected according to the location of the reinforced structure and the base material:
- Fiberglass mesh is attached to a concrete or brick base under a cement plaster mixture indoors.
- Metal mesh is used for facade work on bricks under cement mortar, as well as for large areas of plastering.
PVC mesh is not suitable for cement plaster (corrodes).
In new buildings where shrinkage of the building occurs, the entire wall area is reinforced with mesh. And in buildings that have already “calmed down” there are individual problem areas, for example, joints of structures made of different materials, protruding corners, slopes. It is better to completely reinforce plaster coatings with a large layer thickness, old brick walls, as well as the base.
Reinforcement is performed on a primed, dry wall. The mesh should be completely covered with solution on both sides. Therefore, when attaching the mesh to the wall, a gap is left between the wall and the mesh for filling with mortar. The mesh panel is stretched, then attached to the wall with nails or self-tapping screws, fixed in the joints of the masonry. The panels are overlapped. The mesh is tensioned without excessive force. The main thing here is the absence of mesh bubbles or sagging.
Marking and installation of beacons
If so, how can I level brick walls that were laid incorrectly by the builders? Plaster leveling is one solution to the problem. Improved plaster of brick walls is one in which, according to SNIP, the errors per square meter are no more than 2 mm at a right angle from the plane of the wall. Moreover, on an area of 4 m2 there should be no more than 2 deviations. To achieve this quality right away or to improve old walls, beacons are used for plastering - strips that act as guides. The materials for beacons are wood, plastic, metal (profiles are sold) and plaster mortar.
Installing a laser level
First, using a laser level or tension cords, determine the maximum protruding point of the wall. Marked with a cross. This will be a guideline for the subsequent construction of the future vertical surface plane. The installation of beacons is carried out taking into account the fact that the minimum permissible thickness of plaster on brick is 5 mm. This means that without the use of reinforcing mesh, the top of the plank should rise above this point by at least half a centimeter. The top of the beacon strips sets the position of the future plaster surface.
Fastening a self-tapping screw with thread
A vertical line is drawn on the wall passing through the marked plus sign. A self-tapping screw is screwed in along the line at the top of the wall, and a nylon cord with a plumb line is attached to it. Adjust the position of the cord so that the thread recedes above the plus from the wall to the required distance (the minimum height of the metal beacon is 6 mm).
At the bottom of the wall, focusing on the lace, screw in the second self-tapping screw (the head should touch the lace). Next, focusing on this vertical, the outer beacons are installed on the wall (at a distance of 30 cm from the corners). The remaining beacons are mounted in increments of 100-150 cm. For beginners, it is more rational to choose a spacing of 1 m. Beacons are attached to the wall with mortar or self-tapping screws. You can watch videos on how to install beacon strips.
The solution is applied to the wall between the beacons in sections. When the solution begins to protrude above the slats, it is leveled using the rule. The rule bar is applied to the beacons, pressed lightly, thus drawing the rule along the bars from bottom to top. Excess mortar that collects on the rule is removed with a spatula and the plaster mixture is added where there is little of it, or dumped into a container. Having carried out the rule 2-4 times from bottom to top, make one reverse pass. After this, the solution will not slide down the wall.
Beacon installation
The solution is applied in sections. For beginners, 1-1.2 m long is enough. Having leveled one area, plaster the area next to it. After finishing plastering the wall, when the solution has set, the beacons are removed. The recesses left behind are sealed with the mixture.
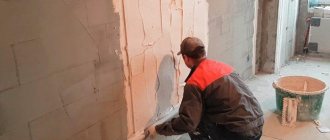
First layer
The spraying is done so that the main solution forming the coating adheres well to the wall. This is a layer of almost liquid mixture. The wall is wetted, then the spray mixture is thrown onto the base with a trowel or ladle. Cover the wall with this solution, leaving no gaps. There is no need to level the layer.
Second layer
The base layer - the soil - is made from thicker dough. Apply with a trowel or spatula, making sure that the solution fills the gap under the beacons. They are leveled according to the beacons as a rule. The layer thickness is no more than 1 cm. If a larger coating thickness is required, several layers of the plaster mixture are applied.
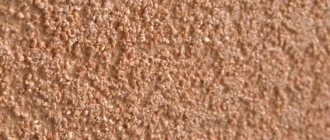
Third layer
For regular plastering (not improved), the third layer is not necessary. The covering is made to form a surface suitable for wallpapering or painting. The covering mixture is similar in thickness to spray, but fine sand (up to 1.5 mm) is used as a filler. The covering is applied with a spatula to the soil, which has not yet dried (the dried soil is moistened). The thickness of the covering is 1.2-2 mm. After application, level with a rule, removing excess.
Final grout
Final alignment is necessary to eliminate minor errors. This is done using a grater as soon as the covering begins to dry out. The grouting is first carried out “in a circle”, using a trowel applied flat to the wall with slight pressure in a circular motion. On convex places, the pressure is increased, over depressions - reduced. The excess is cleaned off the instrument. Where necessary, add a little solution.
After completing the “circular” grouting, grouting is performed “in acceleration” - smoothing straight-line vertical movements. On the second pass, the movements are horizontal. If the walls are going to be painted, they must be grouted “during hardening” so that the circles from the previous grout do not show through.
To finish with wallpaper or paint, after drying, the leveled wall is sanded with sandpaper.
Classic solution composition
The classic composition includes sand, water and cement , which acts as a binder. All this is mixed in certain proportions. The strength of the created coating will depend on the brand of cement chosen. For example, cement M150−200 is used for interior work, durable M300 is used for plastering external facades.
It is very important to maintain proportions. If there is not enough sand, the solution turns out to be less durable after drying and dries quickly. Cement can be used without sand only for finishing small cracks. If too fine sand was used, the plaster may crack in the future. The presence of impurities in it (fragments of soil or clay) will weaken the finish.
The quality of the surface depends on the type of sand . The ideal option is to take washed quarry or river sand, the particle size of which is two millimeters. Large grains of sand will make the surface too rough. Large grains of sand are suitable only for brickwork and reinforced concrete structures.
In addition to the usual CPS, there is light cement plaster, which contains mineral fillers and lime. Its structure is porous, due to which lower thermal conductivity is achieved.
Various plasticizers are added to the solution to increase adhesion and add plasticity to the mass. But their share in the mixture should be no more than 1%. Lime paste will also improve the properties of the material.
Differences between plastering walls outside and inside
We have already partially answered the question of what is the best way to plaster brick walls. Now we need to consider and bring together the nuances regarding the location of the work.
What is the best way to plaster brick walls inside a house?
The choice of compositions for interior walls and partitions is wider than for facade surfaces.
Here for ordinary plastering the following is used:
- cement;
- limestone;
- clay-lime;
- cement-lime;
- gypsum solutions.
For wet rooms, gypsum compositions are almost never used. Only those specially designed for wet rooms, for example, are produced by Knauf. However, they are expensive for leveling brickwork. For decorative work, dry and ready-made mixtures are produced on various bases.
How to plaster the facade of a brick house
External plastering of walls for the purpose of leveling brickwork is most often performed with cement compounds. However, cement-lime mixtures can also be used. Where salts begin to emerge, sanitizing compounds are used. Gypsum solutions are not used for plastering the outside of buildings.
Facade surfaces are finally decorated using decorative plaster solutions (facade and universal), selecting those suitable for a particular effect.
Plastering of plinths is carried out by DSP, composition proportions 1:3 or 1:4.
Differences in technology
Plastering the brick walls of a house outside according to the standards has the following features:
- It is necessary to reinforce the plaster layer with a metal mesh over the entire surface of the wall.
- Plastic perforated corners with mesh must be installed on husks (internal corners), usenki (external corners) and slopes.
- The thickness of the plaster layer is no more than 1.5 cm. The total thickness is up to 3 cm.
- After drying, the primer (base layer) is subjected to priming in 2 passes before coating.
- When plastering the base, the plaster coating is buried 5-6 cm below the surface of the sidewalk or ground. After grouting, the surface is smoothed with a trowel. The base husks are rounded or chamfered.
- All measures are taken to protect the brick wall from atmospheric or soil moisture.
The remaining differences lie in the creation of hardening conditions (listed below).
Leveling the surface using the rule
The technical meaning of this stage is to remove excess mortar and level the surface according to pre-installed beacons. The leveling technology is as follows - the construction rule is applied to two adjacent beacons and pulled along the fresh mortar from bottom to top or in a circular motion.
The actions are carried out until the surface of the plaster becomes smooth and perfectly vertical “along the beacons”. Portions of cement mortar are poured onto the resulting areas of “corrosion” of the surface and the process of “ruling” over them is repeated.
Decorative plaster on a brick wall
For decoration, first select the desired effect, then select a suitable mixture. For example, textured mixtures are not suitable for bark beetle, but “bark beetle” and “pebble” mixtures are not suitable for Venetian.
Popular finishing finishes include:
- for the facade - travertine, bark beetle, lamb, rain, fur coat, mosaic, sgraffito or pebble, or rusticate;
- for indoors - wet silk, Venetian, craquelure, imitation brickwork, wood, etc.
You can get acquainted with the types of effects and implementation technology in the “Decorative plaster” section.
Modern technologies
No matter how much human labor is valued, nowadays the people of our planet are accustomed to and prefer modern technologies. Development has not passed over the construction sector either. Speaking about plaster, it would be a sin not to mention its currently widespread form - mechanized.
Machine plastering of walls is a high-quality and fast method of plastering, in which a ready-made mixture is used, but it must be dry, since in a filled hopper the pump dilutes it with water automatically.
Next, the composition enters a special chamber, which is called a mixing chamber, where it is finally mixed and only then supplied to the surface to be treated using hoses.
You can immediately highlight the priorities of such plaster:
The only drawback that exists in mechanized plaster is the heaviness of the “machine” itself.
Plastering walls with your own hands using lime mortar
During construction or renovation work, you always have to face the need to finish walls with plaster. This process cannot be called creative, so most people don’t like it.
At the same time, correctly and accurately applied plaster guarantees a problem-free finishing of the walls. But how to do everything yourself and without flaws? The video of plastering walls with your own hands using cement mortar is intended to teach you how to do this.
Proportions for preparing cement mixtures for plastering walls
If the main component of the solution is sand, and the binder is cement, then such plaster is called cement-sand plaster. This composition is convenient for leveling both internal and external walls. Just be aware that sand does not like moisture.
For this reason, this type of plaster is not recommended for use in areas of excessive moisture. You can prepare a mortar for brickwork in a ratio of 1:5 for plastering walls with your own hands. A video of mixing a cement-sand mixture will help with this.
Dry plaster mixture is added to water and mixed using a construction mixer
Today, few people prepare their own plaster mixtures from individual ingredients. Ready-made dry formulations are available for sale, which simply need to be diluted with water according to the instructions and mixed thoroughly. Mixing can be done with a drill with an attachment.
How to work in problem areas?
You may ask, how to plaster walls in difficult areas where there are gas pipes or water pipes in the bathroom? You need to start by making a template. In each specific case, it will not be possible to do without it. The template can be made from even pieces of metal or tin, or a board will also work.
The areas under the pipes will also require you to be creative. For such areas, a small piece of metal corner will be quite suitable, because... It will be difficult to get anything into such a narrow space.
Installation of beacons
Beacons are metal profiles that are installed vertically along the wall. Using these simple devices, the master is guided in regulating the layer of plaster during the process of applying it. This process is important and responsible. Immediately after this, you can start cement plastering the walls.
Brick wall with installed beacons
Beacons can be removable or permanent. The first type has a diameter of no more than 6 mm. After applying the base layer, they are carefully removed. To hide traces of the use of beacons, grout is used. Devices with a diameter greater than 6 mm are usually left in the wall.
Installation of beacons begins with marking. The first of them will be at a distance of no more than 20 cm from the edge of the wall. Then the gap increases to 40 or 50 cm. First, the master applies a small layer of plaster to the intended installation site. Then the beacon is slightly pressed into the base strictly vertically. To ensure that there are no distortions anywhere, level measurements must be made in all directions: vertically, horizontally and diagonally.
Although this process is considered painstaking, plastering walls in beacons is the easiest way to apply the mixture in an even layer over the entire wall.