Plastering indoor walls is the basis of repairs. This determines how the living space will look, how long it will last, and whether it will be comfortable. Plaster compositions are intended for leveling walls and for creating decorative elements. With their help you can create a unique design for your own home. Numerous building materials stores offer various plaster mixtures, which differ in purpose, composition, terms and operating conditions. With their help, any home craftsman can plaster walls with his own hands. In addition to the variety of plaster compositions themselves, many application methods have been developed to give the room originality, sophistication, and aesthetics.
Types of plaster mixtures
Plaster mixtures are intended for treating walls for wallpaper or painting. They are also used as an independent decorative material. Available in dry form and in paste form. From the dry mixture, you should prepare a solution for further application yourself.
Types of plaster solutions
Plaster is divided into types based on its basis. The quality of the finished composition depends on this.
- Acrylic. It is based on acrylic resin (synthetic polymer), has excellent resistance to abrasion, contamination, and elasticity. It forms a layer that is not susceptible to the destructive effects of steam and sunlight. Due to its plasticity, the acrylic composition adheres well to the walls of buildings that shrink. This mixture is suitable for finishing walls in rooms with high humidity due to its vapor permeability. But you should not use it on wooden surfaces, as acrylic is highly flammable. This type is available for sale only in finished form in plastic buckets. When buying it, you should definitely check the expiration date; over time, acrylic loses a significant part of its properties.
- Silicone. A universal mixture based on silicone resins, providing high resistance to moisture and elasticity of the finishing material. Silicone composition is most often used for finishing facades; it creates a moisture-proof, self-cleaning coating. That is, all dirt and dust are easily washed off either on their own after rain, or after using detergents and light effort. The service life is more than 25 years. This is ensured by good adhesion to surfaces, which prevents the formation of cracks. Accordingly, such qualities of silicone plasters determine its high cost. Additionally, pre-treatment of the surface with a special primer will be required before plastering.
- Textured. Used for interior and exterior decoration. The composition may contain solid fillers of various shapes and fractions, which create fine or rough reliefs on the surface. Textured plaster can imitate the texture of leather, wood, stone; it is applied using spraying, a roller or a spatula;
- Cement. It is a cement-sand mixture. Used for interior and exterior decoration. The cement base is chosen to level surfaces for further finishing. It is applied manually or with special equipment. Level with a spatula and a rule. When working in damp rooms or outdoors, you need to add slaked lime to the solution.
- Plaster. This mixture consists of gypsum powder, polymer additives, and fine filler. It quickly absorbs moisture and is not resistant to temperature changes, so it is used only for interior decoration. Apply it to any surface, after diluting it with water. Most often, walls are plastered for painting using a gypsum compound. The advantages include the ability to dry quickly (in 40 minutes).
- Decorative. A mixture on a mineral, acrylic, silicate basis, containing insoluble fractions of stone, plastic, sand. Performs two roles at once. It hides small flaws and gives a pleasant appearance. Decorative plaster can be used to create various reliefs, patterns, and textures. Adhesively to any surface
- Silicate. This material is based on liquid (potassium) glass, the composition becomes resistant to moisture, ultraviolet rays, and mechanical damage. The disadvantage is that it hardens very quickly, so it will be impossible to correct mistakes. Specialists should work with these finishing materials. Plus, the palette doesn't provide a good selection.
- Mineral. The composition includes lime, cement, gypsum. It is resistant to ultraviolet radiation. But it has low elasticity and water resistance. Designed for masonry work, finishing concrete and plasterboard walls. The composition is sold in the form of dry mixtures of grayish or white color. To create a more attractive look, you can add color and additives (glitter, marble chips). Mineral plaster is used both for finishing facades and indoors.
Varieties of plaster differ in the method of applying the pattern. On simple plaster, the design is made with a brush, a relief roller or special brushes. Granular plaster is applied to the surface and leveled with a spatula. It contains large granules of stones, granite, marble, so the pattern is created chaotically on its own.
Additional components for plaster
Often other building materials are added to the plaster mortar, with the help of which the surface characteristics and decorativeness of the outer layer are enhanced. For example, they add:
- Coarse quartz sand. The plaster becomes moisture-proof. It resists the negative effects of acids and alkalis well. It is characterized by high vapor permeability, that is, it allows air to pass through itself, which is important for creating an optimal microclimate inside rooms.
- Fine fraction barite. The wall becomes a protection against radiation penetration. This is the type of plaster I use to decorate the walls in X-ray rooms.
- Foamed polystyrene crumbs. This type of plaster forms a thermal insulation layer on the wall.
- Metal shavings. The wall becomes impact-resistant and at the same time beautiful.
- Marble chips. It makes the wall strong, but additionally adds other useful qualities to the plaster composition - moisture resistance, the ability to withstand temperature changes well. When applied to external walls, such a solution is not afraid of natural loads. Aesthetic appearance is also a feature of marble plaster.
- Crushed mica. The plaster layer protects the building from ultraviolet radiation.
- Acrylic, resins (epoxy, polyurethane). The plaster acquires high waterproofing qualities.
- Liquid glass, stone flour, quartzite. Make the solution acid protected. Such plasters are used in finishing the walls of chemical industry buildings.
Pros and cons of plaster mixtures
Each type of plaster mixture has its own advantages and disadvantages. Before choosing what to plaster surfaces with, you need to study the technical characteristics of the compositions. They are reflected in the following table.
| Compound | Advantages | Flaws |
| Cement | The cement composition is strong, durable, suitable for external and internal use, moisture-resistant, ideal for wet rooms, inexpensive. | The disadvantages include the large amount of dirt that remains after working with cement plaster. Application requires worker professionalism and physical strength. |
| Lime | It is distinguished by plasticity and environmental friendliness. | Fragile, if not reinforced with reinforcing mesh, suitable only for rooms with normal operation. When performing work, it is necessary to protect your eyes and respiratory organs with a mask and goggles. |
| Plaster | The advantages of gypsum plaster include the fact that it dries quickly, does not require puttying, is elastic, has good adhesion, and does not shrink. | The disadvantages include low strength, sensitivity to temperature changes and humidity. |
| Cement-lime | Suitable for exterior and interior use. You can plaster with cement-lime mortar in the bathroom and kitchen; it is resistant to moisture and has high adhesion. | Long ripening, the need to use protective equipment when working, a tendency to cracks. |
Necessary tool
Before you start plastering the walls, you need to prepare your tools so that everything is at hand.
Plastering walls with your own hands involves using the following tools:
- Level. This is an indispensable tool designed to determine the curvature of walls in a vertical and horizontal position. You will need a level to place beacons and corners. It is better to use a bubble level and a laser level to speed up the work.
- Trowel. Device for throwing mortar. There are drop-shaped, square, and mason's trowels. You can also use a trowel at the same time.
- Rule. A long tool for leveling the mortar. It is recommended to use two rules, one 1.5m, the second 2-2.5m.
- Polyurethane grater. Necessary for finishing surface grouting.
- Roller, brushes, bucket. For wetting the surface, priming.
- Container for mixing the solution. Use a deep trough or bucket.
- Construction mixer. Designed for mixing the solution.
- Spatula and smoother.
Undoubtedly, it is important what tools are needed for plastering walls, but it is also worth preparing covering materials so as not to stain window sills, floors, and furniture. For this purpose, newspapers, film, etc. are used.
Features of application to various surfaces
The differences between plastering walls with your own hands depend on what surface is supposed to be treated. Concrete and panel walls are cleaned and primed before plastering. If it is intended to be coated with cement mortar, then the surfaces are primed with conventional compounds, but if gypsum plaster is intended to be used, then the concrete is treated with concrete contact or sandy soil.
Aerated concrete, foam block, gas block surfaces are cleaned of unstable particles and glue. Impregnated with deep penetration primer. The inside of such surfaces can be plastered with cement and gypsum plaster, and the outside exclusively with cement, and a reinforcing façade mesh must first be installed.
Brick surfaces are first cleaned of previous plaster, paint, wallpaper, chips that are too large, and the resulting gaps between bricks are sealed with a solution consisting of 4 parts cement and 1 part sand. Wait until it dries. Next, the brick walls are primed and plastered.
The preparation and plastering of surfaces made of wood concrete slabs and gas silicate blocks is carried out similarly to the treatment of other surfaces.
SIP panels, OSB, plywood, and wooden surfaces are not plastered! If there are large differences in levels, then they are sealed with special compounds, after sanding and sealing the seams with sickle tape. Then they are reinforced with mesh and leveled.
How you can tidy up the walls with your own hands inside (for putty, etc.) and outside (for putty, bark beetle, fur coat, polystyrene foam, facade tiles or just for painting, etc.) of the room.
We will need the following tool:
Concrete mixer (trough, glanders and shovel, if you mix the solution by hand), trough, buckets (for dry sand and cement, water and mortar), trowel, two-meter rule, two-meter level, foam grater, beacons (the number depends on the length and height of the wall, and length of the rule), cord or fishing line, fly brush (for wetting the walls).
We will need the following material:
Sand, cement, water (the amount depends on the overall square footage and evenness of the walls).
Do-it-yourself wall preparation:
Walls that will be plastered must first be leveled. It is necessary to knock down the mortar deposits formed due to uneven brickwork. If the masonry seams on the wall are tightly filled, you need to make notches. Notches and knocking down of sagging are done with a hammer. Then you need (especially for beginners) to check the walls for the presence of a bump from one corner to another and, if found, knock them down. This is checked with a nylon cord or fishing line, the main thing is that you see the evenness of the wall. If the wall is plastered and whitewashed, you need to clean off the whitewash and, in case of cracks, break them up more and fill a plaster mesh along the crack. If the plaster crumbles, falls off and the wall is made of bulk materials (clay, slag, etc.), you need to knock down the plaster and fill the entire square with a plaster mesh (150-200 nails or cut wire).
Types of solutions:
For plastering all surfaces in rooms with normal air humidity, lime, lime-gypsum, clay-lime, cement-lime, clay-gypsum compositions are used. For external work (on concrete, stone, brick surfaces) cement, cement-lime, lime, lime-gypsum mortars are used. Wooden surfaces are plastered with lime-gypsum, lime and, less commonly, cement-lime compositions. The foundation base is plastered with cement mortar.
Making cement mortar with your own hands:
It is advisable to sift the sand through a large sieve or mesh from an armored bed before mixing the solution; if the sand is clean (without stones, pieces of clay, etc.), this can be omitted. It is better that there are no stones in the mortar, it is easier to plaster. Cement grade M400 is mixed in a ratio of 1:4 with sand for external work (grade M500 1:5), for interior work grade M400 can be made 1:5 with less strength. Because sand can have varying degrees of humidity, add water, gradually bringing the solution to a form resembling thick sour cream. If we mix in a concrete mixer, you can pour in water alternately with sand and cement, first pouring in a bucket of water and then control the density. This is done to reduce the load on the electric motor of the concrete mixer.
Making cement-lime mortar with your own hands:
Cement-lime mortar is prepared from cement, sand and lime paste. The solution is plastic, adheres well to the surface and is easy to apply. Take M400 cement (1 bucket), mix it with sand (4-6 buckets for the desired subsequent strength) and add lime diluted with water in a bucket (2-5 kg for the desired subsequent strength), then add water to the desired thickness. But keep in mind that a solution that is too strong will tear and it will become covered with cracks. Buckets must be the same volume.
Making your own lime-gypsum mortar:
Gypsum accelerates the hardening of the solution, since the lime itself takes a long time to set and the lime-gypsum solution is stronger than the lime one. Setting begins within 6 minutes from the moment of preparation. The solution will completely harden in 30 minutes. You need to prepare the solution in small portions. First you need to prepare a lime mortar, then select one side, freeing half of the trough so that you can prepare one portion of the lime-gypsum mortar. To do this, you need to pour in a liter jar of gypsum and pour water, making a liquid gypsum dough, mix well and add 2-4 liters of lime mortar. Mix thoroughly, controlling the thickness with water. The prepared portion of the solution should be processed in 6 minutes, taking into account the time of its preparation. The liquid solution will set more slowly, but the plaster will turn out loose and with less strength. A thick solution forms a more durable plaster, but it is more difficult to work with. Clay-gypsum solution is prepared in the same way.
Making your own lime mortar:
Lime mortar is prepared from lime paste (1 part) and sand (2-4 parts). The materials are thoroughly mixed, and enough water is added to obtain a solution similar to a thick dough. If you add one or two trowels of cement to 1 bucket of such a solution, the strength of such a solution will increase.
Making clay-lime mortar with your own hands:
Clay-lime mortar is prepared from clay dough (1 part), lime dough (1 part) and sand (4-5 parts). This solution has more strength than clay.
Making clay mortar with your own hands:
Clay mortar is prepared in the same way as lime mortar. This is a fragile mortar, but if you add one or two trowels of cement to a bucket of mortar, its strength will noticeably increase. DIY beacon installation
We set the beacon level on the edge of the wall near the corner, first wetting it and spreading a strip of mortar vertically. We insert the beacon into the solution and press it with a two or more meter level to the thickness we need, and also do it at the other corner. We put on rubber gloves (so as not to get a chemical burn) and completely cover the beacon, leaving only the edge for removal (we do this with all beacons, because we will remove excess mortar along it and can press it in and we will get holes on the wall).
Installation of corner beacons video:
You can, of course, put leveled edged boards on the corners instead of the outer beacons (if you have one). Outside our beacons we hammer in nails, below, above and in the middle (in general, so that the length of our level from cord to cord is enough) and pull the cord horizontally so that our two beacons form a plane with three cords. We make a gap of 1 millimeter between the cords and the beacon, pushing out the cord from the beacon with something (this is so that they do not interfere with each other during installation, all exposed beacons will have a gap of 1 mm.).
Pulling the cords video:
Next, we place the next beacon at a distance slightly less than the length of the rule (in our case, 1.8 m) in order to pull off the excess solution along them. Now we align the beacons along the three cords and check with a level or the reverse side of the rule that the beacon is vertically even between the cords, but we must have the same 1 millimeter gap between the beacon and the cord as on the outer beacons.
Installation of medium beacons video:
Having exposed all the beacons, you can remove the cords. To speed up the drying of the solution and its elasticity, you can add gypsum (alabaster). After installing the beacons, you need to place the socket boxes and distribution boxes in the same plane as the beacons and secure the wires with a solution, as in the video.
Installation of socket boxes video:
Plastering walls with your own hands:
According to the technology, you need to plaster from top to bottom, because... If only the covered solution begins to slide or fall off, it will pull the entire lower cape with it. And secondly, if you start from the bottom, then all the water from the subsequent upper cape will flow onto the lower cape and water, with which you need to constantly wet the wall for good adhesion of the mortar to the wall. In the case of large holes, you need to pour them in first and let them dry thoroughly, because. large layers (more than 4 cm) may fall off. You can find out how to plaster arches and columns here
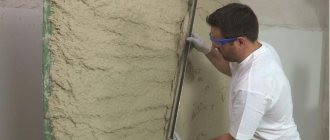
First, dip the brush into a bucket of water and spray it on the wall so that the wall is wet (if we are plastering concrete or stone, which practically do not absorb moisture, it is better to wet it slightly or wet a larger area so that the wall has time to dry slightly). Apply the mortar onto the wall with a trowel or plaster ladle. The solution is thrown with a wrist movement, as if playing table tennis. It may not work out at first, but with each subsequent cape everything will work out. It is advisable to throw the canvas between two beacons from top to bottom so that you can remove the excess from the entire canvas between the beacons. When the solution dries (it becomes harder and more free-flowing), remove the excess. If there are large holes left, we throw it in them and wait until it dries. When all the excess has been removed and small holes remain, we take a grater and apply the solution to it. Using the bottom side of the trowel, we take the solution from the grater and cover the holes and scratches on the wall, having first sprayed it on it, as in the video.
Putting small holes on the wall video:
Again we shoot with a rule (the tip of the rule is along the beacons, so that they can be seen along the entire vertical, as in the video).
Filming by video rule:
There is no need to rush to grout the surface, but you shouldn’t leave it for too long. Once the solution gets stronger, it will be very difficult to wipe it off. Therefore, do not cover the entire wall, but calculate how much you can do; you may not have time to cover it. Only after gaining experience can you increase the volume of work. If there are still scratches, cover them up and begin to rub the top of the wall in a circular motion with a grater downwards, constantly wetting the wall. You need to wet it a little, just to wet the top layer and not rub sand on the outside, because. the solution is solid and free-flowing, as in the video.
Grouting plaster with a float video:
After grouting the surface with a float, the plaster takes on a finished look. When the entire canvas is ready and the beacons are not needed, they can be pulled out (if you carefully pull them out from today’s mortar, you can use them again) and rub out the holes from them to prevent them from rusting in the wall. We gradually cover the outer corners (if you did not use edged boards at the corners) and remove the excess, usually along two walls, gradually increasing the angle and wiping it down when finished.
The usual thickness of plaster is 1-2 cm, but it can be thicker for uneven walls. If the walls are built too poorly and require a thicker layer, in order to avoid the mortar falling off, the plaster must be applied several times. When using this type of plaster, do not smooth over the first layers so that the next layer adheres better to the previous one. It is best to plaster in spring or autumn, when it is not so hot (the longer the plaster sits wet, the stronger it is). Just in case, you can water it with water, and in hot weather, be sure to do so several times a day, otherwise it may crack.
DIY slopes:
To make slopes, you can nail the trim strips level and in proportion to the window. Then throw it on the slope and let it sit. Next, remove the excess parallel to the rail, so that the solution covers 5-10 mm. windows and rub with a grater. Let it harden and remove the slats, rubbing the nail holes with a float. Instead of a slate, you can use a 2 or 1.5 meter level, pressing it against the wall with one hand, but this requires experience or an assistant. To avoid staining the windows, they need to be sealed with film and masking tape. Plaster + decorative fur coat with your own hands:
Here we level the walls with cement plaster and let it dry completely so that there are no wet spots left (so that the fur coat dries monotonously and not in spots, because there will be different shades). We sift the sand well and mix it with white cement in a bucket, in the proportion of 1 part cement and 2 parts sand. Mix it thoroughly with a construction mixer on a drill or some kind of stick. The solution must be liquid, such that it can be poured into the machine for a fur coat cape; the thinner the solution, the smaller the grain of the fur coat and the grain size is also set on the machine. Personally, I use a medium size so that the plates from the drum do not fall out so quickly (in the machine, the grain size is regulated by the tension of the plates, and if they are stretched too hard, they can fall out and you will have to buy a new drum), and I adjust the grain size with the solution liquid. It is also advisable to reduce the opening in the machine, as in the photo, in order to reduce spillage onto the bottom of the wall. Because We will not wet the liquid solution on the wall to prevent sagging. You need to start from the top, simultaneously turn the handle and throw on the fur coat, going down. Usually you need to throw it on 2-3 times (sometimes it happens more if the wall doesn’t absorb moisture well), so throw it on so that you don’t get any sagging. Having passed a certain area, you need to throw it on a second time, not letting the fur coat dry out, otherwise it will crumble. If after making two capes you can see the plaster, then we put it on again. If the corners and foundation are of a different color (as in the photo), you need to use an upholstery cord to mark off the borders and hold a rule or an even strip along them so as not to throw them beyond the borders. Having completely spread the main color over the entire area, we also put a strip and throw on another color. A fur coat can be made in any color using dry paints in powder form, you can also make drawings using a stencil; it all depends on your imagination.
DIY decorative plaster:
With decorative plaster, the walls look especially elegant. The process consists of two stages: ordinary plaster without grouting and coating with gypsum mass. Prepare the gypsum mass as follows: gypsum is mixed with colored pigments and scattered with a scoop on the table, alternating horizontal layers for different colors. The mixture is transferred and poured at an angle onto a plywood panel, mixing the layers and imitating the colored veins of marble. The thickness of the poured layer must be twice as thick as gypsum marble after finishing. Then the mixture is covered with burlap and soaked in a 2% solution of CMC glue until saturated. Next, the mass is brought on a shield to the wall, the burlap is removed and pressed tightly against the plaster, compacting by tapping, then the shield is removed. The surface is smoothed with a trowel. After 2 hours, when the surface has not yet completely hardened, it is planed with a plane. After 3-5 days (depending on weather conditions), the surface is sanded with sandpaper or a grinder. Next, the plaster is coated with 2% CMC glue and covered with mastic. Mastic is made from 3 parts wax and 1 part turpentine. Rub it into the wall with a felt cloth.
DIY relief plaster:
Relief plaster, similar to natural stone, is made from cement mortar. 20% lime paste is added to the solution to increase elasticity. Plastering is done without any special tools, rather it resembles modeling. We throw the solution onto the wall and create the structure of the stone with our hands. One cape is not enough, you need to make 2-3 capes. When the solution sets, you need to rub it with a brush dipped in water. Wear gloves to avoid chemical burns.
Relief plaster, similar to sandstone stone, is done in two stages. First, ordinary plaster (you can add dry paint), then use the handle of a trowel or spoon (depending on the width of the desired seam) to remove the mortar, simulating seams between stones.
The seams between the stones are painted a different color than the stones themselves.
DIY colored plaster:
We do this: add 20% cement to the lime mortar, or use white cement. The color of the plaster will be given by dry paint in powder form. Everything else is the same as with regular plaster.
Do-it-yourself terrasite smooth plaster:
Add crumbs from broken bottle glass, marble, etc. to the cement-lime or cement mortar. The plaster is applied to the wall, leveled, and rubbed. We finally process the surface in the semi-frozen state with a grinder in order to expose the surface of our filler from the cement film.
DIY relief terrazite plaster:
We throw the usual mortar on the wall, level it and immediately add the filler into it. We throw the filler mixture with a trowel, you can sprinkle it on a plywood board with a handle and press it against the wall.
Do-it-yourself repair of old plaster:
It is better to repair old plaster using the same type of mortar as the plaster itself. Lime mortar: light with a slightly yellowish tint, cement-lime: light with a gray tint, cement: respectively gray and gypsum: white.
Decorative plaster looks more beautiful if you use white sand or white cement, also when it is not made over the entire wall, but with a certain ornament. The ornament can be made using a stencil. The stencils are nailed to the wall. After the solution has hardened, it is removed. Semicircular reliefs are made with a trowel until the solution has completely hardened.
If you receive a chemical burn from cement, plaster or lime, I advise you to stop working with these materials for a while and lubricate with sunflower oil or natural cream without chemicals. supplements, in case of a large burn, consult a doctor.
More photos can be seen in the Photo Gallery
Types of decorative plaster application
Applying various types of decorative plaster differs from simply leveling the walls. This will require a certain set of tools. These include a drill with an attachment for mixing the solution, a container in which it will be mixed, spatulas, scrapers, brushes, brushes.
Regardless of what kind of plaster is used and what method of application is chosen, the surface must first be prepared. It must be cleaned of dirt and residues of the previous finishing material. Irregularities and cracks are sealed with putty. Then apply primer in 2 layers. It will ensure good adhesion and extend the service life of decorative plaster. When working with decorative materials, you should always read the instructions for them. And if the manufacturer indicates that it is necessary to additionally prepare the surfaces before applying the finishing material, they should not be neglected.
Spray
One of the popular ways of applying plaster to walls. To achieve the result, the walls are covered in several layers, using a different tool for each layer. This is how an original coating is created.
To get started, you will need a thick brush with long, thick bristles and a stick. The brush is dipped into the plaster, then hit on a stick. Sprays scatter across the wall. If the solution is diluted thickly, the texture will be more prominent. If you first paint the walls in a bright color and then apply the plaster using the spray method, you get an interesting effect of snow flakes.
Italian
In this case, the same spraying technology is used, but compositions of different colors are used. First, spray a layer of the same color and level it. Without waiting for it to dry, apply a plaster solution of a different color on top of the previous layer. It is better if it contrasts with the base. It should cover most of the surface of the previous layer with a dense layer. It is also leveled. The number of layers depends on the result you want to achieve.
Italian plaster
A day later, the finished decorative layer is painted with paint for exterior use or treated with special wax to add gloss. When working with plaster, it is better to use as many different strokes as possible. For this, various tools are used (rollers, brushes, sponges, stencils). This will help create an individual decorative style. The formation of a new relief must be completed within 30 minutes. After this, the solution dries out and plasticity is lost. If mixtures of different colors are used, they are diluted in different containers. You need to constantly clean your tools to avoid smearing your patterns.
Venetian
Venetian plaster is a multi-layer coating characterized by iridescent reflections. The effect is achieved by carefully sanding each layer. To resemble natural materials such as marble or granite, it is recommended to apply the base first and then gradually add shades.
Venetian plaster
To create texture, you should purchase a Venetian trowel. This is a special rectangular trowel made of polished metal with rounded edges. With its help, strokes move smoothly without breaking lines. You will also need sandpaper, suede, and spatulas.
Venetian plaster is sold dry and diluted. You will have to dilute the dry mixture yourself, so you need to take care of a drill with an attachment and a container in which to mix the solution. The dry mixture is diluted with water in the ratio specified by the manufacturer. Then leave to infuse for 5 minutes. For beginners, it would be better to dilute a very small amount of plaster and try to apply it on a small area. This will allow you to understand the principle of operation, feel the material, and correctly calculate your strength.
If you purchase a ready-made mixture in a plastic container, the work will be greatly simplified. I put the required amount of coloring pigment into it and stir it. The plaster mixture is divided into several small parts and tinted. It is important to achieve different shades, so the amount of paint should be varied. Plaster is applied to the wall using the thinnest strokes of the same size. This is how the effect of a smooth transition of colors is created. The starting layer can be light or dark, it doesn’t matter, but it should cover the entire surface of the wall without the slightest gap. It is leveled with a trowel, removing excess plaster. The composition can be applied randomly or in a checkerboard pattern.
Until the solution begins to set, the cavities between the strokes are filled with plaster of a different shade. It is necessary that the strokes come into contact with each other, mixing. This will create the effect of a smooth transition of colors. A new layer is applied only after the previous one has dried. Otherwise everything will get mixed up. The second layer should be made as thin as possible so that after sanding a smooth surface is formed. Sanding is done until shiny with fine-grained sandpaper (grain size zero).
The process of applying Venetian plaster is a labor-intensive process and often takes a long time.
You can use a sanding machine. You can use it to rub in wax later. If there is no machine, then spray the wax and rub it with a piece of suede. The wax must be applied in a thin layer; if you overdo it, dark spots will remain on the surface. Waxing is required. It will add shine and protect the decorative surface from moisture.
Experts have long come up with a method for creating Venetian plaster from ordinary acrylic. First, the wall is primed with a special compound containing fine sand. The second layer is applied acrylic plaster. It should be the same color as the primer. This prepares the base, on which the main layers will then be applied. The layer of acrylic plaster should be a little thinner than the manufacturer recommends.
Then the remaining plaster is divided into 2 equal parts. One is left white, a double portion of color is added to the second. Apply strokes alternately from both containers with ordinary spatulas, following the “Venetian” technology. The strokes should be as thin as possible so that after drying the lower layers are visible. At the final stage, the plaster layers are covered with a thin layer of acrylic varnish. You can add pearlescent paint to it to create the effect of shimmering colors and apply randomly with thin strokes with a cloth.
Preparing the walls
Plastering walls with your own hands begins with careful preparation of surfaces. After all, the better the surface is prepared, the better the solution will stick to it and not fall off in a couple of years.
Before leveling the walls, you should tap them thoroughly to remove the old plaster. To completely clean the surfaces of old plaster, you will need to beat it off with a hammer and a hammer drill with a spatula attachment. To begin with, beat off the cracked pieces under which voids have formed. Then the remaining plaster is cleaned off with a hammer drill. After treatment, the wall must be cleaned with a broom or vacuum cleaner. After this, the surface is primed.
If you are renovating a new apartment, you may find protruding parts of reinforcement on the walls or frozen pieces of mortar formed during the laying of bricks or foam blocks. All this must also be removed, the reinforcement must be cut with a grinder, and the pieces of mortar must be knocked down with a hammer.
One of the most important stages of preparation is priming. Experts advise using sandy primer, concrete contact, putzgrunt. They are suitable for priming smooth surfaces for better adhesion, as they contain quartz sand. The primer is thoroughly mixed before use, and then applied to the wall in different directions with a large brush. After this, you need to wait for the primer to dry completely, at least a day.
Prime the surface with a cotton roller
Deep penetrating primer. This is a highly concentrated liquid composition, sold in cans or buckets. The deep impregnation primer is first diluted with water in the proportion recommended by the manufacturer (information is indicated on the label), and then applied with a brush or roller. Penetrating into the wall, the primer holds together the smallest particles of concrete and brick from the outside and throughout the entire penetration depth. It is recommended to treat the wall with this composition before applying a sand primer. Just wait until the primer dries.
For thick layers of plaster (more than 3 cm), the surface is reinforced with polymer, metal, galvanized, fiberglass or nylon mesh.
Using beacons
You can plaster the wall “by eye” or using beacons. The second method is more reliable, especially if the surfaces are curved and have large differences. A plane of metal profiles is attached to the walls.
Plastering beacons
A simpler and more accurate option for installing beacons is using a laser level, but since not everyone has one, you can do without it.
Installation of plumb beacons involves the following steps:
- First, you need to set the thickness of the plaster layer; to do this, screw in the screws along the edges of the wall from above and below, pull the thread from one edge of the wall to the other, thus finding the zero point from which you need to set the layer at least 0.5 cm;
Setting the thickness of the plaster layer using beacons - Self-tapping screws are screwed into the walls near the surfaces of the floor and ceiling so that their heads are in the same plane;
- Measure the distance vertically between the screws, subtract 2-5 cm. Cut the profile according to the obtained value;
- A line is drawn between the screws with a pencil. Plaster is thrown onto it in 4 places, and the metal profile is usually pressed in so that its plane meets the heads of the screws. The fasteners are removed;
- The first two beacons are installed along the edges of the walls with a distance of 30 cm from the corners;
- A thread is stretched between the upper and lower marks of the lighthouse, from one edge of the wall to the other;
- Subsequent beacons are installed at the distance of the existing rule minus 30cm.
Marking the surface using a plumb line for placing beacons
You can read more in the article: “How to install beacons under plaster”
Next, they begin finishing. When the room is plastered, the beacon profiles are removed and their locations are leveled.
Proportions for cement-sand plaster
There is a classic recipe in which the ratio of cement and sand is 1:3. That is, one part binder, three parts filler. In this case, a certain brand of plaster mortar itself is obtained, but it depends specifically on the brand of cement:
- if the binder is grade M300, then the grade of the solution will be M100;
- if M500, then the mixture will be M200.
That is, the higher the grade of binder, the higher the grade of plaster.
But you can get the M100 grade of mortar from M500 cement. To do this, the recipe changes, that is, the ratio of the components added. It is 1:5, that is, one part cement, five parts sand. In this way, the desired brand of mixture is selected.
It seems that by changing the recipe, you can reduce the cost of the final product. But in order to add more cheap sand, you have to purchase an expensive brand of cement. So it is impossible to save money on this.
Recipe for preparing different grades of mortar depending on the cement used
It is not difficult to mix the solution for plastering walls yourself. The main thing is to prepare the amount that will be consumed within an hour. Exceeding this time leads to hardening of the mass, which can no longer be used.
Procedure for preparing plaster:
- Cement and sand are poured into the container, mixed with a trowel or shovel;
- pour water, knead using a construction mixer;
- The resulting material is checked for readiness - the consistency should be creamy. A trowel is passed along its surface, leaving a groove.
How to prepare a solution for plastering walls can be seen in the video.
Preparation of the solution
Each plaster is prepared differently, depending on the technical characteristics. Refer to the ratios specified by the manufacturer.
Pour clean water into the prepared container. For gypsum plaster you will need 2 parts water to 3 parts gypsum. For cement, water and dry fraction are taken in a ratio of 1 to 5. Lime-gypsum plaster has strange properties; after long mixing it becomes more liquid, so water should be added carefully and a little less than stated in the instructions. Strictly observe the proportions of lime and cement. The last component is taken in 5 parts, but only 1 part of lime. It is recommended to add a few drops of detergent or liquid soap to the solution. This product will act as a plasticizer, preventing solutions from squeezing out water. This way the plaster solution will dry faster and evenly.
Do not add water to the solution after mixing. If the solution turns out to be liquid, you can add a dry mixture to it, but diluting the thick solution with water is prohibited. It is also permissible to stir the solution only once if it thickens.
After kneading, wait 5 minutes and mix the solution. You can start plastering the surfaces.
Mechanical plastering
Mechanized and do-it-yourself plaster differ only in the method of mixing and applying the solution to the surface. Plastering walls using a mechanized method requires the preparation of a special composition and equipment for spraying it.
Thanks to high-speed spraying, the plaster composition is applied evenly and dries quickly. With this method, cracks almost never form. The solution is consumed economically; the sprayer saturates it with oxygen, which increases its output volume.
Mechanized spraying of plaster mortar onto the surface
Before starting mechanized plastering of walls, equipment for applying the mortar is prepared. Pour the dry mixture into the tank, connect the device to the water supply and electricity. All that remains is to direct the hose to the wall and distribute the composition carefully over it. In the sprayer everything is mixed to the required state. When sprayed on the wall, the plaster forms a dense mass.
Why do you need to plaster the walls in your apartment?
Plaster is used for various purposes. This can be local repair of damage, partial or complete leveling, or surface decoration. The finished coating is subsequently suitable for any finishing finishing: cladding, painting, wallpapering.
The demand for plaster is justified for many reasons. The material is able to fill small pores and form a monolithic coating. In this case, the average mass consumption per square meter is from 7 to 10 kg with a layer thickness of 10 mm. The dry residue has strength and sufficient load-bearing capacity to hang various equipment on walls. To do this, just drill a hole and insert a dowel or wooden dowel into it.
The leveling plaster layer can be formed in one go with a thickness of about 30 mm.
Parameters exceeding the norm are acceptable if a reinforcing mesh is installed. There are also mixtures that can make walls that are exposed to heat smooth. For example, if it is an uneven surface of a stove or fireplace.
Stages of plastering walls with your own hands
Application and plastering technology:
- The plaster is applied with a trowel. Do this from bottom to top, evenly. The solution should go beyond the beacons;
Applying plaster mortar using a trowel - The rule is to stretch the plaster between the beacons. There is no need to put pressure on the tool, just move it, touching the beacon profiles, from bottom to top. The removed plaster is sent back to the trough, or higher on the wall;
Pulling the solution along the beacons - We wait until the surface begins to dry, about 15-20 minutes, the surface should be hard, but at the same time, as a rule, part of the solution should be removed;
- We remove the beacons by prying them off with a small spatula or screwdriver;
Dismantling of lighthouses - As a rule (preferably 2-2.5 m), surface irregularities that form at the moment of pulling the solution are cut off. It is necessary to keep the rule at an angle of 90 degrees with respect to the wall. When applying the rule to the surface at different angles, it should completely adhere; if gaps are visible, they must be removed by cutting or adding a solution. In this way, you move the rule in a vertical and horizontal direction along the surface. You usually use the collected mortar to seal the seams from the beacons and other voids;
Trimming irregularities with a rule of 2-2.5 meters - After another 15-20 minutes, lightly moisten the wall with a roller (when using a cement composition), apply the solution in a thin layer with a trowel, usually stretching the layer vertically and diagonally. Then rub it with a polyurethane grater. When working with gypsum composition, the surface is smoothed with a wide spatula; it is also possible to slightly moisten the surface with a polyurethane float. Lime plaster is immediately applied, the excess is removed as a rule, after removing the beacons, it is covered with a thin layer of cement mixture and ground;
Glossing (smoothing) the surface - For cement-sand mortars, the final stage involves grinding or grinding. Finishing work is carried out with a special grater until the surface becomes neat.
Number of layers
Plastering walls is carried out in three stages, each of which uses a solution of a certain consistency. And each such mixture has its own name - spray, primer and covering.
Splash
This is a creamy solution, somewhat runny.
Its purpose:
- form a layer with high adhesive characteristics on the wall;
- cover large wall defects, such as seams between bricks, wide cracks, chips, gouges.
Prepare a solution with plenty of water. Apply with a thickness of 2-5 mm. The process is carried out with effort. That is, the mixture is taken into a trowel and thrown with force onto the surface being processed. The movements must be sharp so that the throwing speed creates pressure on the defects, which would be completely filled with the material.
Priming
This is the thickest layer - up to 5 cm. The plaster itself is a dense solution with a low water content. It is this that is aligned with the beacons. That is, they fill the space between the profiles with the mixture and pull it out from the bottom up, making wave-like movements from side to side.
If the difference in the plane of the wall is large, then the soil is applied in several layers. But leveling the surface is usually carried out only after the entire space has been filled with material.
The beacons are removed after the soil has dried. The grooves remaining in their place are filled with plaster mortar.
Covering
This layer can be attributed to the final formation of the plastered wall. After applying it, the surface becomes as even and smooth as possible. Therefore, the mixture is made almost liquid.
Apply the solution with a trowel, and use it to level the surface in a circular motion, distributing the material evenly. It is important to prepare the mixture correctly here. Application thickness – no more than 2 mm.
Each previous layer must be thoroughly dried before applying the next one. The applied mixture must acquire a certain strength in order to withstand the weight of the next applied layer.