Despite the fact that recently a huge selection of finishing materials has appeared, plaster is still the most popular. However, when choosing this finishing option, you should keep in mind that plastering concrete walls has a number of features. Therefore, we recommend that you first familiarize yourself with this process in detail, which we will consider below.
Plastered concrete walls
Do I need to plaster concrete walls?
Concrete walls are characterized by high strength and durability. However, quite often they have the following disadvantages:
- Curvature of the wall surface. Concrete surfaces are almost never level.
- Porosity. The concrete surface is heterogeneous and porous in structure, which can later cause the development of fungi and mold.
- The presence of shells, chips, potholes.
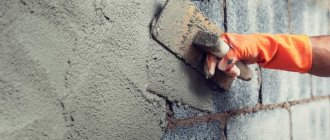
These defects can be eliminated in various ways, but the most popular, reliable and inexpensive method is plastering concrete walls.
By plastering concrete walls they are protected from destructive factors
Using plaster on concrete provides the following advantages:
- allows you to create a perfectly flat surface;
- protects the concrete wall from moisture, mold and mildew;
- You can mount household appliances, shelves, etc. on top of the plaster;
- reduces the thermal conductivity of walls, thereby “insulating” them;
- increases sound insulation properties.
Plaster protects surfaces from direct exposure to moisture, mold, efflorescence, ultraviolet radiation and other factors that negatively affect the base material.
Concrete in interior design: advantages of the material
Concrete is a desirable element in the design of houses and apartments. For a long time it was perceived only as a rough finish that did not carry aesthetics. Now the material has become a trend for professionals and has taken a strong position in the hearts of lovers of originality.
3 reasons to use concrete finishing:
- Interesting texture. The heterogeneity of the structure and cold shades of concrete allow you to create a unique design without impressive material costs;
- Harmonious combination with other materials. Along with this finishing, you can use wood, metal, glass, brick, and fabric. Familiar textures in the new ensemble will sparkle with different colors;
- Minimum effort. Sometimes it is enough to simply rid the walls of wallpaper and cover the surface with a special protective compound. There will also be no difficulties when using decorative imitation materials.
Don't think that concrete design is boring and gloomy. Yes, gray walls look laconic and strict. However, you can choose accessories and accents that will enliven the atmosphere and dilute the minimalist picture.
| Advantages | Flaws |
| Good sound insulation | The need for additional insulation |
| Durability | The ability to strongly absorb moisture if the surface is not coated with a primer |
| Gas tightness | |
| Ability to stay cool in hot weather | |
| Environmental friendliness |
Concrete can create incredible textures in any space. This material is also ideal for equipping a home photo zone. To take stylish and original pictures in your apartment, you just need to periodically change the scenery.
Example of a concrete apartment interior
When is the best time to plaster concrete?
Professional builders recommend starting plastering work a month after concreting the walls. This time is enough for the concrete core to get stronger. To avoid damage to the plaster in new buildings, it is necessary to take care in advance of installing doors, windows, and utilities.
Note!
It is important to ensure suitable temperature conditions. Moreover, 2 days before the start of work, during and after their completion. Indicators should not fall below +5 °C.
Advantages of the material
Do you really need to plaster concrete walls? There is only one answer - definitely. This can be explained by the fact that during construction, small flaws and defects are formed that affect the appearance of the walls. However, it is not possible to cover them with ordinary putty. Among other things, its wide popularity is due to the following reasons:
- High-quality materials have good vapor permeability, that is, they allow the walls to “breathe.” This creates an excellent microclimate in the room.
- High moisture resistance makes it suitable for bathrooms, steam rooms and any other rooms with high humidity.
- You can plaster a concrete wall with your own hands.
- After completing the work, it is possible to apply any facing material.
- Plaster has a huge advantage over drywall - you can hang heavy furniture on the wall.
- The cost of plaster is much cheaper than other well-known finishing analogues.
How to plaster concrete walls
You can prepare the plaster solution yourself from individual components, or you can also purchase ready-made dry mixtures. It is convenient to work with such mixtures; the composition is prepared by adding the required amount of water and thoroughly mixing with a mixer.
Regardless of which of the recommended brands of plaster to use, the principle of applying it to the walls and the stages of the work will be the same. The first step is always to prepare the concrete wall for plastering.
Cement-sand mixture
The solution is highly durable and moisture resistant, but it is difficult to apply due to low plasticity. There is a high probability of cracks forming. Suitable for use in rooms with high humidity. Among the brands of cement plasters, it is worth noting Knauf Grünband, Weber. Vetonit TT40.
In cement-sand mixtures (CSM), cement is used as a binding component, which results in the formation of a stone-like coating that is resistant to negative temperatures. The presence of sand filler does not reduce the quality of the finished plaster layer, but the consumption of cement is reduced. The size of the grains affects how convenient it is to lay the solution on the walls and the texture of the coating.
The cement mixture is not suitable for plastering buildings located in regions with seismic activity, including nearby railway lines.
The use of mineral compounds is not recommended in new buildings, since the coating does not withstand vibration loads, as well as shrinkage of the building. In this case, polymer-based plasters would be a suitable choice.
The general word “plaster” hides a great variety of different materials.
For your information!
In addition, DSP is not recommended for plastering cellular materials (aerated concrete, foam concrete, gypsum concrete), since the coating itself has considerable weight.
Cement-lime plaster
The mixture has increased plasticity, which makes it more workable. Hardens faster than cement plaster. Moisture resistant, can be used in bathrooms. Less susceptible to cracking. Among cement-lime plasters, we recommend the following brands: Ceresit CT 29, EK TT50.
Cement-lime composition is considered a universal material, since it is a facade plaster and at the same time a material for interior work. At the same time, it should be taken into account that such solutions have lower moisture resistance than traditional cement-sand analogues.
Cement-lime can be used for finishing not only residential buildings. This is a good solution for public, commercial, including industrial facilities, based on the composition and proportions of the main components. This list can include rooms with high humidity levels. However, a high-quality ventilation system is necessary.
Gypsum plaster
Gypsum plaster is easily applied to a concrete wall due to the plasticity of the mixture, is lightweight, and environmentally friendly. Due to its high hygroscopicity (absorbs water well), gypsum plaster is not applicable in bathrooms, so it is used mainly in dry rooms. Of the gypsum plasters for concrete walls, Knauf Rotband and Weber are perfect. Vetonit Profi Gypsum.
Other options for plastering materials
In addition to the options mentioned, most experienced builders use other compositions:
- gypsum-lime;
- acrylic;
- polymer cement;
- limestone;
- silicate;
- polymer.
They differ from each other in quality, cost and application to the base surfaces. For example, any silicate plaster is a good solution for treating cellular concrete outdoors. The acrylic mixture is usually applied in a thin layer and is therefore not suitable for leveling.
Gypsum-lime mortar is more suitable for dry rooms
Plastering procedure.
Installation of a beacon system.
In order for the plaster layer to be perfectly smooth, you need to install beacons: elements protruding from the wall to a height corresponding to the thickness of the plaster.
- Plaster. Small fragments of gypsum mortar are applied to the wall so that they do not protrude beyond the surface of the future plaster, but correspond exactly to it. Gypsum is convenient because it dries and hardens quickly.
- Cement-sand. You can also organize landmarks from concrete mortar. Such beacons are simple and cheap, but are suitable only for small areas of work.
- Wooden. For large volumes of plaster (room, apartment), it is more advisable to install vertical lathing. Such beacons are more efficient and convenient.
Wooden slats are the cheapest option, but have disadvantages: questionable evenness, deformation and swelling when in contact with water.
- The metal profile is more reliable. Once the work is completed, the profile does not need to be deleted.
Plastering of expanded clay concrete blocks can be done without reinforcement.
Walls can be plastered without beacons. However, it is quite difficult for a beginner.
Spray.
The first layer of plaster is applied by spraying.
For this, a thin solution (the consistency of thick sour cream) is used. Its thickness should not exceed 0.5 cm. The purpose of the layer is to penetrate well into the pores of the surface for high-quality adhesion to it. It is accomplished thanks to:
- Consistency of the solution.
- Method of application (the solution is not spread, but applied with “slaps”).
There is no need to level the spray.
Liquid plaster for cellular concrete, applied over a reinforcing mesh, adheres to the wall better than thick plaster.
Priming.
Base layer.
Its thickness is 1-1.5 cm. The primer is applied by throwing. Work is carried out from the corner, starting from the bottom of the wall. When working with beacons, the task is simplified: the solution (thicker than when spraying) is applied to the width of the entire span between the beacon slats. The amount of solution should be excessive (the excess is cut off by sliding along the beacon slats as if along guides).
The primer is applied to the almost dry spray - the concrete should not crumble under finger pressure.
Covering.
The front layer is applied over almost dry soil by pouring a liquid solution.
The goal is to create a smooth, perfect surface by filling micropores, tool scratches and large grains of sand. For covering, only fine grains sifted through a sieve with 1.5x1.5mm cells are used, otherwise perfect evenness will not work. When creating plaster for painting (without putty), the coating is done with a cement solution without sand.
Grout.
Without waiting for the covering layer to dry completely, grouting is done - leveling and smoothing the surface using the movements of a tool (grater). There are two types of mashing:
- All around. Movements in a circle (for right-handers - counterclockwise).
- Running, running. The instrument is moved with wide, horizontal or vertical strokes.
Preparation of concrete surfaces for plastering
To prepare the surface for further processing, you need to perform a number of operations:
- The old coating in the form of fragile plaster, whitewash, paint is removed (in which cases the material can be applied to old paint, we recommend reading here).
- Defects in concrete walls are determined. If there are nodules, they are cut down using a hammer and chisel. Massive chips and deep holes are sealed with cement-sand mortar in a ratio of 1:3; if necessary, steel mesh is used for reinforcement.
- On smooth walls, notches are made using a hammer and chisel, the maximum notch spacing is 10 cm.
- If hidden wiring is necessary, grooves are made for the wires.
- The concrete surface is cleaned. A brush and water are used to remove dust and dirt. The wall can be treated using compressed air or a strong jet of water, which will significantly speed up the cleaning process.
- A primer is applied to the wall surface.
Attention!
In cases where it is necessary to lay hidden wiring, grooves should be made just at the preparatory stage.
Conditions should be created so that the plaster adheres firmly to the base. After all, if you leave areas with a number of defects or contaminants (stains of various origins), this significantly reduces the adhesive properties of the finishing material.
The surface should be clean, dry, and also slightly rough, which improves the adhesion of the plaster to the base. Cracks and large holes must be repaired and not ignored. Also, you should not leave metal elements on the walls, and if it is impossible to remove them, then you should at least cover them with paint to prevent the development of rust.
Concrete and company: what is the best material to combine with
Concrete will take its rightful place in the design of rooms, but it is better to complement it with other textured and colorful materials. We talk about the most successful combinations and show photo examples of unique designs in industrial styles.
Tree
To make a concrete interior feel warmer and more homely, you can add decorative wooden elements. Another option is to use slats and beams to cover the walls and ceiling. Furniture can also play a role in creating a unique ensemble.
Concrete and wood in the interior of an apartment are a common combination for grunge and loft styles. For a successful balance, it is worth giving preference to one of the materials, and using the second to correctly place accents.
Combination of concrete and wood in design
Combination of concrete and wood in the interior of the apartment
Brick
Concrete and brick in the interior are another successful technique for the loft style. The trend of the direction suggests the presence of one brick wall in the room. The remaining surfaces can be treated with decorative concrete or simply remove the wallpaper. If you're not ready to take a radical step, go for an unusual floor design. The gray polished surface looks brutal and fashionable.
A white concrete wall is appropriate in a loft design. It will highlight the color of the brick and create a unique atmosphere of brutality. Metal lamps, intricate racks and shelves will not be out of place.
Combination of concrete and brick in the interior of the apartment
Combination of concrete and brick in design
Steel
The concrete finish blends perfectly with the steel elements. You can make walls or floors from the base material and add metal studs, ladders or ceiling bars to the design.
The cold restraint of concrete and steel shine will turn any room into a masterpiece of style. If you want color accents, you can add bright details in the form of indoor plants, posters, rugs.
Combination of concrete and steel in design
Concrete and steel design in an apartment
How to plaster a concrete wall
Most novice craftsmen are interested in how to plaster concrete with their own hands. The technology itself includes several successive stages:
- surface preparation;
- impregnation - applying a primer mixture;
- drying;
- fastening the reinforcing mesh (if necessary);
- applying tile adhesive;
- fastening beacon profiles;
- preparation of plaster mortar;
- applying the first layer (spray);
- soil laying;
- the covering stage follows;
- grout.
In this case, much depends on the preparation of the surface. In addition, it is impossible to do without the appropriate tools:
- drill with mixer attachment;
- construction bucket;
- construction plumb line;
- level;
- building code;
- set of spatulas;
- Master OK;
- falcon;
- corner leveler;
- grater;
- grater;
- trowel.
To these tools it is worth adding a plaster mixture and a primer.
The list of tools required for applying plaster depends on the skills and experience of the master
Padding
Priming of concrete walls is necessary for the following purposes:
- Reducing the absorption of water from the solution into the concrete base.
- Protecting a concrete wall from the formation of fungus and mold.
- Increasing the strength of the protective (surface) layer of concrete.
- Dust removal from the concrete surface. The primer binds dust particles and makes the base clean.
- Improving the adhesion of plaster to a concrete base.
It is necessary to prime concrete walls before plastering with the following types of plaster:
- For smooth concrete surfaces, concrete contact primers are ideal. After application, the composition fills the pores in the concrete, and a rough layer of plaster with high adhesion is formed on the surface, facilitating good adhesion to future plaster. Compositions from the following manufacturers are recommended: Feidel Betokontakt, Knauf Betokontakt, Prospector Beton-Kontakt.
- Old concrete surfaces can be strengthened using a deep penetration primer designed specifically for impregnating weak substrates. Such soil impregnates the top layer of concrete, thereby strengthening it and giving it the necessary strength. Recommended manufacturers: Prospectors “Deep Penetration”, AquaNova “Nova”, Acrylic Optimist “Deep Penetration”.
- To prepare porous concrete surfaces (aerated concrete, foam concrete), primers are needed that reduce the absorbency of the base, thereby preventing uneven setting of the solution. The following primers are perfect: Knauf Mittelgrund, Knauf Rotband Grund (for gypsum plasters), Ceresit ST 17, Toiler TR10.
Important!
You should start applying plaster to a concrete wall only after the primer layer has completely dried.
Installation of beacons
If the old wall has differences of more than 10 mm, then it is necessary to install beacons before applying plaster. They are necessary for even application of plaster with an equal layer of thickness. It is better to use metal profiles as beacons.
If the thickness of the planned plaster is more than 20 mm, then it is necessary to additionally install a reinforcing mesh. It is attached to the wall using dowel nails.
Next, you need to prepare the solution in accordance with the manufacturer's instructions. To avoid the formation of lumps, add water to the dry mixture, and not vice versa.
Applying tile adhesive
Almost any tile adhesive is suitable for leveling the surface. The adhesive mixture is sticky, has plasticity, and also dries in a short period of time and gains strength. Tile adhesive plays a positive role as a transitional agent, due to which it is possible to connect different materials.
It is easier to apply the adhesive mixture using a spatula or trowel. When the composition has already been applied and has not yet dried, you should go over the layer with a notched trowel. Due to these grooves created, the next material (plaster or putty) will adhere tenaciously to the surface.
An important task of primer compositions is antifungal protection
Reinforcement
Adhesive material is also used for reinforcement. To begin with, a layer with a thickness of 5 to 10 mm is applied and then a reinforcing mesh is laid. In this case, the canvas must be pressed tightly and drowned in the adhesive solution, stroking it with a spatula. The mixture that emerges should be smoothed out. After this, you need to give the coating time to dry.
Corner reinforcement is performed using perforated profiles. First, a solution is applied to the external or internal joints of surfaces in an apartment or house, forming vertical stripes in a thin layer over the entire height of the walls. Next, the corners are immersed in it, and the same mixture is applied on top again.
Spray the first layer
A liquid, creamy mixture is prepared. The initial layer (“spray”) is applied to the wall with a deep ladle and a sharp movement. The solution is applied in a thin layer no more than 1 cm thick.
Important!
The "spray" never evens out. After applying the material, you need to wait for it to dry and only then proceed to the next stage.
The main purpose of the Spray is to ensure strong adhesion of the plaster layer to the concrete base. At this stage, the solution is not leveled and after application, slaps remain on the walls, which form the desired surface. And when the finishing material dries, the subsequent primer holds on more tightly.
To improve adhesion, the spray is lined horizontally using the corner of a spatula. Only after this and the mixture has dried does soil laying begin. However, in some cases, the spray is done in two layers, waiting a certain time for each of them to dry. Usually 24 hours is enough.
Primer base layer
For the main (second) layer, a thick solution is used. The mixture is applied between pre-installed beacons, with a layer thickness of no more than 1-1.5 cm. It is thrown onto the wall with a trowel, work is carried out from the floor to the ceiling. The main layer is aligned according to the rule along the guides (beacons). In this case, it is better to make zigzag movements, starting from the bottom and moving up.
During the work, excess solution is collected each time, which must be thrown back into the container with a spatula, or thrown into those places where there is not enough of it.
The work is carried out by breaking the wall into separate sections. If it is necessary to lay thick plaster, it is done in several layers (usually 2 is enough). The lower layers are leveled with a spatula.
After the leveling soil has set, you need to remove the guides (with the exception of mortar beacons). The grooves after the profiles are closed with plaster mortar and smoothed with a spatula. If you plan to complete the finishing using decorative plaster, then there is no need for a third layer (coating).
Subsequently, the walls are primed and puttied in the case of a thin-layer coating.
Concrete plaster is applied in three layers
Covering the front layer
For the third (front) layer, you will need a liquid solution that closes the resulting cracks or depressions after the main layer has dried. Alignment is carried out using the same method using a rule. The result will be a smooth surface of the plaster.
Wallpapering walls or applying paint requires a high-quality and even coating. Otherwise, defects will immediately surface, which will call into question the effectiveness of the entire work. At this stage, the solution is made more liquid, and the sand fraction should not exceed 1.5 mm.
Grout
After the covering dries a little and stops being pressed under gentle finger pressure, the wall is rubbed down. This is the last stage of work, which is necessary in order to remove roughness and small irregularities. You should start when the coating has set, but has not yet dried. The operation is carried out with a special grater, making circular movements; there is no need to be zealous with pressing on the wall. At the same time, over places with depressions, you need to loosen the pressure, and where there are bulges, increase the pressure.
Work with internal corners is carried out with a corner spatula, and for external corners a special metal profile is used to protect the corners from chipping.
On a note!
Applying plaster in the corners of walls, along pipes and other difficult places is done last, after the main plaster has dried.
Before starting work and preparing the solution, it is imperative to sift the sand. For this, a sieve with cells of no more than 1.5 mm is used. In order to improve adhesion, it is better to make notches or purchase soil-concrete contact, which saves time.
We install beacons
Those who do not know how to properly plaster concrete walls should definitely pay attention to such an important stage as installing beacons. The beacon can be a metal profile or a plastic one.
It is installed like this:
- First, a self-tapping screw or dowel is installed. It must be installed under the ceiling, approximately 15 cm from the corner. The thickness of the plaster will be commensurate with the distance from the head to the wall;
- The second one is installed on the same line with the first screw. It will be located near the floor;
- Next, balls of gypsum mortar are placed between them, which should protrude slightly beyond the screws;
- Then the profile is applied and embedded in gypsum mortar. The rack level must be checked with a special device. If there is a deviation from the norm, you will need to remove one of the screws and use the building level again;
- The beacon is installed on the other side according to the same principle;
- Between the installed beacons you need to tension the thread and install the remaining slats along it. The distance between the beacons should be less than the rule itself, which will be needed for work. The result is a vertical arrangement of the slats in the same plane.
After completing all the preparatory work, you can proceed to the main part, because you must learn how to properly plaster a concrete wall, which still remains relevant.
- We start by preparing the solution. The mass prepared for the first layer should not be very thick;
- If you do not know how to plaster a concrete wall with cement mortar by spraying, we recommend that you carefully study this item. You need to throw the solution sharply so that the finished mass sticks to the wall and does not deform. Thus, the entire surface must be treated. The first layer will reach about 10 mm. Excess material protruding beyond the beacons will need to be removed as a rule;
- The first layer must be well dried. The second batch should be thicker. The application method can be either spraying or using a trowel. Often two layers of plaster are sufficient;
- Using the rule, stretch the solution along the beacons in the direction from top to bottom. Movements should be smooth and swaying, without breaking away from established guidelines.
- Before the front layer dries, you need to grout it. Take a special grater and, using one of the methods, finish leveling the surface. Movements can be in a circle, or running, that is, vertically, horizontally.
- After finishing work with the walls, you can start working on the corners. A special spatula and profile will help you make them even and avoid chipping.
Advice!
To avoid the formation of lumps during the mixing of the solution, it is necessary to add water to the dry ingredients.
How long does it take for plaster to dry?
After installing the plaster, it is necessary to leave it to dry, preferably until it reaches full strength. In conditions of tight deadlines, finishing is not recommended earlier than 5-7 days after applying the plaster.
The time it takes to gain full strength depends on the type of plaster used: for cement plasters - up to 30 days, for cement-lime and gypsum plasters - up to 7 days.
The use of heaters and fans is not recommended; drying should occur smoothly under natural conditions. When the coating is completely dry, you can begin finishing - gluing wallpaper, painting walls, installing decorative plaster, etc.
Plaster is an excellent option for leveling uneven concrete walls that have depressions, chips, and sinkholes. Different types of plaster have their own advantages and disadvantages; choosing a specific type of plaster for certain conditions is not difficult.
Heaters or fans are not used to dry walls.
How to choose furniture for concrete in the interior
Concrete walls and floors harmonize perfectly with bright modern-style furniture. Laconic items in neutral shades are also worthy of attention - they do not distract the eye and create a relaxed atmosphere.
Now let's give examples. The white Tulip round table is ready to take its place in the kitchen or dining room. The minimalistic design and pleasant color make the model attractive to connoisseurs of simple forms.
The stylish Ameli couch is quite appropriate in a concrete interior. Soft and comfortable furniture in a deep gray shade will not greatly contrast with the decor, but will add sophistication to the design.
The main advantages of a semicircular sofa are its rich color and interesting shape. This furniture is suitable for the living room and bedroom.
buybuy
Tulip table white round
buybuy
Ameli couch gray
buybuy
Sofa Rozi with pillows
The catalog contains other equally original models of interior and decor items. You can choose products in the same style or carefully combine several directions. The delicacy and discreetness of the concrete finish allows you to experiment with the furnishings of the rooms.
Features and differences of external and internal work
The operating conditions of the facade of buildings and interior decoration differ significantly from each other. Accordingly, the work is performed differently. But there are also general conditions:
- The suitable temperature range is +5 °C to +30 °C.
- Humidity level – no more than 60%.
- All electrical wiring is de-energized.
Advice!
Plastering for external concrete work should be carried out in warm weather. The fresh coating must be protected from weather precipitation, strong gusts of wind and direct sunlight.
Any drafts should be avoided indoors. The use of heaters or fans to speed up the drying of plaster is highly not recommended.
Tips and tricks
Basically, the manufacturer indicates how to apply the material. But there are certain tips that allow you to get the perfect result using decorative plaster for concrete.
- Prepare the surface well.
- Treat the base with compounds suitable for plaster mortar.
- Protect parts of the facade that are not subject to plastering.
Recommendations will help carry out repairs with minimal effort.
To get a high-quality and durable coating, you need practice and an understanding of how to plaster concrete walls and the finishing procedure. The process is simplified if you use branded materials.
Features of concrete ceiling plaster
Working with the ceiling is much more difficult, unlike walls, but beacons are also used here. The plaster mixture is applied with a spatula and leveled using a rule. In this case, two layers are laid and the second is applied after the first has dried. This allows you to hide small defects.
Applying the 2nd layer is called grinding and at this stage a reinforcing fiberglass mesh is attached, which prevents the formation of shrinkage cracks. That is, additional protection is created against shedding and cracking of the plaster.
Available plaster options
The interior walls of houses can be finished in different ways. For example, using sheets of dry plaster, the wet method, or processing with synthetic materials manufactured in factories, as well as ready-made mixtures.
Laying dry sheets is quite simple, but wet mortar is considered one of the most labor-intensive, although the quality of such plaster is considered ideal. Synthetics are more flexible and easier to install, but there are certain nuances that you will learn about later.
Carrying out work manually and mechanically
Some professional builders prefer to apply plaster by hand. In their opinion, in this case the process is easier to control and the mixture hardens faster. But at the same time, the duration of work increases. In addition, there is no way to ensure uniform drying of the solution over the entire surface.
In addition, it is difficult to prepare a mixture with the same consistency for different areas within the same room. The work becomes much more complicated when it is necessary to cover a large area.
The machine method shows effectiveness when it is necessary to cover several tens of square meters with plaster. In addition, there is no need to waste time kneading the solution and achieving the required consistency.
Applying plaster using a machine is a fairly new method of mechanizing this process.
Primer work
Plastering of internal walls cannot be carried out without priming. The primer helps to increase the durability of the product.
A primer can also improve the quality of the surface. It makes concrete more moisture resistant. It dries much earlier when applying the finish.
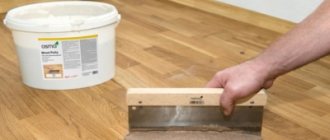
For concrete monoliths, which are much denser, it is better to use a mineral-based primer. There, the binder is cement. Some pros advise using concrete contact. This primer can be used to prime concrete for applying plaster. Look at the photo of plastering walls to see how the work is carried out.
Insulation of concrete walls outside
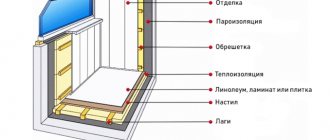
A number of private property owners want to insulate the facade of their house. This is exactly what should be done from the outside. You also need to calculate the localization of the dew point. It is not recommended to use mineral wool, since the material absorbs water, after which it loses its thermal insulation qualities. It is better to give preference to foam plastic. When using extruded polystyrene foam, high strength and durability are achieved.
Before plastering the foam sheets, adhesive is applied to the back side along the entire perimeter. Next, the insulation is attached to the wall, starting from the bottom corner. After the adhesive has dried, the panels should be additionally secured with mushroom dowels. Install all sheets and cover the seams between them with foam. Next, secure the reinforcing mesh (preferably made of fiberglass) and apply a layer of glue. And when the composition has dried, you can begin plastering.
On a note!
At the final stage, all that remains is to cover the walls with primer, then paint. Or, as another option, install a ventilated façade of the house using siding.
Tools for plastering concrete walls
For further application of plaster you will need the following set of tools:
- drill with mixer attachment;
- construction bucket;
- construction plumb line;
- level;
- building code;
- set of spatulas;
- Master OK;
- falcon;
- corner leveler;
- grater;
- grater;
- trowel.
Basic tools for plastering
How to avoid mistakes
Manufacturers usually indicate how this or that material should be applied, which protects against erroneous actions. However, there are certain points that you need to pay attention to:
- You should take care in advance about the proper placement of beacons on the walls. The quality of the coating depends on this. With the help of these guides, the entire surface is divided into several sections no more than 1 meter wide.
- When working with foam concrete, gypsum plaster is suitable. When using cement mortar, the surface needs to be constantly moistened.
- It is better to give preference to those manufacturers who have proven themselves in the construction market. Knauf, Yunis, Volma, Prospectors - these brands will not cause any complaints about the quality of the coating.
- To start, buy 1 or 2 packages to test the mixture. And if the drying time of the composition is within the norm, you can purchase the material in the required volume.
- Violation of the storage conditions of gypsum plaster, the solution sets within 5-10 minutes. Due to non-compliance with the proportions of cement products, the mixture will flow down the wall.
- High-quality ready-made mixture is sold in three-layer packaging - 2 paper, 1 polyethylene. Knowing this helps to protect yourself from buying a fake.
Using a compressor allows you to increase labor productivity. The operating time is reduced, and it is possible to regulate the size of the droplets by adding water. The output is a uniform coating with an original texture.
Thermal insulation of concrete surfaces requires careful planning of upcoming work
Plastering concrete surfaces is not the most difficult job that any home craftsman can handle. Moreover, not only men can do such work; women also show good results. The main thing is to adhere to technology and be careful. Only with this approach will the finishing last a long time and will not require repairs.
Was this information useful to you? Share in the comments!
Using tile adhesive
Construction stores sell many types of adhesive compositions in the form of dry mixtures. The technical characteristics of tile adhesive are often superior to putty, and therefore they are widely used for plastering walls, including as an intermediate layer before cement-sand mortar. A frequently used option is plastering with a mixture of tile adhesive and cement plaster.
Ceresit CM-11, KNAUF Fliesen, Eunice and Craps perform well in the work. The technology is generally similar to working with cement-sand mortar.
Current prices:
The nuances are:
- The adhesive has high adhesion and is applied to walls without reinforcement.
- The material is more viscous than ordinary cement plaster, it is more difficult to work with it, and the formation of sagging is possible with a thick layer of mortar on the wall.
- High viability of the solution - 3 hours.
- The maximum thickness of such finishing should not exceed 10 mm.
Mechanized plastering works.
We are ready to offer you innovative technology for machine plastering of walls of any premises, which will allow you to save money and get a truly high-quality result at a low cost of plastering work. This technology is well known in Europe. Now you can use it for rough finishing of Russian apartments.
What's the secret? Everything is extremely simple - the whole process is mechanized. This means that labor costs and construction material consumption are reduced, and the productivity of construction work increases. You simply place the plaster mixture into a special hopper of the device, which, in accordance with the built-in program, mixes it with water. The solution is mixed by a screw pair, and the finished solution is immediately supplied to the wall, compacted on the surface of the ceiling or walls with an air compressor.
Advantages of plastering works from. Innovative technology for machine plastering allows us to optimize the entire process and speed it up. In addition, all our customers can count on a number of benefits:
Source
General benefits
The main distinguishing feature of such walls is strength and durability. However, a smooth monolithic partition is rarely even, so experts say that it is mandatory to plaster such slabs. The liquid mixture has a number of undeniable advantages, including:
- Reliable protection against moisture.
- Breathable coating.
- Ability to create a variety of textures.
- Noise and heat insulation.
The method of such alignment itself also has positive qualities. With its help, you can achieve a high level of quality when creating a base for applying the topcoat. The solution easily fills voids, cracks and crevices. Protrusions and irregularities are hidden under a layer of plaster.
Carrying out work with the installation of beacons allows you to level the surface of internal walls in apartments and private houses, eliminating curvature (blockages)
There is another surface treatment technology that is used in utility rooms. It does not require the creation of an ideal vertical capital or interior partition and for its implementation there is no need to install a beacon structure. The main advantages of plastering walls are:
- good thermal conductivity;
- sound insulation;
- vapor permeability;
- moisture resistance;
- practicality.
The low cost of the materials used to prepare the solution is also of great importance.