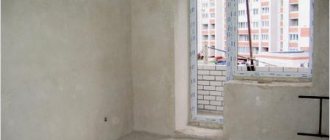
After you have properly prepared the base - leveled it, applied a primer, installed beacons and reinforcing mesh, you can move on to the final part of the finishing work. The final stage includes directly applying the plaster solution to the surface.
First of all, note a number of recommendations that should be followed in order to obtain a high-quality and decorative coating:
- Carry out work at a certain temperature and humidity conditions. As a rule, at a base temperature from +5ºС to +30ºС and humidity not more than 60%, however, individual compositions may require special conditions - follow the manufacturer’s information.
- Carefully follow the manufacturer's instructions for preparing the solution.
- Tools used during application must be washed and cleaned after each stage of finishing work.
- When plastering the walls and ceiling of a room, start work from the top floor, and then move on to the wall surfaces.
- When applying several layers of plaster, be sure to wait until the finished layer has completely dried before laying the next one.
Splash
First of all, a layer of plaster, called “spray,” is applied. The solution for spraying should be more liquid than the composition for subsequent layers and resemble sour cream in consistency.
Spray thickness:
- for wooden surfaces - 10 mm,
- for concrete and stone surfaces - 4-5 mm.
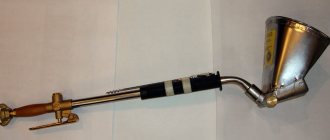
Using a trowel, lay the mortar in the center of the falcon's shield. To save consumables, carefully remove excess mass.
Bring the falcon to the prepared surface, easily tilting it towards the base, and begin to throw the mortar onto the wall or ceiling using a trowel.
Gradually spread the plaster mixture over the entire surface of the wall, trying to throw the solution from the same distance.
Once you have finished spraying, do not try to level the coating - this is not necessary. Remove only excessively protruding areas of plaster.
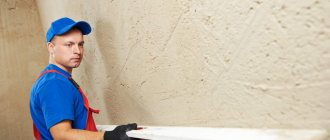
Applying plaster
The solution is applied to dry walls made of bricks or foam blocks at a temperature of +5 and standard humidity for the room or in the absence of precipitation when working on the facade. The first spray layer is necessary for adhesion of the main layer to the surface and is applied by throwing it with a trowel, while the plaster should be of a liquid consistency to fill small pores on the wall and improve adhesion. The spray is not leveled and as it sets, they begin to apply a leveling layer - primer.
The main task of the primer is to level the walls of a room or facade, so for the work you will need a plaster rule, a floor polisher and a trowel. The solution is poured or spread in a layer of up to 25 mm, after which the excess is removed, first horizontally, then vertically. In case of significant unevenness, plaster is additionally applied to large recesses and removed again using the same rule. The process of application and removal lasts until the surface quality meets the standards given at the beginning of the article.
After the soil has set, a covering layer is applied, which will help create a uniform texture on the surface. The covering is pre-sifted through a plaster sieve and thrown or spread on the wall with a liquid consistency, and further grinding of the plaster can be done either with a polyurethane or felt float. As a rule, they work on fresh mortar with a polyurethane tool, and if the covering has already set, they use a tool with felt, which is constantly moistened with water while rubbing the wall in a circular motion.
Priming
The next coating layer is primer, applied over the spray layer after it has hardened. It is not difficult to determine the time of laying the soil: press the spray with your finger and, if the material does not sag or crumble, continue finishing work.
Pour the solution into the “cell” between the two beacons.
Carefully place a rule on the protrusions of the beacons - a metal rectangular trapezoid with a pointed end - and smooth the solution with sharp zigzag jerks, moving the rule from top to bottom.
The pointed end of the rule is necessary so that the collected excess plaster is thrown down from this radius.
Repeat leveling several times, carefully covering the depressions until you obtain a smooth, rough surface. The plaster layer should be located on the same level as the protruding parts of the beacons.
Important nuances of brick plastering
Rice.
7. Plastering the external wall of a house In cases where the applied layer has a significant thickness, it is applied in several stages (with a thickness of each layer ≤ 5 mm), with mandatory reinforcement.
The intermediate layers may not be leveled. The maximum permitted thickness of the plaster layer cannot exceed 100 mm. at the same time, the probability of its delamination and shedding increases significantly. The optimal thickness is considered to be up to 50 mm. Acceptable environmental parameters for plastering brick walls are temperature (5-35) °C, humidity ≤ 65%.
The electrical wiring is de-energized, the recesses for installing switches and sockets are covered with masking tape. They also protect door (window) trims.
- It is recommended to add quicklime (calcium oxide) to self-prepared solutions for exterior finishing.
- In order to increase the thermal insulation properties of the plaster, porous substances (pumice, sawdust, analogues) are added to the solution.
- It is strictly forbidden to dry the plaster with a hairdryer or other means. This will lead to cracking.
Grout
After finishing the plaster application, immediately grout the coating. There are two main methods of grouting:
- All around
Press the wooden float firmly onto the surface of the coating and make circular movements counterclockwise. Cut off any bumps and protrusions using the edges of a grater.
If the covering has already hardened and is difficult to handle mechanically, lightly moisten it with water using a brush.
- Speeding up
Press the float onto the plaster layer and rub the coating with sharp, straight strokes.
Spreading grout is used for high-quality plaster and results in a cleaner and smoother surface. As a rule, it is performed after grouting in a circular manner - having processed the area in a circular motion, it is immediately grouted.
To improve the quality of the grout, go over the surface with a float covered with felt and felt.
Why do you need wall plaster?
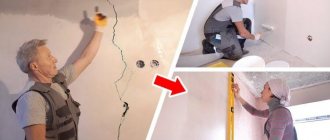
There are many materials for constructing the walls of a house. All of them form surfaces of varying degrees of evenness. But documents and standards establish the same requirements for the finished wall surface. For residential premises, the standard is a maximum unevenness of 1 mm per 1 meter of the wall surface. In order to obtain an even, smooth surface, the wall is plastered and then puttyed.
In order to check the evenness of the walls after plastering, they use a long rule that is used for plastering. The rule is applied to the wall in different positions - vertically, horizontally, diagonally, and they look at the gaps formed between the wall and the plane of the rule. If these gaps do not exceed the permissible values, this indicates high quality plastering.
Smoothing
Smoothing is a type of grouting. To perform this operation, you will need a trowel - a wooden trowel with a strip of rubber nailed to the canvas (for subsequent application for adhesive paints) or a metal spacer (for oil paints).
Smoothing is carried out after applying the covering and leveling it with a trowel with a standard cloth.
For plastered walls:
- Smooth first in the vertical direction.
- Level the coating by moving the trowel horizontally.
Plastering a stove with clay - making the solution stronger!
Reinforcement of stove plaster is a separate topic for discussion. And again, traditional methods are by no means inferior to modern ones, the only question is what will be at hand during the plastering process or what will be easier to get. Reinforcement is carried out both by adding components to the solution itself, and with the help of foreign materials, for example, burlap. In the first case, people often added crushed flax fibers, straw, and horse manure. Today, asbestos is added to the clay solution - at least one tenth.
Burlap is still used by many craftsmen to reinforce stove plaster. This method has its pros and cons - such a stove cannot be overheated, but burlap is the simplest, environmentally friendly and affordable way to strengthen plaster. The burlap can be replaced with a thin mesh made of steel wire, the mesh size of which is no more than 1*1 cm. However, the fastening wire must be inserted into the masonry when constructing the stove. If you missed this point, you will have to use additives in the solution or burlap.
Proper plastering of walls
Plastering walls yourself is a simple process; it is only important to carry out the entire technology correctly.
If earlier this method was used to prevent the entry of moisture into the room and the subsequent “breeding of dampness”, to increase sound and thermal insulation, today plaster also performs a decorative function. Agree, even if this is not textured plaster, but the solution was used exclusively for sealing seams and smoothing out folds, the overall appearance of painted or wallpapered walls looks much neater. Walls are usually plastered after the foundation has settled, that is, about a year or two after the construction of the building.
Properly plastering walls is a job of applying several layers of plaster. One, but massive layer is not enough. This is due to the fact that the thick layer of solution does not have time to set and slides.
Preparing the solution and applying the coating
The uniformity of the solution plays a big role both in the process of its application and in the grouting. If in some places the covering solution is thicker and, conversely, the grout will have different cleanliness. Therefore, before application, pressed or ready-made solutions must be sifted through a fine sieve and mixed again. The covering is carried out with a solution of the same composition as the previously applied layers of plaster. Fatty solutions give a rougher surface, with more grinding and unground stripes. These solutions are more suitable for smoothing. Thin solutions are not strong enough and do not rub well.
Covering, grouting, smoothing plaster
The final finishing processes for plaster are coating and grouting. Instead of grouting, the plaster is often smoothed down. The cleanliness of the finished surface largely depends on the quality of the prepared coating solution. A well-prepared mortar on fine sand of normal fat content is easily, quickly and cleanly rubbed or smoothed, thereby increasing the productivity of plasterers. Fine-grained sand is used to prepare the coating solution. Coarse sand is of little use, as it gives a rough, rough texture.
Plaster leveling
The wider the trowel, the smoother your wall will be.
As a rule, there is no need to level the spray. The exception is those cases when protruding clots of solution form on the surface and must be removed.
But the soil needs to be leveled. This is done either as a rule (in the case of throwing the solution with a trowel) or with the help of a falcon. The latter occurs when applying the solution with the same falcon. The leveling process in this case is similar to the process of spreading primer, only the primer is no longer placed on it, and the pressure on the tool is applied depending on the plane in which it is necessary to level the solution.
Conclusion
What is the best way to plaster a stove? No specialist can answer this question for you. Each stove maker has his own secrets and mortar compositions for plastering the surfaces of brick heaters at home.
You can make it from a mixture of clay and sand or knead a ready-made dry solution. This is a purely individual question. The main thing is to properly mix and apply a layer of plaster on the surface of the stoves.