When renovating an apartment, everyone tries to preserve as much usable space as possible. This can be achieved using liquid nails (LN). This is a type of construction adhesive. It is used for gluing and fastening many building materials. It is convenient to use liquid nails for plastic panels. The composition does not damage fragile plastic. The glue provides a strong adhesion that is as close as possible to a mechanical connection.
Fastening plastic panels to the wall with liquid nails
Until recently, plastic panels were mainly attached to a wooden frame, which took 7-8 centimeters from the selected room. This could be especially felt by the owners of Khrushchev apartments, whose apartments do not have as much space as they would like.
Nowadays, most panels are attached using special glue or liquid nails. You can read about what liquid nails are here.
However, it is worth noting that plastic panels can only be glued onto a flat surface, so first it is recommended to properly prepare the walls (or any other surface).
Preparatory work
First you need to level the walls using putty. If the walls are smooth, then they must be cleaned of dust, grease, paint and other foreign substances.
After this, the surface is treated with a special primer, which will improve the properties of liquid nails.
Before using liquid glue, carefully read the instructions and make sure that it is suitable for PVC or MDF panels (this should be indicated on the packaging).
Technology of work execution
- Previously purchased panels must be brought into the room and the packaging must be opened so that they “warm up” and adapt to the humidity in the apartment.
- Using a tape measure, measure the height of the walls or the area where the panels will be glued.
- Using a square and felt-tip pen, mark the cut points and remove excess parts of the panels.
- Make sure the wall (or any other surface) is clean and dry.
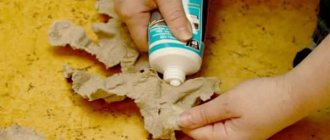
- Apply glue in dotted strips with a distance between rows of strips of no more than 10 centimeters (preferably 5-6).
- Press the panel to the surface along its entire length, but so as not to damage the outer decorative layer.
- If necessary, the panel can be moved slightly in any direction for better installation.
- The grooves of the panels can be lubricated with sealant to better protect the surface from moisture and dust.
- The panel will stick in 1-2 minutes and the total drying time for liquid nails is 24-48 hours (more detailed information is written in the instructions).
Liquid nails are a very versatile substance that allows you to glue not only plastic panels, but also tiles to walls, ceilings and any other surfaces. You can read about how to glue tiles using liquid nails in this article.
Nuances during installation
PVC is attached quite simply, but before you start work, it’s worth learning how to glue plastic panels and some nuances that will help save not only time, but also money:
- Despite the high resistance to temperature changes, it is not worth attaching the material with glue if temperature fluctuations reach 25°C;
- if the storage and installation temperatures are different, acclimatization should be carried out for 10 hours before gluing;
- when insulating walls, it is better to lay PVC on a frame, between which a layer of thermal insulation can be laid;
When attaching horizontal panels, the joining groove should be directed downwards. Thanks to this, moisture will not get under the material.
- if it is necessary to trim sheet panels, it is better to do this using a grinder;
- In order to protect the surface to be glued from the accumulation of condensation, it is necessary to leave gaps of about 7 mm, both at the top and at the bottom of the base. This will ensure natural air circulation.
Liquid nails for PVC panels: stick forever
Liquid nails are a special type of construction adhesive that is suitable for almost any building materials. It is especially convenient to install fragile PVC panels using liquid nails - the glue does not damage the plastic, is suitable for interior repairs, and the work time is reduced to a minimum. Installing the panels yourself is not difficult even for an inexperienced technician. To learn how to glue plastic panels to liquid nails, you need to study the instructions in detail. It must indicate the type of materials to which this glue is suitable.
Types of liquid nails
Liquid construction nails are designed for gluing surfaces together. In this case, the material can be different: plastic, wood, drywall, glass or metal. The secret of such versatility is in a special composition: the glue is made from synthetic rubber, polymers and special fillers are added. This allows you to glue together even parts that do not fit tightly together, for example, PVC panels.
The modern construction market offers 2 types of liquid nails:
- neopropylene (or neoprene, based on organic solvents);
- acrylic (water-based).
Acrylic ones are more environmentally friendly: they do not emit toxic fumes, do not smell, but are more sensitive to water and temperature changes. Installation of PVC panels with liquid nails of this type in the bathroom is undesirable.
Neoprene nails provide instant results and superior grip on any surface. This is especially noticeable in rooms with constant temperature changes and high humidity. These rooms include the bathroom and kitchen. Unfortunately, this type of glue is more difficult to work with: it has a pungent odor that dissipates only 2-3 days after finishing. During the repair process, remember to take this specificity into account.
Liquid nails: advantages and disadvantages
The classic way to decorate walls with plastic panels is to install a wooden sheathing on which plastic is mounted. This technology requires lengthy preparation, and also greatly reduces the usable area. This factor is especially important for small bathrooms, kitchens and balconies. Installing plastic panels with liquid nails allows you to avoid these problems. Cladding with plastic can be done in a matter of hours, and the usable area of the apartment will be preserved.
Liquid nails for installing PVC panels have special advantages:
- construction adhesive does not damage plastic and does not corrode;
- the nails dry quickly and at the same time allow you to adjust the position of the panels on the wall;
- no additional mechanical action is required when gluing;
- the acrylic adhesive composition is absolutely environmentally friendly, and neoprene nails are resistant to humidity and temperature changes.
In addition to the advantages, liquid nails for PVC panels also have a number of disadvantages. Neopropylene compounds are chemically aggressive, so a respirator and protective gloves are required when working with them. After installation, the room must be thoroughly ventilated (sometimes such ventilation takes 2-3 days) to completely remove the smell. All these disadvantages are easy to overcome, because after complete drying the glue becomes completely safe for the health of all household members.
Installation of plastic panels with liquid nails: main steps
Fastening PVC panels with liquid nails consists of 2 stages:
- surface preparation;
- direct installation.
The wall on which liquid nails will be glued must be level, clean and dry. To do this, remove all traces of the old coating from the surface (greasy wallpaper, ceramic tiles, crumbling plaster) and level deep cracks and holes with putty.
After this, you need to prime the surface. The primer will hold the wall together, provide additional protection from moisture, fungi and mold, and improve the adhesion of liquid nails to the wall covering. After the primer has dried (this can take from 6 to 12 hours), you can begin finishing work.
The wall must be primed evenly
We can talk for hours about how to properly glue plastic panels with liquid nails. First you need to stock up on the necessary materials and tools: these are the PVC panels themselves, liquid nails, a construction gun, a sponge, water or mineral solvent (to remove excess glue), sealant.
Before you start working, you need to remove the panels from the packaging and leave them in the room for half an hour so that they get used to the humidity and temperature. Then on the package with liquid glue you need to cut off the tip, screw on a special cap, cut it at an angle of 90 degrees and insert the tube with nails into the construction gun.
After this, you can apply nails to the wall: dotted, in the form of a grid or in zigzags. Then you need to take the plastic panel and press it against the wall (for convenience, you can roll it with a rubber roller). During the first 2-3 minutes, the position of the panel on the wall is easy to adjust. The glue will set in 15-20 minutes, and complete drying will occur within a day. When the last panel is installed, it is also necessary to seal all seams between the panels and the ceiling, bathtub or tray.
You can apply nails not to the wall, but directly to the panels
Liquid nails are a quick and convenient way to finish any room with plastic panels. Thanks to different types of construction glue, you can organize the renovation of any room, be it a bathroom or a balcony, and the simple technology of work will make it easy to do the installation yourself.
Video tutorial on gluing PVC wall panels
Before work, we recommend that you familiarize yourself with the video material, which will tell you in detail about the correct gluing of wall panels to liquid nails.
Selection of adhesive composition
When purchasing, it is important to pay attention to the suitability of liquid nails for working with polyvinyl chloride. Most compositions are considered universal: they are suitable for all materials, since they are made on the basis of artificial rubber, which does not damage surfaces and does not react with them. However, some liquid nails have special properties that make their action specific.
There is always a note about this on the packaging:
- only for interior work,
- for outdoor or landscape work (with increased frost resistance),
- for wet rooms,
- for mirrors (does not damage amalgam),
- for foam panels,
- extra strong for heavy panels,
- for wooden and MDF panels,
- roofing
The best solution would be to buy glue, the instructions for which clearly state the possibility of using it on plastic, including PVC. Also, liquid nails should not damage the base material (wood, brick, plaster, concrete, stone, drywall, chipboard and others). If you are finishing the walls in the bathroom, the glue must be suitable for rooms with high humidity, withstand contact with water and not be destroyed by detergents and alkalis. Other requirements for high-quality liquid nails for working with PVC:
- transparency after drying or white color depending on the type of panels (usually selected by the color of the cap),
- resistance to temperature changes, frost resistance (if a terrace, balcony, or other external buildings are being finished),
- high degree of adhesion to any substrate,
- long service life (up to 15–20 years),
- the presence of an antiseptic and fungicide in the composition,
- elasticity, no cracking when the base is deformed,
- affordable price, economical consumption,
- Convenient application using a pistol.
The glue must set quickly, because holding each panel with your hands for a long time is difficult and inconvenient. It is desirable that the product is environmentally friendly and does not emit toxic compounds or unpleasant odors, otherwise after installing the panels you will have to ventilate the room for 1–3 days. Liquid nails with a viscous, thick texture that do not spread over the PVC, but quickly set and are securely attached to the base, are considered more convenient to use. Only with thick glue can you fix the panels on walls, slopes, door and window openings, and decorate the interior in the desired way.
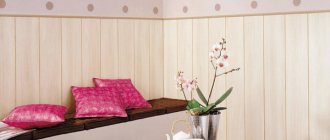
Wood panels in interior design
How to glue PVC panels in the bathroom - on the walls and ceiling photo
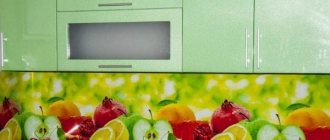
The use of decorative panels in bathrooms and bathrooms is a worthy alternative to marble and tiles. They are used for finishing walls and ceilings, they are moisture resistant, and reliably serve in showers, swimming pools, and saunas.
Thanks to its stylish design, practicality, low price and speed of installation, many Russians choose this particular finishing material.
We glue plastic panels step by step
Since the instructions on how to glue plastic panels are quite simple, anyone can master it. We will tell you about it.
Most manufacturers indicate on packaging with specialized adhesives how much adhesive is needed and how it should be applied to the panels to achieve the desired result.
The main advantages of the panels include the following:
- ease of docking,
- no need to prepare the surface,
- hide any unevenness,
- due to the varnish coating, they are resistant to ultraviolet radiation and mechanical damage,
- have good sound and heat insulation,
- are not afraid of temperature changes,
- have a wide color range, as well as a large selection of different textures,
- affordable,
- easy and quick to install,
- durable and practical.
Wall panels are presented on the market in several versions:
- Rack ones look like lining. If you install them vertically, you can visually make the walls taller. Horizontal installation visually expands the walls.
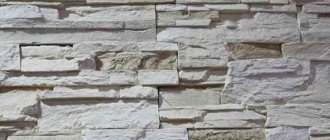
- Sheet ones are similar to plywood and on one side they imitate natural stone, leather or wood.
In addition to glue, mounting on:
- screws, staples or nails,
- use fastening profiles.
VIDEO INSTRUCTION
Gluing plastic panels in the bathroom
This method - using PVC glue - is the easiest and fastest, suitable for finishing small rooms.
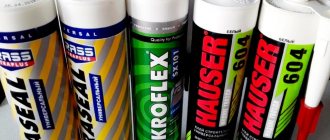
- properly selected glue (such as Titanium and Liquid nails Quelyd or Mastertex), resistant to water, ultraviolet radiation, odorless, safe,
- roulette,
- hammer,
- brush,
- bucket,
- screwdriver, hacksaw.
EXCELLENT VIDEO ON THE TOPIC It is recommended in advance, at least 12 hours before the start of installation, to bring the packaging with panels to the room and unpack it. Panels of the required width and height are also cut in advance.
- The work begins with assessing the condition of the walls. If there are defects, cracks, or bulges, the surface will have to be puttied.
- To degrease the walls, use a soap solution, alcohol or acetone.
- The glue is applied to the back of the surface with dotted lines or dots and pressed against the wall.
- The installation is completed by installing the framing profile and removing dirt from the surface of the panels.
If the surface is uneven, they resort to installing a wooden sheathing, and panels are already attached to it.
To do this, take measurements and calculate how many vertical beams are required for the frame. Also, instead of wood, you can use a metal profile to make the sheathing.
Main installation errors:
- careless attitude towards the material: it cannot be crushed or bent,
- removing the protective film - it is recommended to remove it only after installation,
- cutting the material from the wrong side - this should only be done from the front side,
- the use of organic solvents - they lead to stains.
What glue to use to glue plastic panels
- Liquid nails Tytan.
- Liquid nails Quelyd MASTIFIX.
When asked what kind of glue to use to glue plastic panels, the craftsmen answer - specialized ones. They are sold in construction stores and can be purchased easily. The consumption of the composition is small due to the point application method.
One option is to purchase liquid nails. But since some formulations may contain substances that are incompatible with the panels, it is worth trying it first on a small piece and waiting two days. If no blisters or spots appear, then it can be used.
How to glue panels to a bathroom ceiling
Ceiling panels are an inexpensive and practical solution for finishing bathrooms. Thanks to the variety of colors and textures, you can easily choose the right option for any interior. A lot has been written about how to glue them to the ceiling in the bathroom, and the instructions are quite simple. To work you need:
VIDEO ON THE TOPIC
- Installation begins with measuring the ceiling and calculating the amount of material. The ceiling is marked using twine diagonally and the center is marked. Next, the bathtub room is divided into four rectangles.
- It is important to immediately decide where the seams will be. The stores offer panels with dimensions of 50x50 cm and 100x16.5 cm. It is better to buy the material with a reserve, since some slabs may crack during operation.
- The ceiling is cleaned of whitewash, wiped with a damp cloth,
- Cracks are sealed with putty.
- Next, a primer is required for good adhesion.
- After this, you can start applying glue - universal for PVC. If you bought specialized glue, it will be enough to remove dust from the ceiling and immediately begin gluing.
- The glue is applied in a continuous thin layer to the reverse side.
- The first tile is fixed in the center of the ceiling. You need to hold it for a couple of minutes.
- Next, the tiles are attached in parallel rows, and excess glue is immediately removed with a damp sponge.
- The ceiling edge is decorated with corners or baguettes, and where there will be lighting, a round decorative rosette made in the same style is attached.
Advantages and disadvantages
Plastic is a common material because it has many positive aspects:
- Appearance. The panels are created both in one color and for different surfaces, for example, wood.
- The cladding is installed in residential and non-residential premises. Plastic is not afraid of moisture or sudden temperature changes. Does not deform and is not affected by fungus.
- Easy to attach. Fixing does not require professional skills or experience in this work.
- Easy to care for. No expensive cladding care products are needed.
- Price policy. The panels are available for those wishing to cover the surface with plastic.
- Additional sound insulation.
- Plastic does not emit substances harmful to health.
- The cladding hides unevenness of the rough surface, as well as communications and wires.
Disadvantages of plastic panels:
- plastic burns;
- fragile material;
- the material does not “breathe”;
- Small rodents can live behind the cladding.
Despite the disadvantages, cladding material is used on walls and ceilings.
How to properly glue panels with liquid nails
Thanks to decorative panels, you can carry out renovations indoors with your own hands. However, only following certain rules will allow you to get a truly ideal result that will last for a long time. Let's look at how to attach wall panels to liquid nails correctly and what is required for this procedure.
Installation of plastic panels: main nuances and recommendations
Like any other type of finishing work, the installation of PVC panels shown in the photo has certain subtleties:
- Immediately before gluing the material, you will need to thoroughly clean the wall of the previous finish - paint, whitewash or wallpaper.
- If there are significant defects or unevenness on the walls, you will need to get rid of them by leveling and sealing cracks.
- An equally important procedure that will allow the glue to better perform its functions is degreasing the surface. This also applies to the inside of the panel itself, on which liquid nails will be applied.
- You can start gluing plastic panels with liquid nails only after all surfaces have completely dried.
- The glue should be applied pointwise to the surface of the material, with a distance of 30 cm.
- After applying the adhesive, the panel will need to be pressed very firmly against the wall, and then lifted for 1 minute so that it can just stand. After this time, it will be possible to press it again against the wall surface until it is completely fixed.
- Such manipulations will need to be done with all panels, which will allow you to obtain better and durable adhesion.
The installation technology itself is very simple, but the selection of glue to perform such a procedure will require a particularly careful and thorough approach.
Selecting glue for installing PVC panels
The following adhesives are suitable for attaching plastic panels:
- Special hot melt adhesives, which are applied using a special gun.
- It is also very good to glue panels using liquid nails, which are particularly durable and reliable.
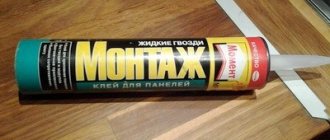
- A good result can be obtained by using the well-known Moment, Titan or Montazh glue.
- Some professional craftsmen very often use in their work, along with liquid nails, polyurethane sealants, which also make it possible to install plastic panels quite easily and quickly.
When choosing liquid nails for PVC panels, you should pay attention to the following parameters:
- After complete hardening, the composition should have a transparent color.
- The result of using liquid nails should be a strong and reliable adhesion that can last a long time.
- The composition must have good resistance to temperature fluctuations, increased moisture levels, severe frosts, as well as to the effects of alkalis and acids.
- A good glue should set quickly enough so that the process of installing plastic panels takes less effort and time.
- The absence of unpleasant odors in the composition is also a fairly significant parameter when choosing liquid nails, since panels attached with its help will emit all these unsafe substances during further use.
To ensure that the installation of panels using liquid nails occurs as efficiently and quickly as possible, you should give preference only to a proven composition. If the glue was chosen incorrectly, the material will very quickly come off the wall and you will have to repeat the installation procedure again.
Preparing the surface for gluing panels
Immediately before gluing the panels onto liquid nails (as in the video), you should very carefully prepare the base surface.
- The wall is cleared of the remnants of the previous finish.
- All surface irregularities and defects are very carefully leveled.
- To prevent microorganisms from multiplying under the panels in the future, the wall must be treated with special compounds that have an antifungal effect.
- Degreasing the wall and the panel itself will allow the glue to better adhere to the surfaces.
- After all these manipulations, the walls should be completely dry.
Once everything is done, you can begin to directly attach the material.
Panel installation technology
PVC panels are installed on liquid nails according to the following principle:
- The adhesive composition is applied in the form of a grid to the wall surface.
- It is best to start gluing work from the corner - to begin with, you will need to install a finishing strip or corner in this place.
- If the installation of PVC panels is supposed to be right up to the ceiling, then a plinth must be attached between it and the wall.
- The part itself is attached to the baseboard in such a way that the grooves meet, after which you need to check how reliable the connection is.
- After gluing the first panel, take the next one, the lock of which should fit into the previous product. Each connection must be checked so that later you do not have to redo the work again.
- For a more complete look, you can use skirting boards, which are glued using liquid nails at the junctions of the wall with the ceiling and floor.
To ensure that panels are fastened with liquid nails efficiently and efficiently, you should carefully monitor each stage of the work. Only following the rules will make the result attractive and durable.
How to glue PVC panels to a wall with liquid nails
PVC panels are very popular today. This can be explained quite simply: a variety of colors and sizes, panels can be made to look like decorative stone, mosaic, wood, etc.; availability by price factor; minimum preparatory work; possibility of self-installation; durability of operational properties and wide scope of application. For PVC panels, high air humidity is not at all important; they behave well in bathrooms and kitchens, because they are made on the basis of polyvinyl chloride, which reacts well to changes in temperature and moisture. Moreover, these can be either ceiling panels or wall panels. Several installation options add a number of positive points in their favor. In the case of budget repairs, this is the best solution, which can not only save money, but also carry out repair work at an accelerated pace. There is a lot of choice of ceiling and wall panels on the construction market, so everyone will choose what they need, based on all their personal criteria.
PVC wall panels
PVC panels, as a rule, have a thickness from 6 to 10 mm, a width from 9.5 to 35 cm, a length from 2.1 to 6 m. But sheet panels are also available for sale in sizes from one square to several. This is also a positive aspect of this material, since the correctly selected panel size can significantly speed up the installation process, as well as reduce the amount of unnecessary waste.
Mounting options for PVC panels
There are main ways to install plastic panels:
- Installation of panels on a specially prepared metal or wooden sheathing using self-tapping screws or nails. This option does not require smooth walls and allows you to hide all the wiring behind the frame; if necessary, the structure can always be dismantled; it takes up a little space, at least 3 cm or more from each wall; when covering small bathrooms and toilet rooms, this is essential disadvantage;
- Fixing the panels to the sheathing using special construction clamps or brackets, as well as to the adhesive mixture;
- Installation of PVC panels with glue or liquid nails. In this case, the panels are fixed to the wall, which must be fairly flat, otherwise, after sheathing with PVC panels, all imperfections will be visible, regardless of the presence or absence of corners. This method gives a good result if you correctly finish the walls with putty and select the appropriate adhesive that will allow you to stick PVC sheets well and efficiently. An ideal option for small toilets and bathrooms, since the area of the room is not reduced. It is recommended to fix large sheet panels (several square meters) using a similar method, so as not to damage the canvas during operation;
- If you are planning an adhesive installation, but you need to hide the pipes, it is better to sheathe the pipes using sheathing, thereby combining both methods.
Selection of adhesive composition
Not many people know how to glue PVC panels, mistakenly believing that the process is quite labor-intensive. In fact, if you develop the right approach and select the right material, you can do all the work yourself.
Gluing PVC panels is possible using glue and liquid nails. The main thing is to use the right adhesive composition correctly, based on the characteristics of the room.
The adhesive for panels must be used specially, designed to work with plastic parts, as well as with the ability to withstand high humidity and temperature changes in the case of using PVC panels in bathrooms.
Among other things, after the panels are glued, there should not be a strong alcoholic or unpleasant odor in the room for a long time; this is a kind of signal about low-quality material. Since the adhesive composition is used indoors, it must meet all environmental standards. The consistency of the material should be sufficiently viscous, not spread after application to the work area, set quickly and last for a sufficiently long period of time. That is why experienced craftsmen prefer not universal adhesives, but special ones, designed for all the characteristics of the room and material.
Only a professional can tell which glue is best to use, but the Moment glue from the Installation series, Titan and Soudal polyurethane glue received a lot of positive feedback; they allow you to glue wall panels in different types of premises. Definitely, which glue is better to use can only be checked experimentally. It is worth emphasizing that the service life of the panels depends not only on the correctly selected adhesive component, but also on compliance with the entire installation technology.
Glue Moment from the Montage series
A type of liquid nails
An alternative to glue for PVC panels are liquid nails. Liquid nails are building materials that can be used on almost any surface; indeed, they are a universal product and are suitable for both interior and exterior work. They perfectly allow you to glue plastic parts together, so you can glue the panels quite easily to the wall. The secret of liquid nails is its special composition, which is based on synthetic rubber. It is this that allows wooden, plastic, metal, glass parts to stick well to each other and more. That is why this material is ideal for sealing and gluing plastic panels for a very long time.
Liquid nails are divided into 2 groups:
- Neopropylene, based on organic solvents. This type of liquid nails provides excellent adhesion to any surface; it can be used to glue panels even to concrete; it can withstand temperature changes and high humidity, but has a specific and rather persistent odor that dissipates only after a couple of days; it is recommended to use it for outdoor work, since extreme temperatures these products are not scary;
- Acrylic liquid nails are water-based, more environmentally friendly and less toxic, the aroma they emit is not as persistent, but they are less resistant to humidity and temperature changes, so they are not recommended for use in bathrooms.
Water-based liquid nails
Advantages of liquid nails:
- A quick-drying composition that allows you to fix the part in any position and at any point of contact;
- They do not have a destructive effect on plastic parts, are not subject to corrosive processes, and have a fairly long service life;
- An excellent adhesive for wall panels, since during gluing it does not require additional mechanical action and the presence of a large number of assistants.
Disadvantages of liquid nails:
- the composition of liquid nails based on organic solvents is very aggressive; when working with them, it is recommended to wear a protective mask;
- Acrylic liquid nails are not moisture resistant.
Despite these disadvantages, liquid nails are an ideal adhesive for PVC panels; they can be used to glue both wooden and plastic panels to the wall, regardless of their shape and size.
How to glue PVC panels to the wall: preparatory work
Not everyone knows how to properly glue PVC panels, because high-quality fixation of panels depends to a large extent on the completion of preparatory work:
- The working surface must be cleaned of paint, wallpaper, old plaster, and the tiles must be dismantled;
- If there are signs of mold on the surface, this is especially true for bathrooms, carry out a complete sanitization of the problem area using special means. The fungus must be completely removed, otherwise after some time it will manifest itself again;
- Carefully seal the cracks, remove all irregularities, depressions and bumps. Ideally, seal everything with putty using beacons so that the wall is as smooth as possible. It would be a good idea to sand the walls with hard sandpaper at the final stage, this is especially true when putting putty “by eye”, without using a building level or beacons;
Wall putty
- After complete drying, the surface is treated with a primer composition for interior work, this process is needed to remove dust from the wall, which, in turn, will ensure more reliable further fixation of the panels, adhesion will increase several times;
- After the primer layer has dried, which is an average of 5-6 hours, you can begin gluing the panels.
Primer of walls
Installation of PVC panels on the wall using liquid nails
To answer the question of how to glue PVC panels to a wall and not only with liquid nails, it is worth preparing the appropriate tools and materials:
- PVC panels, previously unpacked and brought into a warm room at least a couple of hours before starting work;
- liquid Nails;
- construction gun;
- sponge with water (to remove excess glue);
- sealant (for sealing seams).
The further work process is as follows:
- Make markings on the wall with the intended placement of the panels using a building level and a marker (pencil);
- Prepare the panels by cutting them to the required size, taking into account the height of the ceiling. The panel is cut strictly from the front side, this is necessary so that there is no edge or fringe on the front part, but only an even and neat cut;
- If corners and framing profiles were purchased as part of the panels, then we glue them first strictly according to the applied markings. Everything is controlled by the building level;
- Experts recommend degreasing the underside of the panel with a solvent for better adhesion;
- There are several options for gluing panels by applying liquid nails to the underside of the panel or to the working surface of the wall. In both cases, the adhesive composition is applied pointwise or in a zigzag pattern at a distance of no more than 30 cm. The distance between the adhesive points depends on the weight of the panel: the heavier it is, the more often it is necessary to apply glue to securely fix the glued fragments;
Zigzag application of liquid nails on a PVC panel Spot application of liquid nails on a PVC panel
The panel, if there is a profile and corners, is inserted into a previously prepared place. If these components are not available, it is recommended to start at the corners. Pressing the panel tightly against the wall, you can gently roll it with a rubber roller. If the panel is incorrectly positioned during the first 1-3 minutes (depending on the type of glue), you can correct its location using a building level. After 15-20 minutes, you cannot move the panel, since by this time the glue has already set quite well. Complete drying occurs after 12-24 hours. On average, one tube of glue is enough for 5-6 sq.m. panels.
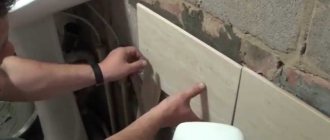
Gluing PVC panels to the wall using liquid nails
- At the final stage, transparent silicone is used. After gluing the last panel, all seams between them are treated with silicone; it is also recommended not to forget to process the seam where the ceiling area comes into contact with the panels. This helps to visually hide and smooth out the gap, as well as achieve additional tightness of the panels;
- Using a sponge and water, clean all dirt from the front of the panels. If you apply an excessive amount of liquid nails after gluing the panel to the wall surface, the adhesive composition may leak between the joints, so it is recommended to remove the excess glue immediately, otherwise after it dries it will not be possible to do this thoroughly.
Inexperienced craftsmen often wonder whether it is possible to glue plastic panels to the sheathing? It's definitely possible. After erecting the structure, PVC panels must be glued according to exactly the same principle as on the surface of the wall. With the difference that liquid nails will be applied only to the area of the profile to which the panels will be glued in a point sequence with a minimum distance between the glue points or one solid line.
How to stick plastic panels on a wall is not so difficult; in small rooms, one person is enough for this work. The principle of operation is the same with absolutely all panels, regardless of whether it is a PVC mosaic panel or with a wood pattern, rectangular or square. The main thing is not to rush anywhere, accurately measure the required size of the panels in order to avoid gluing additional small parts, carefully select the appropriate adhesive composition and complete the entire required sequence of preparatory work.
Video
Selection of glue
Plastic is a lightweight material, so there is a misconception that it will hold up to any composition. But for fixing PVC, especially in the bathroom, a product with increased strength and a number of special characteristics is required.
What kind of glue should be used for PVC panels:
- Firstly, it is moisture resistant. Regular glue will not withstand constant humidity. Only moisture-resistant glue will ensure long-term and reliable fixation of panels in the bathroom and similar rooms.
- The composition must withstand a wide range of temperatures and their frequent fluctuations.
- A high degree of adhesion is necessary for a strong bond.
- It would be good if the components included antibacterial additives. Due to increased humidity, a favorable environment for the growth of bacteria is formed. Good glue will prevent the spread of mold and mildew.
- UV resistance also plays a role.
- The glue should be easy to apply. It’s good when there is a special tip on the package.
- The transparency of the composition speaks in its favor.
- The faster it sets, the better. Ideally, after 10 minutes after attaching, the panel will be clearly fixed on the wall.
- The composition should not contain toxic substances; a good indicator is the absence of a pungent odor.