Published: 02/23/2016
In the previous topic, we talked about the fact that 3D wallpaper for walls has not only advantages, but also disadvantages.
Continuing this topic, we will look at the features of gluing realistic 3D wallpaper.
Our comments and useful tips will help you glue the canvases without outside help.
Neglecting the basic principles of gluing can negate the entire positive effect of a three-dimensional pattern.
For this reason, we advise you to carefully study all the information below, as its importance cannot be overestimated.
Preparation of canvases
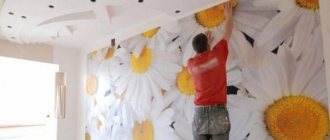
Before gluing 3D wallpaper on the walls, you should lay it out somewhere on a clean area of the floor in the form in which it should be glued.
This approach will work with small pieces or rolls.
If we talk about large-scale panoramas, you will inevitably need additional help in combining the canvases and controlling the entire drawing.
Ask your loved ones or friends for help, since mixing large panoramas is not an easy and risky task.
Varieties
In 3D wallpaper catalogs you can find a variety of types and names. The following are the main ones:
- Stereoscopic. Their volumetric effect is special because it creates for the observer a stereo effect of convexities and relief of the image.
- Component. They are a combination of all kinds of inserts and intricate figures.
- Terraces and windows. Due to the wide perspective, they make it possible to visually expand the space of the room.
- Panel. High-quality large-format paintings, usually depicting landscapes.
Choosing photo wallpaper with a 3D effect is a responsible and difficult process. Such wall decoration should not only cope with all functions, but also be appropriate in a particular type of room.
Connecting joints
Increased attention should be paid to butt and seam joints.
If there are visible gaps in the elements of three-dimensional 3D wallpaper, all realism will be disrupted.
When gluing the next fragment, we strongly recommend that you return to the previous seams each time and make sure that they are even.
The presence of cracks will ruin the effect of all your work.
Help from professionals
If you doubt your abilities, it is better to hire specialists who will perfectly install your new realistic 3D wallpaper.
If you have never glued wallpaper before this moment, it is better to pay money to other people than to ruin the glue, the canvases themselves, and your own nerves.
There is a lot of money at stake, and there is no point in taking risks.
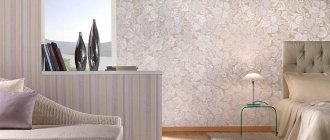
Wallpaper with marble pattern from BEIBEHANG
Seller's reliability: excellent!
Delivery within Russia: free!
It came quickly - less than a month. Packed perfectly, in a tube, nothing wrinkled. The seller promised to adjust the color and brightness of the wallpaper according to my wishes. However, gluing is not convenient. They are glued with an overlap, the pattern matches perfectly, but cutting the wallpaper is very difficult and inconvenient. The wall must be perfectly flat! Glued with regular glue for non-woven wallpaper.
The pattern is even more beautiful than in the picture. The wallpaper material is pleasant to the touch. Dimensions according to order.
Photo wallpapers are high quality and beautiful.
Experiment
If you're already eyeing realistic wallpaper, be prepared to experiment.
Try to imagine in advance what kind of designs you would like to see in your home, what color tones you would like to use.
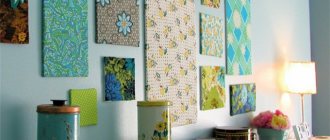
Don’t be afraid to combine three-dimensional designs with other types of wallpaper that can complement the 3D effect.
How to properly glue 3D wallpaper on the walls in an apartment: technique, rules and sequence of work
Along with the growth in demand in the decorative materials market, supply is also growing. Ordinary photo wallpapers are no longer in fashion, but are being replaced by 3D photo wallpapers with a volumetric effect.
- 3D photo wallpaper for every home
- What is wallpaper for 3D walls
- Varieties
- Application area
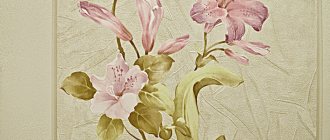
- Convex 3D paintings, flowers, roses
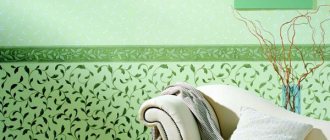
- Beautiful three-dimensional drawings in an apartment with nature
- 3D patterns
- How to glue 3D wallpaper with a raised pattern on a wall
- How to care
- How long does it last?
- Useful video
Rely on the mood
This means that you should consider the feelings and emotions that the 3D drawing evokes.
For this reason, you should choose new 3D wallpaper for walls.
Never take canvases that cause you even the slightest hostility or rejection.
Over many years of use, unpleasant wallpaper will drive you crazy.
Take these nuances into account and make the right choice, relying on your feelings and experiences!
3D wallpaper is a new word in interior design. With their help, you can create a cozy atmosphere indoors, temporarily transport yourself to warm countries, walk along the streets of Milan or Paris, or find yourself in a sunny forest clearing. You can use this wallpaper to cover part of a wall or the entire room - including the ceiling - everything will depend on your wishes and capabilities.
3D wallpaper allows you to create an original and inimitable interior.
For the bedroom
When choosing 3D wallpaper for the bedroom, first of all you need to remember what the room is intended for . Precisely for relaxation and healthy sound sleep. Therefore, no matter how beautiful the paintings with predatory animals, bright colors and other images that excite the psyche are, they are definitely not suitable for the bedroom. It is better to give preference to calm paintings in light colors. Paintings with geometric patterns and abstraction are possible if there are smooth lines in the pattern. Sharp and angular images will also not work.
Selecting an image taking into account the characteristics of the furniture.
When choosing a 3D pattern for the bedroom walls, you should take into account the location of the furniture; if the room is very busy, the pattern will be superfluous. It is important that the 3D image matches the regular wallpaper that will be pasted on other walls.
Light bed colors of the pattern will go well with any color of furniture.
Clear, concrete paintings are more suitable for a classic style, while abstract images will complement a modern design.
To summarize, we can note:
- 3D wallpaper is a new word in modern design.
- Thanks to a three-dimensional image, you can not only visually increase the space in the room, but also create the effect of presence and transfer the entire atmosphere of the image into the room.
- The choice of 3D wallpaper must be approached with special care, taking into account all the nuances and features of both the picture and the room.
- Every year new finishing materials with incredible effects and capabilities appear. Therefore, perhaps such popular and still unusual three-dimensional paintings on the walls will become history tomorrow.
Preparatory work
You will need:
- building level; beacon (rope with weight); putty; even spatula; sandpaper; antifungal primer; flute (wide brush); tape measure.
Using a beacon for smooth gluing of 3D wallpaper.
Before gluing wallpaper, you need to prepare the walls. All old finishes must be removed, this applies to both paint and wallpaper.
Then you need to remove all the nails and dowels from the wall and check the surface for deep scratches and dents. If you find such defects, then eliminate them with putty, then sand them with sandpaper. Also check the plaster for flowability; if it begins to crumble after a small impact, then it is better to re-plaster the walls.
You only need to glue 3D wallpaper onto a perfectly flat surface. For this reason, it is necessary to check the walls using a building level and a beacon. If you do not have such devices, then you can proceed as follows: in order to make a beacon, take a regular rope and tie a weight to it, and use a long ruler instead of a level.
Using a beacon, draw vertical lines on the wall (along which the wallpaper will be glued), measure with a ruler the distance from the wall to the rope (along its entire length), as well as between the horizontal markings (it should be the same). If you find the slightest deviation of 2-3 mm, then the wall will have to be leveled, otherwise you won’t be able to paste the wallpaper end-to-end, which is unacceptable in this case. The slightest error will simply ruin the whole impression, and no 3D effect will be achieved.
After the wall is leveled and marked, begin priming. Do not underestimate this point, firstly, the soil will not allow the wall to “eat” part of the glue, which will allow the wallpaper to stick well.
Secondly, 3D wallpaper is a fairly dense material that does not allow water to pass through. As a result, mold can form underneath them, so treating the walls with an antifungal primer is simply necessary. The solution is applied 1-2 times using a brush (wide brush), the work is left until the surface dries completely.
Where can it be used?
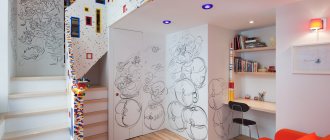
You can immediately note the fact that photo wallpapers using 3D format technology can be used not only at home, decorating the walls or ceilings in the living room, bedroom or children's room. It is better to choose the theme of the image in accordance with the interior of the room. For example, if this is your bedroom, then something calm, sea, sunset, nature will suit here.
Where to use photo wallpaper
Fruits, pastries or coffee fit well in the kitchen. The children's room will look like fairy-tale characters, as well as funny animals. In the bathroom there are waterfalls, fish, dolphins. Thus, 3D photo wallpaper is a universal wall covering that can be used almost anywhere. Moreover, nowadays photo wallpapers are used not only indoors, but also outdoors. The photo shows an unusual design of the garage door.
Pasting 3D wallpaper
Scheme for applying glue to wallpaper.
You will need:
- glue for heavy wallpaper; container for diluting glue; special brush; rubber roller.
There is no way to glue wallpaper alone, since the canvas is quite wide, and the work requires special attention. Work should be carried out at a temperature of +20-25º C (in extreme heat or cold, there is a high probability of the canvas coming off).
It is important to avoid drafts, so you need to work with doors and windows closed. This rule should be observed for several days after gluing. If the room is very hot, then you need to increase the air humidity, just put a few buckets of water.
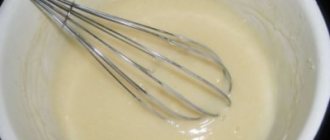
The first step is to dilute the glue according to the included instructions.
There are some nuances here: the container for dilution must be perfectly clean, first pour in water, then make a funnel using a wooden handle, then add glue, continuing to stir. The water should not be warm or hot, otherwise the glue will form lumps. After this, you need to unfold the wallpaper on the floor in order to see the picture as a whole and not confuse the sequence of gluing the canvases.
When gluing this type of wallpaper, the glue is applied to the wall, and not to the canvas.
Scheme for smoothing wallpaper with a rubber spatula.
This is done using a special brush.
It is necessary to glue wallpaper from the corner of the room, strictly adhering to the markings that were made using a beacon. The canvas is applied to the wall, then they begin to glue it, moving from top to bottom. Using a rubber roller, remove air bubbles; this should be done from the center to the edges.
Make sure that the first strip is glued strictly according to the markings, then all other strips will be easy to join. It is necessary to glue 3D wallpaper only end-to-end, there should be no overlaps, and it is important to be careful not to break the line of the design when joining.
If after gluing you still find that air bubbles have formed on the surface, then carefully pierce them with a thin needle. In the case when it is necessary to cover adjacent walls with 3D wallpaper, special attention should be paid to the corners. To do the job as neatly as possible, take a smooth spatula and wrap it with cloth several times.
Using such a device, you can easily glue wallpaper in the corners. Pasting 3D wallpaper with your own hands is quite a complicated matter, requiring careful preparation of the walls and maximum attention. The expert advice outlined above will help you cope with this difficult task on your own.
- Date: 03/02/2015 Rating: 45
Currently, 3D wallpaper is becoming an increasingly popular decoration for the interior of a room. Of course, such pleasure costs much more than ordinary wallpapering, but you have to pay for beauty.
3D wallpaper looks very elegant as a decoration for various rooms. Gluing them is quite difficult. Many people turn to special organizations for help, but you can do this yourself.
Wallpaper gluing sequence diagram.
Those who decide to glue 3D wallpaper themselves should understand in more detail how to glue 3D wallpaper.
In fact, many people have no idea how to perform this process. There is nothing supernatural about this. They are glued in the same way as regular vinyl ones, but the pattern shown in the panorama is very carefully adjusted.
Which plot to choose for each room
Modern manufacturers offer a wide selection of not only color palettes, but also photo wallpaper storylines. The choice depends on personal preferences and the interior features of the room:
- Images of living nature are ideal for a bedroom or a stylish living room; they will harmoniously fit into the interior of the hallway and complement the design of a sophisticated dining room. These can be mountain peaks that soar upward, emerald green tropics, sea expanses with a horizon.
- Urban landscapes will be an excellent solution for a living room in an ultra-modern style. These can be images of night streets, historical and cultural monuments, city bridges and embankments.
- Paths going into the distance, sunsets and sunrises, bridges and streets - all these themes are perfect for a corridor and will look harmonious on the wall, distorting the dimensions of the room and giving the image the necessary depth.
- A special effect can be created by arches that expand the space and are used to decorate corridors and hallways. Such wallpaper will also look great on the kitchen wall; they change the boundaries of the room and adjust its layout.
The main feature of photo wallpapers that expand the space, regardless of the theme of the image, is the presence of perspective, namely a clearly defined horizon line.
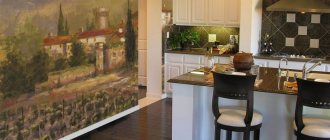
Ideal photo wallpaper for the kitchen
When choosing photo wallpaper for the kitchen, you need to take into account its size. If the kitchen is spacious enough, then the ideal place for wallpapering would be an empty wall that is not covered by furniture. The most advantageous design for a small kitchen would be the “view from the terrace” pattern, which will allow you to effectively expand the space and get a gorgeous view from your balcony or veranda for little money.
Photo wallpaper "Terrace, grass and sky"
Photo wallpaper “View of the city from the terrace”
Photo wallpaper “View from the deck”
A realistic view from the window, which today is often used by talented designers to enlarge a room, will add originality and elegance to any kitchen. By the way, innovative technologies make it possible to use self-adhesive photo wallpaper to decorate the kitchen work area. They have high performance characteristics, look great and do not require special care.
Surface and Image Preparation
It is very important to prepare the surface on which the 3D wallpaper will be glued. There should be no rough spots or dents on the wall, otherwise the drawing will not turn out clear.
Scheme for removing old wallpaper.
It is worth making sure that the old coating is completely removed. There should also be no nails or screws on the wall. They must be removed in any possible way. The wall should be treated with an antifungal primer.
Wallpaper perfectly allows moisture to pass through, which can lead to the very rapid appearance of fungus on the wall. You won’t be able to glue 3D wallpaper alone. You will have to enlist the support of at least three people. In order not to mix up all the parts of the products, they need to be laid out on the floor in such a way that a complete picture is obtained.
In this matter, the most important thing is to start correctly, and then the work will go like clockwork. It is worth remembering that the temperature in the room should not be lower than 25 ° C. Markings must be made on the wall to the nearest millimeter. Next you need to prepare the glue.
Return to contents
How to glue 3D wallpaper without glue? Of course not.
In the case of 3D systems, you need to select glue for rigid elements.
Scheme for manual spreading and gluing of wallpaper.
This type of glue sets quite quickly.
At the same time, it is characterized by the highest strength. The most important thing is to correct mistakes as quickly as possible so as not to spoil the drawing. It must be remembered that there will be no second attempt with this type of gluing.
The glue must turn out to be real, and for this it is necessary to take into account several nuances. For example, the container in which it will be mixed must be absolutely clean. As for the amount of water, it is indicated on the packaging.
You should not ignore such instructions. When diluting, you need to quickly mix the water with a wooden slats until a funnel is formed, into which you need to pour the composition in a thin stream. In this case, the water must be cold. Only in this case can the formation of lumps be avoided. After all the contents of the box have turned into liquid, you need to stir the solution for another five minutes.
The main thing is to choose the right consistency. Usually the mixing time is indicated on the packaging, but you should not take it literally. You can mix until you get the desired mass.
There is no need to make the glue too thick. It will simply be inconvenient to apply to the wallpaper.
Return to contents
Now it’s worth talking directly about how to glue 3D wallpaper.
Before work, it is necessary to close all windows and doors so that there are no drafts in the room. Otherwise, there is a high probability of elements peeling off the wall. You should not open windows and doors for 24 hours after the wallpaper has been hung.
If you do not follow this rule, you may find that all the products have come off or air bubbles have formed everywhere. This type of wallpaper does not need to be covered with glue in order to stick to the wall. The glue is applied directly to the surface. You shouldn’t forget about this nuance. You shouldn’t immediately press the strip of wallpaper against the wall.
It's better to glue the top part first. In this case, you need to start gluing from the corner of the room. In any case, it will not be possible to completely eliminate the formation of air bubbles.
However, their number must be kept to a minimum. To eliminate them, you need to use a special rubber roller, which you need to run from the center of the strip to the edges. Bubbles will be forced out from under the wallpaper. Most of these products are made to order, so there should be no problems with fitting patterns and pictures.
This is exactly how three-dimensional wallpaper is hung. If you are using a picture that is located on several walls, you should take care of how the elements in the corners will be glued. For these purposes, it is worth preparing a spatula in advance, on which a soft cloth is wrapped. When approaching the corners with a spatula, you need to firmly press the strip against the corner of the wall.
There shouldn't be any problems with this.
The most important thing to remember is that 3D wallpaper is a rather fragile thing. That is why you need to do everything extremely carefully. Otherwise, there is a very high probability of damage to the drawing, which means additional problems and costs money and time.
Thus, we can assume that the wallpapering work is completed. There's nothing complicated about it. Almost every person who has ever glued ordinary products can cope with the task.
By following the above instructions, you can be sure that the work will be completed with the highest quality and in the shortest possible time. Everything will take a few hours of free time. If the wallpaper is applied to one wall, the work becomes much easier, because you don’t have to adjust it in the corners, and this is the most labor-intensive process.
Currently, 3D wallpapers have gained immense popularity; they are increasingly used to create a modern interior design.
3D wallpaper will make the interior of the room extremely interesting and original.
3D wallpaper is a wonderful finishing material with excellent qualities and properties, with which you can come up with an unusual and original interior design for absolutely any room.
However, gluing 3D wallpaper is quite difficult. You can, of course, turn to specialists for help, but such services are much more expensive than gluing ordinary wallpaper. You can glue them yourself, but to do this, you first need to learn how to glue wallpaper with 3D technology, what important points should be taken into account so as not to spoil them, but to enjoy the excellent result in the end.
Surface preparation
Wallpaper gluing sequence diagram.
In fact, 3D wallpaper is glued in exactly the same way as regular wallpaper; there is nothing supernatural in this process. You just need to very accurately adjust the pattern depicted on the canvases and carefully prepare the surface where such wallpaper will be glued.
Surface preparation is a very important step in the entire process. The wall must be smooth, without any roughness, unevenness or dents, otherwise the image will not be clear.
The old coating should be completely removed, and any nails or screws on the wall should be removed. You will need to plaster the surface, level it and putty. In addition, the surface must be coated with an antifungal primer, since such wallpaper allows moisture to pass through very well and this can lead to fungus on the wall.
Gluing 3D wallpaper alone is quite problematic; you will need the help of at least two people. After the surface has been prepared, you need to prepare the wallpaper by laying out all the parts on the floor in a certain sequence so as not to mix them up. After this, you need to make the necessary markings on the wall and prepare glue.
Preparing glue and tools
Scheme for removing old wallpaper.
In order to hang 3D wallpaper, you will need glue designed for hard elements. This glue has high strength and sets very quickly. Therefore, errors must be corrected immediately, otherwise the drawing may be damaged.
To get good quality glue, you need to consider some points when preparing it:
- To dilute the glue, you should use only a clean container. You must strictly follow the instructions for preparing the glue and add strictly the amount of water specified in the instructions from the manufacturer. The water for preparing the glue should only be cold, it should be mixed very quickly to form a funnel, in which will need to be slowly filled with the composition. Then the resulting solution should be mixed for another 5 minutes. Only by fulfilling these conditions will the glue be obtained without lumps.
To work you will need the following tools:
- tape measure; stepladder (you can use a chair or table); rags; brush; rubber roller.
After preparing the glue and the necessary tools, you can start gluing the wallpaper.
The process of gluing 3D wallpaper: important points and recommendations
Scheme for manual spreading and gluing of wallpaper.
You need to know that 3D wallpaper is a rather fragile finishing material, so you should work as carefully as possible, following all the recommendations. Otherwise, you can easily damage the drawing, which means additional costs and wasted time.
In addition, the following important points should be observed:
Before work, it is better to remove furniture and things from the room that may interfere. Before starting work, you must close all doors and windows so that there are no drafts, otherwise the wallpaper may come off the wall. The air temperature in the room should be between 23-25 degrees.
Windows and doors should be kept closed for 24 hours after wallpapering to avoid the appearance of air bubbles. Apply glue only to the surface, not to the wallpaper. First, it is better to glue the upper part of the pattern, starting from the corner of the room. It is best to remove the resulting air bubbles with a rubber roller, running it from the center of the wallpaper to the edges. Basically, 3D wallpaper is made to order, so there should be no problems with fitting pictures and patterns. If you need to paste a picture that is located on several walls, then you need to think in advance about how parts of the picture will be pasted in the corners.
In this case, you will need a spatula. You should wrap a soft cloth around it and press the wallpaper against the corners of the wall. It is not recommended to glue 3D wallpaper in new buildings built less than a year ago. Even though such wallpaper is quite resistant to various mechanical stress, it can come off due to shrinkage of the building or tear.
Taking into account the above points, you can complete the work as efficiently and quickly as possible.
This will only take a few hours. The most difficult thing in this process is adjusting the wallpaper in the corners when the wallpaper is glued to several walls. Pasting wallpaper on one wall will not cause any difficulties if you follow the above recommendations.