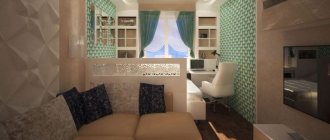
Most often, a bar counter acts in the interior of a room as a stylish space zoner.
Ergonomics in the design of residential premises is now in the foreground. Owners of small Khrushchev apartments combine rooms to visually and functionally increase the usable space. Thus, from two cramped rooms they get one - combined. Most often, redevelopment is done in the living room and kitchen to ultimately obtain a studio kitchen. This method is advantageous in many ways: we get a spacious and multifunctional room with many advantages. However, in order to visually divide a room into several functional zones, it is necessary to draw up a rational design project that involves zoning. To visually delimit zones, different designs are used: decorative partitions, shelving and bar counters. It is about bar counters and their functionality that will be discussed further.
Drywall bar counters in the interior
If you need to visually delimit the kitchen in a studio apartment or make two functional rooms decorated in the same style from a spacious living room, bar counters are used. They can be part of a furniture set or, on the contrary, be a bright accent in the interior.
A bar counter made of plasterboard will be an ideal solution for those who do not like typical designs and can do something with their own hands.
Today, plasterboard designs in the interior have become very popular. Thanks to its versatility, availability and ease of processing, plasterboard has become one of the main materials for interior design. Among the numerous options for plasterboard structures, bar counters occupy far from the last place.
By design, the bar counter can be:
- Island or straight is the simplest rectangular structure, which is installed in the middle of a spacious room, thereby visually dividing it into two functional zones.
- An L-shaped bar counter is more complex in design, but can fit perfectly into the interior of a small kitchen or a small kitchen-living-dining room.
There are even more complex designs of different geometric shapes and sizes, the choice is considerable. How to build such an interior element at home? Where to start and what will it take? Let's touch on the issue in more detail.
Types of structures
Before you start choosing materials, you should think in advance about what kind of design you want to see in your kitchen. The bar counter consists of two elements - the base and the tabletop, the size and shape of which can vary depending on the financial capabilities of the owner and the size of the room itself.
Based on this, the following types of structures are distinguished:
- Monoblock: The shape of the base resembles a square or rectangle, while the tabletop itself can be of any shape and size. Individual cabinets can be built into the base.
- Pipe stand: Very popular in small spaces. On one side, a metal pole runs through the stand from the ceiling to the floor, acting as a support, while on the other side two legs are attached to it.
- Multi-tiered: The tabletop is divided into several levels. This division is very convenient, because depending on how this or that idea is implemented, the levels of such a rack can serve both for storing food and dishes, and as a table for preparing food and the counter itself;
- Support point: This design is a tabletop, which on one side rests against a table or wall, and on the other side one leg is attached to it.
Unique DIY plasterboard bar counter: where to start
First you need to decide on the installation location, as well as the size and design of the product itself. The stand can be blank or have shelves, can include lighting and rails, and have a variety of shapes and design solutions. It is also necessary to draw up a detailed drawing with dimensions, which includes not only the structure itself, but also the locations of contact connections (if any), as well as the necessary communications that will need to be hidden. According to the drawing, the required amount of materials is calculated.
Namely:
- Drywall;
- Metallic profile;
- Everything for the wiring device (if lighting is planned);
- Self-tapping screws and dowels;
- Putty and primer;
- Ready-made countertop or material for its manufacture;
- Finishing material.
You can decorate the bar counter in any style you like: there are many finishing options for this. Wallpaper, paint, decorative plaster or piece material – the choice is huge. In addition to the materials, you need to prepare the tool - more on that later.
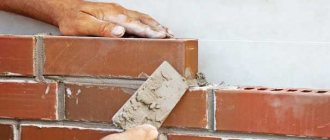
We cover the rack
Drywall is marked and cut into individual elements according to the dimensions indicated in the sketch. Each sheet is screwed to a sheathing made of slats. Drywall is attached in increments of about twenty centimeters. Having secured the sheets along the contour, check whether the hardware caps are well recessed into the sheets.
After covering the structure of the bar counter with sheets of plasterboard, the connections between them are glued with sickle tape. Additionally, to give them rigidity, the corners are fastened with plastic pads.
The pits formed during fastening are treated with putty and, after complete drying, sanded with sandpaper. The structure is coated with a primer and finishing work begins.
Tool preparation
When constructing plasterboard structures, as a rule, one set of tools is always used. It includes everything needed from cutting the profile to finishing the finished structure.
Namely:
- Pencil, tape measure;
- Metal scissors;
- Drywall knife (for shaped cutting - jigsaw);
- Impact drill or hammer drill;
- Screwdriver;
- Construction level, plumb line;
- Milling cutter;
- Wide and narrow spatulas.
Depending on the variation of the design itself and the chosen finishing material, the spectrum may change. It’s better to prepare everything you need in advance so that in the midst of work you don’t have to look for an item you suddenly need.
Choosing a style
The stylistic side of the issue should become the basis when choosing a model, and before you start making a bar counter, you need to decide on its appearance. Before adding a counter to your kitchen set, you need to make sure that the design, the general style of the apartment or country mansion is preserved, and also take care of the practicality of this part of the cabinet furniture.
A DIY bar table can be of several types: classic, multi-level, combined.
The classic stand is fixed at a height of 1 m above the floor level, and the tabletop is installed on the legs. Add elegance with carved wooden chairs or other accessories.
A two-level shelf is a solution that is suitable for a small kitchen. On one perimeter there is a combined dining table with a counter (directly above it). A modern bar counter can be combined. This type of product helps to combine the work area with the dining area, and when installing, you need to pay attention to the correspondence of the height of the countertops and the table.
The convenience of mobile bar counters is that, if necessary, the board folds or slides in, freeing up space. The shelf can be a removable structure; this option can be created with your own hands. The board can be attached to different pieces of kitchen furniture or detached to increase space.
The next option is not recommended for use in a home with a small kitchen; the kitchen should be spacious to create a central countertop. This option is convenient for the housewife because it allows you to place a counter (dining area) next to the sink and hob.
Whatever type is chosen, it is important to consider that the bar counter cannot replace a full-fledged dining area in the kitchen and is only an addition.
How to make a bar counter from plasterboard: a simple algorithm
Do-it-yourself installation of a plasterboard bar counter includes several stages of work, which begin with preparing the surface. The place must be cleared of unnecessary items and cleaned.
Further actions:
- Marking. On the floor, on the wall and on the ceiling, according to the drawing, markings are made of the mounting points of the rack profile and guides. It is also necessary to mark on the wall the height of the future structure and the place where the countertop will be located.
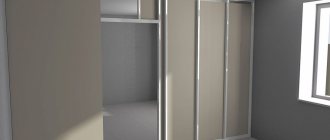
- Frame structure. According to the markings, a rack profile is attached to the floor, rigidly fixed to the floor and ceiling with dowels. Next, the frame is installed according to the drawing. At the stage of assembling the frame, it is important to take into account the possible installation of electrical wiring and take care of this in advance.
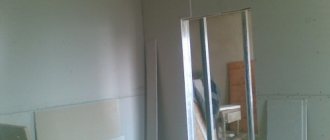
- Installation of drywall. In accordance with the drawing, markings of the sheathed elements and cutting of material are made on the sheets. Next, each element of the future structure is attached to the sheathing using self-tapping screws. Please note that their caps should be recessed into the cardboard layer no more than 1 - 2 mm.
- Installation of lighting fixtures. If the installation of electrical wiring is planned, it is at this stage that the installation of socket boxes, sockets, switches and lamps is carried out, as well as checking the functionality of all contact connections.
- Rough and decorative finishing. After sealing the joints, a layer of starting or universal putty is applied to the structure; after it has dried, you can begin to decorate the structure and install additional elements (lamps, countertops, crossbars, etc.).
The tabletop can be made to order according to the shape of the structure, it can be tiled, or you can make it yourself from solid wood or MDF. When decorating the bar counter and choosing materials for it, it is important to remember that the design should be harmoniously combined with the overall interior and complement it, and not be an absurd “spot” in the entire design.
Tools and auxiliary materials
Working with drywall will require preparation and availability of the following tools:
- stationery knife;
- drills;
- screwdriver;
- metal scissors. They are necessary for cutting and subsequent assembly of metal profiles;
- reinforced tape for subsequent finishing work;
- putties;
- spatula;
- sandpaper;
- pencil;
- rulers;
- level.
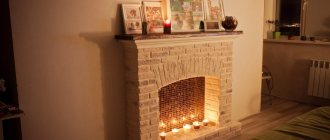
DIY corner fireplace made of plasterboard
DIY plasterboard bar counter design (interior photo)
Dimensions and dimensions
There are no strict restrictions or technical requirements for these indicators. The only condition is correct weight distribution. The load on the supports must be uniform. To determine the weight on each leg, take into account the length and width of the tabletop. Special attention should be paid to the size of the board before making a bar counter in the kitchen with your own hands.
The presence of a supporting pipe (and its dimensions), design, number of supports, and dimensions of the legs are selected individually in each case. The width of the counter is compared with the overall size of the kitchen unit if you have to make the bar counter yourself.
The height of the legs should not be more than 112 cm. The width of the board depends on the purpose of the stand. If the countertop will serve as a kitchen table, then the optimal size will be 60 cm. This figure can fluctuate between 30 and 70 cm.
Retractable
There are several options for a transforming shelf. The sash can be attached to a vertical surface on hinges, and have a folding support at the other edge. The next option is a sliding counter for the kitchen; you can equip the “rails” with your own hands. The legs are equipped with wheels, so the length of the board can be adjusted mechanically.
Retractable structures are equipped with clamps so that the homemade bar counter is stable. When creating this piece of furniture, it is important to choose high-quality fittings and pay attention to the floor covering. The tiles should not have large seams so that the wheel can slide smoothly across the surface. A linoleum joint or large carpet pile may become an obstacle.