I'm glad you stopped by my blog, dear readers! Today I want to tell you how I made partitions from plasterboard. It was necessary to divide the large room into two: the children grew up and wanted to have their own personal space. I took drywall from Knauf and added Shumanet BM soundproofing so that the guys wouldn’t disturb each other. I chose a profile of 75 mm with a sound insulation thickness of 50 mm: according to the technology, there must also be an air layer in the partition. Even my picky boys were pleased with the result. Let me tell you how to do everything correctly.
What is the Code of Standards and Rules, what provisions does it include?
According to the decision of the Construction Committees, as well as the Directorates for Standardization, Technical Regulation and Certification, Article SP 55.101.2000 was adopted in 2000. Its points must be taken into account and carried out during the installation of partitions.
Factors taken into account when drawing up the requirements:
- The type of building for which the partition is to be constructed - residential, public, administrative or industrial building;
- Statistics of seismic data in the area where these structures are located;
- Type, brand of building materials used during installation, compliance with the specifics of the work being carried out;
- General climatic and microclimatic household indicators.
These norms and rules, abbreviated as SNiP, formed the basis for the formation of installation technology.
Requirements for drywall
The marking of plasterboard sheets accepted by SNiP standards is as follows:
- GKL - for construction in rooms with normal humidity (less than 70%) and temperatures from 5 to 30 degrees C. Available in gray color without special impregnations that resist moisture or heat. Recommended for designing structures in hallways, living rooms, bedrooms and other rooms;
- GKLV is a hygroscopic material with high resistance to moisture, painted light green. Used in damp areas (more than 70%). Thanks to impregnation with antiseptic substances and concentrates, it does not lose its linear dimensions and is not exposed to dampness. Designed as a finishing material in bathrooms;
- GKLO - has increased fire-resistant properties due to the presence of fibers and compositions that prevent combustion. Available in yellow sheets, suitable for covering a partition installed in the kitchen;
- GKLVO - plasterboard with improved fire and moisture resistance (up to 90%) in a soft pink color.
The thickness of the sheets should be 12.5 mm - optimal indicators for ensuring the strength of the structure and its sound insulation. Thickness of 6.5 and 9 mm is insufficient.
What formats of gypsum boards can be used
SP for 2000 allows the use of plasterboard formats with edges:
- UK - for sealing joints with putty;
- PC - suitable for the inner layer of multi-layer frame cladding without sealing seams;
- ZK - for sealing joints with plaster;
- PLC and PLUK - when sealing seams without reinforcing tape.
Examples of calculations
As an example, let’s do some calculations of a partition with our own hands for various requirements for it.
Space saving
If the main priority is saving the usable space of the room, the minimum wall thickness will be equal to the sum:
- Transverse size of the rack profile (5 centimeters);
- The total thickness of two gypsum board sheets (9.5 or 12.5 mm).
Total - 50+9.5+9.5=69 or 50+12.5+12.5=75 mm.
It couldn’t be thinner: a frame made of 50 mm profile and single-layer cladding.
The thickness of plasterboard for partitions of 9.5 millimeters is permissible only if it does not experience mechanical loads in principle. A sheet of ceiling gypsum plasterboard is easily and naturally broken by an accidental blow from the elbow or knee.
Thin but durable
If you want to combine space savings with maximum wall strength, its optimal design is a reinforced frame made of a thin (50 mm) profile and double cladding (single-sided or double-sided).
How can you strengthen the frame?
- Wooden mortgages made of 50x50 blocks, inserted into racks;
- Pairwise connection of rack profiles with a standard step between them of 60 cm;
- Reducing the pitch between the posts to 40 cm.
The final thickness with double-sided two-layer sheathing will be 50+12.5x4=100 mm.
The photo shows a wall with a reinforced 50 mm frame and two-layer cladding.
Noise insulation, hidden laying of communications
If you plan to install a water supply system, a 50- or 90-mm sewer inside the frame, or if the wall must provide maximum sound insulation, it is wise to opt for a frame of maximum thickness - from a 100-mm profile.
In the absence of special requirements for strength, the wall cladding is made in a single layer. The final thickness is 100+12.5x2=125 mm.
Frame made of profile 10 cm wide.
Extreme sound insulation
To absorb maximum noise, it is necessary not only to fill the frame cavities with sound-absorbing material, but also to acoustically decouple the sheathing on both sides of the partition. How to do it?
- Build two parallel frames from a 50 mm profile with a minimum (5-10 mm) gap between them;
For better sound insulation, a damper tape is laid under the guides. It eliminates the transmission of acoustic vibrations from the profile to walls and ceilings.
- Fill the frame with slabs of glued mineral wool. Its standard size (600x100 mm) allows you to do without additional fastening: the plates are installed spaced between the posts;
The best sound insulation is glued mineral wool.
- Cover the resulting structure with plasterboard on both sides. It is better to resort to two-layer sheathing. The price of several additional sheets of gypsum board will be paid off by the greater strength of the wall and its lower permeability to high-frequency sound.
The maximum thickness of such a wall will be equal to 50 + 50 (two frames of thin posts and guides) + 5 (the gap between them) + 12.5x4 (two-layer gypsum plasterboard wall covering on each side) = 155 millimeters.
Structure and thickness of soundproofing partitions (C115 and C116).
Requirements for choosing a profile for plasterboard partitions
According to SNiP, partitions are assembled from cold-formed metal profiles based on galvanized steel. You can also use blocks of wood. The humidity of the latter is 12+/-3%, cross-section 40x25 mm.
The metal profile is used in 2 types: rack-mount (marked according to SNiP - SP or CW) and guide (PN or UW). Their thickness varies between 0.55-0.8 mm. The guide is available in several formats: 50x40, 75x40 and 100x40 mm, 3 m long each.
The width of the rack is not 40, but 50 mm, since the main load from the plasterboard sheets is concentrated on it. Reinforced rack type - 100x50 mm format bar. It is designed for the installation of complex curved and massive partition structures.
The height of the structure depends on which format is used. So, for a standard partition consisting of a single frame of a 50x40 mm SP profile with a single-layer gypsum board sheathing, the permissible height is 3 m, from 100x40 mm - 5 m.
What is offered by the market
First, let's find out what we actually have to choose from. On sale we can find the following profiles:
- Ceiling (60x27 mm);
- Ceiling guide (28x27);
- Rack-mount (side walls 50 mm high, bottom walls 50 to 100 mm wide, depending on the requirements for structural rigidity);
- Guide (40x50-100 mm);
- Flexible arched;
Arch frame made of flexible profile.
- Corner perforated.
By elimination
The last two can be immediately discarded: the first of them is intended for assembling curved frames, the second - for strengthening plaster corners.
Reinforcement of the outer corner with a perforated corner profile.
The ceiling and ceiling guide are quite predictably used for assembling suspended ceiling sheathing. With the same success, however, they can be used to level main walls with significant irregularities; in this case, the ceiling profile is attached to it using direct hangers.
Lathing for leveling the wall from the ceiling profile.
Are these profiles suitable for partitions?
No. They are sorely lacking in rigidity: a wall assembled on a frame made of a CD ceiling or a UD ceiling guide will deform even with a slight lateral load.
What's in the bottom line?
That's right, there are only two varieties:
- Rack-mounted;
Rack profile. Curved edges ensure maximum rigidity with minimum weight.
- Guide.
Guide profile 50 mm wide.
The first, as the name suggests, is used as vertical frame posts, the second provides fastening of the posts to the permanent structures of the building - adjacent walls, ceiling and floor.
Types of plasterboard partitions
Types and technical data of structures:
- C111 - partitions made on a single frame 3-5 m high, which are sheathed on 2 sides with gypsum plasterboard sheets, number of sheathing layers - 1. Used for rooms with normal humidity levels. Standards for the thickness of the entire structure are from 75 to 125 mm, sound insulation index 41/43/45 dB, respectively;
- C112 - made of a single frame on a metal profile, covered with 2 layers of plasterboard on both sides. Thickness – 100/125/150 mm, height – 4-6.5 m, sound insulation – 47/49/50 dB;
- C113 is a standard frame, sheathed on 2 sides with 3 layers of gypsum plasterboard. Permissible height – 4.5 m, structure thickness – 175 mm, sound insulation indicators – 54 dB;
- C115 - made of a double metal frame, sheathed on 2 sides in 2 layers. Thickness 155/205/255 mm, height according to SNiP is 4.5-6.5 m, sound insulation coefficient - 53/54/55 dB;
- C116 - double frame structures, between which there is space for communications. Sheathing – 2 layers of gypsum board on both sides, minimum thickness – 220 mm, sound insulation – 49 dB, height – 4.5/6/6.5 m.
According to the SP (Code of Rules), partitions, the standard sizes of which are listed above, are insulated from the inside with an insulating mineral wool board. This standard is specified in the GOST standard 9573-62 and corresponds to the M50 material grade.
Installation of plasterboard partitions
According to SP 55-101-2000, the installation technology is as follows:
- A drawing is drawn up that details the parameters and shape of the future structure. Consumables are calculated and their labeling is selected.
- Based on the calculations of the drawing, marking is performed.
- An NP profile is installed on top of the insulating tape on dowels and anchors at 60 cm increments to the floor and, similarly, on the ceiling. Its length is equal to the length of the future structure.
- A rack type is installed perpendicular to it, close to the wall on which the insulating tape is glued.
- The pitch of the SP profile is from 400 to 600 mm; the smaller the distance, the stiffer and more stable the structure.
- In the place of the passage opening of the partition there is a rack profile. The interior is reinforced with inserts of wooden planks.
- It is recommended to install stiffening ribs at a distance of 50 cm along the height of the rack profile.
- GCR is installed on top of the frame. Installation of sheets begins from the wall in a checkerboard pattern to avoid overlap of seams; the edge of the drywall should be in the middle of the joint venture profile. The next plate is on the second half of the metal strip.
- When the partition is sheathed on one side, wiring, communications are laid, and thermal insulation is installed. Moving on to the finishing trim.
- GKL joints and sheets are puttied, treated with protective mixtures and covered with decorative finishing materials.
Find out how to install
partitions, based on SP standards, using the video example.
Types of profiles
Profile for drywall: you need to know, sizes, types, purpose
Construction stores sell not only drywall, but also various profiles that differ in both shape and size. Each type of profile is intended for certain technological stages, and together they form a certain type of frame, to which the drywall is then attached.
Profiles for forming a frame
The following types of profiles exist:
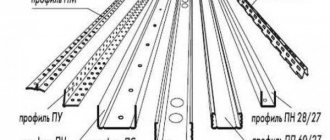
- The guide profile PN (UW) has a U-shape and smooth side surfaces. Other types of profiles are inserted into this profile. Mounted around the perimeter of both vertical and horizontal surfaces. There are profile guides with dimensions of 28x27 mm, 50x40 mm, 65x40 mm, 75x40 mm, 100x40 mm.
The guide profile for gypsum board can be distinguished by its smooth shelves - Rack profile PS (CW). This profile is inserted into the guide profile, thus forming a frame. Jumpers are made and attached from the same profile. Characterized by a complex U-shape. This profile is also called load-bearing, and therefore must have increased rigidity. Similar profiles are produced in the following sizes: 50x50 mm, 65x50 mm, 75x50 mm, 100x50 mm.
The rack profile for gypsum board has additional stiffening ribs and shelves - Ceiling profile PP, as well as PPN - guide PP (UD) and load-bearing PNP (CD), respectively. These profiles are shaped like the letter “P”, while the supporting one has a more complex configuration, since it is distinguished by the presence of shelves and stiffeners. The ceiling supporting profile is characterized by smaller dimensions compared to the rack profile, since ceiling plasterboard has less weight and puts less load on the entire system. The guide (UD) profile has dimensions of 28x27 mm, and the ceiling carrier (CD) has dimensions of 60x27 mm.
The ceiling profile can also be guide or load-bearing. Differ in smaller sizes (compared to wall ones) - The arched profile has a more complex design, since the side shelves have cuts, thanks to which the profile easily bends, creating various shapes of mounted surfaces.
These profiles are quite enough to create a frame for attaching drywall, and of various shapes, if the craftsmen have certain skills.
DIY drywall. Profile for drywall. Types of profiles for drywall
Additional items
To mount a full-fledged frame, profiles alone are not enough. There are a number of additional elements that allow you to assemble a plasterboard system, ensuring all technological stages. These elements should include:
- Corner profile, which allows you to design the corner of a plasterboard system. In turn, profiles for corners are:
- With perforation on both shelves, which allows the corner to be securely held in the layer of plaster (putty).
- With a special mesh glued to the corner shelves, which allows you to strengthen the corner structure.
- On a paper basis, when two metallized strips are glued onto thick paper. It is mainly used to decorate corners that are not used under high loads.
Corner profile - for forming and protecting the corners of plasterboard structures - Perforated hangers, which are intended for fastening and resemble a perforated tape divided into 3 parts. The middle part is not perforated, but has holes for attaching this element to the base. The perforated sides are bent at an angle of 90 degrees and are used for attaching supporting profiles.
Perforated hangers and methods of using them - Anchor hangers for forming the frame of plasterboard ceiling systems. Often such suspensions are called springs, and with their help it is easy to adjust the level of plasterboard ceiling systems.
Anchor suspension - for easy adjustment of suspended ceiling height - PP hangers (crabs), both single-level and two-level. Designed for reliable fixation of places where profiles are connected at an angle of 90 degrees in opposite directions. Used in suspended plasterboard systems.
Connectors - single-level and two-level - Extensions, in the form of brackets, which are intended to lengthen supporting profiles.
When forming a frame, they often do without some additional elements, such as “crabs” (suspensions for fixing intersecting profiles), as well as extensions, replacing them with segments, for example, guide profiles. Unfortunately, this takes a lot of time and such savings are not always justified.
How to connect/extend a profile for drywall
How to properly lengthen a profile, Express connection method, how to connect a profile
Often, instead of perforated hangers, cut profiles are used, which are bent in the shape of the letter “L”. This element is more rigid compared to “P” suspensions. This is especially true for fastening profiles in corners or in places where it is not possible to fully install a natural fastener element.
Two ways to fix rack profiles to the wall - using a perforated hanger and a piece of profile
Perforated hangers can be used both for ceiling systems and for wall ones, while wall hangers are more powerful than ceiling fastening elements.
Profile length
In retail outlets, profiles with a length of 3 and 4 meters are mainly found, while the most common are profiles whose length is 3 meters.
Profiles longer than 3 meters are used if the dimensions of one side of the room are in the range from 3 to 4 meters. In all other cases, preference should be given to profiles 3 meters long. It is more convenient to work with them in every sense. If it is necessary to increase profiles, then this should be done in a checkerboard pattern so that the reliability of the entire structure does not suffer.
Finishing options for plasterboard partitions
According to the SP standards for 2000, finishing materials are chosen from the same manufacturer as the brand of drywall. For example, to fasten the edges of Knauf brand sheets, it is preferable to use Fugenfüller putty. For PLUK edges without reinforcement, use Knauf Uniflot putty mixture.
It is recommended to use self-tapping screws, dowels, hooks and anchor elements designed specifically for the installation of structures with an air cavity as fastening elements. The load on the anchor with a single-layer sheathing should not exceed 20 kg, with a 2-layer sheathing - 30 kg. The conformity of the quality of structures upon completion of installation is checked by SNiP standards (Articles 2.08.01, 2.08.02, 2.09.02, 2.09.04 and 21-01).
Marking for radius partition
You can create identical lines on the floor and ceiling so that the partition does not stand askew using the following methods.
- You can mark the radius using a ready-made figure, even from drywall. It will be applied to the same points on the ceiling and floor and will serve as a pattern.
- You can also create something like a compass, for example, from a screw screwed into the same point on the ceiling and floor, shoelaces and a pencil.
- The cord can also replace a piece of profile, that is, you will get a clearer radius meter.
- You can also use a professional marking tool.
Installation of partition frame guides
Along the finished line, which is marked on the floor and transferred to the ceiling, you will need to install a guide metal profile. On one side it will be cut to take the required shape around the circumference.
You can cut the profile using a grinder or metal scissors. The smaller the radius, the more often the cuts will occur, and vice versa.
The finished profile is installed along the marking line and secured every 10-15 cm. Standard fasteners are used for this - dowels and screws.
Then we install exactly the same profile on the ceiling, then we fix the racks between the ceiling and floor guides.
The rack profile must be installed very evenly, using a level or plumb line. The horizontal installation step is 30-40 cm, fastening using self-tapping screws or a cutter.
To strengthen the partition, it is recommended to install wooden beams in the outer vertical posts.
DIY installation
The work sequence includes the following operations.
Layout and marking
First stage of installation. The main task of marking is to draw vertical lines on the walls along which the wall profile will be attached. To mark a straight partition, you can use a plumb line.
- Attach a plumb line to the top point at the installation site and mark the bottom vertical point using it. If the installation location is on the floor, then the top point should be marked using a plumb line from the bottom point. Using a beating cord, draw a vertical line between the marked points.
- Make the markings on the other wall in the same way.
- Mark the horizontal contour lines of the structure onto the ceilings and floors.
- In the case of a curved partition, the curve should be drawn on the ceiling, and then transferred along a plumb line to the floor.
- If it is necessary to make a doorway, mark the extreme points of the opening on the ceiling and floor.
Construction of the base for the partition frame
- The outer side of the guide profiles should be covered with sealing tape to improve sound insulation and a tight fit to surfaces.
- The guide profiles are attached with dowels to the base according to the markings. Each profile section must have at least three attachment points. In this case, the pitch between the dowels should not exceed 1.0 m.
Formation of doorway elements
- According to the markings along the edges of the opening, install two rack profiles. If a door frame is installed in the opening, the width should be increased by 5 cm.
- The load on the profile when installing the door leaf will increase, so it needs to be strengthened by installing a 50 mm wooden block in the profile or inserting an additional profile.
Installation of vertical racks
- For installation, use a grinder or metal scissors to cut the vertical posts to size.
- The center-to-center distance between the posts is no more than 600 mm. Insert the top and bottom of the rack profiles into the guides and secure with self-tapping screws.
Do not allow the screw to turn while tightening! In this case, the profile fastenings will be unreliable.
- Instead of self-tapping screws, you can use a cutter. In this case, metal consumption and labor intensity will be significantly less.
Installation of horizontal crossbars and wiring
The horizontal crossbars of the frame serve to impart rigidity to the structure and fasten the gypsum board to the frame. It is necessary to mark the horizontal crossbars according to the height of the drywall sheet . You need to use the markings to guide the installation of the horizontal jumper.
Note! The gypsum board at the junction with another sheet according to the markings should cover exactly half the width of the horizontal jumper (profile).
- Secure the crossbar blanks to the posts with self-tapping screws, controlling horizontality with a level or perpendicularity to the vertical post with a square.
- Before laying electrical wires, one side of the partition should be sewn up. Cables should be laid in a corrugated pipe , which has fire safety certification, through holes in the vertical posts of the frame. If the self-tapping screw is close and threatens to damage the insulation, its sharp end must be bitten off or the cable moved to the side. This installation method reduces the likelihood of damage to the wiring to a minimum.
We recommend: Modern materials for finishing the walls of houses and apartments. What is the best way to decorate the walls in a room?
Thermal and sound insulation
Heat and sound insulating materials should be installed side by side after covering with a sheet on one side. Cut mats or sheets to size between the vertical posts, taking into account the expansion allowance in the profile.
Cutting and installation of gypsum board sheets on the frame
Sheathing the gypsum board frame should begin from the bottom. Sheets can be installed both vertically and horizontally - it depends on the design of the frame. If the height of the partition is greater than the length of the sheet, the missing part should be cut off. To do this, you can use a drywall knife.- Attach the sheets to the metal profile with self-tapping screws in increments of 15-20 cm. When using a screwdriver, adjust the torque so that the self-tapping screw does not break through the sheet, but is recessed by 2-3 mm.
- After sewing one side, lay electrical wiring and insulating materials (described above). After this, the septum is sutured with plasterboard on the other side in the same way
Sealing joints on the surface of the partition
Before sealing the seams, you should carefully inspect the surface of the sheathing and check the gypsum board fastenings. Protruding screw heads should be recessed.
To carry out puttying work, the room temperature should not be lower than 10-12˚C and should not change until the putty dries.
Make sure there are no drafts. For puttying, all work associated with high humidity should be completed or interrupted (plastering, priming, floor screed, etc.). High humidity in the room often causes destruction of the putty joint.
Seal joints between gypsum boards only using reinforcing tape (serpyanka). For work use gypsum putty.
Sealing a seam with a thinned edge
- The joints can be left unprimed by wiping them with a damp cloth. After applying the first layer of putty, use a spatula to press the reinforcing tape into it. It should be in the center of the joint along the entire sheet.
- After the first layer has dried, the second layer is applied - the covering one. After the second one has dried, a third one is applied - leveling. The resulting surface should be smooth.
Sealing end and cut seams
- End and cut seams are sealed with preliminary chamfering, and the joint is treated with a primer.
- Press the putty into the joint with a spatula, removing excess. After the first one has dried, the reinforcing tape is pressed into the next covering layer in the center of the joint. After drying, a leveling layer is applied, small irregularities are removed with sandpaper.
If you plan to paint the gypsum board, you need to putty the entire surface of the partition.
We recommend reading: Installing drywall on walls
Covering the frame of the future partition with plasterboard
Is the frame on the partition installed? All that remains is to sheathe one side of the partition, lay insulation and soundproofing materials inside the structure, and, if necessary, cables or pipes. Then sew up the back side of the partition and complete the process with decorative work. So, first of all, we sew up the front part.
To do this we need to bend the drywall. Whatever method you choose, you need to work with gypsum board very carefully so as not to spoil the material. Installation of plaster on the frame begins along the bottom edge, from either side, but very slowly. The sheet is screwed with self-tapping screws to the lower outer radius every 10-12 cm, along the vertical posts - every 20 cm.
Installation occurs sequentially, but with the obligatory exclusion of cross-shaped joints. If the edge of the sheet does not fall on the center line of the profile for fastening, it can be carefully trimmed on the spot.
Now we put everything we need into the partition, and proceed to covering the partition along the inner radius. Here you will need even more patience, because the inner fold is even more complex. By and large, the process is practically no different, but you will have to make a difference in laying drywall of about 60 cm. This is necessary to improve the quality and stability of the radius partition made of gypsum plasterboard.
Selecting a profile for a plasterboard partition frame
Profiles are most often used as components of the frame. It consists of U-shaped strips of durable steel tape with a thickness of 0.5 to 0.8 mm. These elements can add rigidity to the structure without weighing it down. There are several types of profiles, each of which has its own characteristics and functional purpose. In order to mount the frame of a gypsum plasterboard partition with your own hands, we will need:
- Guide profile – PN (English UW). The product has a U-shaped (channel) shape, and according to size it is divided into four types: PN-50, PN-65, PN-75 and PN-100. Digital marking of profiles determines the width of the “back” - the base of the profile. Note that its “shelf” - the side parts - has the same size of 40 mm, regardless of the brand of the product. The back of the guide profile is most often equipped with 8 mm diameter holes for dowels. The length of the products is 3 m.
The PN profile is attached to the floor and ceiling of the room and serves as a guiding basis for the future structure. In a vertical position, the following frame element of the gypsum board partition is attached to it:
- Rack profile - PS (English CW). The upper edges of the side parts of the U-shaped structure of this product are rounded in the shape of the letter C. The width of the back of the profile is similar to this indicator for the PN, since the products will be inserted into each other during installation. Consequently, the marking of rack parts also comes in four types: PS-50, 65, 75, 100. The length of the profile is 3, 3.5, 4 and 6 meters, and is selected taking into account the following rule: it is extremely undesirable to increase it with high ceilings.
The shelf of the rack profile for gypsum plasterboard partitions has three special marks - grooves. The one in the middle determines the joining point of the drywall sheets, and the two outer ones are intended for centering the fastening material (screws).
Since the rack profile bears the main load of the mounted structure, the surface of its back has stiffening ribs in the longitudinal direction. When planning the creation of a partition, it is necessary to take into account how much weight it will have to withstand during operation. If the expected load is 50 kg/m2, then it will be enough to use a profile with two stiffeners, and 75 kg/m2 will require three.
Installation of a profile frame for a plasterboard partition
Installation of a frame for a plasterboard partition begins after all communications in the room have been completed (plumbing, ventilation, wiring, Internet and telecommunications). All cables must lie strictly perpendicular to the posts.
Important! If the room has a wooden floor, then the metal frame elements are secured using self-tapping screws for wooden surfaces.
Horizontal joints of gypsum boards should be placed staggered. With a double frame structure, all racks and guide profiles are treated with sealant to increase sound insulation.
Heat and sound insulating components are installed after installation of electrical fittings.
Types of drywall for partitions
Having considered the types of profiles that will be required for installing the partition frame, let’s move on to another structural element. The sheets that are used in its cladding are slabs consisting of a gypsum base of a special composition and a shell of thin cardboard (hence the name “plasterboard”). This material is divided into several types that have specific markings:
- GKL - the general name for plasterboard sheets - also implies a common material that is used in rooms with normal humidity conditions (dry). Sheet color: blue, gray.
- GKLO is a material with increased resistance to fire (fire resistant). The gypsum included in its composition is impregnated with a special solution with reinforcing additives and fired. Fire-resistant plasterboard is used when installing fireproof partitions made of gypsum plasterboard. Material color: gray, red.
- GKLV – moisture-resistant plasterboard. Used in rooms with high humidity levels. The cardboard covering of the material is treated with a water-repellent composition, and hydrophobic and antifungal substances are added to the gypsum “core”. Sheet color: green, blue.
- GKLVO is a material that combines the properties of several types of drywall - moisture resistant, with high resistance to open fire. The elements that make up the sheets undergo complex processing. Material color: red.
The most popular products of this kind are from the German company KNAUF. Drywall sheets produced by this manufacturer comply with all SNiP requirements. GKL partitions, which are installed using the company’s building materials, are reliable and durable.
It should be noted that recently there has been an increased demand for gypsum fiber sheets (GVL), an environmentally friendly material that is also available in moisture-resistant versions. The difference between GVL is that cellulose fibers are added to its “core”, which provide the sheets with additional strength. There is also a special acoustic plasterboard - a material with increased sound insulation.
All plasterboard sheets are rectangular in shape and are most often produced in the following sizes: thickness - 12.5, 14 and 18 mm; height – 2, 2.5 and 3 meters. The width of all types of material is standard and is 1.2 m. The choice of drywall thickness will directly determine the final weight that the partition
.
Dividing profiles into types
Profiles create the frame of the structure and are responsible for its strength. You won’t get a good partition from a profile with your own hands if you don’t know about the division of this material into types.
- the guide is attached along the perimeter of the future structure;
- rack-mount is installed between the guide profiles in the internal space. The cladding material is fixed to these profiles.
There is also a division of profiles, and until we study these varieties, we will not tell you how to make a frame for a partition from a profile. Profiles are divided according to the material that was involved in their manufacture. Metal profiles can be presented in the following varieties:
- Galvanized is completely hidden behind the skin.
- The aluminum profile remains open, giving the frame a framed appearance. The facing material is inserted into the perimeter of the frame. Such structures are often erected in modern residential complexes, offices and retail facilities. You should build aluminum partitions yourself in the bathroom, since such a design will not be affected by moisture.
- Steel profiles are used for the construction of fire-resistant structures and partitions, which have high requirements regarding strength.
In addition to metal profiles, there are also PVC materials. This material is chosen for partitions with glass elements.
Now that we're done with the theory, you can move on to practical actions and get acquainted with how to assemble partitions from a profile.
The procedure for installing a plasterboard partition
So, having decided on the materials, let’s move on to installing the partition. We will not describe in detail the entire technology of work; we will only talk about the main stages of this event and the sequence of their implementation, conditionally dividing the entire process into several stages:
- Marking the location of the partition.
- According to your project, using a dye cord or a cord breaker, mark a line on the floor in the place where the partition
. - Using a plumb line, we transfer the completed mark to the ceiling and walls. It is necessary to remember about the doorway, which may be included in the partition project, and be sure to mark its location.
- Frame installation.
- We attach the PN profile to the ceiling and floor using dowels (in increments of no more than 1 m). Important: the profile must be secured to the surface using sealing tape or sealant!
- We install (and immediately fix in it) the PS profile into the guide profile. The optimal distance between the racks of the gypsum plasterboard partition frame should be 60 cm.
- Installation of equipment. Inside the frame we install embedded parts for fastening the equipment provided for by the project (supports for wall cabinets, shelves, sconces, wall lamps, etc.). Next, we install the necessary electrical wiring (in a protective casing - corrugation), pipes and other communications.
- Frame covering. We install and secure sheets of drywall on one side of the frame. The material is fastened with self-tapping screws in increments of 200-250 mm.
- Laying material for sound insulation. We lay insulating material in the cavities between the posts. It’s important - when building a gypsum plasterboard partition with your own hands, you don’t need to save on sound insulation; you need to fill the frame with it as tightly as possible!
- Full frame covering. We attach the GVL sheets to the other side of the frame. Note that if the structure has a multi-layer coating, then each subsequent layer of sheets is installed with an offset of 60 cm relative to the seams of the previous one.
- Surface finishing. Upon completion of the sheathing, it is necessary to putty the seams between the sheets of drywall and the screws with which they were fastened. The surface must be primed for further decorative finishing.
Pros and cons of plasterboard partitions
Partitions made from gypsum plasterboard, in comparison with structures made from other materials, have the following advantages:
- Easy to install. Such partitions are installed quickly and easily. Often the homeowner himself successfully copes with this task.
- Light weight. Partitions made from gypsum plasterboard are lightweight and do not exert large loads on the foundations. No special permits are required for their construction.
- Versatility . GCR structures can be used to separate the interior spaces of apartments and private houses. They are also used for the renovation of administrative buildings, offices, shopping and entertainment centers.
- Low cost. Prices for gypsum boards and mounting profiles are low. As a result, gypsum plasterboard structures are inexpensive, so they are especially attractive to consumers.
- Smooth surface. The surface of the drywall is flat and smooth. It looks great and can be used for any finish.
Among the shortcomings we highlight:
- Low mechanical strength. A plasterboard partition is relatively easy to damage.
- Limited strength. It is impossible to hang heavy objects on a gypsum board without reinforcement (TV, bookshelves, etc.).
- Poor sound insulation. The sound insulation of gypsum plasterboard is low, but it can be increased by using a multi-layer partition with insulating material.
- Instability to high humidity . GCRs swell and collapse when flooded. But moisture-resistant drywall can be used, for example, in kitchens.
Installing a curved plasterboard partition
Having examined the installation process using the example of a standard Knauf gypsum board partition, we will also talk about curved structures. Note that drywall is a material that has sufficient plasticity when moistened. After the plasterboard dries, the specified shape is retained.
There is a “dry” method of bending the material, which consists of applying multiple cuts to one side of the sheet. But it is used less often, as it is extremely labor-intensive. Also on the building materials market there is an arched type of gypsum board - it is thinner (6.5 mm) and narrower (60 cm) than the usual one.
To install a curved gypsum board partition, it is necessary to choose sheets with a thickness of 9-12 mm, since these structures have only a decorative purpose. A special arched profile, which has all the strength characteristics of conventional material, will help you mount an oval-shaped frame. Also in the design you can use a regular profile, curved using special equipment.
Drywall for partitions
For quite some time, drywall has been a material that is used in almost all types of construction and repair work. This is a kind of universal material that is used to create ordinary walls, and for the construction of partitions (both low and solid), and for finishing the ceiling, and for building the necessary drawers, and for much more. In other words, drywall is constantly finding new uses in repairs and construction. This material is popular largely because it has a very low cost, is very easy to install, and allows for a high level of heat and noise insulation. And these are not all the advantages of drywall. The most common repair is the installation of partitions without doors made of gypsum plasterboard.
Types of drywall
Metal profile for the frame of a plasterboard partition
Diagram of a plasterboard partition on a metal frame.
The most popular are 2 options with which the frame is built. Installation involves attaching drywall to a metal profile or to a frame made of wooden blocks and boards knocked together. The first option is preferable if you are erecting a partition without a door in a room that has a high fire hazard. The metal profile is made from high-quality galvanized steel using the cold bending method. This profile is used in almost all premises - in utility, industrial, and, of course, residential buildings. The fact that galvanized steel is used in the manufacturing process of the profile allows us not to use any insulating materials when sawing it out or other external influence on the metal.
Galvanized steel allows you to reduce the possibility of metal corrosion to a minimum. Typically, factories produce profiles according to strictly defined dimensions. If you need special conditions, then some of these factories provide the opportunity to order a profile of your own size. But at the same time, it cannot be shorter than 50 cm and longer than 6 m. In order for the profile to be attached to the ceiling, floor or wall as firmly and reliably as possible, various brackets, rods and hangers are used during its installation.
In addition, it is necessary to use special fastening tools to install the profile to the gypsum board. These include anchors, dowels, screws and other screws. They allow both the wall and the partition to bear a more significant load, on which not only paintings, but even heavy boxes can be hung in the future. In a variety of rooms, you can use several options for fasteners: nylon or polypropylene dowels. If special strength of the partition is required, then metal dowels are also used. It is impossible to install gypsum boards on nails, as they can crumble the plaster.
Which profile to use for interior partitions
For a plasterboard partition, you should choose a combination of rack and guide profiles, which help create the ideal frame - reliable, durable, protected from deformation.
Important! The guide profile for partitions is designated by the Latin letter UW, and the rack profile by the letters CW.
The profile size for partitions made of gypsum plasterboard sheets is selected based on the length of the frame. Additionally, you will need self-tapping screws that are suitable for fastening metal. Before deciding which profile will be used for a cardboard partition, it is necessary to take into account the level of humidity in the room. If the indicator is high, then you need to buy moisture-resistant plasterboard and good metal structures - galvanized steel parts (up to 99% zinc) to prevent the rapid occurrence of corrosion.