Partitions made of plasterboard allow you to turn a large room into several small and functional ones: zone a child’s room, separate the kitchen from the living room or dining room, isolate the hallway in a studio apartment, hide the toilet in a combined bathroom.
The construction of interior partitions made of plasterboard requires the presence of a doorway, an arch, or the creation of a false wall that does not completely cover the room. The material allows you to create a structure of any configuration. At the same time, the construction of partitions from plasterboard sheets is a simple process and accessible to anyone who can hold tools in their hands. Let's look at how to install a gypsum plasterboard bulkhead correctly and what is required for this.
How to make a plasterboard partition with your own hands
If you know how to build a partition from plasterboard, you can create a blank false wall, equip it with a door or arched opening, or make windows or niches of unusual shapes. Plasterboard sheets can bend, which facilitates the construction of partition elements with voluminous edges.
To install a plasterboard partition quickly and without problems with your own hands, you need to proceed in stages. When installing a plasterboard partition with your own hands, use simple step-by-step instructions:
- We mark the level on the floor and ceiling in the right place.
- We fasten the guide profile with screws according to the marks on the floor.
- We insert rack profiles into the guide along the edges, and fix them on the walls with dowel nails strictly vertically.
- We install the upper guide profile, constantly monitoring it with a plumb line. As a result, we get a rectangular frame, which is the basis for the partition element.
- We install vertical profiles, moving from the doorway to the walls.
- We install the crossbars and stretch the wires.
- We cover the frame on one side with sheets of plasterboard.
- We lay layers of noise-insulating or heat-preserving material inside the frame.
- We sew up the second side of the frame.
The last step in how to make a high-quality plasterboard partition with your own hands is to remove the seams and places where the screws are attached using sickle and putty. A do-it-yourself plasterboard partition in places with changes in humidity and temperature should be made of moisture-resistant material. The sheets are called GKLV and are painted green. To increase resistance to moisture, you should order the surface facing with tiles or cover it yourself with plastic panels.
You can read more about how to make a plasterboard partition below.
Advantages of the method
Before you make a plasterboard wall with your own hands, you need to understand whether this is the solution you need. Perhaps this technology is only good in certain situations and there are a number of cases where it is not applicable? Let's look at the pros and cons of creating walls using a metal frame and plasterboard sheets. We will not consider the installation option using adhesives now.
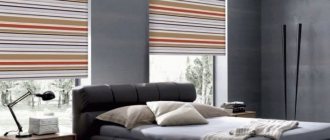
Using drywall you can create walls of various shapes
- The main advantage is the drywall itself. This material is inexpensive, durable and easy to handle. With its help you can create walls of various shapes.
- There is no need to knock down old plaster or peel off wallpaper, prepare the surface in any way or plaster over existing defects. The gypsum board will be mounted on a special frame, so it doesn’t matter what condition the old wall behind it is in.
- Leveling a plasterboard wall is carried out using a frame made of metal profiles. So it doesn't matter how crooked the surface is.
- Insulation and sound insulation can be used in the created frame.
- Wiring can be easily done under the drywall thanks to the frame made of profiles.
- Repair work will require a maximum of two people without special skills.
- The resulting surface will be perfectly smooth, so any finish can be used.
You can hide insulation, soundproofing or wires in the wall frame
Tools and materials
To create a partition structure from gypsum plasterboard, expensive materials and tools are not required. Everything you need is available in construction stores at an affordable price.
Materials
To create a partition of any configuration from gypsum board you will need a frame. It is assembled from metal profiles or wooden blocks. The profile is preferable - it does not rot, is practically not deformed, is easier to attach, and at the same time is identical in cost.
For different rooms and functions of the partition, you need to choose different types of gypsum boards. If simple sheets are suitable in an ordinary room, then for the bathroom you should prefer moisture-resistant ones, and for the kitchen fire-resistant options (with a pink coating).
What types of gypsum boards for partition elements are:
| Drywall type | Dimensions (in mm) | Thickness (in mm) |
| Ordinary | 2500×1200 | 12,5 |
| Flexible | 2400×1200 | 6 |
| Moisture resistant | 2500×1200 | 12,5 |
| Fire resistant | 2500×1200 | 12,5 |
| 2600×1200 | 12,5 |
Pay attention to the edge - it can be straight, thin, semicircular and rounded. The latest options allow you to better hide the seams due to convenient filling with putty. This is important if dense decorative finishing, for example, tiles, is not intended.
In addition to the metal profile and the plasterboard sheets themselves, you will need the following fasteners and materials for the partition:
- dowel-nails;
- rubberized seal;
- metal screws;
- putty for sealing seams;
- serpyanka for joints;
- self-tapping screws with a press washer.
You will also need an acrylic-based primer for processing before decorative finishing.
Required Tools
Before starting work, you should make a list of the tools needed to erect the structure. You don’t need a lot of them, and most are available in every home workshop.
Basic tools needed:
- spatulas;
- regular or laser level;
- gypsum board planes;
- metal scissors;
- roulette;
- hammer;
- screwdriver;
- hammer drill;
- metal ruler;
- marker.
You will also need a cutter for cutting sheets of drywall. If you don't have a special cutter, a regular stationery knife will do.
Which insulation is better: polystyrene foam or mineral wool?
To preserve heat and protect against the penetration of extraneous sounds, the inside of the partition is lined with special insulating materials.
Polystyrene foam or polystyrene allows you to insulate a false wall more quickly and efficiently.
Their disadvantages are low mechanical strength and high fire hazard. And from an environmental point of view, this is not the best choice.
Mineral wool is a material with excellent insulating qualities, but its installation itself is a little more complicated and costs more. But mineral wool is not subject to fire and is environmentally friendly.
Partition thickness control
If you have a question about which profile to choose for a false wall, given that this choice will determine its thickness, it will not be difficult to solve it. Measure the thickness of the interior walls in your apartment. It will be approximately 10 cm. Use this value as a guide.
Moreover, you will be surprised to discover that it is precisely this PS brand profile that is recommended to be used for creating interior walls.
The PS profile is available in three sizes relative to the cross section - 50x50, 75x50 and 100x50 mm. The last one is the most common. A feature of the PS profile, among other things, is the presence along the entire length of mounting holes designed to facilitate wiring inside the profile cavity of utilities.
The simplest DIY design looks like this: a sheet of gypsum board – a profile – a sheet of plasterboard. Insulation - optional
But pay attention to the other two sizes. If the structure is only decorative in nature, if it will not experience a significant load, a PS profile with a section size of 50x50 and 75x50 mm may be perfect.
It is also necessary to keep in mind that there are 3 more types of metal aluminum profiles on the construction market:
- PP profile (CD) is the main type, but for suspended ceilings. It has a cross section of 60x25 mm. Of course, PP is mainly for ceilings, but you can also use it for false walls. This desire will be facilitated by one unique modification of the PP profile - arched, convex or concave, allowing you to create unique curved structures. This profile is produced without mounting holes.
- PN (UD) is “not an independent profile”, since according to the designers’ idea it is intended as an auxiliary guide for the PP profile. But where does the design thought of an inquisitive worker not lead? The PN profile can be successfully used as a completely independent element, this is facilitated by its small cross-section - 28x27 mm.
- PN (UW) – as a type of profile used as PS guides.
Helpful advice! Each master decides independently which profile to choose to create a partition, focusing on the purpose of the false wall. If there is insulation, use a PS profile 100 mm wide. Only this will allow glass wool to be placed inside without undue stress on the entire structure.
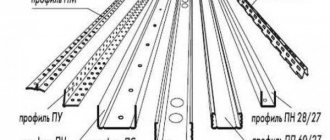
Types of profiles for drywall: sizes, selection and scope of application
Special fittings are used for gypsum boards: reinforced guides and rack-mount metal profiles. Guides are used to attach the frame frame to the ceiling or floor. They are divided into four types depending on the cross-section: from 5x4 cm to 10x4 cm.
The length of guide profiles of any thickness is 300 cm.
The vertical parts of the partition frame are also made from the profile. Such fittings are also divided into four types by cross-section: minimum 5x5 cm, maximum 10x5 cm. The length of the rack profile is 300–400 cm.
Partition marking
When erecting a partition from plasterboard, first of all you need to mark out the room for installation according to a previously created drawing:
- First, we outline a perfectly straight line for attaching the guide to the floor.
- Next, on this line we mark the location of the door opening - we do not install a profile here.
- We transfer the line from the floor to the ceiling. To do this you will need a level and a plumb line.
- Using a laser level, we draw a straight line where the bulkhead meets the walls from floor to ceiling.
Using these marks, the frame of the false wall is mounted. It is important to clearly measure the required distances and draw lines on the floor and ceiling so that they are strictly parallel to each other. Then the zoning element will be smooth, without distortions.
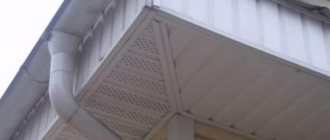
Violations of frame installation technology
Failure to follow the technology with metal profiles or the profiles not matching their purpose are perhaps the most popular mistakes of builders and everyone who makes repairs with their own hands. This is especially true for profiles for curved ceiling surfaces.
From this photo it can be seen that the master, unfortunately, in principle does not understand how to fix the ceiling profiles (PP 60X27). To fix them, you should always use hangers; the profile should look down with its smooth side, because it is on this base that the sheets of drywall are screwed. The design does not have an additional metal strip along the entire length of the profile (cut along the same curved line from a galvanized sheet), which ensures the rigidity of the entire structure. As a result, this structure will be flimsy, and the fastening of the drywall will be unreliable, which will lead to the appearance of a crack after repair.
Assembly and installation of the frame
The next stage after marking is the construction of the partition frame, that is, the fastening of guide profiles to the floor, ceiling and walls. A rubberized seal is placed between the wall and the profile.
It is necessary for a tight connection between load-bearing walls and the bulkhead.
Also, the damper tape acts as a buffer during shrinkage or expansion of the plasterboard partition element due to changes in temperature and humidity in the room. The tape will protect against cracking and deformation.
Negative qualities of drywall
This material is optimal, but you need to be prepared for such not-so-good moments:
- relatively low strength of the material (the created plasterboard slope for plastic windows can be damaged as a result of mechanical stress, and its partial restoration is unacceptable);
- if it is necessary to secure heavy objects on the surface of a plasterboard slope, it is imperative to plan a system of additional structural reinforcement;
- if the humidity in the room (near the window) exceeds 75%, then the material may lose its original characteristics as a result of swelling;
- It is recommended to cut this material wearing safety glasses and using respirators, since gypsum dust is potentially hazardous to human health.
When choosing glue as a fixing component when finishing plastic windows, it is important to make sure that the sheet is in a stationary position, and it is best to use special dowels for fastening hanging elements in a slope with plasterboard.
How to assemble the frame correctly
- First, you need to install and secure along the bottom guide with dowel nails, not forgetting that the doorway remains empty.
- Rack profiles are attached to concrete walls in the same way. For wooden walls, dowels are not needed. Self-tapping screws are screwed through guides directly into the walls with a pitch of 25x30 cm from each other.
- The guides and rack profiles are connected using self-tapping screws with a press washer or a riveter.
- Wooden blocks are inserted into the profile around the doorway and secured with self-tapping screws. Or an additional reinforced metal profile is installed.
- The distance from the wall to the door is measured, the number of profile posts is calculated, taking into account the step between them of 30, 40 or 60 cm.
- The required number of blanks is prepared according to the required dimensions. The frame posts are placed with their ends inside the upper and lower guides. Before fixing the profiles with self-tapping screws or rivets, they are leveled.
- With a high ceiling, the frame is strengthened by horizontal jumpers between the rack profiles.
After the manufacture of the frame for the partition is completed, electrical wiring is installed inside it, if provided. This can be done after covering one of the sides, or before that. The wires are packaged in corrugated tubes.
Covering the upper part of a door or window opening can be done in this way: mark the required length on the profile, adding 150 mm on each side. These will be kind of guides. From the sides of the profile, we measure 45° angles according to the marks and cut along the cut line. Then we bend the outer parts towards the profiles to form a U-shaped structure. We put this blank with bent “ears” onto the racks, then raise it to the required height and fix it with self-tapping screws.
Drywall cutting
The process is carried out with a special tool for cutting drywall. This will help the material not crack or break.
How to cut drywall? The cutting of sheets is done as follows:
- The area that needs to be covered is measured on the frame.
- Then, using a tape measure and a pencil, mark the sheet of drywall.
- Cutting is done with a special cutter or, in extreme cases, with a stationery knife so that the bottom paper layer remains intact. The sheet breaks along the cut and is completely cut through on the reverse side.
- The chamfer is made in two ways: using a gypsum board plane or removing the top layer of paper along the length and width of the seam.
When installing internal sockets or switches, after routing the wires in the drywall, holes for the socket boxes are drilled using special crowns of the required diameter.
Partition installation
The installation of a plasterboard partition is completed by laying insulating material on the unlined side of the false wall, after which it is sheathed like the first side. The position of the installed socket on the unsheathed side is determined in advance, since it is necessary to drill holes before installing the gypsum board sheets.
What else is taken into account if you want to build plasterboard partitions:
- When installing vertical posts, we direct the stiffener towards the beginning of the frame sheathing. This is explained by the fact that the first sheet of gypsum board is fastened from the side of the rib, and the second and further - to the remaining part of the rack profile. If partitions are not made using this technology, they may become deformed.
- If, in addition to erecting plasterboard partitions in the room, gypsum board lining of the entire perimeter is performed, then first the frame is mounted, observing angles of 90°.
- If the height of the element being built is high, the cladding is done in a checkerboard pattern.
A properly constructed false wall is rigid, stable and visually attractive.
Selecting sheet thickness
Of course, the main thickness of the false wall is determined by the profile, but gypsum board, which is available in three sizes, also makes its contribution.
Thickness can be:
- 12.5 mm is the most suitable type (and thickness) for creating partitions;
- 9.5 mm – used for suspended ceilings;
- 6.5 mm – the thinnest type (arched). It turns out to be indispensable when installing on a curved frame made of metal profiles; it bends much easier.
Plasterboard structures allow you to perfectly divide the space of a room, but in no case should you forget about planning a passage or doorway
Total septum thickness indicators
Thus, the total thickness of the plasterboard partitions is determined by the thickness of the profile used and the thickness of the sheet.
The following are the most widely used options for partitions in terms of thickness (without taking into account minor errors in fastening and finishing, which can give an increase of 2-4 mm):
- 125 mm – PS profile 100 mm + 2 sheets on both sides. This thickness fully meets the long-term standards for the performance of internal walls made in a major way during panel construction.
- 73 mm – arched PP profile 65 mm + 2 sheets of the thinnest plasterboard on both sides. The thinnest partition that can be obtained in a combination of plasterboard-profile-plasterboard. Such a false wall of minimal thickness is only decorative; you should not place any hopes on it in terms of load. (see also the article Profile for plasterboard partitions: the basis of the false wall frame)
Alternative options for increasing rigidity
The two sizes given are limiting in terms of rigidity - maximum and minimum. But design goals sometimes force us to create a variety of combinations. On the widest PS profile you can apply a layer of the thinnest drywall by combining several layers at once. In this case, however, you will have to stock up on a fair amount of additional screws.
As installation proceeds, the room is transformed literally before our eyes, but a preliminary calculation of the ratio of the width of the drywall sheets and the location of the profiles is necessary
The calculation is as follows:
A standard sheet measuring 2.5 x 1.2 m requires about 60 screws. If you decide to lay 2 layers one on top, the first layer will require no more than 6-8 screws 2.5 cm long. They must be placed in increments of 1 m. But the second layer will require 4 times more fasteners 3.5 cm long. 5 cm, while the installation step should be 25 cm.
Helpful advice! When installing sheets on a metal frame on both sides, follow the long-standing construction rule of staggered placement. Shift the sheets on the reverse side exactly half the width. This simple technique allows you to significantly increase the rigidity of the entire structure.
If the thickness of the partition significantly exceeds the thickness of the structure (the profile is two plasterboard sheets), special care will have to be taken about the end of the false wall
Good design requires maximum use of all available space. By creating a wider false wall, you can provide yourself with additional space at the end. In this situation, you will have to take care of increasing the reliability of the frame by adding additional horizontal cross members to the structure. (See also the article How to make a niche from plasterboard: tips and tricks)
Not a single instruction will teach you how to do this; imagination and design ideas reign here, and the source material is still the same - 4 types of aluminum metal profiles, fasteners and photos of possible implementation options.
Let's not forget about the possibility of a wooden frame - in some cases it may seem more convenient than a metal profile frame
Plasterboard partition
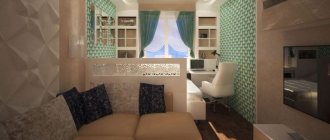
Due to the price-quality ratio, plasterboard partitions are extremely popular. They allow you to delimit the room. In particular, a partition in the children’s room will prevent territorial battles, and in the living room it will designate study and relaxation areas.
Advantages and disadvantages of plasterboard partitions
Drywall is a relatively cheap and easily processed material. GKL partitions have many advantages:
- environmental friendliness;
- the ability to hide any communications;
- variability of finishing;
- light weight;
- good sound insulation;
- ease of installation;
The design does not require inclusion in the technical plan and approval by the BTI.
Cons: comparative fragility, susceptibility to moisture, difficulties when installing massive shelves or wall cabinets.
Features of plasterboard partitions
The bulkhead can be straight or curved. You can erect several false walls connected to each other at an angle. The installation of such a structural element is the same as that of a straight bulkhead. The ceiling and floor are marked with the outline of the partition along which the profiles are installed. At the junction of the elements at an angle, vertical profiles are placed on all sides of the walls.
Features of drywall
It is often used for finishing and decorative works. Due to the ease of installation, it is popular for DIY repairs. Eco-friendly and does not pose a health hazard.
When creating drywall, gypsum is used as a base.
Basic properties:
- Warmth and waterproofing. The structural features of gypsum make it possible to control the microclimate in the room. There are no problems with excessive humidity or dry air.
- Sound absorber. Helps in solving the issue of excessive hearing. The best result is achieved in combination with mineral wool.
- Fire resistance. Not the most fireproof material. Asbestos, for example, is more durable. If drywall is used in facilities with an increased risk of fire, its variety is used - gypsum board.
- Ease. This is one of the most “airy” building materials. The weight of a sheet with an area of 1 m² and a thickness of 6.5 mm is 5 kg. This figure is almost 4 times less than the mass of similar structures.
Working with drywall does not require the purchase of complex tools. Gypsum foam is cut with a simple knife.
GKL - a sandwich panel popular among builders
Table 1. Types of drywall.
| View | Characteristics |
| With insulation | The polystyrene foam coating enhances the heat-saving properties of the material. |
| GKLO | Fire-resistant variety. |
| GVL | It is characterized by increased strength. Due to the fact that it does not have a cardboard covering, it is resistant to fire. |
| GKL with vinyl coating | Used primarily for decorative finishing. It is well fixed and has a long service life. |
| GLKV | Thanks to the presence of additives, it is characterized by increased moisture resistance. The sheet holds its structure well and does not delaminate. Used for furnishing a kitchen or bathroom. An ideal material for country houses, as they have high humidity. Resistant to mold formation. |
Physical and technical characteristics of plasterboard sheets
Finishing
Making a partition from plasterboard is not all. It is important to do the finishing correctly. First of all, you need to seal the gypsum board joints with reinforcing tape and cover them with starting putty, leveling the seams and removing excess finishing material.
Finishing
If the joints of the sheets were on those gypsum boards where the chamfer was removed independently, a primer treatment is done before gluing the reinforcing tape. All putty seams and attachment points are also primed.
Finishing the surface consists of applying a thin layer of finishing putty with a wide spatula and sanding with fine-grained sandpaper after setting.
The putty walls are primed again. After it dries, proceed to wallpapering or painting the surface of the walls.
Advantages of plasterboard cladding
The material has been used for window and door slopes for quite some time. This is not surprising, because it has a number of advantages:
- Environmental friendliness and safety for human health.
- Low material cost.
- Easy to install.
- Minimal maintenance of ready-made slopes.
- Stylish look.
- The ability to make an arched opening and other complex shapes.
- Long service life of plasterboard slopes.
- Possibility of additional insulation of windows or doors.
- Versatility: used not only for windows and doors, but also used for leveling ceilings and walls.
Important! Although plasterboard material has a number of advantages, it also has a disadvantage: the sheets are easily damaged mechanically, even material protected from water can be destroyed due to prolonged contact with it.
Advice from the experts
Those who have already installed plasterboard false walls on their own advise:
- Drill holes for wires at the same level if communications are planned.
- Insert a profile jumper into the metal frame if you are going to hang a picture or lamp.
- If required, you can change the width of the partition - installing profiles in two or more layers. The minimum thickness is a bulkhead on a single frame.
Installation of several layers improves the noise protection and thermal insulation qualities of the partition element.
You can build a plasterboard false wall yourself in a few hours. You just need to adhere to all the nuances of the technology.