Michel
7136 0 0
Michel October 22, 2016Specialization: plumber with 10 years of experience, computer repair specialist, powerlifting coach. I have extensive experience in construction, interior decoration, and making homemade furniture. Hobbies: sports
This article is about how to attach drywall: using polyurethane foam, gypsum glue, sheathing made of timber and galvanized profiles. In it I want to look at traditional methods of installing plasterboard structures and some non-standard solutions that the reader may find useful when renovating his home. So, let's go.
The rough finishing of the attic floor is made with plasterboard.
Perpendicular and parallel application
Drywall can be applied perpendicular (long edges of the board at right angles to the framing members) or parallel (long edges parallel to the framing).
Fire-resistant partitions may require parallel application. (See Chapter 10 for specific information on fire-rated systems.) Perpendicular application is generally preferred because it offers the following advantages:
- Reduces linear footage of joints to be treated by up to 25%.
- The strongest dimension of the board is through the framing members.
- Irregularities of bridges in the alignment and arrangement of frame elements.
- Better fastening strength - each board connects more frame elements than parallel applications.
- The horizontal seams on the wall are at a convenient height for finishing.
For wall mounting, if the ceiling height is 8″-1″ or less, perpendicular application of standard 4″ wide panels results in fewer joints, easier handling and less cutting. If the ceiling height is greater than 8"-1", or the wall is 4" or less, parallel application is more practical.
Walls ranging from 8″-1″ to 9″-1″ in height can be lined with 54″ wide perpendicular panels to eliminate the need to add more joints. (See Sheetrock Brand Gypsum Panels – 54” in Chapter 1.)
For ceiling applications, use a parallel or perpendicular method that results in fewer joints or is required due to frame spacing restrictions
When applying a two-layer ceiling, apply the base layer slabs perpendicular to the frame members; Apply the face coat parallel to the frame with the joints offset. On the walls, apply the base coat parallel to the long edges in the center of the frame; Apply the face coat perpendicularly.
From an aesthetic point of view, a vertical installation can look very good since there are no butt joints between the two non-beveled edges. These un-beveled edges create 4" long humps that can be seen with careful observation (and especially with poor handling of dirt).
However, for structural shear strength, drywall is typically installed horizontally. This bonds most of the studs together on one sheet of drywall to resist shear forces on the wall. You also maximize this force by moving your joints. The effect of two offset sheets of drywall is similar to placing a long diagonal brace from the top corner of the top sheet to the opposite corner of the bottom sheet.
As an added benefit, horizontal settings make it easy to tape at waist level, reduce the effect of any bending of the tenons, and are much easier to correct for a slightly misplaced tenon (you're only trimming a short unbeveled edge as opposed to the full length of the finished beveled edge).
However, for non-load-bearing walls, especially in office environments where metal studs are used, vertical installation can be done for speed. It's also more practical for high ceilings where you'll need 3 or more sheets of drywall to hang it horizontally. I will also do a vertical installation on any wall that is 4 feet wide or less, as this results in a single sheet without any mud bonding.
Only vertically , that’s the proof and the truth!
Why and how the horizontal is wrong (and why the vertical is right). don't spoil the new one from the very beginning:
1 – Defective seam. Horizontal courses requiring more than one drywall panel create (rather than avoid) butt joint ends that are not flat and present a double (minimum) defect . Socket and switch covers, window and door trim, baseboards, paintings, mirrors and cabinets do not stand still. The use of any “butt joint product” erases all “the stated advantages of horizontal!
2 – Unsupported seam – the conical edge of the horizontal is not supported by 90% , only 10% (instead of 100%) of the contacts are framed, the seam will crack. Light switch and electrical panels inside the seam equal more slack and double the butt joint, minimum effort.
3 – Structural Defect – Horizontal reinforces only a wall that is 4 feet high or less, the top slab of a full height wall is never connected to the bottom slab. As per #2 above, frictional contact is minimized (instead of maximized vertically).
4 – Seam breakage. 4x8" Panels - Example 1: 48" tall by 102 " long wall, horizontal = 48" (technically) and that's a 24" wide butt joint or at least double the 48" (Vertical = same, generous, 96" but they simple 6" wide joints. Example 2: 96" high by 102" long wall, horizontal = 222" with 50% being 24" wide butts (vertical = 192" Easy joints 6" wide, yes less). in kitchen horizontal plane = 100% 24" wide stock (vertical = 0%) Yes, horizontally the cone area is halved (at least) to hide her stocks, so very minimally another 24" was added, and #5 below was not counted in Horizon's monumental fraud.
5 – Self-breaking corners – Horizontal uses only one of the tapered edges of the panel and places the other cone at the corner of the ceiling and baseboard, creating (instead of being avoided as with vertical) a crooked corner that must be rolled up or further caulked. It also instantly erases all the “claimed benefits of horizontal, doubling the amount of seam, correcting itself to equal vertical!
6 – Unfriendly seams. The chest-high horizontal seam makes it seem like a 24-inch wide floor-to-ceiling joint doesn't exist, and there's always a baseboard bevel for work-in-progress . (The vertical has easy joints and the top is screwed, glued and rubbed in later along with the ceiling corner, and the baseboard stains can also be done separately).
7 - Fire Hazard Liability - Horizontal fill only fills the face of the thinnest joint and does not block the back, causing smoke and fire to spread, inviting fuel air for fire growth (The vertical is full and airtight if simply screwed on).
8 – Unsafe Installation – Horizontal position requires 2 people to install safely and the panel is in the air, literally creating the potential for injury (vertical position is easily lifted by one person). Using a panel lift is not even as easy or safe as tilting the Vertical.
9 – Extra Waste – When properly covering a knee wall, half wall, tub front, column or ceiling by first removing both tapered edges, Horizontal cannot use tapers elsewhere (Vertical can and does). In addition , Horizontals waste 4 times more dirt on their completely unnecessary butt joints and baseboard bevels. if it was ever done.
10 – Destructive Ignorance – The Foundation and Framing crews work hard to make everything smooth, level, plumb and square. The horizontal destroys these efforts with their defective humps and baseboard bevels (the vertical retains perfection).
11 - Grasping at Straws with Outright Fraud - Horizons falsely and unknowingly brandishes the absurdly invalid (FPL439) 1983 test, “The Contribution of Drywall to the Durability of Light Frames ,” by self-convicted fraudster Ronald W. Wolfe. FPL439 found that all tapered wrapped edges of the paper must be completely intact in order for the horizontal to hit the vertical, period. In the real world, the bottom edge of the paper, wrapped horizontally in paper, is legally removed to remove it from all floors and thereby completely nullifies Wolfe's unforgivably deceitful and useless “research ( ridiculous ) and summation.
12 - Seam or Joint Treatment - According to ASTM C840 8.2, horizontal seams should be caulked to provide any resistance to fire, smoke and air movement (vertical is so good that it does not need to be treated at all).
13 – Expensive, slow complication. Horizontal depends on expensive special muds and even dirty tape or tools that waste mud. The strapping tools still require a 2nd step of cutting the tape, and the mud requires a mixing step. That means more cost, more time, more tools and equipment, and more water. for bad work! Vertical outperforms the cheapest ready-mixed solutions and dry adhesive tape. Again, the Vertical seam treatment is just for looks.
14 – Poor Fire Resistance Rating Vertical installation of single-ply or single-ply commercial drywall is required to ensure actual drywall strength This is well known to most horizontals, but you and your children are not important to the horizontal. And why, to respect the fraudsters who taught them wrong? Now you've seen that Vertical is faster and better in every way.
Just advertise Horizontal as wrong and confidently quote the above-mentioned irrefutable facts.
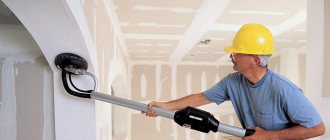
Using a hacksaw when cutting sheets
If the master does not have enough experience, then in the process of cutting gypsum plasterboard he may mistakenly use a hacksaw. But this tool cannot provide the necessary evenness of the cut. As a result, the presence of notches will not allow creating a neat joint between the sheets.
It is easier to cut the sheet with a construction knife. This results in a very even cut. Only the top cardboard layer is cut. And the core is broken along the line.
Storage rules
Any gypsum plasterboard manufacturer must include recommendations with the product regarding what storage conditions and rules must be followed by the buyer so as not to damage the material. However, not all sellers treat this issue responsibly. Therefore, if you are planning to renovate using drywall, you need to know the basic rules for storing it indoors. For gypsum boards there are the following storage rules:
- the room must be warm and heated. It can only be stored in an unheated room at a temperature of at least 10°C. The temperature should not fall below this mark. It should be noted that such a temperature regime must be maintained for 2 days after installing the sheets on the walls or ceiling;
- the room should be dry and closed;
- The shelf life of the product until it is installed on a metal frame in a heated room is at least 2-3 days;
- Stable temperature and humidity indicators are required.
In addition, there are requirements for the placement of the material itself:
- packages should be located away from heating sources;
Note! The minimum distance to batteries should be 1.5 m.
- The storage surface must be level.
Sheet storage
By following these rules, the purchased building material will remain in perfect condition until installation work begins. There are several ways to place drywall in a suitable room. Bundles of material can be stored either horizontally or vertically. The easiest way to place gypsum board packs is “lying down”, i.e. in the plane of the floor. To avoid damage and deformation of the slabs, a certain structure made of boards should be built under them, or special pallets can be used.
Storage base
This design will help prevent product damage if moisture gets on the floor. Raising the pack above the floor level should be approximately 10-20 cm. If you have problems with space in the room, then the best way to place it would be to lean the pack on the wall (place it “on its edge”). But in this situation, it should be remembered that in order to prevent deformation changes in the slabs, we place the first sheet from the package in such a way that it is as close as possible to 90 degrees. Those. it should be almost parallel to the wall.
Note! Under no circumstances should sheets be placed with the narrow side edged. This position of the plates will lead to inevitable deformation under its own weight.
We place the remaining sheets close to it. This way they will be positioned vertically.
No matter how you decide to place the drywall, it must be covered with film. For vertical placement this is especially important. The film will protect the product from excessive contamination with dust, prevent moisture from entering from above, and also eliminate the possibility of damage from mechanical impacts of small forces.
Incorrect installation of fasteners
The self-tapping screw should not protrude above the surface. This will make it very difficult to putty the seams. To make sure that there is no protrusion of the hardware, you need to run a spatula over the surface of the gypsum board. If its blade clings to the head, then the screw should be tightened.
When finishing screwing in the screw, the speed of the screwdriver must be reduced to avoid excessive deepening of the fastener. If this is not done, the cap may tear the material. As a result, the fastening will not be strong. If this does happen, the screw should be unscrewed. To cover the hole using putty.
The self-tapping screw must be buried in the plasterboard sheet perpendicular to its surface. During the work, it is necessary to ensure that the position of the hardware does not change.
Outdoors
In rare cases, it is allowed to place plasterboard sheets before installation work begins on the street. But there are certain restrictions here. These include:
- Accommodation is possible for up to 6 hours;
- products should be packaged in moisture-proof material;
- no frost. In winter, this type of storage is unacceptable. The temperature outside should not fall below 10°C.
This method of saving is used only in extremely rare situations and with the obligatory adherence to all the above recommendations.
Installation of drywall with incorrect sheet layout
This error occurs especially often when plasterboard sheets are adjusted to fit the finished frame. As a result, firstly, the sheets have to be cut. Secondly, there are more trimmed joints. Moreover, with this approach, more material is sent to waste. And the time it takes to complete the work also increases.
In order for everything to be done wisely, it is better to start the work with at least a rough layout plan. And then the paper plan can be used to mark the placement of both the profile and sheets.
Breaking the rules
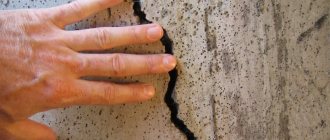
A negligent attitude towards the process of saving products can be fraught with the following consequences:
- slab deformation;
- the appearance of cracks or chips;
- swelling due to excessive absorption of moisture, which will affect the quality of the material;
- change in color of the outer layer of cardboard.
All these points will lead to a decrease in the service life of the product, a complication of installation work, as well as a deterioration in the quality and properties of the material. All specified storage requirements apply to all types of slabs, even moisture-resistant ones. After all, with prolonged contact with moisture, they will lose their factory performance properties. Storing plasterboard sheets requires the buyer to comply with all conditions specified by the manufacturer. If these conditions are violated, the manufacturer is no longer responsible for his product. Therefore, it will not be possible to exchange it. Be responsible about storage and your repair will be of high quality and durable.
Horizontal installation of drywall as part of single-layer sheathing
According to experts, installing drywall horizontally is less durable. Although, this statement applies only to single-layer structures. And it is explained by the different bending strength of individual gypsum board sheets. If the sheathing is two-layer, then horizontal laying can be used in the first or second layer.
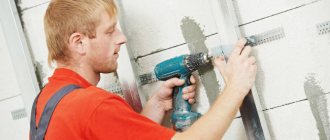
How to attach drywall to a wall
Next, it is on the horizontal guides that the sheets will be attached. Some cases require the installation of only vertical bars. Installation of drywall occurs directly on them using wood screws. Comparing both methods of attaching drywall to the wall, we can conclude that each of them can be used depending on the specific situation. You can attach drywall with glue if the wall has the most even surface possible, and also, if you don’t want to waste extra centimeters of space on installing a frame structure.
The materials used to form the frame are metal or wooden profiles. The first option is used more often. This is explained by the greater reliability of the metal and the lack of tendency to deform.
In accordance with this sequence, the frames are attached to all walls of the room. It is important that the horizontal and vertical guides are located at right angles.
Fastening gypsum boards using the frame method
A more common method of fastening gypsum boards is to install sheets on a frame made of metal profiles installed along the wall.
A few nuances of the method:
- The space between the wall and the profile allows the use of insulation. The most commonly used are mineral wool and foam boards. Before insulation, the wall needs to be treated with an antiseptic.
- In the gap behind the frame are hidden utilities, water pipes, heating and electrical wiring.
The frame method is considered more complex and expensive, but has many advantages:
- good heat and sound insulation;
- you can level surfaces with any degree of curvature;
- no need to prepare walls.
Work order:
Stage 1. First of all, measurements and markings are carried out for the installation of profiles and hangers. Marking for the guides begins from the top profile, the required distance is set aside from the wall, a line is drawn, and transferred to the floor using a plumb line. Vertical load-bearing profiles should be located at a distance of 60 cm from each other, and so that each sheet of plasterboard fixed to the wall rests on three posts. Suspensions should be installed at a distance of 60–80 cm.
Stage 2. Installation is in progress. It is necessary to install guide profiles along the perimeter: using a hammer drill, dowels and screws, the upper one must be screwed to the ceiling, the lower one to the floor. Suspensions are attached to the marked points, and carriers are inserted into the guide profiles. They must be secured with hangers.
Stage 3. Now let's figure out how to attach drywall to the profile. The sheets are installed in a vertical position. You can attach drywall using 25 mm metal screws: they must be screwed so that the caps are “recessed” into the sheet.
Upon completion of the work, the joints are sealed with putty using reinforcing tape, and after drying, the drywall attached to the wall is completely puttied, after which a smooth and even surface without flaws is obtained.
Is it possible to mount drywall horizontally: pros and cons
Thanks to damping tapes made of polyurethane foam or foam rubber, acoustic vibrations from the plasterboard sheets will not be transmitted to the wall ceilings. They are laid along the markings. Modern technologies in finishing work speak of using the method of horizontal and vertical fastening of plasterboard boards with the same frequency. This is due to the geometry of the room and the versatility of the material itself.
However, for each of these methods there are a number of nuances that should be taken into account so that there are no problems with the final finishing with wallpaper or paint.
- It is much more difficult to bring slab joints into a flat surface.
- Most likely, a complete coating with putty will be required due to the “playing open ends of the sheet or, as they also call it, “the spread of adjacent slabs.”
- Calculating the location of the guides is complicated due to the different lengths of the sheets used, which also complicates the measurements and fastening of the sheathing.
- The likelihood of cracks even when using reinforcing and self-adhesive sickles increases.
The material is used to construct partitions and niches. This is due to the fact that the use of other materials is more expensive and labor-intensive. However, when installing drywall, it is necessary to adhere to the technology of laying sheets and sealing the joints between them. Otherwise, during the operation of the premises, various problems will arise, for example, cracks or curvature of the surface.
The location of the guide profiles is determined by the size of the plasterboard sheet. If the material dimensions are 2.5 x 1.25 m, then the horizontal spacing between the battens should be 62.5 cm. 7 - Fire Hazard Liability - Horizontal filling only fills the face of the thinnest joint and does not block the back, causing the spread of smoke and fire , inviting fuel air for the fire to grow (Vertical is full and sealed if just screwed on).8 - Unsafe installation - Horizontal requires 2 people to install safely and the panel is in the air, literally creating the potential for injury (Vertical position can be easily lifted by one person).
Using a panel lift is not even as easy or safe as tilting the Vertical. Installation will be easier, but two layers of profile may cause unevenness on the drywall. If high evenness of the walls is not important, then this can be done.
The screws should be slightly recessed into the plasterboard by literally 1 mm or even a little less. This is the correct way to screw self-tapping screws into drywall. I also don’t really understand why additional horizontal profiles are needed if you lay drywall in 2 layers, “staggered” and additionally use PVA glue Gray wrote: if there are 2 layers of gypsum plasterboard, then horizontal profiles are not needed. they will not affect crack resistance, and will add only a slight increase in rigidity. Let me clarify: of course, this is only possible if the outer walls throughout the entire volume have at least the same vapor and air permeability. After assembling the frame and covering it with plasterboard, fill the space on one side between profiles with glued mineral wool. The slabs must have the same thickness as the profile. There is no need to press down the insulation: the higher its density, the more permeable the wall will be to sound.
As for me, there is no difference. I mounted it this way and that, and in the same room. I didn’t notice any difference after 2 years of use. Although this is my opinion and I do not pretend to be the truth. The main thing is that the guides are positioned correctly.
This is more important. Depends on the height of the ceilings and the size of the gypsum board. I installed a 3-meter gypsum board on the first floor of 2.8 m, on the second floor there are 2.5 ceilings, I looked at how Roman does it and did it horizontally in one room, then I spent a week swearing cutting out 10 cm pieces on top, and I couldn’t even putty under the ceiling comfortable. In other rooms vertically...
Installing drywall with the wrong side out
If you don’t know this yet, then pay attention to this fact. GCR has a front side and a reverse, back side. Installation of drywall should be done so that its front side faces the inside of the room.
But how to determine the front side? Very simple. There are never any markings on it. Moreover, it is slightly rough, and there are factory edges on this side.
If you install two sheets of drywall next to each other, a recess will form at the junction. It is necessary in order to apply putty there during finishing. Out of ignorance, some users believe that the presence of such a seam should be avoided. Because of this, their front side turns inside the structure.
Partition in 2 layers
Since, as mentioned earlier, two-layer cladding is used more often on partitions than on walls, we will consider the installation process using this design as an example. The covering begins, naturally, with the first layer. You need to remember four basic rules that remain relevant for covering any partitions.
- Vertical joints of sheets, if they are on the same side in the same layer, must be distanced from the joints of the opposite side by sixty centimeters. If they coincide, then cracks will inevitably appear on the partition, so this option is unacceptable under any circumstances;
- It is very important that all horizontal joints are on the profile. The joints should not be allowed to simply hang in the air;
- Horizontal joints between different sheets of drywall should not be on the same line. They cannot be allowed to even approximately coincide. The minimum distance between joints is forty centimeters;
- On the same side, horizontal joints with a distance of forty centimeters should be placed in a checkerboard pattern.
First of all, you need to calculate the required amount of materials. A calculator of components for covering the partition on both sides in two layers will help us with this:
*Attention ! All results are approximate - accuracy depends on the wall material, condition and shape of the room
So, let's get down to the cladding technology. To begin with, you need to sheathe only one of the sides, and then move on to the second. Do not forget that the sheets can be joined strictly on profiles and they are placed only vertically. But there are not enough profiles to secure sheets knocking in different places, so you will need to install jumpers. It will be difficult to install them alone. You will have to look for a partner who will hold the jumpers while you secure them to the profiles with self-tapping screws. When you install the first layer, it is important to remember that the pitch of the screws should not exceed seventy-five centimeters. After you have sheathed one side of the partition with the first layer, do not rush to start the second. If you have wired inside the partition, be sure to mark the location of the ends of the wires. It would be a good idea to take a photo of all the wiring.
To prevent the partition from appearing cardboard, fix sound-absorbing mineral wool in it before covering the other side.
You need to insert cotton wool between the profiles, leaving no free space. You need to use a little more cotton so that it sticks without additional fastening.
Wall paneling
As for double plasterboard sheathing on a regular concrete wall, applying a second layer is no different. The frame will be built a little differently and, accordingly, the sheets on the first layer of sheathing will lie differently, but double finishing occurs in a similar way. But covering a simple wall with plasterboard twice is not recommended. If, in the case of a partition, the second layer is necessary so that the artificial wall is strong enough and does not allow sound to pass through, then sheathing a concrete wall in two layers makes little sense. One layer of GVL will be quite enough for insulation, leveling, and sound insulation of walls. The disadvantage of two-layer wall covering is that it significantly reduces the size of the room. Perhaps in large halls this will be completely unnoticeable, but in small kitchens, bathrooms and toilets, which are often found in Russian houses, you will immediately feel the reduction in space. It's not very pleasant to live in cramped conditions. This is too high a price to pay to build a structure that in most cases will not be useful in practice. In such situations, it is better to get by with a standard single-layer construction.
Source: izgipsokartona.com