Today, aerated concrete block is considered very popular among building materials for masonry walls. Aerated concrete owes its demand to its unique properties, expressed in ease of installation, good strength, reliability and durability, practicality, and the ability to retain heat indoors. These advantages bring blocks to first place in the construction of residential buildings. But since the material tends to absorb water, it needs finishing to minimize this disadvantage. One of the practical protection options is plasterboard on aerated block.
Materials and tools for work
To install this finishing material on a block wall you will need:
- plasterboard sheets;
- putty material;
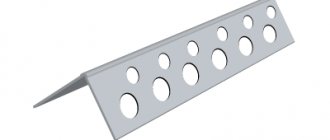
- perforated metal corners;
- self-tapping screws;
- metal profile guides;
- set of spatulas;
- screwdriver;
- building level;
- roulette;
- marking pencil;
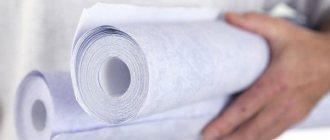
- self-adhesive tape;
- perforator;
- metal scissors.
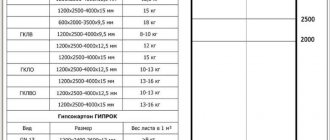
You can begin work with everything you need from the specified list at hand. It is recommended to use plasterboard with a thickness of 1.2 cm. For finishing ceilings, use sheets whose thickness is 0.9 cm.
Before finishing, it is recommended to perform calculations on material consumption.
How to avoid mistakes when covering walls
In order to avoid mistakes, it is important to have a good theoretical background - the rest will come with experience. The main mistakes of beginners are:
- Distortion of the plane of the walls by “helicopter” - this happens if during installation the master uses a bubble building level. It is highly recommended that you use a plumb bob or a laser axle builder if you are doing the work professionally. These devices have the smallest error, which allows you to build even frames.
- A hump or depression in the center of the wall occurs if the rack profiles are longer than the height of the ceiling. When profiles are installed in a frame, they may bend. This is also possible if you do not use thread when leveling.
- Self-tapping screws that are not screwed in completely - all fasteners in the drywall must be recessed by 1-2 mm, otherwise the cap will be very difficult to hide under the putty.
- Self-tapping screws can be screwed in even more than required if a bit with a stopper is not used. Such fasteners must be removed and replaced with normal ones, stepping back 5 cm.
If you miss and miss the profile, unscrew the screw and tighten it well. To prevent it from spinning in the drywall during the reverse stroke, press it on the side with the end of the blade of a utility knife.
- Also, be careful that no part of the frame protrudes too much beyond the plane. Only bedbug self-tapping screw caps can do this. This will not greatly affect the evenness of the wall, but will complicate the fastening of the material - when tightening the screws, the edges of the sheets may break.
Preliminary calculations
The material is purchased with a reserve. But here it is recommended not to overdo it, so as not to incur unnecessary financial costs.
First, the room is measured to find out the area of the walls. The result obtained is simply multiplied by the height of the room, and the areas of window and door openings are subtracted.
When determining the ceiling area, everything is much simpler. To do this, the width of the surface is multiplied by its length.
Five percent of the reserve should be added to the resulting amount of drywall.
All that remains is to divide the total area by the value of one standard sheet, and you can go to the store.
Preparing for wall decoration
The following list of activities must be completed:
- clean the aerated concrete surface from dust and dirt;
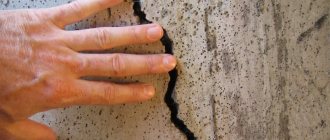
- clean uneven areas, seal deep cracks and chips with cement mortar;
- prime the block surface and wait three to four hours until it dries. Here it is necessary to pay attention to the fact that the primer composition should be intended for building materials with a high level of moisture absorption.
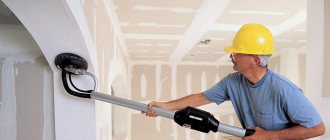
Now you can install sheets of drywall over the sheathing or directly onto the blocks.
How to glue drywall to a wall at home
When gluing walls with plasterboard, several types of adhesives are used, the manufacturers of which guarantee that the fixation will be reliable. Ready-made mixtures are easy to use and provide durable fastening of gypsum boards to wall surfaces. In addition, you can prepare an adhesive solution with your own hands, and also use polyurethane foam.
Important! Improved adhesion of gypsum board to the wall surface can be ensured by coating the inside of the sheet with a deep penetration compound.
The adhesive mixture prepared independently should be used up within half an hour, since after this time it becomes unusable.
Commonly used ready-mixes:
- Fugenfüller putty is applied directly to the walls in a very thin layer, it is usually used by experienced professionals, since its application requires knowledge and skills;
- Silicone mixtures are similar in use with Fugenfüller putty; they are also not recommended to be used independently;
- The universal gypsum adhesive Perlfix will not cause difficulties in gluing walls even for beginners, since it is enough to just dilute it with water and then apply a homogeneous mixture of glue to a sheet of plasterboard or a wall. This glue not only securely fastens the drywall to the wall, but also evens out uneven walls;
- Ceresit SM 11 is used in a similar way to perlfix, despite the fact that its composition is designed for gluing ceramic tiles.
Installation with glue
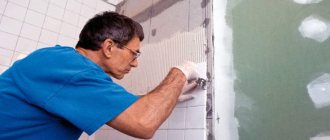
Mounting gypsum boards using an adhesive composition is an easier and more economical option for finishing interior walls. The technique allows you to save money on guide elements and maximizes the amount of free space in small rooms. This method is great for hiding chips, cracks and electrical wiring. So, we glue the drywall onto the gas block.
Execution of work
Let's assume that the preliminary steps have been completed. After that:
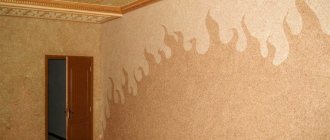
- We apply horizontal markings with a pencil. To do this, draw a pair of lines from the ceiling to the floor surface at a distance of ten centimeters from each other. Now we draw two lines in the middle to divide the wall into three even sections. The distance between the vertical lines is sixty centimeters.
- Using self-tapping screws as marks, we apply a mesh that will help fix the drywall sheet evenly. The extreme markings are set plumb, the vertical angles are found by screwing in or turning out self-tapping screws. To further secure the vertical, it is recommended to tighten a thin fishing line.
- On each vertical there is a plane; beacons made of screws are placed in half-meter increments. The constructed plane is checked with a level. If there are deviations, they are corrected with a screwdriver.
- The adhesive composition is applied to the plasterboard surface with small strokes in those places where the marks are approximately located, and the sheet is applied to the block wall.
- It is very important to check the common planes of two or more plasterboard sheets with a level.
As soon as the adhesive composition has completely dried, you can begin sealing the joints between the sheets with putty material. To do this, use putty prepared on the basis of a dry mixture with the addition of water. The consistency of the solution should be creamy; it is applied to the joints and leveled with a spatula.
It is recommended to use long-hardening gypsum mixtures as glue. The thickness of the applied composition is determined by the curvature of the surface.
If the wall turns out to be completely flat and strictly vertical, then further work will be significantly easier. The main difference of the method is the absence of problems when fixing heavy objects on the walls.
The work of finishing with gypsum board does not cause any difficulties; they can be completely carried out on their own. They should only be performed in dry weather with good ventilation of the room.
To reduce the consumption of adhesive composition, the surface of the walls is first leveled with putty, which is applied in several layers.
Interior decoration of aerated concrete house with plasterboard, lining and plastic
Properly executed aerated concrete masonry is distinguished by the good quality of the surfaces of walls and partitions: they do not require leveling with a thick layer of plaster, and drywall can be installed without a frame.
However, this wall material has a number of features that the interior decoration of a house made of aerated concrete must be taken into account. Photos and videos in this article will help you see the intricacies of the work.
What to consider
Finishing work is carried out after completion of all construction and installation work, installation of window and door units, laying of pipelines, pouring the base for floors.
- Aerated concrete “breathes” well - it allows air to pass through it along with water vapor, which is always present in living spaces, kitchens, and baths.
- If the outside of the house is lined with vapor-proof materials (brick without vertical gaps, ceramic tiles), then moist air accumulates in the thickness of the wall. Humidification of structures and its consequences is a separate topic. If the external cladding of the specified type has already been completed, then the interior finishing of houses made of aerated concrete must be vapor-tight without any options.
- When using vapor-permeable materials in the outer cladding of a house made of aerated concrete, the interior decoration allows for any design project.
- Given the ability of aerated concrete to absorb moisture, before applying any adhesive or putty composition, the surface of the walls must be treated with a deep penetration primer and allowed to dry completely.
- It is necessary to use steam- and waterproof wall finishing in rooms with high humidity: kitchens, baths, swimming pools. As an option - ceramic tiles, natural stone.
Drywall
When looking for an answer to the question: “How to decorate a house made of aerated concrete?”, we advise you to pay attention to plasterboard, with which you can quickly level and insulate the walls.
Frameless wall cladding with plasterboard (sheets of dry gypsum plaster) has been carried out since the 50s of the twentieth century, and included the following sequence of work:
- preparation of wall surfaces,
- marking the installation sites for drywall,
- cutting and preparing sheets,
- applying adhesive or mastic to the walls in the form of “cakes” about 3 cm thick, arranged in a checkerboard pattern, and gluing gypsum boards,
- sealing seams.
The technology has not changed since then:
- Surface preparation includes cleaning aerated concrete walls from adhesive drips with a wide spatula and applying a primer. It is advisable to prime twice.
- A two-meter level is used to check flatness and deviation from the vertical - the thickness of the glue depends on this.
- The sheets are marked and cut to the required shape. Reassembly can be done during work without prior preparation.
- The method of applying glue and its composition depend on the unevenness of the wall. When the deviations are millimeters, the glue is applied to the sheet with a notched trowel.
- If the deviations are 1-2 cm in height, then glue is applied to the wall or sheet in “cakes” with a diameter of about 10 cm and a thickness of up to 2 cm. They are placed in a checkerboard pattern, at a distance of about 30 cm from each other.
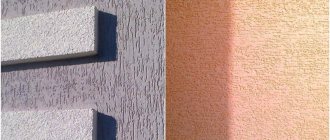
Applying glue with “flat cakes”
Installing drywall on a profile
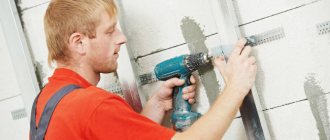
For this finishing method, you will have to arrange a sheathing made of wood or metal profiles. The elements should be secured with dowels with a ribbed surface, since the aerated concrete block has a porous structure. Such products will be perfectly held inside, preventing the frame base from being separated from the surface of the walls.
Execution of work
As a rule, aerated concrete walls are smooth. But if there are irregularities, then the finishing material is attached exclusively to metal profiles.
- the pitch between the guides should be sixty centimeters along the axes. If the width of the drywall differs from the standard size (120 cm), then the guides are attached at a distance equal to half the width of the sheet;
- holes are made in the floor and ceiling to fix the upper and lower frame elements. Vertical profiles are attached to them, the length of which corresponds to the height of the wall;
- after this, hanging elements are installed, fixed to the wall surface after half a meter with special fasteners, because simple self-tapping screws into an aerated concrete block are not suitable;
- the correct installation of the profiles is checked by a level, the guides are leveled, fixed with self-tapping screws to the hanging elements and to the main guides at the bottom and top;
- You can attach plasterboard material. This is done with self-tapping screws on the racks in increments of twenty-five centimeters;
- The joining areas are fixed with self-adhesive tape and sealed with putty, which is sanded after drying.
How to glue drywall to a wall with glue if it is concrete or aerated concrete
In order to ensure the required level of strength in the connection of the gypsum board with the wall surface, it is important to remember that when dealing with a concrete wall, the adhesive composition is applied to the sheet itself. If gluing drywall to aerated concrete is planned, then the glue is applied directly to the wall surface.
Important! Before installation work, you need to be able to calculate the glue consumption in order to purchase the required amount in advance. According to average indicators, for one square meter of a flat surface to be glued, 1800 grams of dry adhesive mixture may be required.
The finished adhesive mixture is applied with a notched trowel in small portions at intervals of up to 25 centimeters. Then the bottom edge of the sheet is placed on the lining, where its position is leveled and pressed against the wall plane. Irregularities and bulges are determined using a rule or level, and then removed by lightly tapping the sheet. The flat surface of the sheet is supported by a wooden block for complete drying.
Expert advice
Before finishing the walls with plasterboard begins, the aerated concrete surface should be puttied and leveled. Significant damage and uneven areas are repaired with plaster mortar.
To finish a high ceiling, a frame fastening option is used, because in this case it is considered more reliable. For low ceilings, it is allowed to use glue, but such work requires a lot of labor associated with holding heavy sheets of plasterboard material at the desired height.
For interior wall decoration, only high-quality plasterboard material is used. Experienced craftsmen prefer to work with products from Knauf, which has long been a leader in the global building materials market.
In winter, such work is allowed to be carried out in a room where the temperature ranges from five to twenty-five degrees Celsius.
Interior finishing work in rooms with high humidity levels is carried out using plasterboard that is resistant to water.
To apply the putty composition evenly in the joining areas, it is necessary to use an angled spatula.
In the case when drywall is sewn onto a wooden sheathing, all guide rails are pre-treated with an antiseptic.
How to glue drywall to the wall and ceiling: installation on aerated concrete and other surfaces
Installation of gypsum boards in the vast majority of cases involves preliminary assembly of the frame followed by fastening the sheets to metal or, in some cases, wooden guides. However, sometimes you have to glue the sheets directly onto the wall surface. In this case, we must act completely differently and take into account factors that would not be important in the case of a more standard approach. In this material we will look at how to glue plasterboard to concrete, aerated concrete and other surfaces.
First of all, we need the drywall and glue themselves. It will not be difficult to calculate the amount of gypsum board required for your case, but what about glue? You need to understand that one square meter of surface can take up to 5 kilograms. Just 1 millimeter of layer when coating a “square of sheet” will require you to spend up to 1.8 kilograms of glue. Important!
The process is quite labor-intensive, so you can’t do it without an assistant. Otherwise, it is best to cut the sheets into smaller pieces and then install them. But in this case, there will be many more seams, which we will either have to putty or reinforce with special tape. The second option is more preferable, since in this case cracks are guaranteed not to appear on the finishing plaster.
In addition, plaster will be necessary if it is necessary to level the walls. We will talk about preparing wall surfaces later, but for now we will list the main tools that you should have at hand: Since we are talking about the ceiling, it makes sense to look for less thick sheet options. Glue can be used as in the case of walls - “Perlfix”.
In this case, the mixture can be made independently - by mixing 40 percent water, 2 percent bone glue, 58 percent alabaster.
Types of plasterboard material
Today it is used quite often for finishing interior walls. This is especially true for houses built from aerated concrete blocks. The following types of plasterboard material are used for finishing work:
- wall – used for finishing the surface of walls;
- ceiling - it is three millimeters thinner than the wall one, the thickness is 9 mm.
In addition, it is recommended to use the following types of sheets:
- standard - they are used most often;
- moisture resistant - recommended for use in rooms with high levels of humidity, for finishing window openings;
- fireproof - they are used when designing an emergency exit;
- combined - have both fire-resistant and moisture-resistant properties.
An internal wall made of aerated concrete block can be finished with any of the listed types of plasterboard.
Installation of metal profile
Finishing walls made of aerated concrete indoors requires a responsible approach, since plasterboard on the wall must last for many years. Therefore, everything should be done slowly and measuredly.
- To begin with, you should secure the guide profiles on the marked lines. When fastening, it is worth making holes in advance. Fastening is carried out with dowels.
Fastening guide profiles - Suspensions are attached to the surface at the designated points.
- Vertical rack profiles are inserted into the guide profiles and secured to the hangers with self-tapping screws. An important factor here is the evenness of the created surface. Each movement made should be checked with a level and plumb lines.
- After installing the vertical profiles, sections for the transverse ones are cut.
- The transverse ones are mounted horizontally. They are connected to vertical profiles using crabs.
Fastening horizontal profiles - In the place of reinforcement, the vertical and horizontal profiles should be made double.
Installation of metal profile for drywall
After completing the installation of the metal frame, you need to check it for strength and rigidity.
Insulation is placed in a frame made of profiles. Insulation is placed in this frame, and wiring is also made under the drywall to switches and sockets. Other communications are hidden here - Internet cable, cable TV. The wires must be corrugated.