Advantages and disadvantages of decorative stone
Gypsum decorative stone tiles are on sale. They are quite heavy, so they are used not only for cladding the interior walls of the house, but also for fireplaces, stoves, finishing window sills and bar counters.
The material has many advantages:
- wide range of models;
- imitation of natural material;
- pleasant surface for hands;
- environmental friendliness of tiles;
- resistance to temperature changes;
- strength;
- long service life.
But the main disadvantage is the need to carefully prepare the surface of the material itself before starting work. The result of the work and its preservation over a long period depend on the quality of pre-treatment. Some tiles react poorly to contact with moisture and physical activity. Glue for laying decorative stone can improve its properties. Also, you should not use gypsum tiles for cladding in rooms without heating, as they can fall off and crack due to low temperatures.
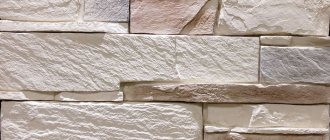
What to look for when buying a stone
When choosing a material for wall decoration, you should pay attention to the following points:
- “Good doesn’t come cheap!” The price of high-quality decorative stone cannot be too low, since high-quality components used in the production process are expensive.
- “Expensive” is not a synonym for “good”. Therefore, we are looking at the elaboration of the texture. The presence of small details on the surface of the stone is a positive result of using expensive silicone molds. Of the three mold materials used by manufacturers - plastics, rubber and silicone - only the latter allow for truly high-quality rendering of casting parts. Silicone molds are expensive, and this affects the final price of the product - see point 1.
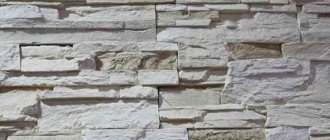
- The color of one element should not overlap another element, as shown in the photo.
- There should be no through holes in the tiles. A responsible manufacturer will reject such samples.
- The geometric shapes of the tiles should be rectilinear, with maintained right angles. The side facing the wall should be flat and have grooves 3–4 mm deep, which improve the bond of the tile with the adhesive layer and prevent the tile from sliding off while the adhesive has not yet hardened.
- The structure on the chipped tile should be uniform. The size of the inclusions should not exceed 5 mm, as otherwise the stone may split.
- You can determine the coloring method by the cut. It should not be done superficially, but by adding dye to the mass from which the stone is formed. Then small scratches and chips of the surface will not be noticeable.
Laying on various surfaces
Laying artificial stone can be done on the following types of surfaces:
- Brick, sand-lime brick;
- Ceramics;
- Concrete, pumice concrete, foam concrete;
- Painted walls, wallpaper;
- Polystyrene foam insulation;
- Plaster, drywall;
- Tree;
- Metal, glass, plastic, etc.
The photo shows artificial stone laying on a painted surface
How to lay artificial stone on a plastered wall or paint?
Decorative stone fits perfectly on concrete surfaces, since its composition is as close as possible to them. If you have plastered walls at home, you can glue the tiles directly on them. However, the plaster should not be old, damp, crumbling, etc. Also, the wall should be as flat as possible. If you do not have this, then it is better to remove the old layer of plaster and apply a new one up to 2 cm wide. If the walls require the application of larger layers, then it is recommended to install a special mesh on which the plaster layer will be applied. If you are laying light-colored tiles, it is better to use galvanized mesh.
This is how artificial stone is laid on the wall
The same applies to painted walls. The paint is brushed off or sandblasted and then the wall is plastered. You can attach the plaster mesh directly to the painted wall and then carry out the plastering work.
After drying, the surface is thoroughly primed, 2-3 times. The primer additionally protects the wall from microorganisms, mold and ensures maximum adhesion to other materials.
How to lay decorative stone on a concrete wall?
Concrete masonry does not require plastering and the tiles are laid directly on the wall using special adhesives. However, it is worth considering that masonry on concrete surfaces is carried out only after the concrete structures have been idle for at least six months. During this time, the concrete completes all shaking and shrinkage and is ready for subsequent work.
How to put decorative stone on cinder blocks, foam aerated concrete and sand-lime bricks?
The fastening of artificial stone to this type of structure is carried out after preliminary preparation. To do this, at the initial stage the wall is leveled - all joints and unevenness between bricks and blocks are puttied, and then plastered with lime-cement mortar. It is also possible to use a mesh, especially when the thickness of the leveling layer exceeds 2 cm.
Also, after plastering, the surfaces are carefully treated with a primer to prevent moisture absorption.
The photo shows artificial bricks being laid on a special mesh.
Fastening tiles to wooden surfaces
Since wood is less resistant to adverse weather conditions and can dry out, rot and become deformed, before cladding it must first be protected from moisture. Therefore, before plastering work, we form a waterproofing layer. For this you can use roofing felt, glassine, and hydrophobic construction paper. The paper is laid horizontally with an overlap of 4 to 8 cm at the seams.
After preparing the surface, a plaster mesh with an anti-corrosion coating is applied to it, preferably in two layers. After applying a two-layer mesh, it is plastered with 1 cm of plaster mortar. Before installation begins, the materials must dry completely.
How to attach a decorative stone to wallpaper?
Many people are interested in the question: can decorative stone be glued to wallpaper or not. Of course, you can do whatever you want, but how long will such a design last? Any craftsman counts on the longevity of his work, and the wallpaper, under the weight of the stone, will sooner or later begin to fall off or create other inconveniences. Therefore, if you are definitely planning to decorate your wallpaper with decorative stone, then you have several options for solving this issue.
Preparing wallpaper before laying artificial stone
Useful tips
Decorative stone looks great even without tricks. But there are a few secrets to giving the final finish a designer-type look:
- The tiled surface will look harmonious if the sequence of stacked elements of different sizes and shades is chosen correctly. When using slabs of the same size, the lines must be precisely aligned vertically, diagonally and horizontally.
- The maximum level of beauty for finishing is provided by trimming corners in individual fragments.
- The seams should be sealed with care and a special bag should be used to fill the voids or a syringe gun. The thing is that the solution that gets on the front surface of decorative artificial slabs is extremely difficult to remove.
Installing artificial stone is simple and does not require significant costs, but work at each stage should be carried out as carefully as possible. Moreover, you should pay close attention to the compatibility of shades of colors and sizes, and only in this case the finish will be pleasing to the eye.
The process of installing artificial stone
How to attach artificial stone? Before laying the stone on the wall surface, the wall itself is checked with a level: if curvature of the plane is noticed, then the wall should be leveled with plaster or putty. You should also apply an antifungal solution to the wall: it is better to walk over the surface at least a couple of times. After this layer has dried, a layer of primer is applied.
Installation of artificial stone - when performing work, you can use special gloves to protect your hands
Artificial stone should be installed at positive temperatures. In the case when the temperature exceeds the barrier of twenty-five degrees Celsius, you should wet the wall and the stone itself on the back side with a water solution.
Before applying adhesive to the stone, you should check the correct shape of the stone several times to see if it will fit. Fastening the artificial wall stone begins from the lower parts of the wall and then moves upward. The stone is secured to the wall with liquid nails or sealants.
When working with stone, you should prepare an adhesive that will last about twenty minutes of work: with a longer working time, such glue begins to dry out. Place the stone in the desired location on the wall, apply a little pressure and secure it.
Glue for working with stone
Particular attention should be paid to the selection of adhesive solution. How to glue the decorative stone is decided after purchasing the material. The basis of such adhesive compositions can be gypsum or cement.
The following requirements apply to the glue:
- long-term preservation of appearance;
- reliability of material fixation;
- safety for human health, absence of toxic emissions during building operation;
- compliance with the material used.
For artificial bricks, adhesives for ceramics and selenite, PVA glue, dry cement mixture and bustilate, and thickly rubbed oil paint are also used.
Types of solutions
In addition to glue, other compounds suitable for laying tiles are used:
- Mastic for fastening to concrete, brick walls or covered with plasterboard. Its main advantage is the absence of harmful substances in its composition. It also dries quickly and prevents moisture penetration.
- Assembly sealant is an elastic and moisture-resistant solution on a polyurethane or polyepoxy base. It perfectly connects different surfaces.
- Polyurethane glue can expand in volume. The sticking of the tiles will be normal, and minor defects will be less noticeable.
- "Liquid Nails". This is a reliable and elastic composition for attaching decorative stone to almost any surface.
When choosing adhesive solutions, you should take into account the characteristics of the surface to which the cladding will be attached, and the stone itself.
Manufacturer brands of glue for artificial stone
Ceresit adhesives are considered the most popular. They are packed in paper bags, which indicate the types of work for which they are intended. There are compositions for interior and exterior use. The second group of products is a little more expensive in price. In addition to Ceresit, other brands of glue are often used for interior decoration: Knauf or Perlfix. The installation technology also depends on the type of glue.
In addition to popular manufacturers, there are also cheaper brands that produce formulations:
- "Unice Plus";
- "Acrylic";
- "Creps";
- "Confiad".
They differ in price and composition.
How to care for stone
Caring for gypsum stone will not require much effort on the part of the housewife.
All that is required is to periodically wipe off the dust from the varnish base. It is worth noting that if bricks with an aging effect were used in the interior, then the dust on them is not visible as on dark varnished bricks. The varnish, in turn, protects the plaster from moisture. Gypsum bricks for decorating a room are the best budget solution. With the help of such inexpensive materials, you can create a cozy interior in any corner of the house, and all that is required to design an interior solution is imagination, time and compliance with installation technology.
Varieties of decorative bricks
Decorative material is made from gypsum or cement-sand mortar. This significantly affects where you will apply the decor. Gypsum is afraid of moisture, it is used in living rooms, and cement tiles are suitable for the bathroom, kitchen and toilet.
There is also gypsum cement decor coated with organic paint (Kasavaga brick). It is interesting because it allows for masonry without seams, but has a higher cost.
As for appearance, the decor often imitates brick and slate. All types of material look very beautiful. Slate decor gives the feeling of a solid stone wall; brick also has a special loft style chic.
Types of decorative stone
The finishing material for walls differs in its composition. Therefore, after studying the features of each of them, you can independently select options for cladding surfaces on the street and in the house. Artificial stone is produced in several ways and is divided into the following types:
- Ceramic – creation requires annealing at high temperatures.
- Made from gypsum - ideal for internal cladding. You can make tiles at home. The appearance is difficult to distinguish from natural. It is not used as an external element due to its instability to cold.
- Concrete - concrete is the main component, so the cladding is heavy and is not always appropriate as interior decor. Resistant to frost and negative weather conditions.
- Acrylic - plastic during the molding process, production is allowed at home.
- Flexible is a modern cladding element in which a thin layer of sandstone is applied to a flexible surface.
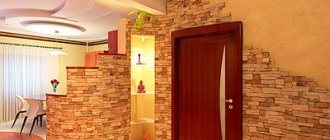
Where is it appropriate to use artificial stone:
| Place: | Description: |
| Yard | A wide range makes it possible to decorate not only the external walls of the house, but also paths, gazebos and fences. |
| Facade | Installation on a foundation creates additional protective properties from wind, rain and frost. The base is most susceptible to mechanical stress. |
| Fireplace | Finishing of stoves and fireplaces has long been done using both natural and artificial materials. Even brick-like tiles that can withstand high temperatures are suitable. |
| Arch | Interior portals without doors are designed in any order. Wallpaper, plaster, painting goes well with the finishing material. |
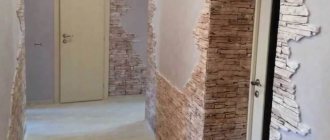
| Entrance door and hallway | Cladding work begins from the corner; pre-shaped tiles are used for the opening. |
| Window | A room in which not only the interior portals are decorated with stone looks beautiful. An apartment with clear zoning of space looks advantageous. |
Selecting the type of installation
Despite the amazing beauty of the facades, which are lined with artificial stone, the installation process is not as complicated as it seems at first glance. By strictly following the step-by-step instructions, even a beginner will be able to efficiently and beautifully clad a house with artificial stone.
Important! The temperature for finishing work on the facade should be within 5-25 degrees Celsius, otherwise the laying technology may be disrupted, which will reduce the performance properties of the material.
There are two ways to lay artificial stone: wet and dry. Each of these types has its own advantages and disadvantages, so when choosing, take into account the characteristics of the house, budget and the chosen material for cladding the building.
“Wet” installation technology has nothing to do with humidity or water. The method got its name due to the fact that the cladding is made using adhesive (cement) mortars, and the “dry” method involves attaching the stone with screws (self-tapping screws) to a pre-mounted frame.
Fastening the stone with glue
Wet technology is carried out more quickly, because the preparatory work does not involve the installation of a frame. The stone slabs fit tightly one to another. You can create decorative seams by retreating no more than 12 mm between the stones, but then you will need a special grout mixture to seal the seams. Typically, this technology is used for houses that do not require additional insulation and the preparatory stage will only be high-quality cleaning of the walls and priming.
Advantages of the “wet” method:
- less labor intensive;
- high speed of work;
- High qualifications and experience are not required to perform the work.
This method is not suitable for high-rise buildings, and the service life of the cladding is much shorter compared to the “dry” method. The average service life is 20-25 years. While with the dry method the period can be increased to 40 years.
The “dry” method allows you to create the correct air layer, which protects the building from overheating and hypothermia. Installation can be done at almost any temperature, since there are no special requirements for materials. As for additional care for such a structure, it is quite simple and practical. You can always quickly replace one element with another.
"Dry" method
Advantages of the “dry” method:
- creation of additional ventilation;
- long service life;
- suitable for cladding high-rise buildings;
- wide temperature range for facade work;
- compliance with modern fire safety requirements (by creating proper ventilation);
- Repairs are made quickly if one of the elements is damaged.
Tools for facade cladding using the wet method
- Construction rule, level.
- Pencil and ruler.
- Putty knife.
- Wire cutters.
- Circular saw (or grinder).
- Master OK.
- Brush with metal bristles.
- Paint brush.
- Electric drill (or construction mixer).
Tools for cladding facades with artificial stone
Materials for the “wet” cladding method will need:
- fake diamond;
- construction adhesive for stone or cement mortar;
- a rag to remove glue residue from the surface;
- grout mixture.
Prices for popular electric drill models
Electric drills
Details
Preparation of materials and surfaces
You can attach gypsum tiles to almost any type of surface - concrete, brick or wooden walls, plaster, metal and glass. The main requirement that ensures a high-quality installation is dryness, strength and cleanliness of the base.
Surface preparation is as follows:
- Remove the remnants of the old facing layer - you will need to remove all the plaster and the old adhesive.
- Clean the base surface with a wire brush.
- Apply an acrylic-based primer coat to the surface with deep penetration. After this, you should leave the walls to dry in accordance with the priming instructions.
Helpful advice! If the walls are wooden, then reinforcing fiberglass mesh should be installed.
Another step will be preparing the material for cladding. Initially, you need to calculate the cladding area. The standard overconsumption of material will be 10%, which should be kept in mind when calculating the required amount of material.
Preparatory stage for the material:
- Cut the artificial stone into pieces of the required configuration and size using a hacksaw or saw.
- The cut areas should be cleaned with a file or sandpaper to give them a natural appearance.
- The reverse side of the stone slabs should be lubricated with the same primer that was used to treat the wall surfaces. Then leave to dry.
- Apply paint and varnish composition to the cladding material and let it dry. You will need to use several shades.
Next, let's look at the direct instructions for use.
Gluing instructions
So, let's look at how to glue decorative stone to walls. For laying decorative stone, two technologies are used - seamless, and also with jointing. You should choose the ideal option before starting installation work so that you can correctly calculate the amount of material.
Please note that with a seamless laying method, the consumption of stone material will increase by 10-15%.
The principle of performing cladding work is very similar for both technologies:
- Place gypsum tiles (artificial stone) on the floor near the cladding area in the same order as they will be placed on the surface of the walls. This will make it possible to see the final finishing result and make the required adjustments.
- Mark the surface of the walls to ensure the most accurate placement of materials.
- Carefully study the instructions for the composition of the glue and only after that you can begin diluting the solution. This is extremely important because ready-made mixtures have a limited shelf life.
- Prepare the adhesive composition - it should be without lumps, not very fluid, thick, but definitely not sticky.
- If you use a cement-based mixture, it should be applied to the walls in a layer with a thickness of a maximum of 0.6 cm. Do not cover an area of more than 1 square meter at a time with glue - to prevent the adhesive composition from drying out.
- Apply a spot solution on the back side of the tiles (8 points each) or in wave strips if the composition chosen as an adhesive is a polymer sealant for installation.
- Start gluing the decorative stone from the bottom of each corner, where it will be more convenient.
- Press each tile into the mortar applied to the walls so that it extends along the edges of the piece. The material should be pressed as tightly as possible to the surface.
- If you choose a laying method with seams, then you do not need to make gaps between the tiles larger than 1 cm. With the method without seams, the edges of the fragments should fit as closely as possible to each other.
- Fill the joints between the tiles with the special grout or adhesive that was used for installation. In certain cases, the adhesive squeezed out along the edges is enough to level the surface and seal the seams.
- Grout the seams after the adhesives or grout have begun to set, but it is unacceptable to wait until the composition has completely hardened. It should be borne in mind that the approximate hardening time for different products can vary from 10 to 30 minutes.
- The surface covered with panels should be treated with polyurethane or acrylic varnish. This will provide reliable protection from moisture, as well as long-term operation. For the same purposes, you can use any product that has water-repellent properties.
- Complete drying of the surface, which is covered with gypsum tiles, is achieved within 3-4 days.
Helpful advice! Gypsum decorative stone, which is easy to glue to walls, is a lightweight material, and it attaches well to vertical surfaces. But it’s still better to start gluing the tiles from the very bottom row. This will make it possible to make the lines as smooth as possible with a seamless installation method and prevent individual fragments from slipping.
How to wallpaper
Despite their relatively light weight, decorative stones are a slightly heavy wall covering. For this reason, it is not recommended to stick it over wallpaper. Otherwise, there is a high risk that the gypsum panels will come off the walls and collapse. If the design includes a combination of decorative stones and wallpaper, you will need to leave bare areas under the panels.
It is recommended to mark the surfaces of the walls in advance so that when installing wallpaper you do not have to cover the places where the decorative stone will be attached. The surface must be prepared for wallpapering and stone installation - leveled and treated with a primer.
The fastening of artificial stone is carried out only after the wallpaper has been glued, and not on top of it, but on the remaining free wall areas.
If you want to install decorative slabs on walls whose surface will be ideally covered with wallpaper, you need to follow the instructions:
- Mark with a pencil on the surface of the walls the places where you plan to glue the stone, step back 2 cm and outline the boundaries. The indentation is required so that the wallpaper sheets slightly extend under the plaster panels and there are no unsightly gaps left between the two types of cladding.
- Using a sharp knife or blade, cut out the outlined fragments and remove the wallpaper in such areas.
- Prepare a glue solution and attach the slabs to the walls according to the instructions.
- Treat the surface that is finished with panels with a special varnish.
If for some reason you should install the decorative stone first, and only after the wallpaper, you should use one of two methods:
- Attach all the slabs to the surface of the walls, except for the last, top row. Next, glue the wallpaper; you need to make a spade on the area under the stone. At the end, attach the last row of gypsum boards.
- Lay all the slabs, without exception, and the wallpaper should be glued with a margin of 6 cm (depending on the type of wallpaper). After perfect drying, use a sharp knife to cut off the excess by running along the joints. The resulting seam should be covered with decorative skirting boards (baguette).
Helpful advice! If you are not using paper wallpaper, but liquid wallpaper, then you do not need a spade under the slabs - the joint will already be neat.
How to glue correctly
A builder can glue decorative stone to a wall in several ways. Two main technologies are used: with jointing and seamless. Each has its own design features and is selected for a specific finishing option.
The technology is selected before purchasing the material in order to more accurately calculate the required volumes. Also, when purchasing, you should lay out about 2 square meters of tiles for review. This is important as batches may differ in color and shade.
With unstitching
This option for laying tiles is considered more aesthetically pleasing due to the neat seams that frame the artificial bricks. It is formed due to the adhesive composition on which the finishing material is glued. The width of the seams can range from 0.1 mm to several centimeters. The distance between the tiles is selected according to the dimensions of the plates.
Artificial stone can be glued by pressing it into the applied layer of glue. Its excess is removed with a spatula. If the adhesive composition is not enough to create a full-fledged seam, builders use a pastry bag, with which the glue is applied between the tiles.
Seamlessly
The apartment can be faced with large gypsum boards. They are usually laid as close to each other as possible so that the composition does not leak out. Therefore, this technology is considered seamless. If it suddenly gets on the surface of the tile, you should wait until it hardens and then carefully remove it. If the tiles are glued, excess composition should be removed before applying the protective layer.
This technology is simpler due to the absence of the need to maintain uniform seams between bricks. However, stone consumption when laying slabs densely increases by 10-15%.
Common Mistakes
When laying decorative tiles in an apartment, installers often cut off more material than necessary. As a result, small bricks either go to waste or are attached to the walls, thereby spoiling the created pattern from the facing material.
Often installers (especially inexperienced ones) forget to remove any glue that gets on the plaster surface. And after hardening, it is difficult to remove such a composition without damaging the lining. Inexperienced installers, when forming joints, forget about the need to align the tiles along the same line. Thanks to this, a beautiful and clear drawing is created. There are also frequent cases when a wide gap is left between the tiles, as a result of which the cladding takes on an aesthetically unattractive appearance.
And the last common mistake is ignoring the priming of the walls and the inside of the tiles and refusing to treat the decorative material with a protective layer. In the first case, the chances of mold appearing on the walls increase, in the second, the service life of the finishing material is reduced.
Tools and materials
To carry out the work you will need a set of tools consisting of the following elements:
- building level;
- cutting tools;
- file for forming a smooth edge when cutting slabs;
- ruler and pencil for marking;
- primer roller;
- spatula for adhesive composition;
- metal construction brush;
- rubber construction hammer;
- special mixer and container for the mixture;
- crosses to create uniform seams.
The following materials will be needed:
- white glue for decorative stone;
- clear varnish or acrylic impregnation;
- primer;
- paint for painting stone and seams.
Materials should be selected taking into account the type of tiles and the characteristics of the walls.
Surface preparation
The surface of the wall must be thoroughly cleaned of any contaminants, the remnants of the previous coating must be removed and all detected cracks and crevices must be sealed using polyurethane foam or any plaster mixture. It is better to putty the walls with a gypsum-based composition. Gypsum plaster or putty will provide reliable, high-quality adhesion. After the putty has completely dried, it is necessary to treat the surface twice with a deep penetration primer mixture.
This is reliable and effective protection against fungus and mold, high humidity and insects. Now you can start gluing the canvases. If desired, the outline of the proposed panel, which will be created from decorative stone, is outlined in advance so as not to glue extra sheets and calculate the amount of material required with maximum accuracy. The last sheet should extend beyond the boundaries of the picture. After drying in accordance with the specified boundary, the edge of the canvas is carefully cut and work with stone tiles begins.
Often the idea to decorate part of the wall with stone panels comes at a time when the walls have long been completely covered with sheets of wallpaper. In this case, the edge of the decorative coating is marked directly on the surface with a pencil or marker and the canvas is cut along it, so that later the unnecessary part, after wetting with warm water, can be removed.
Laying is carried out so that there is a distance to the edge equal to the size of the tile.
Choosing adhesive for gypsum tiles
Plaster bricks should be laid with the correct glue; there are several options for this:
Cement tile adhesive.
Used for tiles. Used to glue any cladding. Plaster based on gypsum. Excellent for interior work.
The mixture is white and will not be noticeable under the brick. Silicone sealant. The method is unusual, but effective. Allows you to place the brick tightly against the wall.
When using glue for external masonry, frost-resistant compounds should be selected, otherwise the mixture will crumble and fall off with the brick. Only fresh glue is used and prepared according to the instructions on the package.
Installation on an insulated facade
Houses insulated on the outside with expanded polystyrene slabs and mineral wool can also be decorated with decorative stone. In this case, even before installing the thermal insulation, it is important to evaluate the quality of the base and choose a reliable method of fixing the insulation and the entire subsequent structure. Usually, the insulation glued to the wall is also secured with dowel nails or anchors, depending on the type of base. A reinforcing galvanized mesh is laid on top of it. It is also attached to the base and covered with plaster. The stone is mounted on the hardened plaster layer. The double anchoring system provides reliable support for the stone cladding. But this is one of the options, and there are many of them when working with artificial stone cladding. Much depends on the skills of the craftsmen. The average cost of stone laying work is from 1200 rubles. for 1 m², and it’s hardly worth saving on this.
The logical conclusion of the formation of the architectural appearance of a country house is its design with elements of facade decor
Quick questions and answers on façade finishing with stone
Below we have collected information that will help you understand how to properly glue stone to a facade.
- How to make a double base reinforcing layer?
Make a double reinforcing base like this:
- Apply a layer of glue to the insulation.
- Embed a reinforced fiberglass mesh, so-called, into the glue. armored mesh with a density of 320 g/m².
- Through the first base - armored mesh and glue, drive dowel-fungi with a metal nail into the foam . Number of dowels – 10-12 pcs. per 1 sq. m.
- Place the facade alkali-resistant fiberglass mesh with a density of 145-160 g/m² into the glue.
- Apply the glue.
- Glue the stone.
- Sand the seams.
- To protect the facade from moisture, cover the stone with a water repellent.
In fact, the weight of the stone on the facade is held by anchors - dowels, which are driven through mesh and foam into the wall of the house. The recommended weight of stone for gluing to the facade is no more than 50 kg per 1 sq. m. m. More, at your responsibility!
- How to combine plaster and stone facades?
Make temperature-shrinkable joints between the stone cladding and the “wet facade” by laying a bundle of foamed polyethylene and sealant. There is no need to plaster the unit. Decorative frames made of PSB-S, with a base reinforcing layer with mesh, will cover these seams, and they will not be visible on the facade.
- Why can't you glue stone onto stone wool?
Mineral insulation is vapor permeable. Therefore, glue the stone only to a thick layer of facade foam. Otherwise, when moisture condenses, the mineral wool will get wet under the stone, which will lead to an emergency with the facade.
The thickness of the thermal insulation layer is calculated taking into account moisture accumulation in the structure.
- How to decorate a frame with artificial stone?
In order not to trap moisture in the frame walls, and to allow steam to escape outside, make a curtain façade. Pie designs:
- counter-lattice;
- OSB-3 boards;
- damping layer - facade foam plastic 5 cm thick glued to OSB not with cement, but with polymer glue, i.e. - glue foam;
- double base reinforcing layer;
- stone.
Types of decorative brick masonry
Options for laying artificial bricks
Cladding with artificial brick is not complicated, the brick material is made in the form of a panel, and can be laid out on the walls in different ways. The technology depends on the type of brick used:
- The long edge is spoon-shaped. The end edge is butchered.
Spoon laying includes 4 rows of spoons and 1 row. When using the bonding method, the entire masonry will be made only from bonded parts. Types of masonry can be different, the most common are:
Gothic - work is carried out using long and short rows of bricks, alternately. An offset is made between the rows by half a brick. Brandenburg - made from a pair of long rows and one short one. Glue the brick so that the butt side is a couple of rows above each other.
Each row is mixed into half a brick. Cross - a complex type of masonry. Decorative bricks are glued to the walls alternately with different sides. Between the rows there is an offset of half a brick.
In general, there are quite a few options for laying decorative bricks; it is recommended to look at photos on the Internet and decide on the desired type that will suit the specific decor of the house. After that, you can lay out everything yourself.