10825 0 8
Rednasty October 22, 2016I'm not a wizard, I'm just learning. But I know everything about interior styles, comfortable home improvement and the transformation of Khrushchev’s apartments into luxury apartments. Hobbies: I like to give good advice.
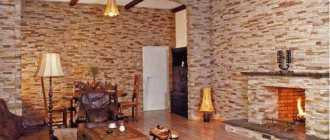
Decorative brick in the interior looks amazing, but can it be glued to drywall?
Widely used to create artificial niches and shelving, plasterboard occupies one of the leading places among finishing materials. No less popular among connoisseurs of stylish interiors is decorative stone, whose ability to add originality to the decor cannot attract attention.
Therefore, it seems to me that the desire to combine the two most popular finishing materials today is more than natural.
Many may wonder: is it possible to glue decorative stone to drywall, and how durable will such a structure be? I guarantee that in this article you will find all the necessary answers and get acquainted with all the intricacies of this method of framing walls.
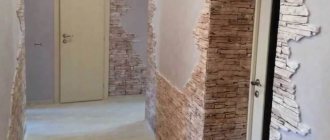
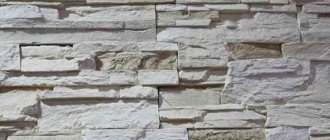
This photo clearly demonstrates that you can decorate drywall with stone, and quite successfully!
The advantage of plasterboard bricks
It is necessary to understand that we are talking about finishing materials, the thickness of which corresponds to the thickness of the plasterboard sheets, plus a layer of applied putty. This is not a load-bearing structure at all, but simply a spectacular decor that plays an aesthetic function.
Decorative bricks made from plasterboard and putty have several advantages:
- it is light and therefore easy to lay;
- looks impressive and has aesthetic appeal;
- when properly manufactured, it completely replicates the appearance of natural brickwork;
- has a long service life because it does not lose its qualities during operation;
- unpretentious in masonry, and therefore for installation you can use liquid nails and similar compounds.
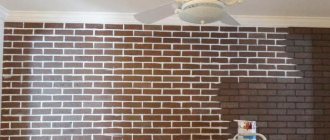
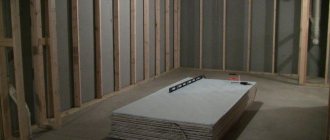
Wall made of gypsum plasterboard made of brick
It takes a little time to make decorative bricks. On average, you can prepare a fairly large batch in one day (about 7-8 hours). It will take about a few days for complete drying and decoration (if you decide to apply paint and give the faux brick natural colors and texture). After this, you can proceed directly to decorative masonry.
Note that the resulting home-made brick is suitable for indoor use only, and it is recommended to lay it in rooms with a moderate level of humidity. Yes, you can use moisture-resistant sheets of plasterboard as a base, but still, to decorate the facade of a house or apartment, it is better to use special finishing materials, since they have increased resistance to atmospheric factors.
Manufacturers
Most popular brands:
- Glue for decorative stone "Monte Alba". Used for interior cladding. Sold as a dry mixture in a plastic bucket with a lid.
- Knauf is a well-established brand in the construction market. Perlfix gypsum assembly adhesive provides high strength and adhesion.
- “Volma-montazh” is a dry mixture with mineral additives to improve adhesive properties.
- Synthetic glue of the Bustilat brand.
- Liquid nails of the brands Klesel, Stauf, Henkel (the well-known “Moment”).
Required materials and tools
The advantage of homemade decorative brick is that it can be made using scrap materials. The key element is drywall sheets. Standard materials used for the construction of niches and multi-level ceilings are suitable. If you plan to decorate a bathroom or kitchen with artificial bricks, it is recommended to use moisture-resistant sheets.
You should buy textured putty. This will help recreate the natural texture of real brick, with pores, small cracks and abrasions. If there is ordinary putty left in the house, then it is also suitable for making artificial brick, and you can use other methods for decoration.
Other materials that will be required for the work:
- varnish - it is recommended to use transparent or matte, which will help consolidate the result and preserve the appearance of artificial brick;
- building mixtures - we are talking about compositions intended for laying sheets of drywall;
- sand - useful when decorating the surface of artificial brick;
- paint - water-based paint is suitable, and stock up on several colors in advance to give the brick a natural shade;
- primer - a deep penetration mixture is needed, as it will help strengthen surface adhesion;
- PVA glue - used for additional decoration.
As for the set of tools, it is standard: a construction knife for cutting, a profile with metric divisions or a hydraulic level, a spatula for applying putty, a brush and roller for painting, a container for mixing solutions.
If you have a drill with a mixer attachment, it will make the job much easier. To style the surface you will need a roughing plane.
Gluing methods
Decorative gypsum stone can be glued in several different ways. The choice of method for laying the stone depends on which surface you plan to glue the gypsum product to.
Be that as it may, the walls will need preliminary preparation. You will need to level the walls, filling holes and cracks, removing too much surface relief. If the gypsum stone and its texture are similar to natural stone, you don’t have to deal with the elimination of small and minor defects. If the wall decoration is very old, it is worth removing the plaster and removing the old wallpaper. After completing the preparatory work, the wall is coated with a liquid primer, which will ensure good adhesion. Decorative stone can be laid immediately after the surface is completely dry.
Using gypsum-based adhesive
If you decide to glue gypsum stone, it is recommended to use a special gypsum-based adhesive. This is quite simple to do: you should choose a good glue, for example, Volma or Knauf. Next you will need to do the following:
- Dilute dry glue with water in the proportion determined by the instructions. As a rule, this is a kilogram of dry mixture per half liter of water.
- Stir the mixture thoroughly so that no lumps remain.
- Treat the walls with a hydrophobic primer to ensure a high level of adhesion.
- You will need to carefully cut the coating along the contour. The design should be made a little smaller than what was originally conceived.
- Lay a guide strip of stones on the wall, then lay the remaining stones.
Using ceramic glue
This gluing method is also considered acceptable. It can only be used in rooms where there are no difficult operating conditions. This is done simply:
- The wall is coated with a hydrophobic primer. If you plan to glue stones to a metal surface, you will also need reinforcement.
- After this, a guide strip of stones is laid out.
- The way the stone is held is checked. After the glue has hardened, you need to lightly pull the stone towards you. If it does not fall off, you can continue gluing.
- If glue seeps between the joints of the stones, it must be immediately removed with a sponge before it hardens.
It is worth remembering that this type of gluing is possible, but it is difficult to call it expedient, because glue for ceramics is more expensive and takes longer to dry. Its advantage is durability, but gypsum stones are rarely intended to be used for long periods of time.
Using liquid nails
This method is appropriate to use only if you plan to finish a small section of the wall, or to spot repair an already finished surface. The operating instructions are as follows:
- If necessary, apply markings in the form of horizontal lines along the surface of the wall.
- If the rows do not fit on the wall, it is worth leaving space for trimming at the bottom of the wall - this way it can be hidden behind the baseboard.
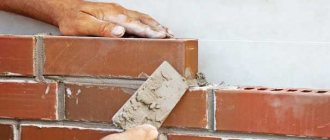
- Apply glue to the decorative stone, then let the mixture sit for 10-15 minutes so that it has time to dry a little and does not seep between the seams.
- Place stones on the surface of the wall. Installation should begin from the corner of the building.
Preparation and marking of workpieces
When all the tools and materials have been collected, you can begin to work directly. First you need to take sheets of drywall and apply markings. The cells must correspond to the actual size of the decorative brick that is needed in the end, but on average it is:
- height - about 60 mm;
- length - approximately 250 mm;
- thickness varies in the range of 9.5-12.5 mm.
Marking plasterboard for making decorative bricks
Next, you need to coat the plasterboard sheets with a primer on both sides. After complete drying, the final marking is applied (you can use a simple pencil).
Laying the drywall on a flat surface and pressing it with your hand, cut the sheet strictly according to the markings. The knife must be held firmly and at an angle of 45 degrees. Having made 2-3 deep cuts, you can break off the desired fragment and proceed to the next one. The result will be rectangular blanks for future decorative bricks.
On what surface can decorative stone be glued?
There are certain requirements that apply to the surface in order for the stone to stay on the wall for a long time. So the surface should be:
- smooth, without flaws;
- dry;
- no dust;
- Before gluing the material, it must be degreased.
Drywall fits these parameters and is an excellent base for artificial stone. Attention! There is a limitation on the type of drywall that is planned to be faced with decorative stone - it should not be moisture resistant.
Types of drywall suitable for cladding with artificial stone
Making bricks
Further work is reduced to the following order:
- the putty mixture is mixed with sand in the required quantity (try to calculate its volume taking into account the number of workpieces received in order to avoid overuse of the solution);
- the resulting mixture is applied to the workpieces using a spatula (it is recommended to work quickly until the mixture begins to harden);
- using a sponge, brush, plastic film or any other available means, it is necessary to give the surface of the putty the desired texture that replicates the appearance of real brick.
Next, the resulting fragments are thoroughly dried in a room with moderate humidity, and then sanded. This allows you to remove smudges (if any) from the surface of the homemade brick.
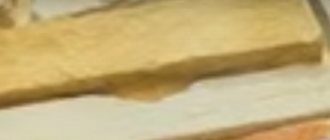
Applying putty to gypsum plaster boards
With a little imagination, you can give the bricks spectacular chips and natural cracks. To do this, you can use a brush with metal bristles, a knife or other tools. You can smooth out rough edges using sandpaper.
Having completed this stage and received high-quality artificial decorative brick blanks, you can proceed to the final stage - artistic design. To do this, you need to dilute a small amount of paint, add brown, burgundy or orange to it and apply the first layer to the surface of the brick. After drying, it is recommended to apply another layer, but of a different shade. The more heterogeneous the color of the surface, the more natural the artificial brick will look. After painting, a layer of varnish is applied.
Installation and finishing
When the brick is ready, you can proceed directly to the laying. Carefully clean the wall and coat it with primer, then make markings and begin laying the fragments, placing them on the adhesive mixture. When laying, you can use standard plastic crosses, and after drying, fill the seams with a grout mixture.
At this point, the bulk of the work can be considered completed. If desired, you can apply an additional layer of paint or varnish to the brick surface, making it more uniform, beautiful and attractive. With enough diligence, you can recreate natural brickwork using available materials. Happy renovation!