Today you won’t surprise anyone with a traditional whitewashed ceiling. Modern finishing materials allow you to create real masterpieces of “ceiling” creativity. One such material is drywall. With its help, it is easy to get both an ordinary flat ceiling and a complex multi-level structure with bends and interesting lighting. This material is also convenient because it is suitable for various finishing methods; it can be painted, wallpapered and plastered. In order for the entire structure to be as light, durable and practical as possible, you need to choose the right ceiling plasterboard.
The concept of gypsum board
In the 19th century, an English paper mill owner, Augustine Sackett, invented 15mm thick plasterboard as an alternative to “building board”. He placed a layer of hardened gypsum dough between two layers of construction paper. This material made it possible to sheathe the walls and ceilings of rooms, hide unevenness, and make partitions. Depending on the work performed, the thickness of the drywall is taken into account. For gypsum board ceilings, the sheets differ from those used to cover the walls.
Marking the ceiling before leveling
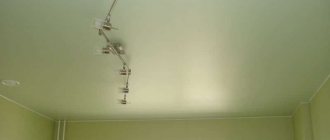
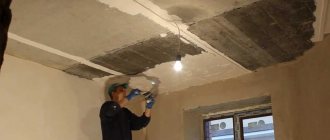
Work begins after clearing and removing crumbling building materials and treating with antiseptic primers. At this stage, one or more horizontal lines (based on the number of protrusions) are laid along the perimeter of the walls using a water or laser level. If all the rules are followed, the straight line of the starting point will coincide with the ending point. To eliminate errors, a cord is stretched across the entire plane of the room. If it is necessary to simply level the ceiling, without complex lighting, the structure is lowered only to the profile height (i.e. 60 cm from the minimum possible point). When including spotlights in the lighting plan, the correct placement of their housings will require at least 10-12 cm (by analogy, when insulating or soundproofing, the level depends on the thickness of this layer). Markings are carried out for direct hangers - along the central axis of the profile with an interval of 60 cm.
There is no need for additional leveling; it is carried out only with frameless fastening, which is rarely chosen. But it is recommended to seal large cracks with a solution, at least to improve insulation and moisture resistance. In both private houses and apartments, it is advisable to combine the process of leveling with plasterboard and wiring electrical communications (the wires are either laid out in the attic and brought out at the right points, or between the profile), this allows you to save space. In bathrooms, kitchens and other rooms with high humidity, the cable is placed in a box; in any case, it is securely fixed. All wiring work is completed before the gypsum board sheathing begins.
Alignment and installation technology
The standard scheme of actions includes the following stages: assessment of the condition of the surface and its preparation, drawing up a plan for the placement of sheets, profiles and lamps, calculation of materials, marking, wiring, installation of the frame, covering the structure, processing of joints and plastering, decorative finishing. The fastening of the support begins from the walls - the lower part of the guide product is laid strictly along the marked line and fixed with dowels in increments of no more than 45 cm. Next, direct hangers are installed; when assembling multi-tiered projects, anchor varieties are used. After this, a profile is attached to them - 5 mm shorter than the distance between the walls to simplify its installation in the guides.
At this stage, it is important to level the plane as best as possible; level control is carried out when fixing each segment; to avoid errors, a fishing line is stretched between the walls. It is recommended to place the first profile at a distance of 30 cm from the edge, no more; in problem areas, its step is increased. It is also worth reducing the interval from 60 to 40 cm when using specialized brands - fire and moisture resistant. The increase is mandatory when the thickness of the plasterboard for the ceiling is over 12.5 mm.
Exclusively longitudinal placement is not enough: transverse inserts are required at all joints, and we should not forget about displacement. The most reliable option would be a staggered profile arrangement.
The easiest way to install the transverse elements of the frame is with the help of “crabs”; if they are absent in the required areas, the metal is cut and bent, but this method takes a lot of time. The installation of the frame is considered complete after fixing all the inserts with self-tapping screws and checking the level again.
Finishing with plasterboard begins from the corners (all whole elements are placed at the edges, segments - towards the center). All holes for lamps are prepared in advance, after cutting the gypsum board. This stage requires the strength of at least two people; lifting and fixing slabs of standard size and weight is extremely difficult on your own. For fastening to the frame, metal self-tapping screws are used, located in increments of no more than 25 cm. Their caps are recessed by 1-2 mm, protrusions are not allowed. During the sheathing, a small gap is left between adjacent sheets (within 5 mm).
The final stage is the finishing of joints and surfaces: the material is primed, the seams are reinforced with fiberglass or paper tape and filled with putty, several times if necessary. The holes for the self-tapping screws are covered with cross-shaped movements, and excess mortar in any areas is removed immediately. After drying, the slabs are lightly cleaned and covered with a thin layer of finish; when preparing plasterboard ceilings in private houses and apartments for painting, putty is applied twice, in this case the surface is carefully sanded.
Types of gypsum boards
Drywall varies depending on the room in which it is used and for what kind of construction. The main selection criteria will be its properties and scope of application. The difference is easy to determine by the color of the building material. GCR is usually used for finishing premises:
- ordinary;
- fire resistant;
- moisture resistant;
- moisture- and fire-resistant.
Depending on the area of application, there are:
- arched;
- ceiling;
- wall
Installation methods
Depending on the area of use of drywall, there are various installation methods. Each of them is most suitable for a specific type of work, although all of them, to one degree or another, can replace each other. Therefore, in order to understand how to make the best plasterboard ceilings, you should study in detail the installation methods suitable for this.
Standard method using profiles
This method of installing plasterboard on the ceiling is based on the fact that the plasterboard sheets will be attached to a specially created structure made of profiles. It is quite versatile and reliable, which makes it possible not only to cover walls, but also to install partitions. It is also often used when installing multi-level ceilings.
It can be characterized by the following parameters:
- has greater reliability and durability;
- the supporting frame is not subject to rotting or corrosion;
- when covering, it takes up significant space;
- has a fairly high price;
- heavy weight of the structure;
- standard installation speed.
Advice! You should not resort to other installation methods if you can fully use this method.
The result of tiling plasterboard in the bathroom
Method using wooden slats
This type of installation is best suited for sheathing. It does not take up a lot of space, and the finished sheathing will cost significantly less than a full-fledged profile system.
This method is distinguished by the following parameters:
- cheapness;
- space saving;
- installation speed is slightly higher than standard;
- the weight of the structure is significantly reduced;
- has less reliability and strength compared to metal ceiling profiles for plasterboard.
Advice! Use this type of installation only indoors and only for cladding.
Method using planting gypsum
In its simplicity, this method takes a leading place. It involves the use of a special cement mortar, which is applied to the surface and pressed with a sheet. Then, using a level, the drywall is leveled and the plaster is allowed to set.
This method is used in cases where it is necessary to level out minor defects in the wall or it is necessary to save the interior space of the room.
It has the following parameters:
- big savings in money;
- the weight of the structure is reduced;
- installation speed is reduced;
- one of the most reliable methods;
- huge space saving.
Advice! This method is well suited for installing slopes and some elements of figured ceilings and plasterboard arches.
Optimal solution
True professionals do not use one installation method for the entire scope of work. They try to save not only the customer’s money, but also their time. The result is unique combined structures that combine all the available properties of not only installation methods, but also the drywall itself.
Ordinary
This is the most common and frequently used type of gypsum board. It is a classic combination of gypsum and gray cardboard sheets. Due to its relatively low weight and, accordingly, ease of installation, it is often used when working at heights. However, the use of this type is only possible in rooms with low humidity, since it no longer has additional beneficial properties in the form of moisture resistance. For the ceiling, the thickness of this type of plasterboard is a maximum of 9.5 mm. It is this type of gypsum board that can be easily processed and covered with wallpaper or other finishing materials. The safety of human health is ensured by environmentally friendly materials used in its manufacture.
Pros and cons of drywall
The plasterboard consists of three layers - between the shells of thick cardboard there is compressed gypsum. GCR has the following advantages:
- This is an environmentally friendly and lightweight material that is suitable for leveling different surfaces and forming all kinds of structures indoors.
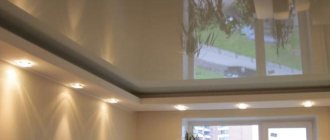
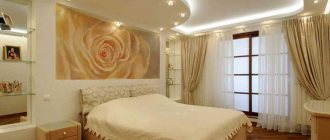
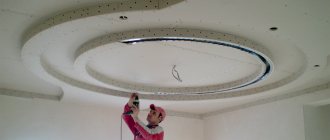
- Ceiling plasterboard allows you to create an original and non-standard surface design.
- Using this material, multi-level structures with bends, steps, transitions and shelves for laying lighting are made. But it is worth remembering that multi-level ceilings are only suitable for high rooms.
- There are no problems with the choice of finishing material, since the plasterboard sheet can be painted or covered with wallpaper. The material is easy to cut and process. It is used in combination with stretch ceilings.
- After installing the gypsum board, a smooth and even ceiling is obtained.
- The main advantage is convenience and ease of installation.
The only disadvantage of gypsum boards is that a lot of dust is generated when cutting, so work must be carried out in protective equipment. In addition, plasterboard is a fragile material, and therefore is not suitable for load-bearing structures.
By area of application
The dimensions of one sheet of drywall of any type allow you to cover a surface area of three square meters. The average weight of the sheets is approximately 30 kg. The thickness of the sheets also varies, so it must be taken into account when deciding what thickness of plasterboard to use for the ceiling.
If you want to create a real work of art on the ceiling with rounded elements, or mount it in the form of multi-level steps, you should pay attention to arched plasterboard with a thickness of 6.5 mm. It is easy to bend and secure, for example, in the form of a wave.
Another commonly used type of plasterboard is ceiling plasterboard with a thickness of up to 9.5 mm. It is medium in weight among already known types and is therefore also often used for ceilings. The thickness of the drywall plays a big role when choosing, as it affects the weight of the product. The thicker the building material, the heavier the sheet will be and the more difficult it will be to work with, especially on the ceiling.
The heaviest is wall plasterboard with a thickness of up to 12.5 mm. It is practically not used when finishing the ceiling due to its heaviness. Well suited for mounting on walls and where elevated work is not required.
Thus, if you want to implement your wildest design ideas on the ceiling or simply cover all its unevenness, the optimal choice will remain the ceiling type of plasterboard. They also choose it due to its low cost compared to other types.
Selection of material depending on the place of application
The wide range of applications of such a material as drywall is the reason why its varieties began to appear. They have similar parameters, but some of their features are adapted for use in specific specific conditions.
Therefore, in order to figure out which plasterboard for the ceiling is best used in the bedroom or nursery, and which in the kitchen or bathroom, you should consider all its types.
Regular drywall
This type of material is considered the most common and is labeled GKL (Gypsum Cardboard Sheet). This sheet is produced in gray with blue markings. It is used in enclosed spaces where the humidity does not reach 70%. At the same time, this type is usually made with a length of 2500 mm and a width of 1200 mm.
Special attention should be paid to its thickness.
The fact is that it comes in 9 mm, 6 mm and 12.5 mm.
- 6 mm - usually used to create arches, since this type has good flexibility and pliability.
- 9 mm - used for making ceilings. This is due to the fact that it has significantly less weight than a standard sheet, which means it will not heavily load the fasteners.
- 12.5 mm - used for cladding walls and erecting partitions.
Advice! Some craftsmen claim that they can carry out all work with a sheet 12.5 mm thick. This may be true, but the service life of a ceiling with this type of plasterboard will be much shorter than when using 9 mm material.
Fire-resistant plasterboard
This type of material has the same gray color as regular drywall, but is marked in red, with the letters GKLO (Gypsum Cardboard Sheet Fire-Resistant). It has increased fire resistance, which is achieved by adding special reinforcing components to the composition that is used to create the core .
- industrial premises;
- attics;
- electrical panels;
- ventilation shafts.
Some builders suggest that it can be used in the manufacture of fireplaces, but this opinion is erroneous. At high temperatures, even a thick asbestos board will deform, and fragile drywall will simply twist.
Need to know! Fireproof plasterboard is installed in rooms to increase the level of fire safety, and not to protect against open fire or high temperatures.
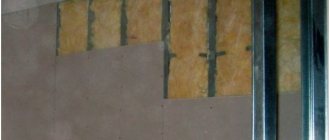
Moisture-resistant plasterboard on a frame made of profiles
Drywall moisture resistant
This type of material contains silicone granules and antifungal substances in its core. They enable the material to withstand high humidity well. For this type, special impregnated cardboard is used. .
However, even this cannot protect the sheet reliably enough. Therefore, it is recommended to protect the outer layer with special dyes, ceramic tiles or waterproofing.
- baths and showers;
- balconies and loggias;
- kitchens and bathrooms;
- garages and sheds.
This type of sheet is green in color with blue markings GKLV (Gypsum Cardboard Sheet Moisture Resistant).
Advice! This material is good enough to be used for outdoor applications. At the same time, it is necessary to reliably protect not only its front part, but also the ends.
Moisture-resistant, fire-resistant plasterboard
This material is green in color with red GKLVO markings (Gypsum Cardboard Sheet Moisture-Resistant, Fire-Resistant). During its creation, the production technologies of GKLO and GKLV were combined to obtain joint qualities. This material is used in places with high air humidity and serious fire safety requirements. .
Arch made using a combined method
Calculation of the required amount of drywall
How to calculate the consumption of plasterboard for a ceiling? Before starting construction work, it is necessary to take careful measurements and determine the area of the ceiling. Knowing the dimensions of the drywall, it is easy to calculate how many whole sheets will be needed and how many will have to be cut. The easiest way would be to take a sheet of paper, mark the area of the ceiling on it and mark the sheets of plasterboard. In this case, you will immediately see how many solid sheets can be mounted.
After this, it is worth deciding on the thickness of the sheets that you plan to purchase. If you need to make a complex structure on the ceiling, then it is better to take lightweight building material. It will bend better, taking the required shape. It will also be much easier to lift and mount it by weight than a heavier one.
In rooms with high humidity or in the presence of an open source of fire, you should not skimp when purchasing drywall. Properly selected, it will be able to protect residents in case of fire and withstand temperature changes and lack of heating. For example, when renovating a country house.
Easy to install and suitable for many types of finishing, drywall has gained popularity since its invention almost two centuries ago. Such a ceiling will delight the eye with its grace and beauty for a long time. It is appreciated by craftsmen of all levels, making working with it accessible even to a beginner in construction.
How to calculate the consumption of plasterboard for the ceiling
To correctly calculate how much material will be spent on installing a frame ceiling, the rooms are measured.
The main mistake of novice builders is that they select the wrong sizes of drywall sheets. Because of this, many seams are formed. To install the ceiling correctly, the master will select the optimal length of the material and place it on the surface according to the rules. To do this you will need several sizes.
Material calculation diagram for a suspended ceiling
Beginners are advised to draw a diagram of the planes on which drywall will later be installed, as shown in the figure above. It is better to do this on a sheet of paper in a box to select the required scale. By graphically placing the material, you can see what size is needed and how much drywall will be spent.
If there is no time for such calculations, then purchase material based on the total surface area, adding up to 20% “in reserve.”
It is taken into account that if the ceiling is 280 cm wide, then the best option is to use 300 cm of sheet. A mistake in this case would be to install 250 cm of material with the missing 30 cm attached to it. This method will reduce the number of profiles used, securely fix the structure, and save time allotted for work. The ceiling will look aesthetically pleasing due to the absence of many seams and joints.
Installation of conventional plasterboard sheet
Knauf drywall size
The dimensions of Knauf plasterboard sheets are most often given in millimeters:
- the length of the sheets can be from 2000 to 4000 millimeters;
- sheet width varies from 600 to 1200 millimeters;
- The thickness of the sheets is 6.5, 8, 9.5, 12.5, 14, 16, 18, 20, 24 mm, which depends on the purpose of the sheets.
Quite often, plasterboard sheets are used, the size of which is 2500x1200x12.5 mm. A sheet having these dimensions has an area of approximately 3 m2 and a weight of approximately 29 kg. Drywall is packaged in packs of fifty pieces. One such package is enough to decorate an area of 150 m2.
Each sheet of Knauf drywall has special designations:
- the standard to which it is manufactured;
- geometric dimensions;
- type of end edge;
- group;
- letters that indicate the type of drywall.
Features of working with drywall
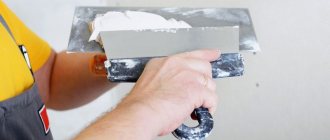
Now we will look at several features when working with drywall for ceilings and walls. After installing the sheets, it is traditionally necessary to seal all joints and screws with putty, but before that, follow these steps:
- Clean the entire surface from dust. Use sandpaper to remove excess roughness.
- Prime the drywall with a roller.
- After the primer has completely dried, begin applying putty to the GC ceiling.
To achieve the best effect, prime several times. For a perfectly even application of putty, seal all joints with masking tape. After the solution has dried, they must be removed.
Types of drywall by edge type
Different types of plasterboard edges
Continuing the conversation about what kind of plasterboard is needed for the ceiling, one cannot fail to note another classification of sheets - by type of edge.
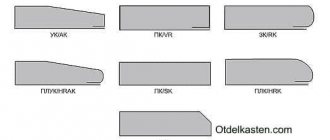
Drywall sheets come with the following types of edges:
- Straight edge (PC) . This material is intended for “dry installation”, which does not require laying joints. This type of plasterboard is used to create multi-layer sheathed ceilings and other structures as an inner layer.
- With thinned edge (UK) . Suitable for installation followed by gluing with reinforcing tape and applying putty.
- With rounded edge . Used if you plan to seal a joint with putty without reinforcing tape.
- With a semicircular and thinned edge (PLUK) . When used, it requires both covering the joint with tape and subsequent putty.
More often than others, plasterboard sheets of the UK and PLUK types are used, which allow the butt seams to be sealed perfectly evenly.
So, we looked at what types of plasterboard there are and which of them are most often used to finish the ceiling in certain situations. All you have to do is choose the most suitable material for your case and build a high-quality suspended ceiling from it.
YOU MAY ALSO BE INTERESTED
A few words about the profile for drywall - it’s important!
We figured out what kind of gypsum board is needed to install the ceiling. Let's look at the subtleties of selecting a metal profile for the ceiling material. The profile also varies. And its choice depends (directly) on the type of drywall used.
Profiles are divided into:
- guides - their size is 27x28 mm;
- corner - used to increase the durability and strength of the ceiling structure, applied on top of the main sheets, the dimensions of such profiles are selected individually;
- arched - they are placed to form rounded and original shapes on the ceiling;
- the main ones are profiles with maximum dimensions (27x60 mm).
The metal frame is of great importance for the operational reliability of the ceiling. Therefore, purchase profiles with the specified parameters. It is desirable that they be made of stainless alloys that hold drywall screws well and are not subject to corrosion.
Finishing the ceiling from plasterboard sheet
One of the most popular types of finishing is painting. It is worth paying attention that before using glossy paint, you must carefully remove all irregularities and roughness, as the paint can emphasize them.
Ceiling wallpaper is also often used to cover plasterboard ceilings. Gluing them is not difficult, since gypsum board has a layer of paper on the surface.
If you want to get an original ceiling covering, you can use decorative plaster. It is worth noting that it is applied to moisture-resistant drywall. The technology for performing this type of finishing is not as simple as in the two options described above, so it is better to seek help from a specialist.