Cladding panels
The panels can be used to cover walls, floors, and ceilings.
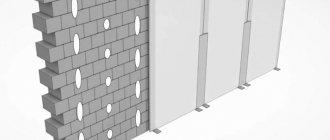
Finishing plates are easy to install due to their large size. They are attached to a frame system, so there is no need to level the walls or cover up cracks and cracks. They finish both vertical and horizontal surfaces.
Facing lamellas are one of the most economical finishing methods. The layers are large, so you will need a small amount of them. The plates can be cut and adjusted to the parameters of the loggia.
Plastic sandwich panels
Sandwich panels look strict and elegant
Plastic sandwich panels
These are two layers of PVC, the space between which is filled with a layer of thermal insulation foam. Plastic panels are not afraid of moisture and are resistant to temperature changes. The front side is laminated, so it does not allow liquid to pass through, and the inner side is porous, allowing air to circulate freely.
Products can be mounted using glue, liquid nails, ordinary self-tapping screws, or on a frame.
Plastic comes in different qualities. Before purchasing, ask how heat-resistant and impact-resistant the product is. Does it emit unpleasant odors, especially when heated, and are its combustion products toxic?
MDF sheets
Unlike lining, the area of the panels is larger, so the process of laying them is much simpler
MDF sheets
Such plates effectively replace wooden lining and provide reliable sound and heat insulation. Particle boards are not afraid of moisture and have high decorative qualities.
The material is highly flammable, so if you plan to run wiring underneath it, wrap the cables in corrugated material.
This finish looks aesthetically pleasing and modern. It is easy to clean with ordinary soapy water. It has a significant disadvantage: the outer film layer is very delicate, scratches easily remain on it, which spoil the perfect appearance.
Aluminum slats
Drywall acts as a preparatory stage before finishing
Aluminum slats
Aluminum panels are considered the most prestigious and expensive. They do not burn, are resistant to mechanical damage, and look stylish and elegant. The lamellas are elastic and resilient, they bend well, but do not break.
They consist of two aluminum plates, between which there is a plastic filler. The durability of the coating is confirmed by a guarantee from the manufacturer for 50 years of use. The products are not afraid of corrosion, do not rust, and are not subject to abrasive wear.
On sale you can find different shades and specimens with decorative patterns. The only drawback is the price, which is several times higher than similar panels made of plastic or particle boards.
We build a house for a cat with our own hands. Interesting ideas and step-by-step instructions: from plywood, cardboard boxes, fabric. Drawings with dimensions (120+ Photos & Videos)
Ceramic tile
Durability, resistance to external influences, ease of keeping clean and a wide choice of colors, sizes and laying methods allow us to consider ceramic tiles as a convenient material for the design of walls and floors on the balcony. Mosaic bright and multi-colored compositions look especially impressive, which can be combined with a monochrome floor covering made of the same material.
Wooden panels: a raw material with light weight, affordable price and easy installation
The decision to cover a balcony with panels made from natural wood comes to far-sighted and rational consumers.
By betting on the unique properties of the material, owners of houses and apartments do not lose. They get the opportunity to inexpensively and stylishly solve the problem of finishing the walls on the balcony.
Due to the fact that the installation of panels does not require special skills or the use of specialized equipment, finishing a balcony with your own hands takes a minimum of time, money and effort. It can be completed within a few days and get an excellent professional result.
The advantages of wooden panels include the following properties:
- a large selection of shades and textures, the ability to paint and apply varnish;
- wear resistance;
- aesthetics;
- ease of care.
Experts say the disadvantages of the panels are insufficient heat and sound insulation. To strengthen them during installation, it is worth using special layers. Their functional purpose is to retain heat in the room and muffle noise coming from outside.
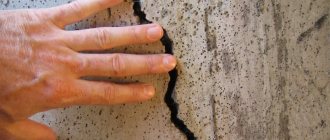
Concrete and paint
This option saves not only finances, but also precious square centimeters of small balconies. This type of finishing can be done with your own hands, if you are willing to work patiently and step by step.
After cleaning the walls, the painstaking work of leveling and filling defects begins. In some cases, it is impossible to do without a layer of plaster on the reinforcing mesh, which eliminates distortions.
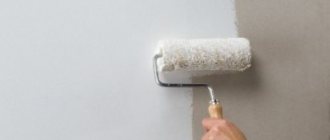
Before painting the walls, you need to protect yourself from high humidity by applying a layer of sealant to the entire surface of the concrete.
At the last stage, acrylic or oil paint is applied using rollers and brushes. You can use a pneumatic sprayer.
The only disadvantage of this finish is the absence of an additional thermal insulation layer, which is neutralized by the thoughtful arrangement of heating devices.
How to cover a balcony outside
Exterior finishing of a balcony places slightly different requirements on materials. In addition, it must be strong and reliable, wear-resistant. To understand the best way to cover the outside of a balcony, let’s look at the main options.
Vinyl siding
It is available in two versions - traditional in the form of long boards with a tongue and groove fastening, which is often used to sheathe houses, and facade in the form of slabs with uneven edges, imitating stone or masonry. Both materials are mounted on the sheathing using self-tapping screws, but the frame is assembled slightly differently, adapting to the geometry of each material.
You can cover the balcony with siding. Regular or base (right)
Metal siding or corrugated sheet
Although vinyl is considered durable among plastics, it can’t compete with metal.
If for high-lying balconies how durable the material is is not critical, then for lower floors it is very important. That’s why downstairs balconies are often sheathed on the outside with metal siding or corrugated sheets
Whether it is better to cover a balcony with siding or corrugated sheets is a matter of personal preference. Both have a high degree of reliability. Siding is made of aluminum or galvanized iron, on the front surface of which a polymer film is applied. Profiled sheet is a shaped sheet of roofing iron coated with polymer or paint. The service life is stated to be from 15 to 25 years.
You can inexpensively cover the outside of a balcony with metal siding or corrugated sheets
The main difference is the installation method. A part of the desired shape is cut out of the corrugated sheet and a large piece is attached to the sheathing with special self-tapping screws with a painted head. Siding is also assembled like lining: there is a tenon on one side and a groove on the other. Along the edge of the strip there is perforation for fasteners. Self-tapping screws are screwed into it (in the middle of the hole, slightly short of the cap - leaving the ability to move with temperature changes in the materials).
How to decorate a house with siding is written in the article “How to cover a house with siding with your own hands.” If you choose this material, you will need to know the features and installation rules...
Wood paneling
Houses are built from wood, so why not cover the outside of the balcony with it? Not a bad option, but the wood requires maintenance
Therefore, special attention should be paid to the impregnation of the material used. Take antiseptic and protective compounds for outdoor work
The treatment is carried out before installation begins - then it will be problematic. When finishing, do not forget to process the ends of the boards cut to size. Otherwise, the entire installation is the same.
You can sheathe the outside of the balcony with wood - clapboard, for example
Just keep in mind that without proper care, attractive cladding will turn into something unattractive. A fragment of a tree left without care can be seen in the photo below on the right.
Requirements for external and internal finishing
Without understanding the rules of finishing work, many mistakes are possible. The main requirements for materials are:
- Ease. An important factor for self-installation.
- Suitability for repair. It is necessary to evaluate the risks and durability of materials. Therefore, even if the highest quality materials are used, it is worth sheathing in such a way that in case of unforeseen circumstances, damaged areas can be easily replaced.
- Durability. Any apartment owner wants to not have to worry about a new balcony for 15 years.
- Practicality. The surface of the materials should be easy to clean, not absorb excess moisture and not accumulate dust.
- Attractiveness. The person who started the renovation must think about how the balcony will look before starting work.
When planning to decorate the outside of a balcony or sheath the space inside, it is important to understand the possibilities and realize the desires. If you cannot understand what the owner wants, there is no shame in turning to professionals. Expert advice will make your search and selection easier.
How to decorate a balcony outside with your own hands using siding
The starting strip is the first strip of siding, which provides for the subsequent fastening of siding to it and, one might say, guides the strips.
The window sill allows you to hermetically seal the space under the balcony window so that moisture does not get under the finishing. Side fasteners cover all exposed sides of the siding, maintaining an airtight seal.
The window sill serves to protect the finish from moisture
Next, you need to take care of the tools that you will need during the work process:
- Drill with a special attachment for self-tapping screws;
- Level;
- Pliers;
- Knife;
- Hammer.
In addition to the level, you will need a rope or fishing line, which must be pulled onto the surface in advance so that the siding lies on the surface as evenly as possible.
It is necessary to remove all the old cladding from the railings, and make sure that it does not collapse when falling on neighboring balconies, cars and people. Having repaired the slab under your feet, you need to tighten it. To do this, a wooden beam is placed on top along the entire perimeter of the slab and secured to the slab and walls with metal tongues.
Sheathing includes two stages: the production of a wooden frame and the subsequent fastening of siding sheets to it
On the outside of the balcony, timbers are placed below the level, forming a frame for laying the siding.
All metal rods and corners are painted. Slots for self-tapping screws are pre-marked on the siding for ease of installation. After the preparatory work, you can start finishing. The siding is attached to the frame with special self-tapping screws, which are inserted into the drill attachment, while maintaining the correct installation level. Sheets of siding cannot be fastened close to each other; the material must be freely connected to each other, without any gaps.
Once the sheathing is done, cladding is next required. All edges are finished with corner fittings and side fasteners.
>Technology for finishing a balcony with siding (video)
Features of plaster for cold glazing
If the house is located in a climate zone with difficult weather conditions, then glazing is unlikely to achieve a comfortable temperature in the space adjacent to the apartment. Therefore, special requirements are placed on finishing materials. Thus, the plaster must have waterproofing and water-repellent properties. The mixture should be able to withstand sudden changes in temperature and humidity. If possible, the created layer should not become a favorable environment for the emergence and subsequent development of biological life.
Walls lined with plaster should be easy to clean, and condensation should not cause peeling and the development of fungus and mold. Taking all this into account, the plaster must be selected in such a way that it has a special purpose and characteristics. Most often, compositions are used for external work, which make it possible to create a layer that can withstand difficult operating conditions.
Zoning
The balcony can be separated from the apartment by a block or attached to it. For the first option, it is not recommended to use white plastic.
It is preferable to use double-glazed windows or natural materials. You can install sliding glass doors that will fill the rooms with light and add originality.
When separating the balcony area, there are two options. If you partially demolish the block, the window will remain in place and the door will remain open. This design can be incorporated into the decor in different ways. If you remove both the door and the window, you will be left with a wall element that will act as a table or counter. In this case, there is a wider choice of interior.
Another way is to make an arch between the zones. Structurally, this is one space, but it is visually divided by an arch. This way you can arrange a nursery or a relaxation corner.
Solutions like the latter are the most current and are combined with wooden elements, and also visually expand the space.
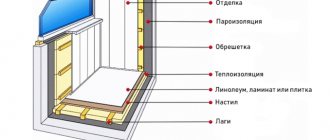
Don't forget about insulation
To create a relatively stable microclimate in the balcony room and protect the apartment from strong winds and frosts, it is recommended to insulate the balcony room from the inside. The following are used as thermal insulation materials:
- mineral wool;
- expanded clay;
- foam boards;
- extruded polystyrene foam;
- foamed polyurethane foam;
- foil penofol.
Of all the options listed, expanded clay is suitable only for floors, the rest are suitable for both horizontal and vertical surfaces. Before insulation, cracks and crevices are filled with sealant or foam. Insulation begins from the ceiling. If the apartment is on the top floor, this surface is insulated more thoroughly. Then move on to the side surfaces and the floor. The heat insulator is fixed with glue or placed between the lags of the sheathing.
Balcony design
The interior should adapt to the shape and size of the room. In a small loggia it is impossible to arrange a full-fledged dining room or living room, and in a large one a lone chair with a coffee table does not look good.
There are boot-shaped balconies. Often, residents do not know how to decorate such a room and leave it empty. In fact, it can be made practical and convenient - depending on the location of other rooms, you can place cabinets, shelving and shelves there. You can even put a refrigerator.
The remaining space is well suited for a workspace. A sofa next to a window wall also looks good. However, such furniture will have to be made to order.
Small balconies are well suited for a dressing table with cosmetics and jewelry; a mirror will fit perfectly there. This composition will help to allocate personal space for the girl.
Instead of a dressing table, you can put a computer and an armchair. The workplace will turn out to be secluded and cozy, and if in the previous case the mirror visually expanded the space, here it is replaced with lighting.
For medium-sized loggias, it is possible to transform it into a recreation area. Light furniture will fit there. You can install a rack or wardrobe on one wall to store seasonal clothes.
It is necessary to take into account that thermal insulation reduces the size - if the room is not often used, it would be wise not to insulate it. On larger loggias it becomes possible to create a full-fledged workplace with the necessary furniture and equipment. For the kitchen this is a table, cabinets, refrigerator and stove.
Transformation into a playroom is an ideal solution next to a children's bedroom. You can put a hut there, lay a carpet and store toys.
Using new balcony design products for 2021 will allow you to furnish the room in a modern and up-to-date manner
Everything is important in design: window sizes, lighting, colors, furniture materials. Some styles can be applied to existing ones, others must be approved at the design stage.
How to decorate the walls on the balcony?
If you are the owner of a small apartment, then an additional room will come in handy. Every owner of a balcony wants to turn it into a quiet and cozy corner, using it as a separate room. Its interior will largely depend on the taste of the owner, well-chosen materials, their colors and textures, as well as on the arrangement of furniture. To create a comfortable space even with a small area, it is important not to clutter it with a lot of furniture.
After the floor insulation and glazing are left behind, you can begin the final stage of work - decorating the walls on the balcony. This is the most sensitive moment, requiring careful selection of finishing materials, because the appearance and performance properties of the entire room will depend on this. In this regard, many people have a question, how to decorate the walls on the balcony?
This article will show you options for decorating the balcony space from the inside, photo design, which will help you understand what kind of material may be suitable in your case.
How can you cover the walls on the balcony?
Before you start finishing, you should understand one simple truth: the cheaper the material, the more often you will be forced to change it. So, the walls inside the balcony can be decorated:
1. Tree.
One of the common materials for finishing balcony walls is wood. Many, without hesitation, purchase lining for these purposes at an affordable price and with an attractive appearance. Thanks to wood, the balcony room takes on the appearance of a room in a country house, which is conducive to rest and relaxation.
However, when choosing a lining, it is necessary to pay maximum attention to what type of wood it is made from. As a rule, a type of material such as eurolining is used to cover the walls on the balcony, whose practicality in work can hardly be overestimated. At the same time, the manufacturer has a gradation of classes - from A to C, the higher the class, the higher its quality.
In addition to the critical stage of the material, even more attention must be paid to its installation. To do this, using a large number of self-tapping screws, avoiding large gaps, each plate is secured. What is the advantage of lining? - you ask. The fact is that installation is facilitated by the presence of special grooves in it that promote strong closure. You can read the photo instructions for working with eurolining.
Also, this plate method allows you to replace a damaged segment of the lining, which eliminates the need to completely dismantle the wall. All kinds of colors, shades and textures will help create a unique comfortable atmosphere for your balcony.
2. Drywall.
What is the best way to decorate the walls on the balcony from the inside if you don’t want to spend too much time leveling the walls for painting, decorative plaster or wallpaper? A panel made of three-layer plasterboard - a layer of gypsum located between two layers of cardboard - can easily do this. This option is the most affordable and convenient; it will allow you to get smooth walls without unnecessary costs.
Drywall is ideal for insulated balconies, since its main disadvantage is its poor frost resistance. However, taking into account the fact that this drywall will be located in a place potentially close to a source of moisture, you should opt for a moisture-resistant type of material.
If the walls on the balcony are smooth, then you will not need anything other than glue and drywall, but it may turn out that you will need to level the walls and install frames from profiles for drywall.
After installing the drywall, the only thing that needs to be done is to apply decorative plaster or paste any kind of wallpaper, which will make the balcony the highlight of the entire apartment, and it will become a favorite place for your pastime. An example can be seen in the design photo.
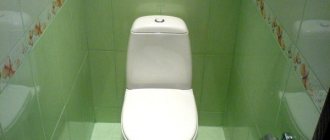
3. Plastic.
The walls on the balcony can be finished with plastic panels. Their diversity allows you to choose any color from a wide color palette. When working with them, one of the necessary conditions is the installation of sheathing. Plastic panels are resistant to moisture, which is very important for balcony rooms.
However, a significant disadvantage of plastic is its fragility and instability to low temperatures, so finishing interior balcony walls with plastic is only possible in areas with not very harsh climatic conditions; it is easily deformed under weak mechanical stress.
4. Siding.
In addition to covering balconies, loggias and facades with siding, it is actively used for interior finishing work, and, perhaps, its only requirement is the need for lathing.
Being a worthy replacement for lining and having a lot of color options, its service life is much longer. It has fire-safe properties, since it does not burn, but melts. Siding is easy to work with, which allows you to decorate the walls of any room with your own hands in the shortest possible time. See examples of wall decoration on the balcony inside the photo of siding design.
5. MDF panel.
In order to work smoothly with MDF, you need to know, first of all, what this material is made of - wood fibers pressed into slabs, covered with a film that imitates natural wood. With its relatively reasonable price, it is easy to install and heat resistant.
MDF panels can be used to perfectly finish pre-insulated rooms, since its instability to low temperatures and high humidity is taken into account.
6. Ceramic tiles.
Often, apartment owners line the interior walls of their balconies with ceramic tiles. A huge selection of colors and sizes allows you to combine tiles of all kinds: glossy with matte, with or without a pattern. This finish will go perfectly with a tiled floor. In this case, you can put matte tiles on the floor, and glossy tiles on the walls.
Finishing with this material is justified by its durability and ease of use, however, due to the availability of less expensive materials, tiles are currently used less and less.
7. Cork and cork wallpaper.
The most modern and popular material today is cork. It is divided into wallpaper and sheets, which are equally distinguished by high heat and sound insulating characteristics. This finish is environmentally friendly, moisture resistant and durable.
In addition, this material can, if desired, be coated with varnish or wax. Working with cork wallpaper and sheets is simple and does not require special training of craftsmen: you only need special glue. You can cover both walls and ceilings with cork. See the example, decorating the balcony inside the photo with cork.
8. Facing stone.
The most durable material for interior wall decoration is decorative facing stone. With proper work, it can serve its owner for 50 years or more, with a 15-year warranty on the stone itself!
It is resistant to moisture, does not burn, and tolerates sudden temperature changes and is suitable for absolutely any climate zone. Its only drawback is its rather high price.
If you feel the strength to experiment and are fluent in working with several materials, you can show maximum creativity and imagination by combining several types to decorate a balcony room.
Before you decorate the walls on the balcony, remember that there are a huge number of design options for this room (see photo), so before starting work, coordinate your existing fantasies with the budget of this event. Whatever you choose, keep in mind: it is better to sheathe the walls of the balcony of a pre-insulated room, this will extend its service life and use it as a living room.
Cork
Covering walls with cork, according to experts, creates an optimal microclimate in the loggia.
| Advantages | Flaws |
| An environmentally friendly material, which also has excellent heat and sound insulation properties. | Can't boast a large selection of colors. |
| Weighs little; finishing is carried out quite quickly. | When installing, it is recommended to cover the cork with varnish or wax. |
| It is not subject to deformation, as it is not afraid of moisture and temperature changes. |
Before installing the panels, they must be allowed to rest in a dry room (about 2 days). The cork is glued to a flat surface and is only suitable for closed balconies.
The photo shows an insulated loggia finished in the form of cork panels.
Cork panels
One of the most unique materials for finishing a balcony is cork wall covering, which is made from crushed and compressed oak bark.
Cork panels on the balcony as finishing
This is truly an unsurpassed, environmentally friendly, antibacterial material that does not rot and mold, does not absorb odors, is resistant to atmospheric influences, and is not subject to deformation. Therefore, cork covering is used not only in an insulated room, but also in an unglazed balcony.
Cork panels are very easy to use and can be easily cleaned with a vacuum cleaner and a damp cloth. One drawback is the high cost.
Balcony design styles
When choosing a direction, take into account the purpose of the room and your own feelings.
- A loft with artificially aged surfaces, boarded ceilings, a wooden box instead of a cabinet, and rough shelving is suitable for an office, a bedroom, or a workshop.
- Rusticism close to nature with simple furniture, wooden and stone surfaces will relieve tension and create the illusion of calm in the recreation area.
- In the workshop, decorated in the shabby chic style, against the backdrop of pastel plastered walls, writers, artists, and home craftsmen can create comfortably.
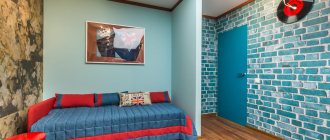
- Minimalism is a good option for small loggias. Light shades of the walls expand the space. Against a white background, a wall with imitation brickwork and laconic black shelves stand out well.
- High-tech with clear lines adds rigor to a teenager's workplace. The walls and ceiling are finished with plasterboard and plaster. A narrow glass table with chrome parts is installed at the end part.
- White and light blue colors, inherent in the Scandinavian style, seem to expand and cool the space of the loggia facing the southern part of the apartment. The cold shade can be diluted with the warm tone of the wooden paneling.
DIY balcony decoration
In order for the overall composition of your balcony to look harmonious, you need to take care of its comprehensive finishing: floor, ceiling, walls, and slopes. Let's take a closer look at the finishing of each surface.
Walls
Depending on the materials used, the lathing can be metal or wood.
- If you plan to insulate the walls of the balcony, then you should give preference to the wooden option. For its construction, bars 4x4 cm, 4x5 cm, 5x5 cm are used for racks, and slats 2x4, 2x5 cm for transverse strips.
- Installation of racks is carried out in increments of no more than 1 meter, and horizontal ones - no more than 50 cm. If there is no need for vertical racks, then horizontal ones are attached directly to the wall surface. The main racks are attached to the walls using self-tapping screws and dowels.
- The horizontal rail should be installed at a distance of 10 mm from the floor; this space is filled with mounting foam. The correct installation of each subsequent row must be checked using a building level.
- Insulation is carried out by laying slab insulation in the space between the frames, followed by fastening it to the wall using dowels and self-tapping screws. Next, MDF panels are mounted on the constructed sheathing using self-tapping screws, clamps or nails.
Ceiling
One of the most common options for finishing a balcony ceiling is a single-level suspended ceiling made of MDF.
- Before carrying out the main work, it is necessary to clean the concrete base from dirt and dust, as well as putty cracks and crevices in the slab.
- After this, you can begin installing the sheathing, which can be made of a metal profile or wooden slats.
- First, the width and length of the ceiling slab are measured, then, in accordance with the measurement results, the sheathing elements are cut.
- They, in turn, are attached to the ceiling using 6x40 mm dowel nails. The structure is constructed in such a way that the distance between the guide elements is no more than 30 cm.
- After installing the sheathing, it is necessary to carry out thermal insulation. Typically, slab insulation is used, which is attached between the frame elements using vinyl spacer “fungi”.
- To do this, the slab layer together with the concrete base is drilled with a drill, then a spacer is inserted into the resulting hole and a self-tapping screw is screwed into it.
- When the ceiling is insulated, you can attach the MDF board to the frame using self-tapping screws or small nails.
Slopes
Plastic slopes are the most versatile option. Preparatory measures include cleaning the slopes from the old finish, as well as treating them with antiseptics and cementing the cracks.
- In order for future slopes to be perfectly level, you need to fix wooden slats along the side and top sides of the opening.
- This is done using screws 95 mm long. Next, the starting U-shaped strip of PVC is fastened (using self-tapping screws) along the outer edge of the window.
- Then the F-shaped profile is installed so that its groove is opposite the groove of the U-shaped strip, and the upper part is overlapped. Now you can begin installing the most precisely cut plastic slopes into the profile grooves.
- For additional thermal insulation, you can use roll insulation, which is laid together with a PVC slope strip.
Floor
To finish the floor, you can use laminate, parquet boards, ceramic tiles or linoleum. First prepare the surface:
- the subfloor is covered with waterproofing;
- insulated with slabs of polystyrene foam or expanded polystyrene;
- Make a 4 cm thick screed on top.
To reduce the load on the floors, you can install joists, lay insulation between them, and fill waterproof plywood on top. Laminate, parquet boards and linoleum must be laid on a backing made of cork or polyethylene foam. The tiles are laid on a concrete screed; tile adhesive or mastic is used as a solution.
https://youtube.com/watch?v=EmsXWnchQXE
Warm plastering of the balcony
Such work involves the use of mixtures that are suitable for the premises. If the balcony becomes an extension of the room, then it can be covered with decorative plaster, for which there are no special requirements. Usually the composition is laid on a whole pie of insulation, waterproofing, wind protection and vapor barrier film.
Attention! All other materials under the plaster layer must be selected with special care. For example, insulation should not cake under the influence of moisture and lose its properties. Therefore, it is worth abandoning mineral wool. The thermal insulation must also be rigid enough so that plaster can be applied to its surface.
Expanded polystyrene is best suited as insulation, but you need to take care of the method of attaching it. Installation can be carried out using cement mixture or mastic, but the most suitable option would be polyurethane foam. With its help, it will be possible not only to carry out installation work, but also to fill the resulting gaps.
Before starting work, the walls are treated with special compounds that will be able to eliminate biological formations. All joints are waterproofed using a solution of cement and PVA glue. Additionally, you can use waterproofing tape.
Siding
Usually this material is used for finishing facades, but it is acceptable to use it inside a balcony. The products are made on a vinyl basis, therefore they have the following advantages:
- Good indicator of resistance to atmospheric influences (precipitation, wind).
- No substances harmful to human health in the composition.
- Good level of ventilation, ensuring timely removal of moisture from under the coating.
- The material tolerates high and low temperatures well, so installation work can be carried out at any time of the year.
- Possibility of spot repairs.
Siding is rarely used for interior decoration of balconies; most often it is used for facade work
Installation of siding inside the balcony
The preparatory work, tools and consumables are exactly the same as in previous cases. The inside of the balcony may be damp, so it is better to treat all surfaces with an antiseptic composition and lay waterproofing material.
Siding installation begins with the installation of a frame for the panels. Wooden slats are installed on the ceiling at a distance of 40 cm, on the wall - 50 cm. Transverse slats are mounted at a distance that is 5 cm less than the length of the element. The sheathing is attached to dowels.
Before installing siding, it is necessary to erect a wooden frame and lay waterproofing material
Then the insulation is laid. A thermal insulator is mounted into the resulting voids of the frame and secured with a waterproof film. As a result, the balcony will turn into an insulated room.
Now let's look at how to properly cover a balcony with siding. The first step is to install special guide profiles on the sheathing, after which the siding is cut to the required size using metal scissors. There is no need to make indents; the first panel is placed directly in the corner and secured with a self-tapping screw. The tongue of the next panel is placed behind its wide part and also secured. In this way, the entire area is finished. Finally, plugs are installed on the corners and edges of the coating.
Installation of special guide profiles for siding
Technologies for applying decorative plaster
Before work, it is important to decide which application algorithm to choose. To do this, you can use one of four methods, each of which involves the use of:
- roller;
- brushes;
- spatula and trowel;
- fabrics
- films;
- sponges.
Venetian plaster, which is very common among consumers, can be applied with a trowel and putty knife. A small portion of the mixture is applied to the trowel and distributed over the surface.
If you want to get an unusual texture, you can use available tools and materials. The first layer is applied using a trowel, left to dry for a while, and then processed with a textured roller or improvised means.
Surface preparation
Special attention should be paid to preparation. The walls are cleaned, degreased, and dust is removed from them. The walls may need to be washed and left to dry. The priming step is mandatory. This not only increases the adhesion of the materials, but also reduces their absorption.
Attention! For an unheated balcony, it is best to choose a primer with special properties. Mixtures with fungicides and antiseptics are suitable.
The preparation stage may also involve leveling; for this, starting plaster is used. It has particles with large fractions. Then another layer of primer is formed. After it has dried, you can begin plastering.
Application of decorative plaster
Application techniques may vary. If desired, you can create a travertine effect. At the first stage, the composition is distributed over the surface into the thickness of the particle fraction. As soon as the first layer has dried, you can begin to apply the material in strokes, covering individual areas. This allows you to form a characteristic pattern over the entire area.
Finishing
The final step may be staining. Work can be done in one or two colors, as well as using the dry brush technique. To lighten, you can remove part of the paint layer or give the surface the effect of Venetian plaster. In the latter case, you will have to give the wall an imitation of natural stone, for example:
- malachite;
- granite;
- marble.
The technology involves the use of a glazing composition. First, the plaster is painted one color using a long-nap roller. The second color should have a metallic sheen. A common one is silver, which is diluted with a universal primer and, using a small roller, passed over the tops of the texture. At the final stage, the plaster is coated with varnish.
Attention! Painting decorative plaster is no less important stage than the formation of the texture itself. You can complete the finishing decoration of the wall using special rollers and mittens, which create unique effects on textured coatings.
Floor arrangement
If you do not pay attention to the balcony floor, then all other work may be in vain. One of the options for arranging the balcony floor after the glazing is done is laying logs
First, the concrete floor is inspected, identifying cracks and irregularities. The surface is cleaned of debris, old coating is removed, and defects are eliminated. Laying an insulating layer of penofol will help protect against dampness. It is cut to size and the foil side is placed on the concrete.
Proceed to the installation of the subfloor. For transverse joists, take 40 by 50 mm timber, lay them on the floor in increments of 0.6 m, and secure them with at least two anchors. The beam should not come close to the wall so that a “cold bridge” does not form. Insulation is laid between the joists, foaming the seams.
At the same time, the outer wall of the balcony is insulated. Then they proceed to the installation of longitudinal joists. First, determine the top point of the floor. From here they begin laying the logs. Having mounted the outer bars, a cord is pulled between them. It will help set the rest in level. Sometimes they are limited to installing only longitudinal joists. The installation of the floor is completed by laying plywood. Having cut it to size and, not forgetting the gap with the wall, secure it to the joists with self-tapping screws.
If glazing of the balcony is not provided, then the best option for finishing the balcony is tiles. It is used to cover the floor and walls; the ceiling can simply be painted. The tile has increased strength, is not subject to corrosion, and is not afraid of humidity and temperature changes. You can use wood cladding, but you will have to constantly monitor its condition.
From time to time it will be necessary to treat the wood with protective compounds to prevent rot and mold. It is not recommended to use porcelain stoneware or stone. The large weight of these materials can lead to damage to the integrity of supporting structures. The floor installation is completed by laying the floor covering and installing baseboards. But they do this after finishing work on the ceiling and walls of the balcony.
Floor finishing
Complete interior decoration of a balcony necessarily includes flooring. To do this, it is advisable to choose strong, durable, heat- and moisture-resistant materials that at the same time have high aesthetic qualities. Experts advise giving preference to such options as tiles, linoleum, wood boards, laminate, ceramic and PVC tiles, carpet. When choosing a finishing material, it is necessary to take into account whether there is glazing and how the walls are covered.
When installing a new floor covering, the subfloor is first prepared. It is cleaned of the old coating and leveled. If insulation is necessary, logs and insulation are installed. The next layer is a plywood or wood fiber sheet, on which the finishing floor is placed. At the final stage, the plinth is attached.
Selection of materials for exterior finishing of the balcony
External finishing is carried out either before the glazing of the balcony, or simultaneously with it. That is why, first of all, all the necessary tools and materials are purchased.
Considering the constant exposure to various weather conditions, the following are perfect for exterior decoration of a balcony:
- plastic lining;
- vinyl;
- aluminum siding;
- corrugated sheeting
Wood should not be used in this case, especially for apartment buildings, since the material is impractical in terms of wear resistance
Let's look at the suitable options in more detail.
Plastic (polyvinyl chloride) lining
One of the inexpensive options for exterior finishing. The lining is attached to a sheathing made of metal profiles or wooden beams.
Advantages of the material:
- large selection of colors, styles, patterns;
- ease of installation and adjustment, reliability of fastenings;
- low price.
Its disadvantages:
- over time, the panels fade in the sun;
- strong gusts of wind can tear individual parts of the trim out of the fastenings;
- The fragility of the panels makes transportation inconvenient.
Installation procedure:
- A sheathing is installed from a metal profile or wooden beam along the entire outer surface of the balcony;
- The guide strip (the first panel) is fixed level with self-tapping screws;
- It is attached at the bottom, installed in the starting profile;
- The following strips are attached to each other using tongue and groove.
For the budget price category, this material is a real find!
Profiled flooring
Corrugated sheeting is, in fact, galvanized steel sheets, “folded” with corrugation. The material is more expensive, but its characteristics are more reliable.
Advantages of corrugated sheets:
- despite good rigidity and strength, it is light in weight;
- long service life - about 50 years;
- large selection of colors;
- does not fade in the sun;
- it is quite easy and quick to install even at height;
- good environmental performance.
Mount it as follows:
- A metal or wooden frame is attached to the outer walls of the balcony, after which it is treated with protective compounds;
- Sheets of corrugated sheets are attached to self-tapping screws with rubberized linings, starting from the corner and overlapping;
- End caps cover protruding corners.
Although many people do not like the aesthetic component of this material, it is best suited for city balconies.
Aluminum siding
Aluminum siding is considered optimal in terms of aesthetic and performance characteristics. It is also attached to the sheathing, perfect for further insulation of balconies and loggias.
Advantages of the material:
- the polymer coating is resistant to weather conditions and ultraviolet rays, which means it has a long service life;
- provides complete fire safety;
- resistant to microorganisms, mold, corrosion;
- moisture-resistant and frost-resistant.
The only negative is the price of aluminum siding. Few people can afford high-quality finishing, but the result will definitely be worth the money.
Types of decorative plaster
When a consumer decides which decorative plaster to choose for a balcony, he should pay attention to the basis of the composition, which can be:
- mineral;
- acrylic;
- silicone;
- silicate.
The first is based on cement, mixes well with water and can be applied to mineral surfaces. They are pre-treated with quartz primer.
Acrylic plaster is made on the basis of a resin of the same name and has water-repellent characteristics, which is ideal for balconies and loggias.
The consumer's choice may fall on a silicone composition, which is versatile, which is why it is so popular. But the silicate mixture contains potassium glass, and the composition itself is rarely used for interior decoration. It is probably better to avoid such decorative plaster in conjunction with a balcony, because the material is most suitable for facades, as it emits harmful substances.
Mineral plasters
When choosing decorative plaster for a loggia, special attention should be paid to mineral mixtures, which may differ from each other in the fraction of the filler and its composition. The mixture can be made from:
- marble;
- granite;
- quartz;
- gold particles;
- cellulose;
- pearlescent particles.
This decorative mixture is good because the craftsman can create an imitation surface with his own hands:
- oak bark;
- traffic jams;
- marble covering.
The material allows you to obtain three-dimensional reliefs and unique embossed images.
Acrylic
When thinking about the question of which plaster to choose for a balcony, you should consider the features of acrylic mixtures. They are good because they are characterized by high impact resistance and the ability to repel dust. The last characteristic is especially relevant for the balcony space, because not a single loggia can be glazed so that dust and dirt do not get inside. Even if the walls become dirty during use, they can be washed. Acrylic compositions can be divided into mixtures for external and internal use. The first type of plaster is suitable for loggias and balconies, which is frost and moisture resistant and also has protective properties. Operation can be carried out in any climate zone.
Silicone mixtures for balconies
Such compositions are offered for sale in a wide range of colors and textures. With their help, you can create unique effects, providing walls with the qualities of wear resistance and reliability. This plaster is suitable even for a beginner, as it is easy to apply due to its plasticity. The layer tolerates temperature influences and high humidity well, but such conditions often persist on balconies and loggias.