The Latin word “structure”, which came into our language, means internal order, structure. This word is best illustrated by structural plaster. Its structure, manifested by different application techniques, becomes a decoration of the walls.
Structural decorative plasters have modeling components as fillers that differ in geometry, color, and type of substance. The structural components are:
- stone chips (crushed stone or rolled),
- synthetic/ceramic granules,
- shell fragments,
- different fiber origins,
- metal dust, etc.
Various methods of applying and performing decorative plaster coating reveal these inclusions to the viewer's gaze. Appearing on the surface, inclusions give it a distinctive pattern with the shape of its visible part, color, and reflectivity. The fibers serve as a reinforcing element that keeps the relief ridges from falling off when applying the mixture. They give it strength after hardening. Therefore, when using structural solutions for decorative textured work, rather high, complex reliefs are obtained. Embossed finishes are popular. The appearance of the decorative relief coating “plays” with shadows, giving the wall movement and depth.
Types of structural plasters
Structural plaster for interior wall decoration is a mortar. Solutions have different binding bases. According to it, finishing mixtures are divided into:
- mineral (base – lime, cement binders),
- acrylic (some also call it latex)
- silicate (liquid glass base),
- silicone (polymer base).
The mixtures are also divided according to the conditions of use:
- decorative plaster for interior wall decoration,
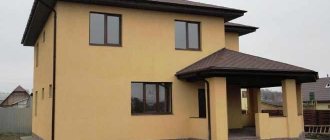
- compositions for finishing facades (exterior work).
In addition to this gradation, there is a division according to the size of the filler particles, according to the various effects that certain mixtures can exhibit. For example, roller decorative plaster has granules of various fractions to create a texture called bark beetle plaster. There are solutions that can be used to easily obtain the texture of travertine stone. The type of decorative texture also depends on the method of applying the solution and the type of tools used.
Why does decor need structure?
Structural plaster is a multicomponent construction compound intended for decorative wall finishing.
Each manufacturer means by this term its own understanding of the structure. Some of them evaluate the solution by the resulting texture on the wall, others evaluate the quality of the original composition. Regarding the second, they argue that such plaster is a heterogeneous solution, consisting of fractions of different quality characteristics. These include:
- inclusion cross-section (mm);
- fraction source material;
- granule shape;
- origin of components.
Others, regardless of the internal structure, attach more importance to the external manifestation of the composition on the wall. The same structural plaster for interior work, after application to the surface, can take on absolutely any shape. It all depends on the impact received.
This approach is interesting from an aesthetic point of view, since it allows you to create and create new options each time, modeling the connection in a different way. Therefore, the answer is obvious - the structure allows you to create a unique design. This is actively used by real craftsmen, but given the high cost of the working material, there are not many of them.
Which is better: mineral, acrylic or silicone?
All four main types of solutions have features determined by their base and other components. Due to poor environmental friendliness, silicate compounds are not used for interior work. Therefore, below we will mainly talk about three types of decorative solutions.
Mineral
The main binding components of the solutions are white cement M500 and lime. These structural compositions do not shrink when hardened, “get along” well with any base (although somewhat worse than silicone and acrylic), “breathe”, are environmentally friendly, fit well and keep their shape. They are not afraid of water, so they are suitable for plastering wet rooms such as bathrooms and basements. They can be washed with soapy water or dishwashing detergents.
You can easily make mineral structural plaster with your own hands at home. Ready-made formulations are the most affordable. Sold dry. Seal with water at a temperature not lower than 12 °C. Requires thorough mixing before application.
Since mineral plasters are quite hard, they are not resistant to vibrations and various movements. When the house shrinks, cracks appear. Therefore, they cannot be used in new buildings until the buildings “nest” - settle down. They are also not used in seismic areas or near railway tracks.
Non-flammable, therefore can be used near sources of open fire. Lime compositions are not susceptible to mold and mildew. When colored clays are present in the composition, they turn out colored. Mostly they are white or colored. Service life 10 years.
Acrylic
The binders of this type of mixture are acrylic synthetic resins. The basis of the solution is a water-dispersed emulsion. In addition to the filler, substances are added to it that impart the necessary properties - biocides, fire retardants, etc. The structural acrylic mixture is supplied ready-made in buckets.
Acrylic mixtures are tenacious, durable, and elastic. No harmful fumes are emitted. However, they hardly “breathe.” Because of this, they are not recommended for use in bedrooms and living rooms. However, they are good for bathrooms. Not resistant to UV radiation, flammable. They accumulate static, so they become dust collectors. Wash and clean with a vacuum cleaner.
Guaranteed durability – 15 years.
Silicone
The binders of structural plaster are polymer resins. It is very elastic. The polymerized dispersion has high strength. It is hydrophobic, but breathes due to micropores. It does not get dirty, it is fire resistant, it is not afraid of UV rays, it does not fade, it can be used for work indoors and outdoors. Wear-resistant. Pre-priming is required. Serves for 25 years. Most expensive. Rich palette. Evaporation during hardening.
Of the three plasters presented, the most tensile is silicone. It requires a silicone primer and is the most expensive. Decorative acrylic and silicone compositions do not require final painting and are sold ready-made. These are relatively recent materials. However, mineral plaster, which is somewhat inferior to them in several individual positions, in general, copes well with the functions of a structural decorative coating and has its advantages.
Mineral structural plaster for interior work can even be prepared from putty (acrylic and silicone plaster cannot be made well at home). Economical and environmentally friendly.
Therefore, all three types are good in their own way.
How to make a mineral mixture using regular putty? Take 4 parts of it, add 3 parts of clean sand, mix the mixture and add water to the desired consistency. You will get structural decorative plaster - a mixture that has a structure suitable for creating texture.
Sequence of work
The thickness of the decorative plaster layer must correspond to the thickness of the fraction . Polymer compositions can be applied in 1 layer; in other cases, at least 2 are required.
As an example, we consider the “fur coat” finishing technology using silicone plaster and a fur roller.
Stages of work:
- Use a spatula to transfer a small amount of the composition onto the trowel;
- without scribbling, apply the plaster to the surface;
- align the tent with chaotic movements, without pressing on the trowel;
- Use a polyurethane float to rub the plaster in a circular motion;
- it is important not to press too hard on the trowel and trowel, so as not to “wash out” the filler;
- Before painting, the surface is covered with a primer in 1 layer and left until dry;
- a fur roller is lowered into the tinted composition and rolled slightly;
- rolling is carried out in a strictly horizontal or vertical position, starting from the top edge of the wall;
- as a result, the surface acquires a grainy texture;
- After drying, remove the falling out elements with a wet trowel and No. 320 sandpaper.
For tinting, you can use universal pigments or water-dispersion paints.
After adjusting the relief, the wall must be covered with a layer of natural wax . To do this, dip a foam roller into wax and roll it over the surface. Wearing fluffy mittens or taking a porous sponge, rub the composition into the surface. The protective layer dries in 12 to 24 hours.
Advantages and disadvantages of use
Structural decorative plaster:
- hides various minor imperfections of the walls,
- gives the surface relief and volume.
- applied to any base,
- has good thermal insulation properties,
- has high mechanical strength,
- withstands temperature fluctuations over a wide range,
- waterproof,
- durable,
- practical (allows washing and disinfection of premises with chlorine),
- easy to do with your own hands,
- has a rich palette,
- microporous structure allows the walls to breathe,
- Easy to install with a minimum of tools.
Knowing these advantages, you must also remember the disadvantages. There are fewer of them:
- this finish is monolithic, so if the cladding needs to be changed, it will have to be leveled,
- the coating has a significant weight - up to 4.5 kg/m2.
How to find the best option.
When choosing structural plaster for the interior, it is important to remember that there are people in the room. Therefore, you need to give preference to a water-based mixture rather than one based on organic solvents.
If you plan to do the work yourself, it is better to choose the least capricious options that do not require tinting.
It is worth considering that sometimes the interior mixture can be replaced by structural plaster for facades.
data-matched-content-ui-type=”image_stacked” data-matched-content-rows-num=”2″ data-matched-content-columns-num=”3″ data-ad-format=”autorelaxed”>
Tools
Every craft uses its own tools. In finishing plastering work, the main tools are a spatula and a trowel. To work with stone inclusions, it is more rational to use stainless steel tools. They do not blacken when grouting and ironing.
The main tools and devices are:
- spatulas,
- brushes,
- rollers,
- trowel,
- sponges,
- containers,
- as a rule,
- level,
- brushes,
- rags
- masking tape
- mixer (electric drill with attachment).
Spatulas and graters for applying decorative structural plasters must have rounded edges.
Variety of textures
Depending on the plaster filler and application method, the surface may look like:
- sand wall or dunes;
- orange peel;
- luxury tanned or cracked leather;
- fish scales;
- various reliefs;
- reptile skin;
- smooth or fleecy fabric;
- semi-antique;
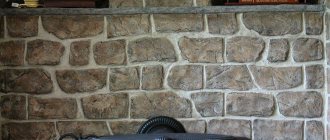
- cracked stone surface;
- precious stones.
USEFUL INFORMATION: Plastering walls: the necessary set of tools for the job
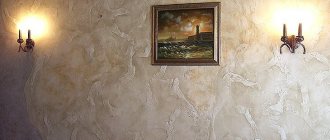
Particular sophistication of the interior is provided by bas-reliefs that can be applied to a dried plastered surface.
Technology of applying structural mixtures
The work process consists of several successive stages:
- Preparation of the base (cleaning the old coating, repairing cracks, leveling the wall in case of large deviations),
- Before applying structural plaster, the base is primed (for wood a mineral primer is required),
- Preparation of the solution (if the mixture is dry, it is sealed, tinted if necessary, and other additives are added),
- Application of decorative coating,
- Giving the desired texture
- Painting or glazing.
The appearance of the finish depends not only on the composition of the mixture. It also depends on the tool used to make the coating, on the methods of its application and painting.
Material selection
Depending on the chemical composition and technical characteristics, a choice is made in favor of one solution or another. For cladding porous load-bearing bases: foam concrete, cinder block, shell rock, wood concrete, etc. It is best to use silicate-based plaster. Walls plastered with cement-sand leveling mortars are best treated with mineral decorative compounds.
It is not recommended to apply structural latex plaster on surfaces previously treated with water-based and water-dispersion based primers. This can lead to peeling and even cracking.
The most universal option is silicone decorative plaster. It is excellent for both facade work and interior decoration, due to its resistance to dampness and mechanical stress. Silicone has antistatic properties, so such surfaces do not attract dust particles.
In addition, it does not interfere with free gas exchange with the environment, which makes it possible to maintain a comfortable microclimate indoors.
Basic DIY application methods
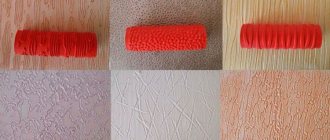
The solution can be applied by spraying (to create a kind of fur coat) or using a trowel. The surface texture of an evenly laid coating depends on the size of the grains. When simulating untreated stone, a composition with a grain size of 1.5 mm is used; for bark beetle, a grain of 2 mm is more suitable, for tree bark - 3 mm.
By running a wide brush or comb over the laid layer, you can create a variety of patterns. The direction of movement of the tool can be rectilinear, circular, wavy, chaotic. Their combination produces many interesting patterns.
Before applying to the wall, be sure to practice on sheets of plywood or plasterboard.
Different textures are obtained using the touch-off (or trimming) method. The trowel is placed on the freshly laid mortar and lifted away from it. The stuck mixture follows it for a certain moment, then breaks. The result is scallops, which become the basis of the overall pattern. They are either “smoothed” with movements of a soft plastic trowel, or slightly flattened with a damp sponge.
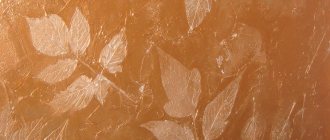
Relief is obtained in a variety of ways: by “applying” a lump of a plastic bag, rolling a roller with a figured cylinder or figured pile, using stencils. By drawing parallel lines with a hard decorative brush, straws are obtained.
By simultaneously applying two or more mixtures painted in different colors, a surface with a smooth, gradient transition between different colors is obtained. To do this, the composition of different colors is applied in small portions to the edge of the trowel using a spatula. Apply strokes, forming a thin layer using arcuate movements. When doing it yourself, it is advisable to experiment. Ideally, you can create pearl or malachite tints.
There are other application techniques. In all techniques, sharp edges are removed from the dry surface using medium-grit sandpaper. Dust is removed with a brush. Surfaces created from an unpainted composition are decorated after the coating dries.
Plastering
Several different techniques can be used to achieve the desired texture. Before starting work, the surface should be prepared for applying the solution.
Preparatory work
Liquid for removing wallpaper
The order of preparatory work depends on whether the walls were previously finished with other materials. If so, then it is necessary to carefully remove all the finishing down to the leveling layer of the base plaster, and in some cases, to the brick or concrete base of the wall. Wallpaper, old painting and whitewash must be removed in any case: applying decorative plaster compounds to them is unacceptable. To do this, you can use a metal spatula or knife, and in especially difficult cases, a grinding machine or a hammer drill with a spatula.
You can remove wallpaper using a warm soapy solution or a special wallpaper remover, which can be purchased at a hardware store. Getting on the inner layer of the canvas, it destroys the adhesive layer, and the wallpaper comes off the wall without any problems.
Waterproof vinyl wallpaper should be perforated using a needle roller or a “wallpaper tiger” before being wetted with liquid. This way the liquid can penetrate to the inner base of the canvas.
Old putty can also be removed from the surface using a chemical composition that can be prepared at home. Take 1 liter of warm water and mix with 3-4 tablespoons of starch. The wall is covered with this mixture, and after half an hour the putty can be cleaned off with a metal spatula without any problems.
The procedure for preparing new walls for applying structural plaster solutions is similar to preparing for any other types of finishing. The algorithm in this case looks like this:
- Measuring walls for curvature using a level or plumb line.
- Applying a leveling layer of base plaster.
- Elimination of minor defects using putty.
- Surface primer.
Tools
To apply structural plaster we will need the following tools:
- Container for plaster mortar.
- Plaster trowel, trowel, falcon.
- Wide and narrow spatulas.
- Texture rollers, stencils, combs, etc.
Texture roller
Wall application
The simplest and most common way to apply decorative mortar to the wall is with a spatula. Since the required layer must be quite thin, not exceeding 3 -5 mm, the basting method is not suitable here. The solution is taken from the container with a narrow spatula and evenly distributed onto a wide spatula. Then, using a wide spatula, the plaster is applied to the surface to be treated with smooth and sweeping movements.
Another method that allows you to simultaneously obtain a decorative texture while applying the solution is spraying. To do this you will need a broom and a stick. It is better to take a plastic broom so that particles of vegetation and small twigs do not fall on the plastered surface. They take a stick in their left hand, and a broom in their right. A broom is dipped into the plaster mortar and hit with it on a stick, which is held at a close distance from the surface of the wall. Splashes of the plaster mixture, falling off the broom, cover the wall with a thin layer of specks.
The procedure must be repeated several times until the entire surface is covered with a thin, even layer of the mixture.
Giving relief
Rain plaster
Giving a relief structure can be done in a variety of ways. This opens up a wide field for designer creativity. Some specialists can create entire panels and bas-reliefs based on plaster mortar. The simplest version of the relief can be obtained by walking over the freshly applied solution with various devices: a roller with a textured pattern, a rubber stencil, an ordinary sponge. More complex designs - “rain”, “Leonardo”, “bark beetle” - will require work in two stages.
For example, a “rain” pattern is applied using the following method:
- You should walk over the fresh solution with a metal trowel, pressing it with force and sharply tearing it away from the wall. As a result, the entire surface will take on the appearance of a “hedgehog.”
- After the “thorns” have dried slightly, they are leveled with a smoothing iron in one direction at an angle of 45° to the floor. The result is a pattern reminiscent of slanting raindrops on glass.
Using instructions on how to cover walls using decorative plaster, any home craftsman can transform his home. The video shows a master class on decorative modeling from plaster mortar.
Painting
Decoration is done using various materials and methods. The paint can be applied with a roller, brush or sponge. Coatings with relief are painted with a brush or sponge. In addition to manual application of paint, mechanized application is used - using various spray guns. When applying paint to a flat or flat-relief coating, stencils can be used.
Paints also have a binder base. It is important that it is compatible with the base of the plaster mass. The best way is to use the coloring compositions of the manufacturer whose structural plaster you used. The coloring material may contain impurities that give an additional effect. These are metal dust, pearlescent powder, small particles of mica, etc. Detailed information about painting decorative plaster.
Painting can be done in one or several stages. The paint color for each stage can be the same or different. Apply the paint with a sponge in a circular motion, blending thoroughly. The protruding parts of the relief can be lightened with a clean damp sponge, or painted in a different shade. For better painting, roller passes twice in perpendicular directions.
The final coating is usually a varnish (often acrylic varnish) or a wax coating. Glazing is applied in 1-2 layers. It must be remembered that the shade of the dried paint coating is different from the color of fresh paint. Therefore, preliminary painting is required.
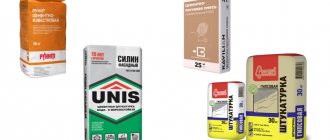
Manufacturers and brands.
There are a lot of domestic and foreign-made options on the market. One of its most striking representatives is Alpina structural plaster. It is produced as a ready-made white composition, which is colored after application.
Structural plaster of the Alpina brand is one of those options that is best applied with a spray gun, saving your time. In addition, it easily withstands atmospheric fluctuations, which is why it is used for facades.
Another option is Modellierputz structural modeling plaster from the manufacturer Dufa. It is based on a latex dispersion with the addition of mineral chips, so it has a granular pasty texture. The difference from the previous version is that it can be tinted before application.
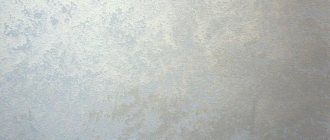
Venetian
To get a beautiful coating, you need to purchase a transparent ready-made mixture and add one or more colors to it. To give the surface the necessary effects, the material is applied in layers, and protective wax or varnish is placed on top.
This plaster contains marble particles and lime. If necessary, you can get a marble or glossy surface. The applied composition dries quickly with the possibility of forming a mosaic-type relief. Among the qualities of such a durable coating are environmental friendliness, fire safety, resistance to wear and moisture.
Work on applying decorative plaster requires certain skills. The quality of the final result depends on a number of factors. Follow the step-by-step technology and the end result will definitely not disappoint you.
When applying, the following sequence of actions must be observed:
- Clean and level the walls;
- Select areas up to 1 m in size, and after drying, apply the first layer;
- For the first coating, continuous application technology is used, and all subsequent layers are applied in strokes. Movements should be small. By adjusting the degree of pressure, you can change the texture of the coating;
- Smooth the coating over the area. Repeat steps over the entire surface;
- Allow the plaster to dry;
- Polish and apply wax or varnish to protect. As a result, you can get a coating like the one in the photo of decorative plaster.
Using modern methods of finishing walls and facades, you can create a beautiful interior, distinguished by originality and comfort. Decorative plaster helps solve this problem in the most effective and visually attractive way.
What does the market offer?
At the moment, the most popular plasters on the market are the following:
- "Stone". The material is produced in Russia. With its help, you can create a surface reminiscent of natural stone, limestone, and so on. Can be applied to concrete, drywall, wood and starter plaster. The coating dries within a day, and full strength gains occur in 10-14 days, depending on air humidity.
Structural plaster "Stone" - “Bark beetle” (“Ceresit” ST 64). Marble chips are used as filler. After drying, furrows are formed on the surface, imitating the results of the activity of a bark beetle. The material can be used on external and internal surfaces. It takes 24 hours to dry and 5-7 days to gain strength.
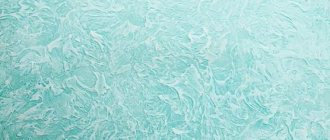
“Bark beetle” (“Ceresit” ST 64) - "Wet silk" (WGT). This plaster, after drying, imitates the texture of fabric. For use on interior concrete or plasterboard surfaces only. Requires adding color. Good resistance to water. "Wet silk" (WGT)
- “Travertine” (“Derufa.”). After drying, this material becomes similar to limestone. It is made on the basis of acrylic resin. The main advantage is a large margin of safety. Dries in 9 hours, gains strength in 3 days.
"Travertine" ("Derufa") - "Encausto Fiorentino". This is a representative of the so-called Venetian plasters. After drying, it imitates the color and texture of marble. Can be used on all types of internal and external surfaces. It dries quite quickly - in about 2-3 hours, and after just a day you can touch it.
"Encausto Fiorentino" - “Decor” (“AliMix”). It is made on a cement base and supplied in the form of a dry powder in paper bags. Can be used for interior and exterior decoration. It sets in 2-3 hours, dries in a day.
"Decor" ("AliMix") - “Alpina Strukturpulz K15 Lamb” (“Alpina”). Area of application: external and internal surfaces of concrete and brick. Can be applied over old paint.
"Alpina Strukturpulz K15 Lamb" ("Alpina")
Plastering with structural mortars is a simple procedure that you can do yourself, saving on the services of specialists. The main thing is to follow the instructions above and the recommendations of the manufacturers.