The technology of painting on wet plaster has been used for many hundreds of years; such paintings are called frescoes. In ancient times, they were painted in churches and monasteries, then they could be found in the most prestigious buildings, including palaces. Then it was forgotten and was used only by restorers during the restoration of works of art.
Nowadays, such decor is used in the design of various interiors, including residential ones. How is painting on wet plaster done, and is it possible to do it yourself?
Painting on wet plaster
Features of the work
Despite the high decorative value of such decoration, it is not used too often, even when decorating modern churches. There are several reasons for this phenomenon.
- Difficulty in preparing a special base. Not everyone can plaster a wall with high quality and taking into account all the requirements. Here they use a special recipe for preparing the mixture; in addition, there are subtleties in its application.
- The process is very slow, artists cannot work from a square meter. Painting on wet plaster differs significantly from traditional painting; it is much more complex and requires compliance with many special technological conditions.
- High cost of finishing the premises. One wall costs significantly more than the complete finishing of all surfaces of the room. This makes the use of such drawings inaccessible for the vast majority of our compatriots.
Drawing such pictures on the walls requires great skill and experience.
As you can see, professional painting on wet plaster (frescoes) can only be done by a limited circle of people. But for the decoration of residential premises, all these requirements are not fundamental, so to perform such work it is enough to have a talent for drawing and basic plasterer skills. Well, if funds allow, it is best to hire a specialist for this. Now you can briefly get acquainted with the features of the technology.
Types of plaster painting
The technology for performing plaster painting is not particularly complicated.
The main stages of its implementation are as follows:
- The drawing is done on the walls or ceiling, which are pre-plastered. Work begins on a wet base.
- The contours of the design are applied to the surface, and then they begin to paint it with water-soluble paint.
- After the “painting” has dried, it acquires a kind of depth through the absorption of paints by wet plaster mixtures.
If you evaluate this process, it may seem that there is nothing complicated about it. Only during work will all the nuances that accompany this creative process appear:
- condition of the walls;
- preparation of solutions;
- painting technology.
If you are not confident in your skill and artistic abilities, you should first practice in small areas. Initially it can be done on a dry plastered wall.
On video: creating a pattern on decorative plaster.
Features of plastering
Specific proportions are chosen by the master. In this case, the size of the building, the microclimate in the room, and the peculiarities of using the structure according to the seasons are taken into account. All these factors have a direct impact on the operating conditions of the building and the microclimate parameters in it. These characteristics, in turn, influence the specific composition of the plaster. On average, about four parts of sand are needed for one part of lime, but this is not a specific recipe, but only an approximate recommendation without taking into account fillers and other individual additives.
Preparation of plaster mortar
Plaster is applied in several stages.
Step 1. Wetting the wall. You need a lot of water, the brick must absorb the maximum amount and to the maximum depth. In some cases, this requires several days; the time is determined by the master based on personal practical experience and intuition. The more water the wall absorbs, the longer the plaster will be damp, and this is a very important condition.
Using a wide brush, generously moisten the surface of the wall with water.
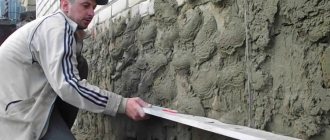
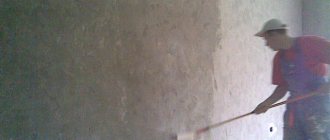
Step 2. Two or three rough coats. They are applied one by one, the total thickness is within 3 cm. Why do you need to make several thin rough coats? This is due to the physical characteristics of the plaster solution. If you immediately apply it in a thick layer, the coating will have many air pockets of various sizes; no amount of trowels can remove them. Air bubbles have an extremely negative impact on the strength and durability of the plaster. According to these parameters, it is already much inferior to cement-based compositions.
Apply a rough coat of plaster
Step 3. Make a finishing leveling layer no more than 4 m thick. Here a solution of only sand and lime is used, there are no fillers. This layer acts as a base; it should be as smooth and uniform as possible. The presence of hemp and brick chips in it does not allow the paints to be evenly absorbed into the damp surface of the wall.
Apply a leveling layer
Step 4. Several layers of whitewash with high-quality lime. Such work is carried out by painters immediately before painting. Lime whitewash will replace the canvas for the painting.
The final stage of preparation is whitewashing with lime
Important. The room must be completely free of drafts. While the drawing is being created, windows and doors are tightly closed.
Next, the creative process of painting the mural begins.
Preparing the surface for painting
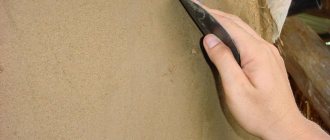
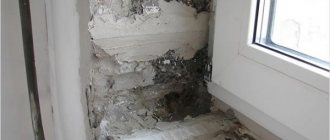
Surface preparation is considered the first stage of painting. Its goal is to level the wall with lime plaster and smooth it to almost perfect condition. Traces of the old coating must be completely removed. Old paint or poorly adhering plaster, wallpaper, whitewash - everything that was previously on the wall must be removed.
Today, frescoes are made using a lime-sand mortar, it is diluted in a ratio of 1:4 (1 – slaked lime, 4 – sand). But the finishing layers adhere to different proportions - 1: 2.5 (instead of sand, it makes sense to take powdered grated brick).
Why you shouldn’t take cheap lime for the plastering part of the work:
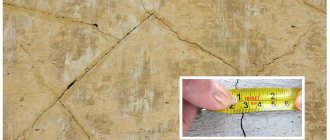
- it is made from waste and is considered lean, since it contains less calcium oxide and is extinguished more slowly;
- Due to such a slow slaking, as well as a large number of impurities, such lime will cause efflorescence, which means it may subsequently fall away from the wall, forming unattractive smudges in plain sight.
Previously, it was natural for artists to thoroughly wash and stir the lime to achieve complete slaking. But today it is possible to immediately buy pure lime and slak it at home.
The sand that will be part of the solution must be clean. The same river sand is perfect for this. It is advisable to sift it through a medium-sized sieve, because plaster compositions love fine sand, this way you can achieve a more plastic composition.
Plaster surface preparation takes place in 3 stages:
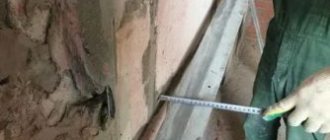
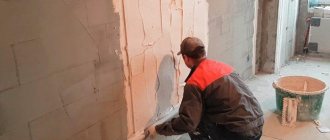
- Spray For lime mortars, a brick wall is considered the ideal base; a concrete one is a little worse. If the wall has wallpaper, everything needs to be removed; if the wall is crooked, it must be reinforced. The spraying itself is carried out either with a trowel or with a pump. The rule is to remove excess. It happens that you can see that the spray will be thick. It needs to be stretched 2-3 times to avoid cracks. And in this case, the reinforcing mesh is placed here (but first you need to get the beacons).
- Primer. Prime the wall when the spray has set a little. The thickness of the solution is important; it is applied to the wall with the same trowel, and it should be ground with a trowel. Excesses are also removed by the rule. This completes the geometric leveling of the surface.
- Cover. For the covering layer, you need to make a more liquid solution; grated brick or fine sand work well as a filler. Moreover, grated brick will still be preferable, since it retains moisture well (and this is advantageous for high-quality setting of the solution). The covering layer itself is small, no more than 2-5 mm, it is applied with a grater.
Hint: in one fresco painting technique you need to apply as much cover as you can cover with the fresco. So, for example, an experienced artist can paint about 7-9 squares (taking into account the complexity of the composition, of course). If there are many small details in the composition, productivity will be lower, which must be taken into account when applying the covering.
Decorative artist Sergiy Gusev talks about preparing the wall and painting.
Drawing a picture
Step 1. Preparing a sketch. Before starting work, a sketch of the composition is drawn, the details are not drawn, only the outline of objects and people is drawn.
Option sketch for a fresco
Step 2. Transfer the sketch. First, the area is marked and the scale of transfer is determined. The main anchor points are drawn, and the initial drawing is made on them. If the image is small in size, then the sketch is transferred using the pinching method: the paper is applied to the surface of the wall, marks are made with the sharp tip of a pencil.
When transferring a sketch to the wall, the proportions must be strictly observed.
Step 3. Preservation of the drawing. After the transfer, the so-called process of preserving the condition of the wall surface is carried out. The fresco is completely covered with a thin technical film; it adheres perfectly to fresh whitewash. Air bubbles are removed with a sponge or rollers, thereby ensuring a tight fit. This method allows you to keep the plaster damp for a long period of time, and open for painting only those areas that can be completed relatively quickly. Of course, the features of the composition are taken into account; it is necessary to work on the whole image, and not its parts.
Part of the wall is covered with film to prevent the plaster from drying out.
Step 4. The master determines which piece of the picture he can paint in a day and frees the corresponding area of the wall from conservation. The film is cut very carefully with a sharp blade; no marks should be left on the wall. The surface under the film is constantly damp, but not so wet that it interferes with the application of paint. Only an experienced painter can determine whether a wall is ready for work.
To draw the next fragment, part of the film is carefully removed
Practical advice. If for some reason the humidity is insufficient, then it must be moistened with a spray bottle and whitened with whitewash. They are transparent, the outline is clearly visible.
As work progresses, the drawing may change and be adjusted slightly. The writing process must be done quite quickly, the brushes must be soft and not leave marks on the wall. The consistency of the paint depends on the style of the fresco. In some cases it is paste-like, while in others it is liquid and is applied in three or four layers. The total thickness can reach several millimeters.
Paints for painting on wet plaster
On a damp wall, the paints adhere perfectly, and when calcium comes out of the lime, it covers them with a protective film. Russian traditions of painting frescoes involve the use of thick dyes; claims that the drawings are thin and translucent are misleading. The method of work is chosen by the painter; he makes decisions as he works. Drawing frescoes has its own requirements and rules; the master studies them for many years and only after that has the right to engage in such work. You should not hope that you will be able to create a real drawing on a damp wall the first time. Apprentices learn their skills from experienced artists over a long period of time.
Video - Painting on wet plaster
Painting on wet plaster is the most expensive method of finishing a room, and now you have an understanding of the technology of the process. Such work can only be done by professional artists; you can apply only the simplest compositions yourself using simplified technology. Painted walls require an exclusive design of the premises; it should resemble ancient buildings. It is advisable to make all window and door openings arched. On the pages of our website there is a detailed article on the technology of making plasterboard arches; we recommend that you familiarize yourself with its contents.
Painting on wet plaster
The technology of painting on wet plaster has been used for many hundreds of years; such paintings are called frescoes. In ancient times, they were painted in churches and monasteries, then they could be found in the most prestigious buildings, including palaces. Then it was forgotten and was used only by restorers during the restoration of works of art. Nowadays, such decor is used in the design of various interiors, including residential ones. How is painting on wet plaster done, and is it possible to do it yourself?
Painting on wet plaster
Execution algorithm
All actions are divided into several stages; only the precise implementation of each of them can ensure proper quality. Even the slightest deviation from the technology used will certainly have extremely negative consequences.
Having decided on the theme of the drawing, prepare its sketch
The quality of the substrate preparation is critical
Drawing is the most creative process
Now you can briefly familiarize yourself with the features of each stage.