Finishing the external walls of a building can be done in many ways. Choosing the most suitable one is a matter of awareness, skills and financial capabilities.
The use of facade plaster is a tribute to tradition, the opportunity to obtain a high-quality coating that well protects the wall material , promotes the release of steam while the surface has water-repellent properties and, most importantly, can be partially repaired.
A stain of damaged coating that appears can be easily repaired as if there was no flaw, which is much more difficult to do when finishing, for example, with siding. In addition, the plaster can be repainted, changing the appearance of the house without any complex work.
The choice of facade plasters is very wide; let’s take a closer look at one of them - Bark Beetle plaster.
Description of facade plaster Bark beetle
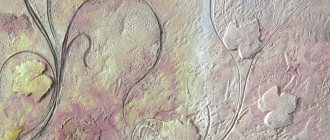
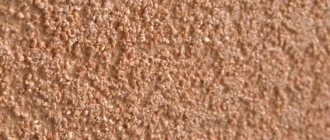
Bark beetle facade plaster is a textured coating that has a surface with a mass of grooves, pits or stripes that imitate traces of pests living in solid wood . The absence of a flat plane allows you to hide small surface defects and mask possible unevenness or other flaws in the walls.
At the same time, the aesthetic component of such a coating is very high; the surface looks very solid and attractive. The composition of the mixture for producing bark beetle plaster can be based on gypsum or acrylic base , and the gypsum mixture is sold in the form of a dry powder, which is diluted with water before application, and acrylic compositions are sold ready-to-use.
IMPORTANT!
The specific appearance of the coating is given by grain - small pebbles (marble chips), which under a grater create grooves that give the surface a recognizable appearance.
The grain size in the composition can be different - from 0.8 to 3.5 mm , which changes the surface topography, making the grooves larger or smaller.
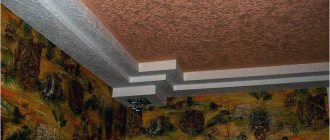
Below is a photo of the facade of a private house covered with bark beetle plaster:
Photo #1
Photo #2
Bark beetle plaster: photo examples of successful use of the material
Bark beetle plaster is in wide demand due to its external qualities; it is a decorative plaster for the facade and interior of a house.
Note! Finishing made from this material has many advantages - it is durable, environmentally friendly and pleasant to look at. Its distinctive feature is its grooved texture.
Bark beetle plaster
The material has found widespread use throughout the world and remains one of the most sought after of its kind. There are two types of bark beetle on the market: acrylic and gypsum, and both of them are quite versatile in terms of application. To decorate walls yourself, you will need to purchase a considerable number of tools and materials for preparing surfaces, applying lower layers and the plaster itself. Then, after the initial stage of work and creating a base for the bark beetle, it remains to decide how exactly to design the coating. Special techniques have been developed for creating textured ornaments and decorative designs. At this stage it is also recommended to use your own imagination. The result can be a unique and stylish design.
Photos of textured bark beetle plaster clearly reflect this, and today it is one of the most popular and sought-after facing materials, which is easy to apply and can create not only a beautiful coating, but also protect the base from negative environmental influences and mechanical damage. You can learn more about this universal material from this article.
Specifications
There are many manufacturers producing bark beetle mixture. Each of them strives to add some ingredients to their composition that enhance a particular parameter or effect. Therefore, there are no general technical characteristics, but some qualities common to all types of mixtures can be identified.
These include:
- The coating is quite light and does not create excessive load on the walls.
- Operating temperature range from -55 to +60 degrees ; when heated, it does not emit harmful volatile substances, does not fade, and is fire resistant.
- The surface is durable, does not withstand too strong impacts, and can be cleaned with a brush or vacuum cleaner.
- Withstands washing with water , is resistant to precipitation, chemical compounds, and does not contribute to the formation of mold.
- The base color of the composition is white, the composition cannot be tinted, but after drying it can be painted in any desired color.
- It is completely environmentally and does not contain any harmful impurities.
- The average consumption with a layer thickness of about 3 mm is 3.5-4 kg/sq.m. m.
- The prepared solution is suitable for application within 2-3 hours.
- Drying time for the coating is 2-3 days, full strength is achieved within a month.
- Frost resistance - 50 cycles.
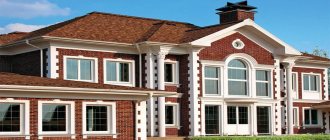
Photo #3
Typically, dry mix (the most common and used type) is sold in 25 kg bags, the contents of one bag cover 7-8 sq.m. surfaces.
Can be applied to the following types of substrate:
- Plaster.
- Drywall.
- Brick.
- Chipboard.
- Concrete.
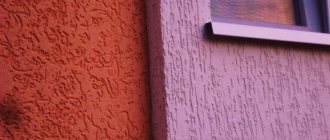
The texture and pattern of the surface depend on the grain size, the skills of the plasterer and the direction of the grooves.
Photo #4
Advantages and disadvantages of bark beetle plaster
Bark beetle plaster is durable and environmentally friendly. It contains only natural ingredients. Thanks to the mineral filler, the mixture turns out to be light - this, in turn, relieves the surface of the building from unnecessary load. Natural phenomena such as direct sunlight and low temperature do not have a significant impact on the material. Heavy rains, snow and hail will not damage the coating. Fire-resistant qualities also provide protection from sun exposure: the color retains its original brightness. In addition, plastered surfaces are easy to clean. It is acceptable to use water and detergents for these purposes. The bark beetle is resistant to mold formation - this is an important plus under any circumstances.
Note! This coating is difficult to damage mechanically, but if this has occurred, it will not be possible to hide the defects. The disadvantages are also the difficulty of application. An inexperienced person may need outside help.
Textured bark beetle plaster combines beautifully both with clinker tiles and with natural or artificial stone.
The advantages of this facing material are:
- the possibility of using bark beetle plaster for exterior and interior decoration;
- high viscosity and good adhesion of the material to the base, due to the presence of mineral additives and polymer materials in the mixture;
- environmental safety of the material;
- light weight of the surface formed by the facing material, which does not create additional load on the wall and foundation;
- has increased resistance to mechanical stress;
- the material does not shrink during the hardening process, which eliminates its cracking;
- has increased frost resistance, can withstand temperatures down to -55°C;
- the material is resistant to UV exposure and the influence of precipitation;
- able to withstand exposure to aggressive environments;
- has good vapor permeability, which allows the walls to “breathe” and prevents the formation of fungus and mold on the surface;
- possibility of easy painting with various paint compositions;
- long period of operation without loss of original appearance;
- fits well on brick, concrete, chipboard, plasterboard bases, sandwich panels and polystyrene boards, but requires the creation of a base layer based on cement or gypsum plaster;
- affordable price.
Note! It is not recommended to apply bark beetle plaster to wood, metal, plastic or glass surfaces.
Additional advantages of finishing the facade with bark beetle are:
- The material is available and widely distributed;
- There is a large selection of shades;
- Among other things, if the coating was originally white, it can be painted.
If you do not have the necessary skills for applying plaster, it is better to entrust the application of “bark beetle” to specialists.
Decorative bark beetle plaster is easy to paint, which is very convenient if there is a need to frequently renew the surface.
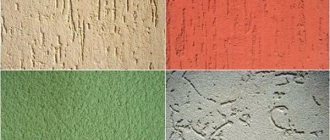
Other types of facade plaster textures
There are other types of facade plaster, which may have a basic composition of different elements, for example:
- Mineral compositions. They are considered the most durable and economical, and their strength only increases over time. The base is cement with various additives, the mixture is not tinted and can be painted.
- Acrylic. The elastic surface tolerates small movements and shrinkage of the building well. It has good water-repellent qualities and high vapor permeability, which allows the coating to easily withstand temperature fluctuations.
- Silicone. Expensive and very high quality coatings. They are distinguished by their versatility, protecting against all harmful influences - moisture, sunlight, temperature changes, etc. The composition is easily tinted, having a wide range of colors, which improves its performance. Due to the high price, the use of such plasters is limited, but their quality is very high.
- Silicate. Plastic, vapor-permeable mixtures, easy to apply and do not retain water. They are successful on busy streets where there may be a high level of dust in the air, as they are immune to pollution.
There are other materials for exterior use, as manufacturers are constantly looking for new, more attractive and high-quality additives, compositions and bases for coatings.
Types of decorative plasters
Bark beetle plaster: photo examples of beautiful houses
The great popularity of the bark beetle is due to its unique decorative effect, high resistance to weather conditions and long service life, which reaches 25 years without loss of surface texture and color. The quality and relevance of this finishing method is also evidenced by the fact that bark beetle is often used as plaster for the facades of houses in Europe. Photos of houses with external walls of a similar plan are presented below.
How to properly mix decorative mixture
The quality and strength of the resulting coating depends on the correct preparation of the working mixture. Meanwhile, the procedure is simple.
Required:
- Container for mixing the composition (for example, a bucket),
- Mixer for mixing. An electric drill with an adjustable speed will do.
- Dry mixture.
- Water.
There are instructions on the package indicating the dilution ratio of the mixture.
NOTE!
The amount of water and dry mixture must exactly correspond to the proportions specified in the instructions, otherwise the quality of the coating will be low.
The mixture is thoroughly stirred using a mixer and left to swell. After a few minutes, you need to stir it again (you can repeat the operation three times). This will help break up lumps and contribute to the quality “ripening” of the composition. The finished solution has the consistency of thick sour cream or mashed potatoes.
Bark beetle mixture consumption
The peculiarity of the Bark Beetle mixture is that it is applied to the entire plane at once - the entire wall at one time.
This means that it is necessary to prepare the required amount of the mixture, since its readiness period is limited , and interrupting during work to prepare a fresh portion of the mixture means the edge of the applied composition will set.
The junction of the two layers will be noticeable, and the entire work will be, if not ruined, then done poorly.
Bark beetle plaster is a finishing coating that is applied in a thin layer to the prepared surface.
The thickness of the layer should approximately correspond to the grain size, otherwise thicker application will not produce grooves that make the surface recognizable and attractive.
The whole point of applying such a composition will be lost. Therefore, the consumption of the finished mixture is quite economical, per 1 sq.m. The surface needs about 3 kg of composition . Depending on the thickness of a given coating or grain size, the consumption may vary in one direction or another, but the average value is approximately the same as indicated.
CAREFULLY!
Some sources indicate the thickness of the bark beetle plaster layer to be 1 cm or more . Most likely, in this case, along with the finishing layer, the thickness of the preparatory layer of sand-cement plaster is taken into account. The bark beetle itself is not applied in such a thick layer.
Technology of finishing the facade of a house with bark beetle plaster
There are two ways to apply such decorative plaster to the facade of a house:
- independently using hand tools, which allows you to save on the cost of renting automated equipment;
- using special equipment for applying plaster, which can reduce work time by several times.
Machine application of plaster
Regardless of the chosen method of working with the material, the application technology must be carried out according to strict rules in the following sequence:
- surface preparation for finishing;
- preparing the solution;
- applying bark beetles to the surface of the plaster;
- final painting of the facade.
Let's look at each of the stages in more detail.
Tools for work
To prepare the plaster solution, you will need a container of the current size (depending on the amount of work), a construction mixer or a drill. For subsequent work with decorative bark beetle plaster with your own hands, you will need to have a number of tools available. The material should be applied to the surface using a spatula. It is better to choose several products of different sizes: for smooth surfaces a large spatula is relevant, and for hard-to-reach places (corners, protrusions, niches) it is better to have a small tool.
If you choose an automated method of working with decorative plaster, you will need to acquire a special gun for applying bark beetle to the facade of the house.
Also, when working with bark beetles, you will need graters, a knife, a rule and cuttings. They will allow you to work with the material quickly, without difficulties. And for painting the facade, it is good to choose rollers or brushes of different sizes. The size of the tool is chosen as in the case of a spatula: wide tools for smooth surfaces, small ones for hard-to-reach places.
Plaster application tool
Surface preparation
First, you need to remove the previous finishing from the surface of the house facade: plaster layer, paint, decorative panels, and other materials. Further, in order to achieve better adhesion of the finishing material to the base, it is first primed with special compounds. Experienced craftsmen advise choosing a composition of the same brand as the bark beetle plaster. It is also desirable that it be white. Then dark stains from the soil will not show through in the grooves of this type of plaster mass.
Facade primer
Priming is carried out in several layers until the surface of the walls of the task acquires a uniform white color. This is necessary to increase the durability of the facade and give it an aesthetically attractive appearance.
If you choose an expensive primer composition, just one layer of material may be enough, since a high-quality product from leading manufacturers often has a thick consistency and perfectly fills the micropores of the base.
Leveling the surface for plaster
Preparing the mixture
When preparing the plaster mortar, it is important to strictly follow the manufacturer's recommendations indicated on the packaging. In this way, it is possible to guarantee the façade of the house high-quality and long-lasting cladding.
Plaster mortar suspension can be used immediately after purchase. The main thing is to carefully move the material before use. If you purchased a dry mixture, it will need to be diluted with water, following the manufacturer’s recommendations regarding the current proportions.
The water is heated to a temperature of 20° Celsius, and then the dry component is gradually added to it. The solution is thoroughly mixed with a construction drill so that lumps do not form. A construction mixer is also suitable for these purposes. After preparation, the solution should not be left for a long time, otherwise it will harden and will not be suitable for use.
Preparation of plaster
Application Features
The first layer of plaster is applied with sweeping movements “in a spray” along pre-set beacons, then the surface is leveled using the rule. To increase the strength of the facade, it is worth using reinforcing mesh.
We plaster the wall, having previously secured the beacons
In order for the cladding to look monolithic, to have no level differences, and also to ensure that the seams are not visible on it, it is necessary to adhere to the continuity of application of the material. Each new section of the wall should be joined to the previous section that has not yet dried. Therefore, experts do not recommend allowing breaks in work. But if this is absolutely necessary, then the boundary of the solution will need to be sealed with construction tape, and then coated with a layer of plaster. When work resumes, the tape is removed.
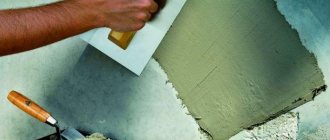
The mixture is drawn up with a trowel. The composition is applied according to preliminary markings. Applying plaster.
In order to prevent changes in color and texture on the base, it is necessary to use the composition of not only one brand, but also one batch. The thickness of the plaster layer should be selected equal to the size of the filler. The working tool is held at an angle of 60° relative to the facade of the house.
30 minutes after applying the plaster layer to the wall, a pattern of different types is created on it using a soft grater: in the form of horizontal, vertical, cross, spiral or randomly located stripes. It is formed after rolling solid granules behind a grater.
Horizontal pattern Vertical pattern Various techniques for applying plaster
Painting plaster
After plastering all the walls of the house, the surfaces are allowed to dry thoroughly. This may take different times, depending on the type and brand of plaster chosen. Read the manufacturer's recommendations on this matter, as it is not recommended to violate them. Otherwise, the facade will lose its durability and may delaminate or crack.
After the cladding has completely dried, it can be painted. To do this, paint and special tools are used.
We choose a high-quality mixture and paint from one manufacturer.
Use a roller to paint the main surface, and use a brush to paint the grooves that remain after rolling the granules under the influence of a grater. A house whose facade is painted in two colors looks unusual: the main surface is light, and the grooves are a dark shade.
Facade painting
Preparing the surface for application
For high-quality application of decorative coatings, the surface must be prepared . It must be cleaned of dirt and dust, old wallpaper or paint, peeled plaster must be removed, etc. The prepared wall must have a clean and dry surface without crumbling, deep dents, cracks and other defects that cannot be hidden under a thin layer of finishing coating.
- Detected cracks or dents should be treated with a spatula , removing peeled or broken pieces so that the edges form a solid monolith without signs of delamination.
- Then all detected flaws and problem areas are filled with a solution using a spatula, primed or puttied - depending on the condition of the surface.
- If the quality of the wall surface is unsatisfactory, you should plaster it with a sand-cement mixture - create a preparatory leveling layer . To do this, you can install beacons on the wall - special strips that serve as a support for the rule, with the help of which the surface plane is derived. Usually two beacons are installed at the edges, their position is adjusted by level.
- Then a cord is stretched between them, along which intermediate beacons are installed. The distance between them should be 10-15 cm less than the length of the rule . After a few hours, the surface is pre-troweled, and the next day the surface is completely grouted.
Surface preparation
Surface priming
The plaster layer must be well dried; if work is carried out on hot days, it is recommended to water the plastered surface daily with water from a hose to prevent cracking. The cracks that appear are wetted and then rubbed over again.
Color variety of bark beetle plaster
There are various shades for tinting on sale - from standard to noble. Therefore, there is a place for bark beetle putty in any design, both elegant and simple. A dark or deep color will successfully highlight the recesses and visually “improve” the walls. Indoors, light shades of brown, blue, gray and purple, as well as white, yellow and beige, are predominantly used. Some irregularities in the form of lighter or darker areas look beautiful.
The facades, in turn, are painted in both light and dark colors, depending on one’s own preferences and the surrounding environment. Pigment is sometimes added to the primer to give it a certain sheen. The shade of the coating, or rather its perception, additionally depends on the material. Both acrylic and gypsum putty look attractive in this regard. When tinting a mixture, the biggest danger is creating an overly saturated or muddy tone.
Note! There is also a special coloring agent “bark beetle” for use on metal surfaces to give the desired effects without plaster.
Color variety of bark beetle plaster.
Technology for applying the mixture and do-it-yourself reinforcement
When applying a decorative coating to a layer of foam plastic or other external insulation, intermediate coating technology . It includes preliminary application of a layer of tile adhesive on the surface of the insulation, installation of a mounting mesh - reinforcement, leveling the preparatory layer with another adhesive layer.
After this, the preparatory layer is primed. When reinforcing, the mesh is not simply installed on top of the adhesive layer, it is pressed into it to achieve complete and durable contact . The second layer should completely hide it inside itself.
Reinforcement
Trying on the mesh
The preparation surface must be smooth and neat, since the final appearance of the wall largely depends on this. To do this, it is best to apply the adhesive layer with a notched trowel ; it evenly distributes the adhesive over the surface, leaving calibrated stripes, which are subsequently crushed by a mesh and covered with a second layer of adhesive.
Applying the finishing layer
A metal spatula should be used to apply the finishing coat. The surface texture is created with a grater or half-grater. An important element of the work is acquiring the skill of applying a layer of the required thickness.
If, when you move the grater, you feel the rolling of pebbles under it, then the layer is correct and the surface will have a specific pattern - stripes and grooves, reminiscent of wood eaten away by insects.
The direction of movement of the grater is an important point on which the orientation of the grooves and lines of surface texture depends. In which direction the grater movements are directed, the grooves will be located.
If there is no need to obtain a surface with a certain direction of the pattern, then the movements of the grater should be circular, more or less sweeping - depending on the size of the grain in the mixture.
Applying the first layer of plaster and creating the final coating are operations that are 10-15 minutes behind each other in time . That is, first a layer of plaster is laid on the surface and “stretched” to the required thickness.
Then, after 10-15 minutes, when the composition begins to set, the layer is smoothed with a grater to obtain a characteristic pattern. It is difficult to obtain the desired surface immediately upon application ; in addition, the composition is not suitable for use for long, it is important to have time to do everything.
NOTE!
For efficient and quick work on applying a decorative coating, it is recommended to work together - the first one applies a preliminary layer and calibrates it in thickness, and the second one follows it with a lag of 10-15 minutes and texturizes the surface.
Polyurethane graters Bark beetle for creating relief
Applying a layer
Creating horizontal relief
Creating vertical relief
Application of decorative bark beetle plaster
To apply the bark beetle, use a spatula or grater. Please note: the thickness of the putty layer should not be greater than the size of the granules contained in the bark beetle. The plaster should be spread over a small area so that it hardens faster.
It is recommended that two people do the work: one person applies the plaster, and the second applies the decorative pattern.
This is especially important when the wall has a large area. Be sure to remove excess and uneven material. After the finishing is completed, we move on to the grouting process.
Painting a plastered surface
The color of the Bark Beetle mixture applied to the wall is white . The composition cannot always be tinted, so after the plaster has dried, painting will be required. To give the surface the desired color, facade paints of certain colors can be used, the choice of which depends entirely on the tastes of the owner.
At the same time, we can note a successful option, often used for this type of finishing - double painting . Usually it is done like this: the surface is first painted over with special emphasis on the depressions. A second coat of paint of a different color (usually lighter) is applied in such a way that the dents or bottom of the grooves are not affected.
Painting plaster
For this purpose, you can use a paint roller with a flat surface. The result is a surface with an emphasized expressive texture, very aesthetically pleasing, and, moreover, covered with a double layer of paint.
Decorative bark beetle plaster is an effective and aesthetic coating for exterior use , easy to apply and attractive in terms of quality and composition. The possibility of self-finishing, ease of work, subject to a few simple rules, make this coating widespread and preferable from an aesthetic point of view.
Painting the bark beetle
The most ideal option for the facade would be to use paint that matches the color that is present in the plaster itself. This will avoid the appearance of visible stains when the paint coating chips or peels.
There is a proven and proven coloring technique when two shades of paint are used. Using a fleecy roller, the first layer is applied to the laid plaster, which fills all the strokes and lines. After drying, take a rubber spatula and apply two more layers with a different shade.
For walls decorated in gray or dark yellow, additional treatment with acrylic varnish, which gives a metallic tint, is ideal. Then the gray color imitates aged metal, and the yellow color imitates the surface of sandstone. In addition, multilayering increases the degree of protection of the main wall material.
If you look closely at the photos of facades with bark beetle finishing, it becomes clear that such plaster is rarely used to decorate official buildings.
Despite the use of strict color schemes, the decorated facade will still look emotionally rich, which is why the bark beetle is more appropriate in the areas of private construction and the construction of apartment buildings.
If you use a high-quality product, you can get a presentable facade with a service life of 10 years or more.