Leveling with plasterboard
Drywall is one of the most common materials. And this is not surprising, since working with him is a pleasure - there are no significant expenses, there is no need for special skills, and there is minimal waste.
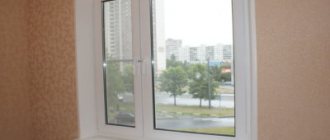
So, when thinking about how to level the slopes on the windows, pay attention to the drywall, the installation of which we will now consider in detail, having prepared the basic tools.
Tools and materials
To work you will need:
- GKL
- Painting knife
- Or profiles for the frame and fleas
- Or drywall glue and long screws
- Level
- Screwdriver
- Hammer
- putty
- Putty knife
- Serpyanka
- Glue container
- Finishing strip
- Meter
- Metal ruler
- Perforated corner
Installation features
The only peculiarity of installation is that it can be performed in two ways:
The frame method is characterized by installing a frame on a profile slope. However, this method is used not for leveling as such, but for direct installation. In this case, we are considering exactly how to level the slopes on the windows, so we use the frameless method.
For the convenience of the frameless method, we recommend using a special strip that is mounted along the perimeter of the slope along the frame. It is this bar that will serve as the “starting point” for installation.
However, you don’t have to use the plank, but attach it directly along the slope; the only thing is to prevent peeling and cracking at the junction of the window and the slope. You will need to use acrylic, but more on that later.
So, let's start marking. To do this, carefully and slowly take the dimensions of the slope and transfer them to the gypsum board with a simple pencil.
Next, applying a metal ruler to the line, we make an incision with a paint knife, pressing lightly.
Important! You must cut off the cardboard, not the inner plaster layer!
After making the cut, place the gypsum board on the edge of the table so that the cutting line coincides with the edge and press lightly, carefully breaking the sheet. On the other hand, cut the cardboard with the same paint knife.
And now, taking a little glue with a spatula, we put it on the slope, so that we can then install drywall on top.
All is ready? Great! Now we take the sheets and attach them directly to the slope using a hammer drill and self-tapping screws.
Important! When attaching the top bar, you should use either the help of household members who will hold the sheet, or spacers that will prevent the latter from falling and breaking.
We don’t recommend attaching it only with glue, you definitely need to secure it with screws for accuracy, and it’s better to plant it every 50 cm - in the center, but don’t drive the screw in completely. Take a level in your hands and check if the plane is level?
Next, proceed according to the same scenario, gradually “sheathing” the slope.
Important! If you have a plank installed, then the drywall should fit into its groove, and if not, pick up a paint knife and we will correct the situation.
Quite often, a whole “scattering” of cracks forms at the joints, which come out again even after minor putty. To avoid this, we make the joint “soft” by filling it with acrylic.
So, did you grab a paint knife? Fine! And now, right along the joint, stepping back by 3 mm, we make an incision - a chamfer, which is directed at an angle of 30-45 degrees to the frame. From the side of the frame and the slope, we now glue masking tape along the chamfer.
Now, pick up a construction gun with acrylic and fill in the chamfer. Filled out? Then don’t waste time and unstitch the seam by running either your finger or a piece of cable. Now, remove the tape immediately, carefully and slowly.
Important! You need to use acrylic, not silicone, which cannot be painted!
So, now, in order to correctly level the slope on the window, you need to “finish off” the corners - we place perforated corners on them on plaster or drywall glue, immediately checking the evenness of the installation with a level.
And one more thing - if there are joints, that is, you were unable to use only solid pieces of drywall for the slopes, then you need to carefully take care of them before puttingty.
Perforated corner putty
Namely, along the seam, stepping back 2-3 mm along a metal ruler on both sides, chamfer, or, as they say in drywall, we embroider the seam.
Next, we putty it, and glue it on top with sickle tape. Now the seam will not come apart, and after puttying and subsequent painting it will not be visible at all.
We also embroider those places where you attached the sheet to the slope with self-tapping screws - for this we make an incision crosswise, and immediately fill the place with putty. As soon as the putty has dried, we go over it with sandpaper, removing the excess. We also putty and sand the perforated corner.
And now - take a spatula - and walk along the entire slope. All! You did a great job leveling the slope on the windows using drywall! This is how you can make a slope.
Also, there is also an option with plaster, which let’s look at!
Leveling internal slopes
After you have managed to level the slopes on the windows from the outside, you can begin to design the internal slopes.
Plastering internal slopes
You need to plaster from the bottom up, first with vertical and then horizontal movements.
If you choose this method of finishing slopes, you may need:
- putty knife;
- building level (plumb line);
- roller;
- brush;
- primer;
- plaster mixture;
- finishing putty;
- wooden slats;
- perforated corner;
- painting mesh;
- dye.
At the 1st stage of work, you need to remove the remaining foam and install plaster beacons or wooden slats around the entire perimeter of the window opening and the wall, which are attached to regular plaster mortar. During installation, be sure to check their levelness using a building level.
After the slats are fixed, the finishing surface must be treated with a primer, which can be used to increase the adhesion of the finishing material. After the primer has dried, you can begin plastering. The solution is prepared in accordance with the instructions indicated on the packaging of the dry mixture.
Plastering should start from the bottom up. Using a spatula, the solution is applied first with vertical movements and then horizontal. If leveling slopes requires applying a large layer of plaster, then it is better to divide the whole process into several stages. After the first layer has hardened, the second can be applied and so on. When a smooth base has been formed, perforated corners are placed on the corners and putty is applied with a finishing mixture. After the putty has dried, the surface of the slopes is rubbed with a painting mesh. At the last stage, the prepared base is painted with water-based paint in 2 layers.
Leveling slopes using plastic panels
Scheme for finishing slopes with plastic panels.
To install them you will need the following tools and materials:
- drill (perforator);
- level;
- metal scissors;
- plastic panels;
- polyurethane foam;
- silicone sealant;
- self-tapping screws
The procedure for installing plastic slopes is as follows:
- Along the perimeter of the slopes, a starting profile is attached to the window using self-tapping screws, into which the plastic panel will be inserted.
- When constructing slopes, there is no need to mount a frame, since the edges of the panel at the corners of the slopes are fixed to the wall using mounting foam and self-tapping screws. After the foam has hardened, the gap between the wall and the panels is finally sealed with foam. In this case, it is necessary to constantly monitor the evenness of the installation using a building level.
- To complete the work, platbands are attached to the slopes to hide this gap. For these purposes, you can use a regular plastic corner or a special F-profile.
- After leveling the slopes, minor gaps form at the joints of the plastic parts, which can be sealed with silicone sealant.
Leveling slopes with plasterboard
Scheme for finishing slopes with plasterboard.
Having chosen this option for finishing the slopes, you need to prepare:
- grinder or hand saw for cutting drywall;
- building level;
- putty knife;
- brush;
- plasterboard sheets 12 mm thick;
- polyurethane foam;
- putty;
- primer;
- paint.
After the base is prepared for the installation of slopes, you need to cut out a blank for the right (left) side of the window from 12 mm thick plasterboard, having previously measured the height and width of the wall. In this case, the width of the workpiece should be made 20 mm larger than the width of the wall. After this, apply mounting foam to the wall over the entire finishing area. After it has hardened a little (about 10 minutes), press the workpiece against the wall and level it using a building level.
Using the same technology, drywall is installed for the left (right) side of the window. Then you should measure and cut the blank for the upper slope (its width should also be 20 mm larger than the width of the wall). Then lay the slab on the floor and treat its entire surface with foam, then after 10 minutes press the workpiece against the wall.
After the foam has completely hardened, you need to saw off the protruding edges of the drywall with a hacksaw. Then the surface of the finishing material is puttied, primed and painted in 2 layers.
Minor putty
After plastering, putty work follows. And if, say, to level a slope on the windows, you need to level out about 1 cm of a pothole, then plaster will not be needed.
So, what will you need?
Tools and materials
- Starting putty
- Final putty
- Spatulas
- Skin
- Primer
- Brush
- Container for putty
- Hammer or drill for stirring
Installation features
So, if there are potholes, then we dilute the mixture of starting putty according to the proportion indicated on the package and carefully putty these places, leveling them with the same spatula.
Important! Before direct puttying, be sure to prime the surface!
Next, wait until the puttyed areas dry, then sand and now apply another layer of starting putty, but this time over the entire slope.
It is on the entire slope that the putty will be applied after plastering.
Once the layer has dried, cover the surface with a final finely dispersed putty. That's all! Here are the options for finishing slopes. Yes, and there is another species that you can learn about here.
Now you know how to level a slope on a window in three ways. All you have to do is choose the one that suits you!
| Installation and installation of windows in a log house - recommendations and tips |
| How to make beautiful window slopes yourself |
| How to choose a good roof window - tips and tricks |
| Homemade wooden windows? We do it easily and conscientiously! |
Good afternoon, tell me, is it possible to get a personal consultation from you? It’s just, to be honest, I wouldn’t want to write everything here now and then attract ridicule in my direction(
Good afternoon. Yes, of course, this is possible, we have a “Question-Answer” section, write there and I will describe everything in detail for you.
I also sent you a question, please answer me in a personal message.
As a rule, replacing any windows leads to the destruction of the adjacent section of the wall. The question arises: what should be done to make the window structure look beautiful and reliably protect from noise, wind and other troubles of the street? The answer is simple: in this case, repair work cannot be avoided. There are various options for sealing slopes, but to choose the right option, you need to consider them in more detail.
Content:
Preparing the work surface
How to properly plaster slopes on windows and get an excellent result depends on good surface preparation. A small violation of an important stage will be the main cause of cracked or fallen plaster. So:
- The beauty and accuracy of plastering work will require leveling the surface of the window slopes from the outside and inside. According to building codes, vertical slopes should not deviate by more than 1-2 mm per 1 m. Inspect the evenness of each wall. Before plastering the window slopes, you need to level the walls . Time costs and plaster consumption will increase, but it is better not to ignore quality requirements in order to get a good result. If the surface is slightly curved, a wire mesh is suitable for leveling.
Construction beacons are used to level the surface of slopes
To properly plaster the slopes on the windows with your own hands, take into account all the preparatory stages to achieve high quality work. To accurately level the surface, use construction beacons or a plaster profile . Visually smooth walls can play a cruel joke after all the work is completed, so be sure to install guides along which the surface will be leveled. Beacons will serve as a guarantee as a leveling element, the use of which will avoid future alterations and additional costs.
Plastering on beacons
About slopes
The sections of the wall adjacent to the window block are called slopes. They are internal and external. Strict requirements apply to internal areas.
The following functions are assigned to the slopes:
- giving the window structure an aesthetic and attractive appearance. Is it really possible to imagine a high-quality window that is connected to a broken wall;
- improvement of sound and thermal insulation. Window structures that do not have high-quality slopes do not have sufficient tightness;
- protection of installation elements and seams from environmental influences. A high-quality slope not only protects fasteners from corrosion, but also reduces the likelihood of windows fogging and freezing.
Thus, slope repair is a list of works aimed not only at restoring damaged sections of the wall, but also at creating additional insulation.
Basically, one of the following repair options is selected:
- Plastering the surface followed by painting. A widespread and inexpensive finishing option.
- Plastic sheathing. Plastic panels are combined with the window profile material; in addition, such repairs do not take much time;
- Installation of drywall. The option is labor-intensive, as subsequent finishing is required. The material is convenient to use for windows of complex configurations.
For any repair of slopes, first of all, high-quality surface preparation is necessary.
Finishing window slopes - plastering, leveling and installation of plastic slopes
An important stage of work associated with the installation of plastic windows is the preparation of window slopes. It is necessary to install window slopes correctly, because even if you carry out the work of installing a plastic window very carefully, the window opening is destroyed, and potholes and cracks may appear, the repair of which is necessary. We will consider in detail the stages of preparing and leveling slopes for walls, as well as the materials that we will need during the finishing work.
Plastering slopes
This option for repairing slopes is low cost. To seal, all you need is a finishing mixture, a set of simple tools and water-based paint.
This option also has disadvantages:
- To obtain a very smooth surface, you need to put in a lot of effort and spend a lot of time. An experienced installer performs this work much faster;
- Cracks often appear after plastering. This may be due to a single-layer surface coating, when a thick layer slides down. In addition, cracks appear due to changes in humidity or poor quality of the mixture;
- low thermal insulation of the window structure;
- lack of adhesion to the plastic from which the window is made.
It is believed that plaster looks more aesthetically pleasing for internal slopes than plastic and drywall.
Plastering begins with the correct selection and preparation of the mixture. In this case, it is necessary to take into account the location of the slope.
- External slopes are subject to special conditions: precipitation, wind, temperature fluctuations. It is recommended to use cement and heat-insulating mixtures with a water-repellent effect. This can be a product or a regular mixture of cement and sand.
- Internal slopes must have an aesthetic appearance. To ensure a smooth surface, gypsum mixtures are suitable. Starting and finishing putties are very common.
In any option, the drying time of the solution is taken into account, since further decorating work continues after it has dried.
The slopes will be of high quality if you follow the advice of experts.
1. Do not dilute a large amount of solution. This is due to savings - the unused solution dries quickly.
2. The solution is applied in several layers. The next layer is laid after the previous one has dried.
The repair sequence is as follows:
- The dry mixture is diluted according to the instructions on the package.
- The location of the corner is determined. Using a building code and a level, a lighthouse is marked on the wall.
Determining the starting point of the angle
Using a beacon and staff
View from above
- The solution is applied by spreading or throwing. The plaster starts at the bottom and moves up the slope.
- Using a spatula, remove excess mortar from bottom to top and create an angle.
- Decoration can be done in any way. The easiest way is to paint. It is performed after applying a two-layer primer.
If you have any questions, watch our video:
Installation of beacons
Professional builders perform plastering work on beacons made of wood or metal. If a small layer is required, you can plaster the slopes according to the marks made from the gypsum mixture.
If you are going to plaster the slopes with your own hands, having absolutely no experience in leveling surfaces with building mixtures, then it is better to purchase ready-made beacons for plastering in the store. In extreme cases, you can use strips of plywood.
- Along the entire surface of the outer wall, beacons are attached using nails or screws. The vertical is set using a plumb line, and the horizon level is set using a level.
- The second beacons must be installed so that they are adjacent to the window frame or door block. They are attached using a mixture with the addition of gypsum, into which the profile is pressed. For this you can also use clean, quickly hardening alabaster.
Covering slopes with plastic
As noted earlier, plastic is in demand due to its simple installation and low cost. Besides this, there are other advantages:
The following sequence is selected for work:
- A wooden block is attached to the slope so that the window space is not covered.
- Using a stapler, we attach the starting strip to the block.
- We cut strips of plastic to size. They are inserted into the starting strip fastener.
- After everything is inserted, carefully move the panel away from the wall and fill it with foam from the far corner.
- We fix the panels with mounting tape to the wall.
- After the foam has dried, the ends of the panels are closed with special corners.
It is possible to install the corners immediately
External slopes - for plastic windows and more!
External window slopes for plastic windows are often left without due attention, even if you can get by with the plastic option and do the work yourself. The customer saves money, the contractor saves time, since external slopes require a lot of tinkering. However, the absence of slopes on the outside only harms windows, so care must be taken to ensure their presence.
Plastic external slopes for windows - is there a need?
Most often, polyurethane foam is used to seal the cracks left after installing windows. This is fast and, at first glance, effective - as the foam expands, it fills all available space, blocking air flows. Instead of foam, sealing tape or, as it is officially called, PSUL, is also used.
Both of these options are good only in combination with slopes - if you leave the materials, as they say, in the open air, then both will lose their properties over time and simply collapse. Moisture and wind will finish the job. It’s not so bad if this happens to plastic windows – the house will certainly become colder, but there is little threat to the windows themselves. But with wooden windows the situation is more complicated - they can become deformed from moisture, become moldy, or rot.
As a result, saving on slopes in the near future can lead to much larger processes - repairing or replacing windows. Therefore, you cannot forget about finishing the external slopes - together with them, the installed windows will last twice as long as the warranty period.
Installation of external slopes - the fastest and most popular finishing methods
The easiest way to finish external window slopes is putty and painting. Some people get by with just painting, but this is wrong. A layer of paint should protect the foam and windows from atmospheric influences, but we must not forget that the paint itself is susceptible to them, so it must be renewed at least every 2-3 years. The quickest way to make external slopes with your own hands is by gluing plastic corners. They are attached to the corners with butyl sealant, and to the window with double-sided tape. Nevertheless, the plastic copes with its task - it covers the seals from direct sunlight, rain and wind.
The most popular way is to decorate and at the same time protect the external elements with metal.
For this purpose, galvanized metal is used, which has a special polyester coating. After measuring the window opening and the slopes themselves, a piece of metal of the required size is bent into a shape resembling the letter “Z”. The curved edges are attached to the window frame with self-tapping screws, and the seams are treated with silicone-based sealant. The color should be selected in combination with the color of the roof, windows or facade so that it is in harmony with the overall picture. For example, if the windows are wooden, then for finishing the slopes it is better to choose a color identical to the shade of the wood.
Sandwich paneling
Without auxiliary profiles, the slope is sewn up within a few hours. The order of plating is as follows:
- The panels are cut to fit the dimensions of the slope.
- “Liquid nails” are applied to the panel and it is pressed tightly against the surface of the slope.
- The gaps between the frame and the panels are sealed.
- The corners are installed on the outside with glue.
Lining and sandwich panels cannot be repaired. As a rule, they change when damaged. In this case, the choice of shade is of great importance, since it differs in different batches of material.
Plaster mortar
Plastering of external and internal slopes is carried out using self-made mixtures or ready-made store-bought options. It is advisable to purchase already prepared options, where the correct proportions are observed and there is no need to measure the number of components for the mixture made.
Plastering on slopes of your own making will require the presence of binding elements in the composition, which are often: clay, cement or gypsum filler. Depending on the number of components, the solution can be simple or complex in composition. It is very important to add the exact amount of components to obtain a high-quality mixture, otherwise the solution may turn out to be greasy and quickly crack after drying . A solution that is too poor in composition will also not bring anything good: it will turn out to be fragile, as a result of which the slopes will need to be repaired after installation.
Making your own plaster mixture requires precise proportions.
In order not to make a mistake in the consistency of the future mixture, be guided by the following signs:
- a well-mixed mixture will slightly cling to the spatula;
- poorly mixed (greasy) will cling strongly;
- a lean mixture does not exhibit adhesion properties at all.
To make the mixture, you can use slaked lime, which in the right proportions is ideal for wooden and stone bases. You can only use the slaked version, otherwise the surface may swell. You can buy the component at a hardware store. You can perform lime slaking yourself in this way:
Slaked lime is often used when plastering slopes
- Pour the quick slaking lime into a container of the required size and fill it with water until the lime is completely covered with liquid. The active release of vapor begins within a few minutes, after which we add a little more water and mix the mixture thoroughly.
- Medium slaking lime is poured in an amount of ¼ of the container and filled with water to half the volume. Vapors begin to release after 30 minutes; when finished, dilute with water and mix.
- Slow slaking lime is not poured with water, but only moistened. The extinguishing process continues for more than 60 minutes.
You can also use gypsum, but you should take into account the efficiency of the work, since the mixture with this substance dries within 5-10 minutes. It is important to take into account that gypsum mortar is unstable to a humid environment, so it is advisable to use it for interior work in dry rooms. One of the durable materials is cement, which adheres to the surface within 15 minutes and dries completely within a day.
When choosing what to plaster slopes on windows indoors and on external parts, pay attention to the strength properties of the constituent components so that the slopes last a long time.
Drywall installation
A sheet of plasterboard is a building material in which gypsum is placed between layers of cardboard. The material is indispensable for hiding various wall defects, so it is recommended for slopes.
Its advantages include:
- wide range of uses. Suitable for all types of windows;
- can be used to finish slopes of any size;
- low price;
- quick installation;
- environmental Safety;
- painted in different colors.
There are also disadvantages:
- low strength. Any mechanical impact leaves traces;
- destruction at high humidity;
- rapid wear, requiring additional painting;
- inconvenient installation. When cutting, it is necessary to use protective equipment, as gypsum dust is harmful to health.
1. Drywall is the base that requires finishing.
2. It is better to choose a moisture-resistant version of the material that is not afraid of condensation on the windows.
There are several ways to cover slopes with plasterboard, but the simplest is considered to be the following installation using putty.
- The slope is measured from the wall to the frame. If the wall is uneven, then it is necessary to take measurements in several places.
- The measurements are transferred to the drywall. For convenience, a pattern is made.
- The future slope is cut out of the sheet. The material is cut with a knife or sawn.
- Putty is applied along the edges and in the center of the workpiece.
- The workpiece is pressed tightly against the slope, and a spacer is installed. It takes a day for good adhesion.
- Very often, aluminum corners are installed to align corners.
- The surface of the slope is puttied and, after drying, treated with sandpaper.
- The cladding is completed with two layers of painting. In this case, the window profile and window sill are protected with masking tape.
Preparation, which is essential for plastering window slopes
At first, when the window frame is just inserted into its intended place, wide gaps are clearly visible around. They must be sealed before active plastering of the window slopes begins. A variety of materials are used for this purpose. For example, in rural areas, where suburban areas are decorated with log houses, access to drafts is prevented with the help of dry moss and tow. The latter is widely used in the city, but construction foam is increasingly being used.
So, carefully, but not stingily, fill with foam all the gaps between the window opening and the frame, or, if the cracks are small, fill them with tow soaked in 3% sodium fluoride. It is advisable to wedge the frame first to prevent deformation. We leave a small recess 2-3 centimeters deep; it will be filled with a solution for plastering slopes. Sometimes, when plastic bags are installed, a window sill that matches the style and color is installed along with them. Before you begin leveling the slopes, this horizontal panel should be removed, firstly, this way it will be safer, and secondly, it is better to work out the geometry of the opening to the very bottom of the side surfaces.
The last stage of preparation is cleaning; it must be done whenever you have to work with plaster compositions. There should be no residues of oil paint, no greasy stains on the base; in such contaminated areas the plaster will peel off and eventually fall off. Therefore, we thoroughly wash and degrease the surface. We trim off too large protrusions with a hammer or an ax, but there should not be any smooth places; if any are found, we make notches with an ax to ensure high-quality adhesion to the mixture. If the wall is made of building blocks, we open the seams, making them about 1 centimeter deep. If there is a large unevenness that requires a thick finishing layer, we fill it with reinforcing mesh.
Features of the design of window/door openings
There are several simple ways to finish the internal slopes of doors and windows - cladding with plastic, plasterboard, wood. These materials allow you to quickly level and at the same time decorate the surface, but the highest quality option is plastering slopes with cement mortar. It allows you to obtain slopes of various widths and shapes, which is especially important for arched and round structures.
Note: although plastering window slopes is a dusty and labor-intensive task, it allows you to achieve absolute tightness (the finishing layer becomes part of the wall, which cannot be achieved when covering with plastic and plasterboard).
Plastering slopes - pros and cons
Plastering slopes is a traditional finishing method, and despite the abundance of proposals for new materials, sometimes you simply cannot do without plastering work. The advantages of the method include:
- production of slopes of any size, complexity and shape, including arched, round, curved;
- resistance to difficult operating conditions;
- environmental friendliness and aesthetics;
- maintainability and the possibility of color design, painting;
- Plastering slopes with cement mortar fills cracks and uneven areas, levels the surface, and provides additional sound, water and heat insulation.
But leveling slopes with plaster also has some disadvantages: the process is complex, multi-stage and labor-intensive; if the technology is violated, cracks may appear at the junction; solving the problem will require additional costs: sealing and restoration.
Window profile for plaster, greatly facilitates the formation of the geometry of the opening
Technology for rough finishing of internal and external window slopes
Plastering of slopes is carried out after installing and fixing windows and doors, as well as rough finishing of the walls of the room. He can be:
- simple (lime, cement, clay);
- complex (gypsum, clay, or cement-lime).
Attention: for interior work, a gypsum or lime mixture is used; external slopes are plastered only with cement mortar.
The composition of the leveling mixture depends on the location of windows and doors, and the humidity in the room
Preparatory work
Before plastering window slopes with your own hands, you should remove dust and eliminate gaps and cracks in the wall. It is most convenient to seal them with polyurethane foam, but you can also use tow and felt. Immediately before applying the leveling mixture, the walls are impregnated with a primer.
Tip: if the width of the seams between the window and the panel is more than 4 cm, you will need to make notches on the wall and reinforce the seam with reinforcing mesh to improve adhesion to the mortar.
Filling cracks with foam
Slope leveling
How to make slopes on plaster windows? For cosmetic or major repairs, a universal method is to finish the slopes “as a rule”, carried out according to the beacons. Beacons are fixed in the corners using mortar, along which the surfaces of the opening will be leveled.
Beacon installation diagram
Next, proceed to fixing the guide rail. To do this, a metal corner or a wooden plank of suitable length is usually attached to the slope in the vertical direction.
Recommendation: it is better to fix the rule with dowels, and check the evenness of its installation with a level.
Attaching the guide bar
The solution is applied to one of the sides, leveling it using a fine mortar. It is recommended to start from the top slope, then move to the side slopes, and finish with the bottom slope.
Attention: during the work it is necessary to cover the window with film so that the solution does not get into it.
Decorating a window opening - leveling slopes with plaster
When the mixture dries, carefully remove the guide rail. Next, the corners are corrected, the surface is treated with a grater, removing the remaining solution.
Advice: a window profile for plastering slopes will significantly speed up the work. It simultaneously serves as a guide for leveling surfaces, protects the frame from contamination, and prevents the appearance of cracks.
The window profile will greatly facilitate the work of decorating the opening.
A clear example of how to plaster door slopes with your own hands - video:
After finishing the internal slopes, they begin to work on the external ones. If left untreated, the polyurethane foam will deteriorate over time under the influence of atmospheric conditions, which can cause window deformation and damage to the walls of the building.
The finishing of the external sides of the window opening is carried out similarly to the internal ones.
External plastering of window slopes - video:
DIY window slopes made of plaster. Step-by-step instruction
When installing new window units and replacing old ones, close attention should be paid to the finishing of the slopes. The microclimate in the room directly depends on their quality, whether cold air will penetrate inside, whether moisture will begin to condense on the windows, how much street sounds will be heard. You can decorate the slopes using wood, plastic, gypsum board sheets, OSB boards or plaster. I prefer the latter method and will talk about it further.
Which slopes are better: plastic or plaster?
Plaster is gradually giving way to new building materials and technologies. Its main competitor in the budget segment is slopes made of PVC (sednwich panels). Comparing the main advantages and disadvantages of both materials will help you make a rational choice for a particular case.
Pros of plaster:
- Plastering is the most economical way to finish window slopes.
- The material is highly durable and resistant to mechanical damage.
- Additional protection from moisture can be easily obtained by painting the slopes with oil paint.
- Serves as an excellent base for decorative stone cladding or an external textured layer.
- Has a long service life. Chips and scratches can be easily covered up, restoring the original appearance of the finish.
Disadvantages of plaster:
- In terms of its thermal insulation qualities, this finish is noticeably inferior to polyurethane foam, which is used to seal gaps when installing plastic windows.
- Wet finishing work takes longer.
- Quite a lot of debris, dust and dirt appears. To prevent the solution from sticking to the floor, it is necessary to lay a film in advance.
- Compositions based on cement binders shrink, so after some time it may be necessary to seal cracks. Gypsum plaster is sensitive to moisture.
Pros of PVC:
- No wet processes. Installation of plastic slopes takes several hours.
- A wide range of panels and corners of different colors for decorating slopes is on sale.
- Plastic is resistant to moisture and is not afraid of fungus.
- They are part of the plastic window system. They look most natural and harmonious when paired with them.
- Easy to maintain. Sometimes it is enough to simply wash them with soapy water.
Disadvantages of PVC:
- Mechanically damaged slope elements cannot be restored.
- The material is less environmentally friendly compared to traditional plaster solutions. Plastic does not support natural air and moisture exchange.
How to plaster
For external slopes, durable cement or lime plaster is required. Solutions based on these binders are more resistant to temperature changes and can withstand high air humidity.
For interior work I use gypsum mixtures; this will be a rational solution for saving money and time. I also like gypsum plasters because after application they can be glossed (rubbed), the surface becomes smooth, and putty is no longer needed.
Work technology
Now I’ll tell you how to properly and quickly plaster slopes on windows. You will need the following tool:
- building level and 90º square;
- perforated painting corner;
- trowel, narrow and wide spatulas
- plaster float with mesh;
- container for preparing the solution;
- acrylic primer + roller or paint brushes;
Work order:
- The degree of unevenness of the wall is determined. The more significant it is, the thicker the layer of plaster will need to be applied. This will affect material consumption.
- If the window sill is already installed, it is covered with film, cardboard or several layers of paper. To protect the window sashes, it is also necessary to cover them with film using masking tape.
- The slopes are cleaned of old finishes, as well as dust and dirt. The surface must be clean and level.
Important: Residues of oil paint can reduce adhesion between the wall and fresh plaster to almost nothing and lead to its rapid peeling.
Important: If the thickness of the plaster layer is more than 30 mm, it is necessary to install a fiberglass plaster mesh.
How to make a “dawn angle” on slopes
Slopes that are at an angle of more than 90° to the window are called deployed; they form the so-called “dawn angle”. This is a classic form of window openings, thanks to which more light enters the room.
The technology of plastering with the “dawn angle” differs slightly from the one described above.
- On three sides of the window, measure the distance from the window frame to the wall (distance L in Fig. 1).
What will you need for the job?
The main material is plaster mixture. There are two types of plaster most commonly used: gypsum and cement-based.
Features of the cement mixture
There are compositions for rough coating, including coarse sand, and for finishing surface finishing - with fine-grained sand inclusions. Such solutions can be quickly prepared and are quite easy to apply. But you need to take into account that it takes a lot of time for the layer to dry completely, and this will increase the duration of the repair as a whole. But the diluted mixture sets so slowly that even an inexperienced performer will be able to cope with the work. Another plus is the inexpensive price.
Properties of gypsum plaster
There is another option - special acrylic mixtures. They are universal and can be recommended for any surface. But the cost of materials is such that not everyone can afford to use them.
But you also need to prepare primers in advance: deep penetration and finishing. Putty and sealant may be needed.
Design nuances
Any facade system solves several functional problems at once:
- Protection of building walls from precipitation and mechanical deformation;
- Insulating the building, reducing the cost of heating the interior;
- Prevention of premature destruction of a building, extension of its service life;
- Giving the facade an attractive, aesthetically finished appearance.
The basic configuration of a ventilated facade is usually represented by a metal or wooden sheathing, a layer of insulation, a membrane to protect the heat insulator from moisture and wind, and cladding materials. Facade cladding can be made with any finishing material; it all depends on the taste and financial capabilities of the property owner.
A distinctive feature of hanging systems is the creation of an air gap between the heat insulation layer and the cladding material to ensure air circulation and prevent rotting of the insulation layer. This determines the choice of thermal insulation material in ventilated facades - preference should be given to non-combustible materials. But the presence of a moisture-proof membrane does not completely reduce the fire hazard; when heated, this layer begins to quickly melt and support combustion.
Preparing for work
To do everything correctly, efficiently and reliably, you need to fulfill several conditions: select the right putty, prepare the surface, create conditions in the room suitable for carrying out this type of work.
Selection of putty and other materials
The leveling mixture is selected in accordance with the area of application and scale of work:
- External slopes can be puttied only with water- and frost-resistant cement compounds. All types of facade putty are suitable.
- The mixture for interior work is selected depending on the microclimate in the room. If there is constant high humidity (bath, sauna, etc.), then the putty should be cement or polymer. For dry rooms, gypsum and lime-gypsum compositions can be used.
- If a thick layer of mortar is required for leveling, buy both finishing and starting putty. Or a universal mixture.
Advice. In the case of initial slopes in a new building, they are shaped using plaster solutions, and only then leveling putty is used.
- Relatively smooth slopes without significant defects can be repaired using only finishing putty.
In addition to putty, you will need a deep penetration primer to improve the adhesion of the leveling compound to the base, silicone sealant, and perforated corners to strengthen the outer corners.
Advice. Buy a primer with antifungal additives. It will prevent mold from appearing on slopes.
The set of tools is standard: wide and narrow stainless steel spatulas, a level, a painting knife, and a brush or roller for priming and subsequent painting.
Surface preparation
Before you putty the slopes, you need to thoroughly clean the working surface - remove old paint, falling off plaster, sweep away dust, cut off the mounting foam protruding beyond the window block.
Advice. You need to cut the foam not flush with the frame, but a little deeper. After which the cut is treated with a sealant to protect the foam from condensation, which reduces its thermal insulation properties.
If the window sill has not yet been installed, it is advisable to do this before finishing the window slopes, so that later you do not have to level the damaged areas again. In addition, work performed in the correct sequence will allow you to immediately seal the joints between the slopes and the window sill with high quality.
The next stage of preparation is to protect the window frame and window sill from dirt and damage during the puttying process. Plastic and wooden structures can be covered with masking tape, and surfaces with an unstable coating that can come off when the adhesive tape is removed (for example, MDF) can be covered with film or paper.
The final chord of the preparatory process is priming the entire working surface. The primer composition should strengthen the base, increase its adhesive properties, and prevent the appearance of mold due to possible excess moisture.
It’s better not to skimp on primer. You don’t need a lot of it, so its price won’t affect the amount of expenses too much. But the quality and reliability of the slopes will be high.
You can proceed directly to putty only after the soil has completely dried. But you shouldn’t delay it either, otherwise dust will settle on the surface.
Plastering on windows - step-by-step diagram
Step 1: Calculation of the opening
So, we have a brand new and precisely installed window, a comfortable and wide window sill - and ruins of walls around all this beauty. You can plaster the opening at a right angle to the plane of the window, using the technology of the Middle Ages (at that time the very presence of windows in the room was a feat). But it is much more interesting to learn how to plaster slopes on windows and doors with increasing illumination of the room.
This repair technique has a special name “dawn angle”; it essentially means the expansion of a window (less often a door) opening into the room. Thus, there is more light in the room, as well as more difficulties when plastering. But the result obtained in the form of strict lines of an enlarged opening is worth it.
Step 2: Marking and preparing the opening
The angle from the frame to the edge of the slope is set with a protractor; its value should be the same on the sides of the window. Do not determine this angle “by eye”, otherwise the repair result is unlikely to please your eyes upon completion of the work. The amount of expansion is from 1 to 2.5 cm for every 10 cm of opening thickness. If the distance from the window to the inner wall is 25 cm, then the “expansion displacement” will be from 2.5 to 6.5 cm. These points are fixed at the bottom and top of the opening with deep marks.
It is necessary to prepare the base of the slope for plaster. To do this, remove all layers of old paint, previous putty and other contaminants. Do not be afraid of deep removal of previous building layers - the cement-sand mortar needs space for strong adhesion to the surface. Plaster made of cement and sand fits well on all common building materials - concrete, brick, aerated concrete. But the composition of the preliminary primer, which is used to treat walls before plastering, must take into account the specifics of their material.
Step 3: Internal vapor barrier
The joint between the window (door) frame and the slope is already insulated with polyurethane foam or rough plaster. It is necessary to cut off excess foam and carefully treat the entire joint line with a vapor barrier film or silicone-based sealing compound. Internal vapor barrier will prevent windows from fogging up during strong temperature changes - it can be done in literally 5 minutes, is inexpensive, and brings benefits for years.
Step 4: Beacons as the basis for impeccable accuracy
When plastering slopes, the exposed beacons are very different from their counterparts used when concreting floors or laying bricks. In fact, these are rather limiters made of straight and wide slats. They are tightly nailed (screwed) to the surface of the inner wall - exactly according to the marks made after the protractor. The edges of the slats create a boundary for future plaster and protect the corner from accidental damage until the solution has dried.
Accurate installation of beacons is the basis of a high-quality slope. It is better to re-nail the rail than to get an opening with a deviation from the desired values. After installing the beacons, the integrity of the vapor barrier layer is checked, the plastered surface is once again treated with a primer for proper adhesion (adhesion) to the solution. It is better to apply the primer not with a spray gun, but with a brush, this increases the coverage of hard-to-reach areas.
Step 5: Directly plaster
The solution for the slope is first applied in small portions along the perimeter of the beacon slats, using strong movements of the spatula. Next, we begin filling the opening, and the procedure depends on its depth. For cement-sand mortar, a layer of up to 5-6 cm is optimal; if the depth of the opening is greater, the mortar is applied in several steps.
When the slope is filled with mounded mortar, its excess is removed with a precise and single movement of the aluminum rule. The apparent simplicity of such a “stroke” requires a lot of experience. After leveling the solution exactly along the beacons on all three sides to be plastered, you must wait until it dries. Next, the beacon slats are removed, and their installation sites are leveled with a solution. The remains of the plaster mixture are diluted to a semi-liquid state and rubbed into the surface of the slightly hardened slope with gentle movements of a grater. This reduces the risk of cracking of the new plaster when it dries completely.
How to plaster a slope with your own hands?
First of all, start by protecting the window. If the window is new, do not remove the applied tape. If you removed it, then masking tape will help you. Cover the glass itself with either sheets of thick paper (glued with tape) or sheets of cardboard.
However, metal-plastic windows can be easily disassembled. It is enough to remove the plastic plugs on the hinges, pull out the metal rods, put the window in the “ventilation” mode and remove it from the hinges.
Preparing for work.
We remove the previous coating, right down to the brick. Either a hammer drill or a chisel with a hammer will help with this. We clean everything from dust and cut off excess polyurethane foam. After cleaning, we impregnate the slopes with a deep penetration primer. It is advisable to choose a primer with protection against bacteria.
Tools: level (from 1 meter), container for mixture, mixer, spatulas, knife, corner for plaster.
We plaster the slopes with our own hands.
The slope putty mixture is the very ingredient that will determine the future appearance of the window. It is best to choose putty with large grains of sand. This will be the "base layer". After it dries, it can be coated with a “finishing layer” of smaller particles.
When choosing mixtures, look at the “vapor permeability” of the plaster. The higher it is, the more difficult it will be for bacteria and fungi to grow.
Step-by-step instructions for plastering slopes:
- Using a 100-120 mm spatula, apply broad strokes of the base layer;
- We work out the corners using a plaster corner (it should be completely covered with the solution);
- Lightly level, but do not achieve absolute smoothness;
- We wait until it dries.
Plastering slopes along beacons.
To get the slope right, two boards (beacons) are enough. See Figure 1 for the beacon installation diagram.
We set up beacons step by step:
- Determine the mark on the window frame from which plastering will begin.
- Place a long putty knife (or level) so that one end touches the mark and the other rests against the wall.
- Move the end that rests against the wall half a centimeter (this space will be occupied by the future layer of plaster).
- Secure the first board (rail, beacon) near the frame (next to the mark).
- Secure the second board (rail, beacon) near the slope (from the side of the room). It should be extended by 5 mm. This is the optimal thickness of the thinnest layer of plaster.
Figure 1. Lighthouses are indicated in orange.
So you now have 2 beacons. How do you know that you have set them correctly? If you apply a putty knife (or level) to them, it will lie at an angle to the slope. Determine the most optimal angle and feel free to get to work.
Painting wooden windows, window sills and window slopes
Painting wooden windows after insulation
Painting a wooden window, it seems that it could be easier, take a brush, good enamel and paint it yourself, placing a few newspapers on the windowsill and floor?!
No matter how it is. In practice, I have not yet taken up and started painting the first sash of the window with my own hands. Painting a wooden window is definitely a labor-intensive process. Illiterate window painting without proper preparation will end with the paint peeling for the new season! Peeling of paint from windows occurs especially quickly on the street side, under the influence of sun, rain and frost. Few people know that painting the outside and inside of windows is not done in the same way, even though it comes from the same can.
How to paint a wooden window with high quality:
- Thorough cleaning of old paint with a hair dryer and spatula
- Priming a wooden window with wood impregnation
- Painting the inside of the window and frame with a roller and brush
- Impregnation (not painting) of the exterior wood of windows with diluted paint*
*- This small nuance will allow the window not to peel off from the outside for a long time and at the same time will protect and protect the frame and window sashes from rotting for many years! Few people know this; they paint everything in a continuous layer, covering the window with paint like a film on all sides, which greatly reduces the durability of painting your windows!
A little about the details of the preparatory stage of painting windows:
First, the master removes the old paint from the window and window sill using a spatula and a hair dryer.
The use of chemicals to remove paint is not recommended for the following reasons: a) toxicity b) solvent residues absorbed into the wood over time have a destructive effect on the new paint from the inside. Then the master putsty on the cracks and chips on the window and window sill (paint and putty are included in the cost of preparation for painting the window). After drying, sand the window surfaces, and only then paint. The glass is sealed with paper tape during repairs. The work here is not for a couple of hours, as you already understand!
Window painting technology
After the carpentry work is completed, the windows are painted. Our company's window painting technicians perform the work in the following order:
- Removing window handles
- Unwinding sashes in case of double windows, removing middle stationary sashes and upper transoms
- Removing peeling paint from windows with a hairdryer
- Applying putty to areas of peeling paint
- Sanding dried putty
- Gluing masking tape to glass
- Painting windows (casements, frames and slopes, including external ones) in one or two layers depending on the condition of the window
- Removing masking tape
- Twisting sashes on spark windows
- Reinstalling the handles
And how, having read to the very bottom of the page, do you still think that you can insulate your windows, and even using Swedish technology, with your own hands and paint them with the paint removed? Do you have the time and energy or should you still call us? Vacation is the best time to start window repairs yourself and tell your friends and work colleagues and remember more than once. we need to redo it