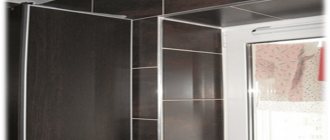
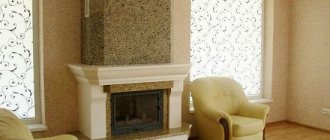
Even the most beautiful and expensive front door or new window looks unaesthetic. Until the slopes are finished, giving a complete look to the interior.
Common materials for decorating openings are plastic panels and drywall, but the work can also be done using laminate.
Advantages of design
The popularity of finishing slopes with laminate is due to the advantages of this material:
- Economical. For installation on walls, there is no point in choosing an expensive coating of a high strength class - the load on the internal surfaces of the openings will be insignificant.
- Long service life, moisture resistance.
- A wide range of laminate flooring - a variety of colors and shades of material, types of textures (imitation wood, tile, natural stone, leather).
Cutting laminate and assembling it will not be difficult for a person doing this work for the first time.
Plastic finish
A popular material, environmentally friendly, budget-friendly and easy to maintain. Manufacturers offer a wide color palette, which makes it easy to match the plastic to the texture of the door leaf. A square meter costs no more than 200 rubles. But the material is not particularly durable and does not fit every door.
The entrance door opening is lined with plastic according to the same principle as MDF: first the surface is prepared, then a sheathing of slats is attached, and then plastic panels are attached to it.
Mounting methods
Door or window openings are finished using one of the following methods:
- Glue. Installing laminate flooring using this method requires preliminary leveling of the base with plaster or plasterboard. To fix the material in the opening, polymer glue (for example, liquid nails) is used.
- On polyurethane foam (with low pressure during the polymerization process). In this case, there is no need to level the rough surface - the foam, expanding, will fill all existing unevenness.
- With the construction of the frame. Finishing is carried out without plastering the base. Simultaneously with laying the laminate, a layer of insulation is laid. The sheathing is done using wooden slats or metal profiles. The laminate is fixed with self-tapping screws and glue.
Strips of material are laid along or across the door (window) opening: in the case of horizontal installation, installation of laminate slope elements is carried out from the bottom up.
Purpose of slopes
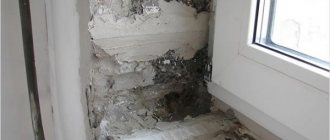
When repairing or replacing doors, when the frame is fully secured and installed in the opening, wide spaces appear in it, which builders or repairmen subsequently fill with foam. It is important to take into account the characteristics of the filler: it is fragile and easily subject to deformation under the influence of any chemical agents. For reliability and long-term service of the foam, it is additionally coated with cement mortar. This technique allows you to extend its service life, increasing its strength characteristics. After such finishing, the entire surface must be processed and smoothed.
Door slope functions:
- Soundproofing. The cladding reduces the penetration of noise and sounds.
- Leveling planes. Plaster will not allow you to achieve the geometrically correct planes of the doorway, while slopes hide all defects and cracks.
- Heat retention. Laminate allows you to maintain the temperature regime set in the room, preventing cooling through the entry of cold air flows from the adjacent room. This property is especially important for the front door.
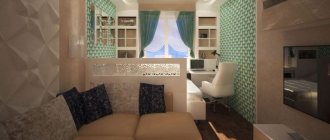
- Decor, general design of premises. Slopes complement the interior, emphasizing the details. A wide range of shades and textures allows you to choose finishing materials to suit any interior.
Preparing for work
The preparatory stage includes the following actions:
- to avoid contamination or damage during work, cover the door or window frame with masking tape;
- if you need to connect a switch for lighting devices, think over and outline the cable routing diagram;
- provide free access to openings, remove curtains, move furniture and prepare all necessary materials and tools.
Selecting the best materials
To decorate door or window openings, laminate is suitable, which is left over after covering the floors in the apartment. If there are no such residues, buy panels intended for residential premises. The optimal thickness of the product is from 6 mm to 8 mm.
An important selection parameter is the environmental friendliness of the laminate (formaldehyde emission class) - the “E1” sign on the product packaging indicates that the amount of organic compound emissions is safe for human and animal health.
Before purchasing, make sure that the surfaces of the material are intact and that there are no dents or cracks. Compare the shades of the stripes - there may be differences in the color of products in the same package.
What tools are needed?
Before starting work, prepare the necessary tools:
- metal square;
- roulette;
- pencil;
- jigsaw or hacksaw for metal;
- rule;
- level.
If installation involves arranging a frame, you will additionally need:
- perforator;
- screwdriver;
- metal scissors.
Materials:
- laminate;
- profiles or wooden beams (slats);
- polyurethane foam or adhesive;
- self-tapping screws;
- dowel-nails;
- wooden planks or decorative corners for finishing slopes;
- primer.
Surface marking and material cutting
The cladding of door slopes is based on the fact that the master tries to close the wall at the opening without gaps. To cut laminate you will need an electric jigsaw or a fine-toothed hacksaw. It is difficult to achieve a high-quality result without a tape measure, a square, or a metal ruler. For beginners, it is preferable to make a design template from cardboard.
An affordable option for a classic door
How to do it yourself?
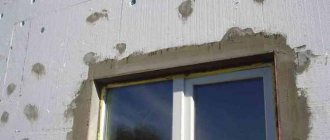
The initial stage of finishing the openings with your own hands is to prepare the rough foundation.
Preparing the base
Follow these steps:
- eliminate all protruding areas on the surface of the opening, remove peeling paint or plaster;
- Clean all surfaces to be finished from dust with a moistened sponge, wait until the surfaces dry;
- plaster or foam all holes and cracks.
Regardless of the method of constructing slopes, be sure to treat the rough base 2-3 times with a primer mixture - this will prevent the development of mold and mildew under the laminate.
Marking and cutting
First of all, use a tape measure to measure the openings, taking into account the angle of deviation of the slopes from the door or window. When using a horizontal method of arranging the laminate and interlocking the planks, apply the markings to the pre-assembled material.
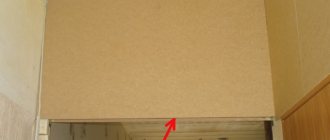
Please take into account that the decorative covering of the slope should extend onto the window or door frame by a few millimeters. Measure the sides of the openings only after preliminary “trying on” (without fixing) the top laminate strip.
Advice
Make sure that the covering does not interfere with the opening of the window or door.
Transfer the pencil markings onto the laminate and start sawing:
- If you use a jigsaw, use a knife to cut through the protective film on the front side of the laminate (along the marked line), fix the bar with the outer side down. Set the power tool to a high speed and smoothly, without moving the jigsaw from side to side, cut the material.
- A hacksaw with fine teeth is also suitable for working with laminate. To avoid chipping, apply masking tape to the cut line. Perform the process with the plank facing down.
How to decorate the front door or window?
The installation of panels also begins with the installation of the top panel.
Mounting on a profile frame
- Remove any remaining foam after sealing the cracks around the perimeter of the door or window frame.
- Drill holes and use dowel nails to secure vertical profiles on the inside, adjacent to the window or door, and on the outside of the opening. Attach the plank with one side to the wall.
- Install horizontal slats at the bottom and top of the sides of the opening. Also fix the transverse profiles on the upper section of the opening. Thus, you will form 3 perimeters from the profiles - 2 side and 1 top. If the opening is large, secure several more cross bars between the guide profiles.
- Screw the laminate to the frame using self-tapping screws.
On a wooden sheathing
- Drill holes of the required diameter and secure wooden slats along the inner and outer perimeter of the opening.
AdviceBe careful - the frame elements should not protrude above the wall surface.
- To create additional structural rigidity, fix several more transverse slats into the vertical posts of the sheathing.
- If the surface of the slats corresponds to the location of the parts of the laminate and the area of their contact is sufficient, glue the sawn parts of the floor covering to the frame. Otherwise, screw the laminate with self-tapping screws.
Cover the heads of the screws with furniture plugs that match the color.
By glue method
Level the rough base:
- Mix the amount of plaster required for the job.
- Scoop the solution onto a spatula and apply it to the surface of the base, starting from the bottom of the slope and moving upward.
- Apply the rule and lift it up, leveling the layer of plaster. After the procedure, inspect the surface - if there are unevenness, add solution to these areas, repeat the leveling procedure with a spatula with a wide blade. Check the evenness of the base with a level.
- After the solution has dried, work the slopes with a construction float in a circular motion, paying attention to the corners.
- Cover the surface with primer mixture 2-3 times.
When the slopes are dry, start gluing the laminate: apply glue to the back side of the laminate, press the material to the plastered surface, and hold for a while.
Attention
To prevent the panels from moving, secure the top strip with masking tape and the side strips with spacers.
On the foam
- To prevent changes in the position of the coating during polymerization of the foam, install limiting slats around the perimeter of the opening.
- Apply a light layer of foam to the top of the opening and the back of the trim panel, set the laminate in place and secure it with masking tape.
- Treat the side parts of the slopes with the mounting mixture, then the back part of the finishing material.
- Place the laminate on the slope and secure with masking tape. Check the evenness of the surfaces with a level.
- After the foam has dried, cut off any protruding parts. Apply plaster to cracks in joints and corners. Lubricate the joints of the panels with glue.
Finishing work - decorating the corners with platbands, metal or plastic decorative corners.
Our experts have prepared a number of separate publications devoted to how to properly make, install, insulate and plaster window slopes. After reading them, you can find out why and how to insulate slopes inside the house, how to properly seal them after installing windows, how to line internal slopes, as well as how and for what you can use siding.
Frame mounting
Before finishing the door slopes with laminate moves into the final stage, you will need to assemble the frame. This is not difficult - you will have to fasten wooden or metal strips along the entire perimeter of the door, to which the laminate can later be attached. Next, the finishing will actually begin.
Depending on the chosen direction for placing the parts, they need to be cut to length or width. It's easier to work when the parts are positioned horizontally. Their vertical arrangement requires trimming along the entire length of the planks, which is not always possible to do evenly. Making a cut to width is much easier. The installation of elements on the frame begins from the bottom side and gradually, connecting the elements to each other with locks, they rise up. The parts can be fixed with self-tapping screws or glue.
Possible installation errors
The accumulation of condensate or the presence of a draft after installing laminate slopes indicates the following:
- poor preparation of the rough foundation before installing the panels;
- inaccurate measurements;
- using insufficient amounts of adhesive;
- leaving voids in the area where the decorative covering adjoins the window or door.
Finishing openings is a fairly simple task. However, before performing work, you should carefully familiarize yourself with all installation methods and features , since failure to comply with the technology can lead to subsequent freezing of windows or doors, the formation of condensation on their surface, and the development of mold or mildew.
And then dismantling and constructing new openings can be expensive, both for the wallet and for the windows and doors themselves.
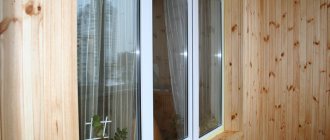
Plastic cladding
Quite often, interior openings are lined with plastic, but it needs to be chosen correctly so that there is no feeling of disharmony when you see a plastic entrance to a room decorated, for example, with wood. Otherwise, installing plastic is not difficult.
- Along the perimeter of the opening, wooden slats or a profile are attached to the wall. Their installation must be carried out using a level, but it is better to stretch 2 cords from top to bottom at the 2 vertical ends of the opening. The distance from the threads to the wall depends on the thickness of the profile. The sags are set level and attached to self-tapping screws, which are screwed into the upper and lower parts of the opening. Along these planes, base profiles are nailed to the ends of the wall with dowels. The plane above the box is built using horizontal threads.
- The starting bar is nailed close to the box.
- Plastic panels are cut according to the vertical and horizontal dimensions of the opening.
- Vertical sheets are installed and fastened with self-tapping screws to the slats.
- The top panels are placed and also secured.
- The finishing profile is installed.
- Corner joints are sealed with sealant.
To work with plastic you need:
- sander;
- jigsaw;
- impact drill or hammer drill;
- screwdriver;
- hammer;
- carpenter's knife;
- level.
The direction of the plastic panels can be parallel to the wall, but it is better if their joints with each other are located horizontally (from the door to the room).
You can choose the most suitable method for constructing slopes based on the availability of a particular material, economic or design reasons.