Material selection
Selecting the optimal material for finishing slopes is a responsible job that must be taken with the utmost seriousness. Depending on the type of windows installed, lining slopes can be of two types:
- Wooden.
- Plastic.
Further division is based on the characteristics of the material used in the manufacture of the window. First, let's look at wooden structures, their appearance and properties.
Wood paneling
When choosing wooden slopes from lining, you must take into account a number of requirements:
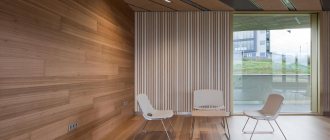
- Combination with the textured pattern of the window frame. A material that differs in appearance will not be able to fit into the overall style of the opening.
- The type of wood must match the material on the windows. There are several reasons for this: firstly, different breeds differ in density, texture pattern, color and behave differently. When choosing a material for the façade of a building, it is necessary to select a species that can withstand precipitation and the effects of ultraviolet radiation. The best options are considered to be coniferous wood, which, if properly processed, can retain its original characteristics for decades.
- The wood must match the color style of the room. It is always better if the color differences are within 3-4 tones. It is possible to create contrasting shades, but there is no need to experiment and use a large tonal spread. A window that is too contrasting will draw all the attention to itself, drowning out the decor of the room.
PVC products
What are the requirements for choosing PVC slopes:
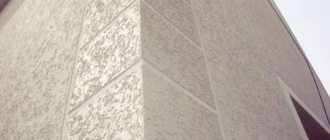
- Color. The selection of colors is approximately similar to wooden lining. To decorate window openings, PVC panels of various colors are used. For houses made of logs or finished with a block house, it is recommended to use brown shades. White slopes look great on red brick walls, contrasting with the overall style of the building. Internal lining slopes are selected based on the finishing of the room.
- Drawing. It can be different, roughly matching the style of interior decoration. For example, for walls covered with wood, it is better to choose panels with a wood texture pattern.
- Surface type. The panels can have a glossy or matte surface.
Recommendations from experts
According to experts, it is best to line slopes with PVC clapboard or sandwich panels, since small cracks will form on slopes lined with plaster after some time. This happens due to the increased shock load and temperature changes that arise due to the operation of the windows. And also due to the fact that the plaster does not have sufficient elasticity.
Finishing with PVC clapboard has the following advantages:
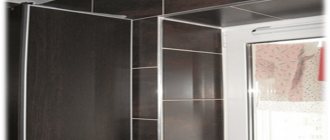
Slopes lined with PVC clapboard have a finished look that will go well with the modern style of the window.
- plastic ones can be installed on the day the window is installed, and finishing the slopes with plaster takes more than one day (puttying, drying, painting);
- Slopes trimmed with PVC clapboard additionally serve as a thermal insulation barrier between the street and the room.
- there is no need for periodic maintenance;
- plastic slopes have excellent moisture resistance;
- Slopes lined with PVC clapboard have a finished look that will go well with the modern style of the window.
Related article: How to make a cold smoked smokehouse with your own hands, video
Recently, PVC sandwich panels have been used quite often during construction work. This material has a number of excellent characteristics: excellent rigidity and strength with low weight, excellent thermal insulation properties and aesthetic appearance.
The front side of these panels is protected with polyethylene film. Inside the material there is foamed polystyrene, which has a closed cellular structure. Panels can be produced with either a single-sided or double-sided working surface.
Window slopes lined with sandwich panels have the following advantages:
Their PVC slopes withstand the effects of ultraviolet radiation.
- sufficiently high quality of thermal insulation;
- the premises will have additional sound insulation;
- high strength and long service life;
- excellent moisture resistance;
- good resistance to ultraviolet radiation;
- wonderful appearance.
As for finishing with plasterboard, we can say for sure that this type of building material is environmentally friendly, lightweight and its installation is quite simple.
But it is impossible not to point out its main shortcomings. Firstly, this material is quite fragile. Secondly, it has the ability to absorb moisture. Therefore, drywall must be dried before use.
Measuring the perimeter of the window slope and preparing the installation site
After the material for assembling the slopes has been selected, it is time to move on to taking measurements and preparing the base of the window opening.
At the initial stage, it is necessary to carry out the following checks:
- Determine the distance from the window frame to the outer wall of the room at several points. The indicators should not have significant differences. The maximum tolerance is 5 mm. In case of more significant discrepancies, it is recommended to reinstall the window unit.
- Take measurements of the width, height and diagonals of the opening. Ideally, the window should be installed strictly in the center. Minor deviations will lead to distortions when installing panels or lining with your own hands. In some cases, it is easier to remove the excess part of the window opening than to reinstall the window.
- Check that the frame is installed correctly in the vertical and horizontal planes. This is done using a construction or laser level.
Checking the evenness of the location
To prepare the surface for further work, perform a number of actions:
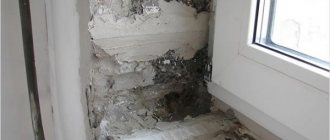
- Remove protruding parts and unnecessary covering of old trim. It is necessary to ensure free access to the window frame so that nothing interferes with the installation of the slopes.
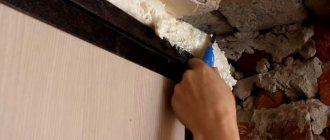
- If the window installation was carried out recently, then it is necessary to remove the remaining foam. The most convenient way to do this is using a stationery knife. A spatula or other sharp objects will also work.
- If through holes are found, take measures to eliminate them. Fill with cement mortar or, in case of significant damage, fill with foam.
As a result, before starting the installation of the slopes, you should get a window opening without flaws and suitable for performing work on installing the lining.
Wooden slopes for windows - choose the species
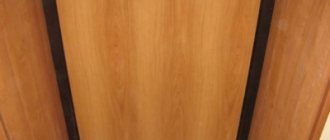
This solution will be ideal in the case of installing wooden windows, however, it is important to observe some nuances. To achieve the desired result, the surfaces around the windows are finished with panels made from the same type of wood as the frames themselves. For example, if the windows are made of oak, then the panels must also be ordered from oak - only if this rule is followed, the color palette, pattern of the panels and the window frame will completely match, since the texture of any wood (pine, oak, larch, etc.) there are certain differences.
Modern equipment makes it possible to produce wooden slopes for windows with a length of 2.8 m and a width of up to 1 m. The thickness of the panels can be 12 and 15 cm. The basis of this material is FSF plywood, which has increased moisture-resistant qualities, high wear resistance and strength, which is why FSF is very popular and in other construction works.
To give the products more sophistication, the base is covered with veneer made from expensive wood. At the final stage, the panels are primed, which improves the adhesive properties of the paint and varnish coating, and also helps neutralize wood resins. For this material, colored or transparent polyurethane varnish is mainly used.
Many wood panels are made to order, which imposes additional requirements for their installation. In most cases, installation is carried out by specialists from the manufacturing company, since the process can rightfully be called jewelry. Since this material is quite expensive, installing wooden slopes with your own hands is a very risky business, especially in cases where the manufacturer has not provided for the possibility of conveniently connecting the elements to the window frame.
Necessary tools and materials for finishing window slopes
Almost every man with minimal builder skills can cover a window opening with clapboard. To make lining slopes with your own hands, you will need a set of tools:
- Electric drill. Regardless of the type of window, you will need to prepare a set of wood drills.
- Hammer. Necessary for fixing fasteners in reinforced concrete, block or brick walls. If the cladding is carried out in a wooden house, then an electric drill will be sufficient.
- Sawing tool. This could be a hacksaw, jigsaw or miter saw.
- Measuring tool. To mark and take measurements, prepare a tape measure, a square, a simple pencil or marker, and a bubble level.
- Screwdriver. If you don’t have such a tool in your home arsenal, you can replace it with a drill with adjustable speed or a Phillips screwdriver. The second option will significantly complicate and slow down the work.
You will also have to prepare a set of fasteners: self-tapping screws, dowel plugs and liquid nails. To assemble the frame, purchase a beam or wall profile. Polyurethane foam will help fill the voids.
Buy slopes for wooden windows in Chelyabinsk
Wood is constantly associated with environmental friendliness and naturalness, and has a unique structure. They are an array of the same wood as a wooden window (made of mapled oak or pine, ash or beech), the thickness of which varies in the range of 18-20 mm, width - 1 meter, length - up to 2.8 meters. Wooden slopes, portals for windows, are used to perform a decorative function, masking traces of repairs: polyurethane foam, seams, gaps. Well-chosen products perfectly frame wooden windows.
Installation of window slopes
The most widespread are two methods of installing lining as slopes. Let's take a closer look at both options separately.
Installation on polyurethane foam
Installation of slopes with clapboard is carried out on a perfectly flat base. Otherwise, distortions cannot be avoided. The surface must be plastered or covered with leveling rough coatings - for example, fiberboard or plywood. Vertical cladding is used for installation. In such a way that the panels or wooden lining are cut not according to the width of the slope, but according to the height.
Vertical placement method
The installation process on polyurethane foam is as follows:
- Measure the height of the slopes and prepare sections of the required length. To avoid discrepancies, it is recommended to take measurements at several points.
- On the reverse side, apply a small layer of mounting foam.
- To improve the quality of adhesion, spray the wall surface with water from a spray bottle. In this case, the foam adheres better and dries faster.
- Wait a little while until the foam is covered with a light crust and then proceed to install the lining. During this time, the foaming composition will rise a little and will not burst the slopes much.
- The lining is attached to the top of the window. Then the side strips are installed. In this way, it will be possible to create a bursting structural element for the upper part of the slope.
- To spread the side panels, install two strips at the full height of the window opening and spread them with a rigid strip or block.
Attention! After complete polymerization of the foam, and this is around 12-24 hours (the exact time is indicated by the manufacturer on the container), the expanding structure is dismantled.
On a frame made of bars
Window openings where there are significant dimensional errors are best sheathed using the frame method. In addition, this type of installation considers the option of installing lining along the width of the slope, which increases interest. After assembling the frame, you can insulate the structure.
Installation on the lathing
Installation process:
- Depending on the type of wall, we attach wooden beams or metal profiles. When installing, check the plane of the entire frame and that there are no obstructions at the top or bottom.
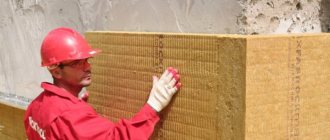
- Fill the space between the guides with insulation. Mineral wool is best suited for this purpose.
- Next, the slopes are covered with clapboard. Cut pieces of the required size in advance and secure with fasteners. If the frame is wooden, then it is more convenient to work with small nails. Of course, if the lining is made of wood. Otherwise, metal screws are used.
- At the final stage, the corner elements are fixed. For fastening, use adhesives or sealant.
Wooden or plastic lining is installed on slopes in three ways, using liquid nails, wood screws with a decorative head in the front part, or clamps and mini-nails.
What should you consider when choosing lining?
In order for a window covered with clapboard to last for a very long time, special attention should be paid to the choice of material. First of all, we are talking about the variety. It is generally classified into four main categories. “Extra” is rightfully considered the best and highest quality. It has a perfectly smooth structure and surface. Grade “A” is slightly worse in terms of aesthetic parameters, as it allows the presence of one small knot on each panel. If you pay attention to grades “B” and “C”, then their aesthetic parameters will be even lower.
As for the quality of the shalevka, it directly affects the durability of use. For example, if the wood does not have a special protective impregnation, or its processing technology has been violated, then the surface will very quickly begin to darken and will require additional time and effort to restore its original appearance. At the same time, it is worth considering that any wood will begin to darken over time.
How to restore the attractiveness of the lining?
If a window covered with clapboard has lost its former attractiveness, then this can be solved in several simple ways.
The most common is considered to be surface painting. In this case, it is best to use an acrylate paint coating. It will not only restore the window to its former attractiveness, but also provide additional protection from moisture and ultraviolet radiation.
Another fairly inexpensive and uncomplicated method that you can do yourself is varnishing. The only thing to remember is the mandatory preliminary cleaning of the surface and its thorough sanding using an abrasive wheel or pumice. After this, the shalevka is treated with a protective impregnation or antiseptic and varnished.
A similar method can be used if you want to slightly change the existing design. For example, make it darker or lighter. The only caveat in this situation is that to change the color or give a different shade, you need to select the appropriate tint varnish.
Insulation of slopes
Despite the fact that bare skin is already a fact of insulation, it is still recommended to use additional materials to increase efficiency:
- Styrofoam . The material has a low price and good initial characteristics. To insulate the slopes, a method of installing the lining on the frame is selected. Fixation is possible without a frame, but the rigidity of the sheathing will not meet the standards. It is used not only to insulate slopes, but also the entire building.
- Penoplex. Refers to a subtype of foam plastic that has been processed by an extruder. Due to this, penoplex surpasses foam insulation in many characteristics. Installation is carried out between the frame slats, followed by filling the voids with foam.
- Mineral wool. For installation, you need to use scraps that exceed the cell dimensions by 2-3 cm. This necessity will help to securely fix the insulation inside the sheathing. The downside of mineral wool is its tendency to accumulate moisture. Therefore, when choosing this insulation, pay attention to ensure that these indicators are minimal.
Necessity of finishing
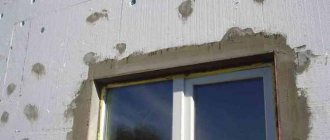
The slope covers the seam made of polyurethane foam, which will be formed when installing a new window unit.
The need for this type of work arises primarily due to the fact that in any case, when removing old windows, the existing slopes will be destroyed. Secondly, something needs to be done to cover the polyurethane foam seam that will be formed when installing a new window unit.
Much in finishing depends on the material used and the quality of the work, since cracks and various types of damage should not form on the lined window slopes due to getting wet or freezing. To achieve the durability of the constructed slopes, it is necessary to properly prepare them: remove all old plaster from them and, if necessary, insulate them with basalt wool or expanded polystyrene.
Scheme for installing a slope made of sandwich panels: wall, mounting foam, window frame, insulation, sandwich panel, batten, J-profile, C-profile, window sill.
High-quality finished slopes will not suffer from temperature changes, condensation will never form on them, and the thermal insulation and sound insulation properties of the room will be significantly increased. Today, the most popular are three methods of cladding window openings:
- using plastic sandwich panels;
- plastic lining;
- moisture-resistant plasterboard.
The properties of the finishing material play a very important role both from the point of view of practical application and from the aesthetic side.
Processing of wooden lining
After all installation work is completed, to increase service life and to exclude the possibility of damage by various fungal formations, it is necessary to treat the surface with antiseptic materials. You can also use water-repellent compounds. This will help protect the material from deformation when indoor humidity increases. Plastic lining is more practical in this regard.
To decorate the surface, you can use water- or alcohol-based stains. The construction market today offers a wide variety of compositions. Don't forget about the finishing coat. This could be varnish or paint.
Recommendation! Carry out processing and application of the decorating layer on structural elements that have not yet been assembled. Firstly, this will simplify the execution process, and secondly, the parts will be completely covered with a protective layer.
Differences between PVC lining and sandwich panels
Everything is quite simple: the structure of the plastic lining does not contain insulation, it has a cellular structure, based on this, the thermal insulation properties of your window slopes will be minimized if you do not pre-insulate them. However, visually, slopes made of plastic lining look no worse in comparison with slopes made of sandwich panels, although if you look closely, you will certainly notice the difference.
After some time of use, the plastic lining may simply peel off.
After some time of use, the plastic lining may simply peel off, and all due to the fact that this material is hollow. PVC lining is excellent for cladding balconies and loggias with their preliminary insulation. Only then will the result be practical and durable.
Therefore, initially thermally insulating window slopes and subsequently using plastic lining for cladding will take you much more time and money than using for these purposes a material whose structure already contains a layer of insulation.
Related article: Insulating floors under tiles on loggias and balconies
As mentioned above, sandwich panels consist of PVC sheets and insulating material (expanded polystyrene). This material fits perfectly onto the window opening; subsequently it will not peel off and does not need any additional modification.
To summarize the above, we can highlight their main differences:
Scheme of the sandwich panel structure: top sheet with polymer coating, locking connection, insulation, bottom sheet.
- different thermal insulation properties;
- moisture resistance of the material - sandwich panels react much better to moisture compared to plastic lining, based on the fact that polystyrene foam is a fairly moisture-resistant material;
- service life - window slopes made using sandwich panels will last you much longer in comparison with slopes made using plastic lining;
- cost of installation work - using sandwich panels will cost you more than using plastic lining.
Necessity of finishing
The slope covers the seam made of polyurethane foam, which will be formed when installing a new window unit.
The need for this type of work arises primarily due to the fact that in any case, when removing old windows, the existing slopes will be destroyed. Secondly, something needs to be done to cover the polyurethane foam seam that will be formed when installing a new window unit.
Much in finishing depends on the material used and the quality of the work, since cracks and various types of damage should not form on the lined window slopes due to getting wet or freezing. To achieve the durability of the constructed slopes, it is necessary to properly prepare them: remove all old plaster from them and, if necessary, insulate them with basalt wool or expanded polystyrene.
Scheme for installing a slope made of sandwich panels: wall, mounting foam, window frame, insulation, sandwich panel, batten, J-profile, C-profile, window sill.
High-quality finished slopes will not suffer from temperature changes, condensation will never form on them, and the thermal insulation and sound insulation properties of the room will be significantly increased. Today, the most popular are three methods of cladding window openings:
- using plastic sandwich panels;
- plastic lining;
- moisture-resistant plasterboard.
The properties of the finishing material play a very important role both from the point of view of practical application and from the aesthetic side.