Depending on the type of base, plaster layers may be different:
- Brick. This material is characterized by the presence of a relief pattern, which increases adhesion to the plaster. The minimum layer of plaster is 5 mm; less should not be applied, since the solution will not be enough to hide all the defects of the brick surface. The maximum thickness of the plaster without installing a reinforcing mesh is 2.5 cm, with the installation of this element – 5 cm.
- Concrete walls. The porous structure of such coatings ensures good adhesion to all types of plasters. In addition, such surfaces are mostly smooth, so a solution with a thickness of 2 mm or more can be applied. The maximum layer of plaster without using a mesh is 2 cm, with a reinforcing mesh – 7 cm.
- Cellular concrete. Walls made of gas or foam blocks rarely need leveling, since they have a smooth surface. Most often they are plastered only for decorative purposes, so the layer thickness ranges from 2 to 15 mm.
- Wooden covering. Plaster is rarely applied to this type of wall because the mortar does not adhere well. Applying mixtures to a wooden wall begins with the installation of reinforcing mesh. It can be metal, plastic or wood. Metal and wooden products are attached with nails or screws, and plastic ones with special glue. The thickness of the plaster layer on the mesh is not regulated, since it is only needed to hide it. The recommended thickness of the solution is 2 cm.
- Drywall. This material is used to level the walls, so it only requires decoration. If it was decided to use plaster, then the material must be of high quality. Usually 2 mm is enough for decoration, the maximum allowable layer is 10 mm. If for some reason it is planned to apply a thicker layer, then a plastic reinforcing mesh is first installed.
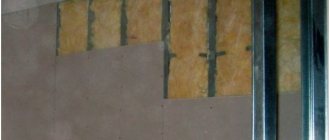
- Insulation materials. Contrary to the opinion of some craftsmen, plastering polystyrene foam, mineral wool and other thermal insulation materials is not only possible, but also necessary. The work begins with the installation of a reinforcing mesh, then a little solution is applied to mask the mesh, and at the end the main one, the thickness of which is 1-2 cm.
Plaster of any surface consists of several layers
On a note! Manufacturers indicate which layer of plaster can be applied on the packaging; before starting work, you must read the instructions in detail.
Plastering an apartment without the help of a specialist
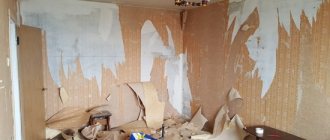
Analysis of the base for any defects
Carefully inspect and check the walls using a rule and level. If as a result you find out that they are crooked, you need to think about how to resolve the issue. Minor repairs or puttying are not always suitable in such situations. This is why there is a need for plastering work.
This will make it possible to level the walls for subsequent finishing (painting, wallpapering, etc.). However, here you need to understand exactly what the thickness of the plaster layer should be. Indeed, when performing interior work, this indicator may be one, but the optimal thickness of external plaster will be completely different.
In order to hide imperfections on indoor surfaces, they are leveled using plaster compounds. Each of them has a recommended range of application thickness.
Minimum value
They always strive to obtain the most minimal layer. In this case, the plaster adheres more firmly to the base, less material is consumed, which means repairs are cheaper.
What should the layer be?
Attention
The optimal thickness for plaster coatings has long been determined in practice and is included in SNiPs.
When doing home renovations, you don’t have to follow them - but don’t be surprised if the coating then starts to crack and the wall starts to freeze or fog up. Therefore, even where responsibility for non-compliance with standards cannot be expected, it is better to comply with the requirements.
When determining the thickness for decorative plaster, you need to take into account:
- Placement area – external or internal. This is due to different conditions in temperature, humidity inside and outside.
- The composition used for plastering . Gypsum mixtures are usually not recommended to be applied in a layer of more than 15 mm. For cement, the thickness increases to 20 mm.
- The grounds on which the work is being carried out . Different materials absorb moisture differently, they have different adhesion abilities, so they can support different layers of plaster.
- Application technology .
“Clean” plaster should be relatively thin, but reinforced plaster (at least the old-fashioned way with shingles) allows the walls to hold a thicker layer. This point is very important in cases where decorative plaster is used to correct flaws that arose during construction: incorrect wall geometry, uneven corners, masonry defects, etc.
Features of layers when plastering
To level the surface, plaster is applied to the walls in several layers, each of which has its own distinctive features and characteristics:
- The first one, spray, is the most significant in its parameters. It is applied directly to the surface of the wall prepared for leveling. The application method can be manual or mechanical. In the first case, you will need a plaster ladle, and in the second, a special machine that directs the solution under pressure onto the wall surface. With a single-layer application, the layer of mortar reaches 2 cm, but if a multi-layer application is required to properly level the surface of brick walls, then the thickness of the spray can reach 5 cm. The maximum thickness of plaster on a brick is 10 cm, the spray is 2/3 of this layer. This layer is not smoothed, it is allowed to dry completely before applying the second layer. The uneven lumpy surface has high adhesion, which guarantees the durability of the coating.
- The second plaster layer is soil. This layer is the main one. Its maximum thickness is from 7 mm to 5 cm. The creation of soil is associated with the main difficulty of performing the work: distributing the plaster using a rule. You need to “stretch” the walls so that not the slightest section of the created surface protrudes above the level of the beacons.
- The third final layer is the covering. To create it, I use a fairly liquid composition, which is quickly distributed over a completely dry plastered surface. Its thickness does not exceed 0.5 cm.
This is the final stage of plastering work. The thickness of each layer is determined by the requirements of SNiP, but with a strong slope of the walls or significant deformation of the surface, it may be necessary to increase the created layer, in which case the mesh for reinforcement will no longer be nylon, but metal.
Leveling walls with plaster is shown in more detail in the video:
We plaster ourselves
1. Apply the mixture. Now let's proceed directly to plastering the walls. To do this, you need to prepare the mixture according to the instructions. Please note that it should not be too liquid. In your left hand, hold a grater with a small amount of mixture. Using the end of a spatula, take a little bit of the solution and throw it onto the wall. The direction of movement is from bottom to top. Then smooth the layer using a grater in a circular motion. If you are plastering on beacons, level the mortar over the surface using a rule, lightly pressing it against the wall.
2. Set the layer thickness and number of layers. It is advisable to apply gypsum solutions in one layer. Cement - in three layers (preliminary, main and leveling). Thin-layer plastering is done only on smooth brickwork (5 mm and above) or concrete surface (up to 5 mm). It is not recommended to make an overly thin layer of plaster, because... it may crack later. And if it is too thick (more than 30 mm), it may slide off during operation.
3. Let the plaster dry. The setting of the solution depends on the composition, humidity and porosity of the surface, as well as on the thickness of the layers. Gypsum plaster hardens much faster. So, each subsequent layer with lime-gypsum mortar is applied through with cement mortar - through Walls plastered with cement mortar will dry completely only after approximately
4. Putty and sand. When the composition has dried, use a “grater” with sandpaper of different grain sizes to sand the wall. If necessary, putty with preliminary priming. And we polish again. This completes the alignment of the walls.
Layers of plaster and their functions. Work order
Depending on the actual condition of the wall, the technology for its preliminary leveling is selected. If the wall is very dry and the room is hot, then it is strongly recommended to wet the surface by any available method before starting work. The solution application technology consists of several stages:
Alignment. The work is done as a rule, its plane rests against the beacons, the tool moves upward in a zigzag manner and removes excess solution. It is dumped into a container and reused for plastering.
Making beacons. There are several methods, each of them has its own strengths and weaknesses. The specific one is chosen by the master, taking into account the type of wall and his professional skills.
Primer or wet with water. Both processes increase the adhesion of the mass to wall surfaces.
In the first case, modern deep penetration impregnations are used, in the second, a liquid solution with an increased cement content is produced.
How to control the layer of plaster mixture?
Since we are talking about the application of plaster mortar, it is necessary to consider ways to control them. Plasterers use the following methods:
- Peephole overlay . If a thin-layer coating is applied and the technician has sufficient experience, this method is the simplest.
- Use of beacons . This term refers to special guides that are attached to the wall along the boundaries of the area to be plastered. If you set them correctly using a level and plumb line, you can achieve their exact location in the horizontal and vertical plane.
After this, it is enough to simply apply the solution so that its height between the two beacons is equal to their thickness.
Using beacons from the plaster mixture itself (landmarks) . This method is similar to working with metal or wooden beacons, but consists in pre-filling reference sections of plaster of exact thickness onto the wall. Then, when plastering, the master is guided by them.
The thickness standards established by the rules for a decorative plaster layer are not a dogma; deviation from them is permissible. But it's better to follow them. This is especially true for beginner plasterers who do not yet have sufficient experience in finishing work.
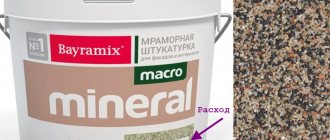
Manufacturers' recommendations
Companies that create building mixtures conduct a series of tests on their products and have a developed quality control system. As experts, they include a list of recommendations with their products that clarify general ideas about finishing mixtures.
Here are the most popular brands of material:
▶ Knauf Rotband (Rotband) . Gypsum plaster with high-quality plasticizers and polymer additives. Recommended range for finishing thickness: minimum – 5, maximum – 50 mm. For every 10 mm, the mixture consumption is 8.5 kg per m2 of wall area.
▶ Knauf Grunband . Frost-resistant and crack-resistant cement-lime plaster. Material consumption is 12 kg/m2 with a finishing thickness of 1 cm. The recommended minimum and maximum values of the finishing layer are the same as for Knauf Rotband.
▶ Ceresit CT 24 . Another mixture based on a cement binder, optimally suitable for plastering the external walls of a house. The manufacturer recommends using it for walls made of cellular concrete, the recommended layer is from 3 to 30 mm. Consumption at 10 mm - 14 kg/m2.
▶ Veber Vetonit TT40 . Universal composition based on cement. It is recommended to apply 5–40 mm, consumption – 17 kg/m2.
▶ Unis Ecolayer . Gypsum based plaster from Unis. The manufacturer recommends a finishing thickness of 5 to 50 mm, with a possible increase to 70 on concave sections of the walls. Consumption – 10-11kg/m2.
▶ Unis Teplon . A mixture based on modified gypsum. Thickness values are the same as for Unis Ecolayer. Mixture consumption – 9 kg/m2.
▶ Prospectors . Gypsum-based composition. Acceptable thickness is from 5 to 100 mm. Consumption for a layer of 1 cm is 9 kg per m2 of wall surface.
▶ Found PC21 M. High strength cement plaster. Can be applied in layers from 2 to 30 mm. Consumption 13 kg/m2 with a thickness of 1 cm.
Is it possible to plaster drywall: how to do it correctly and with what?
Many novice craftsmen who have started DIY repairs are interested in how to properly plaster drywall. Indeed, after installation, plasterboard sheets require some manipulations before finishing: sealing and reinforcing seams, filling in recesses from self-tapping screws, and final leveling of the entire plane. But not everyone knows what material is used for these purposes - plaster or putty. Let's figure out whether it is necessary to plaster drywall, what materials are used for rough processing, and consider the case when plaster is really necessary.
Optimal plaster thickness
When deciding the question “what layer of plaster can be applied to the wall in my case?” you should strive for the minimum numbers that are possible without loss of quality of work.
Finishing brick, concrete and aerated concrete walls
The minimum thickness of plaster on brick is 5 mm. This is due to the characteristic surface topography. With a smaller layer, it will clearly appear outward. In this case, puttying for further leveling will be troublesome and, most importantly, unproductive. The maximum thickness without the use of reinforcing mesh is 20 mm, anything larger (up to 50 mm) is only with it.
The thickness of the plaster on concrete, thanks to the good adhesion of this base with all finishing materials, can be almost any. The minimum layer can be from 2 mm, and the maximum, if you work without the use of reinforcing mesh, is 2 cm. With meshes, the minimum is 2 cm, the maximum is 7 cm. In exceptional cases, with significant curvature of the walls, it is permissible to increase the figure to 10 cm.
Process steps
We decided on the thickness. But you need to remember that plastering is not carried out in one layer. Therefore, the total thickness must be divided into several stages. The process distinguishes:
- Spraying - up to 5 mm on concrete and brick and up to 9 mm on wood;
- Basic (leveling) – from 5 mm;
- Finish (if the previous one turned out to be of insufficient quality) - up to 7 mm.
If we calculate these data, it turns out that the minimum thickness of plaster that should be applied to concrete or brick is 10–15 mm, and to a wooden surface – 13–17 mm.
Conclusion
Plastering walls is not such a complicated procedure as it seems at first glance. The main thing is to properly prepare the base and monitor the thickness of the laid coating. Remember a few practical tips.
- If the solution is applied in several layers, the total thickness of which exceeds 3 centimeters, be sure to use reinforcement.
- Prepare the base carefully. An influx on the wall with a thickness of only 1.5 millimeters will increase the amount of material used by at least 3-4 bags.
- Use beacons to make your work as easy as possible.
SNiP for plastering work. Permissible deviations.
| Parameters and properties of plaster | 1 | 2 | 3 |
| Deviations from the vertical by 1 m, no more | 3 mm | 2 mm | 1 mm |
| Maximum deviation from the vertical for the entire height of the room | 15 mm | 10 mm | 5 mm |
| Number of irregularities per 4 m2, no more | 3 | 2 | 2 |
| Depth of irregularities, no more | 5 mm | 3 mm | 2 mm |
| Deviations from the horizontal by 1 m, no more | 3 mm | 2 mm | 1 mm |
| Base moisture content, no more | 8 % | 8 % | 8 % |
Gypsum plaster is applied in one layer or in several layers using the “wet on wet” technology (for example, in the case of reinforcement). The layer thickness is 15 mm (see table 10, clause 3.21 of SNiP “Insulating coatings”).
To reduce the risk of cracks (their visibility on the finishing surface), the plaster layer can be fully or partially reinforced with a plaster mesh.
To carry out further finishing work, the mass humidity of the plaster layer should be no more than 8% (see SNiP 3.04.01-87). According to European building regulations, the residual moisture must be no more than 3 CM percent (approximately equivalent to 5 mass percent). On average, gypsum plaster dries at the rate of “1 mm layer of plaster = 1 day.”
The installation of plaster layers under conditions of improved or high-quality finishing involves the installation of beacons on the thickness of the plaster layer (clause 3.16 of SNiP “Insulating coatings”).
Preliminary work
Work should begin by cleaning the surface of old plaster, primer and whitewash.
Surface cleaning
Before plastering the ceiling, it must be completely cleaned (see, for example, the article How to clean whitewash from a ceiling: effective options)
Many people wonder whether to dry clean or wash off the old coating.
Before plastering the ceiling, use a spatula to remove all irregularities and protruding defects as much as possible. Often you even have to resort to using a hammer and chisel to chip away the bumps that the builders left when constructing your home. Then prime the ceiling with a special compound to improve the adhesion of the plaster (read about how to prime the ceiling in the corresponding article)
After maximum cleaning of the ceiling, the next stage begins - installation of beacons.
Installation of beacons
Lighthouses.
- If you are planning to plaster the ceiling with your own hands, before starting this process you need to mark it according to the level using beacons. First, using a hydraulic level, beat off the correct plane around the perimeter of the walls.
- Next, attach metal beacons along the walls using gypsum mortar.
- Now you need to place the beacons across the walls, in increments slightly smaller than the length of the rule. To ensure that the guides are located in the same plane, alternately apply the rule to two adjacent beacons and, using a bubble level already attached to it, adjust the position of the slats.
- Before plastering the ceiling, check its level again diagonally, as well as along the width and length.
- Now you need to wait a little for the solution to harden. It is advisable to wait at least a day before starting plastering the ceilings after installing the beacons. Otherwise, the uncured solution can displace the beacons.
Related Posts
- Plastic fastening clips for plaster beacons
- Leveling the ceiling and do-it-yourself plaster for painting
- Why line the roof and ceiling with clapboard and how to do it correctly? nuances of the procedure
- Cost of painting walls and ceilings
- Caring for matte and glossy stretch ceilings
- How to install beacons on a wall for plaster?
- Leveling the floor according to beacons
- How to make a ceiling in a private wooden house and do-it-yourself finishing
- Decorative plaster on the ceiling - features of the material and performance of the work
- How to remove a suspended ceiling: working with harpoon, cam, wedge fastening, dismantling PVC cloth and seamless fabric covering
- DIY two-level plasterboard ceiling
- How to whitewash a ceiling with your own hands
- The cost of dismantling the Armstrong suspended ceiling and prices in the estimate
- How to drain water from a suspended ceiling yourself and the cost of repairs after flooding
- Fastening beacons and mesh for plastering work
- Repairing ceilings in an apartment: finishing features
- How and how to cover the ceiling in a garage with your own hands beautifully and cheaply
- How to glue fiberglass correctly?
- How to attach a ceiling cornice to a stretch ceiling and hang a curtain
- How to sheathe a ceiling with plasterboard: tools and necessary materials, markings, arrangement of the frame, installation of sheets
- Beams on the ceiling in the interior (8 photos)
- How to operate a plastering machine correctly
- How to properly glue fiberglass to drywall with your own hands
- Filing a rough ceiling on wooden beams in a private house
- Which roller to paint the ceiling: surface preparation, choice of paint and tools, subtleties of painting the ceiling
Read with this
- Plastic fastening clips for plaster beacons
- Leveling the ceiling and do-it-yourself plaster for painting
- Why line the roof and ceiling with clapboard and how to do it correctly? nuances of the procedure
- Cost of painting walls and ceilings
- Caring for matte and glossy stretch ceilings
- How to install beacons on a wall for plaster?
- Leveling the floor according to beacons
- How to make a ceiling in a private wooden house and do-it-yourself finishing
- Decorative plaster on the ceiling - features of the material and performance of the work
- How to remove a suspended ceiling: working with harpoon, cam, wedge fastening, dismantling PVC cloth and seamless fabric covering
Calculation of the volume of dry construction mixture
To prevent the procedure for applying plaster on the ceiling due to a lack of consumables, the required amount of solution must be calculated in advance. You will need to calculate the following exact values.
- The area of the ceiling of the room in square meters.
- Minimum planned thickness of plaster cladding. You can determine it based on the instructions above in the article.
- Ceiling drop level in mm.
In addition, consider the percentage of the total volume of dry material that will go to waste. This value depends entirely on the experience of the performer. Professionals know how to properly prepare the solution and apply it optimally, so they have no more than 5% of the consumable resource left unused. It is advisable for a beginner to take a reserve of up to 20%, which is enough to cover errors in calculations and application to the ceiling.
Calculate the required amount of solution in advance
What are the advantages and disadvantages of plastered ceilings?
The very first thing to start with is efficiency. Not every one of us can afford to spend money on installing a complex suspended ceiling structure, not to mention stretch ceilings. In terms of materials costs and labor costs, plastering the ceiling is considered the cheapest way to bring the ceiling part into proper shape.
Advantages
Here it would be appropriate to talk about the advantages that plaster has. This technology has the following advantages:
- environmentally friendly (lime-cement and gypsum mixtures are absolutely harmless to humans);
- the plastered layer does not reduce the height in the room (the maximum permissible layer thickness is 5 mm);
- durability (a properly made solution guarantees the integrity of the plaster for 7-10 years).
Against this background, you can correct the idyllic picture by mentioning the shortcomings that plaster for ceilings in residential premises has.
Flaws
It should be said right away that self-repair always means significant cost savings. However, when you do plastering work yourself, only your skill and skill can guarantee you good quality work. If you hire professionals for such work, plastering ceiling surfaces will become an expensive pleasure for you. Do-it-yourself plastering of an apartment ceiling will cost you more in terms of labor costs than installing a suspended ceiling system made of PVC panels or plasterboard.
Let's return again to the manufacturability of plastering panels. The current limitation on the thickness of the applied layer of 5 cm will not eliminate significant level differences on the ceilings.
And one last thing. Plastering a ceiling with your own hands is not as simple a task as it seems at first glance. To do this, you need to have certain skills and abilities, an idea of how painting and plastering work is carried out. When you start plastering a ceiling surface for the first time, it is difficult to achieve a perfectly smooth coating the first time. When working with suspended structures, the result the first time can be more or less tolerable.
Leveling a curved plasterboard surface with plaster
In order to correct mistakes made during installation of a plasterboard ceiling or wall and prepare it for finishing, you will need:
- Spatulas – wide and narrow.
- Gypsum plaster.
- Putty for seams and finishing.
- Primer “Concrete contact and roller for its application.
- Paper tape, sickle mesh or fiberglass, cut into strips about 7 cm wide.
- Construction mixer, container for mixing the mixture.
- Long level or rule.
Let's get to work. The first stage is sealing the seams and preparing the surface.
- We remove chamfers from the edges of the plasterboard sheets with a sharp construction knife, if this was not done before installation.
- We prime the seams. After drying, fill them with a special putty for seams. We reinforce the joints: if paper tape is used, it is glued exactly in the center of the seam onto the putty; for fiberglass it is better to use PVA glue.
- The holes from the screw heads are covered with the same putty mixture.
- After drying, the entire plasterboard surface is primed with “Concrete Contact” primer.
Primer of drywall before applying plaster will prevent the material from getting wet and will improve the adhesion of the plaster mixture to the smooth cardboard surface.
How should you plaster drywall to level it? Further actions depend on the scale of the irregularities.
If the recesses on the surface are small, you can use the peel-off plastering method:
- The recess is filled with plaster mixture.
- The solution stretches as a rule. The recess turns out to be filled with plaster; on a flat area its layer will be small.
For more serious unevenness and distortions, you should use a beacon profile, which is leveled so that after applying the plaster a flat plane is obtained.
After the plaster has dried, the surface should be sanded and puttied in the usual way. For painting you will need to apply 2-3 layers, for wallpaper one will be enough.
Construction forums reveal a picture of the leaders among leveling mixtures used in modern repairs. Mixtures of Knauf, Ceresit and Vetonit have become popular putty compositions for interior work on drywall. The surface on which it is planned to apply the first rough layer of putty must be cleaned of dust and grease stains. Plasterboard sheathing should not contain irregularities at the joints and protruding parts of fasteners.
If such defects exist, then the connecting seams are cut with a knife, and the heads of the screws are deepened by 1 mm.
- the solution is collected from a bucket with a narrow spatula and evenly distributed on a wide canvas;
- a wide spatula is used to distribute the gypsum mixture (the optimal layer thickness is 1.5-2 mm);
- after distributing one batch, unevenness is removed with a wide tool, the material is removed from it with a narrow spatula;
- the resulting surface is left alone to harden for one day.
This event will help avoid the appearance of cracks at the joints of drywall sheets. Before starting, check the correct fastening of the screws. They should be recessed into the sheet by 0.7-1 mm. If the caps protrude, they are screwed in to the required depth.
Plastering a plasterboard ceiling requires high-quality and proper preparation of the surface. The entire scope of work is assessed in advance. If the ceiling is simply flat, then there will be no problems with the preparatory work. It is important to ensure that the heads of the screws are tightened (but without excessive zeal), so that when puttying the spatula does not cling to them. When working with drywall, no special construction equipment is required.
You also don’t need to have any special technical skills. However, the minimum set of tools for carrying out high-quality repairs should be: To putty the ceiling of wet rooms, it is better to use cement-based mixtures, although they are more difficult to level and sand. For ordinary rooms, waterproof polymer compositions are chosen.
Plasterboard putty
So, we found out that instead of plaster, putty should be applied to the gypsum board. In this case, the question may arise as to how much it is really needed. Some people believe that it is enough to apply a primer to the surface of the plasterboard wall under the wallpaper, but this decision cannot be called correct.
Putty in the case of gypsum plasterboard performs the following tasks:
- Fills seams between sheets, strengthening weak joints.
- Masks recesses from self-tapping screws, with the help of which plasterboard sheets are attached to the frame, prevents the appearance of rust from screws on the finish.
- Hides small cracks and dents that may appear during installation.
- Allows you to make a surface for painting so that it looks perfectly even and smooth.
- When preparing gypsum board for wallpapering, it forms a protective layer that prevents the wallpaper material from sticking “tightly” to the cardboard surface. If you skip the puttying stage, during subsequent repairs you will not be able to remove the wallpaper from the plasterboard wall without damaging it.
Important! Various putty mixtures are used to seal the seams between sheets of drywall and putty the entire surface. In the first case, you need to use a special putty for the seams, for example “Knauf Uniflot”, in the second - a finishing thin-layer putty mixture.
You can read about the rules for sealing seams using paper tape or sickle tape here.
The technology for puttingtying drywall from “A to “Z” is described in detail here.
When is it permissible to apply plaster to drywall?
Plasterboard walls and ceilings can be plastered in one single case: when the structure is installed unevenly and of poor quality. If mistakes were made during the installation of the frame, the profiles or wooden beams were not level, the finished plasterboard surface may have deflections and protrusions, and it may be filled up.
In this case there are two ways:
- Remove plasterboard sheets, disassemble the frame and mount everything again.
- Level the surface with plaster.
Since they can be damaged during the process of dismantling and reattaching the sheets, in some cases it will be easier to plaster the surface.