Before you begin any type of work, you need to acquire all the equipment. Then the process will go much faster, because you won’t have to be distracted by looking for a small device that you can’t do without.
Applying decorative plaster is no exception. There is also a minimum set that allows you to do everything correctly and quickly.
What is hidden behind the word “trowel”, and what types of it exist?
Neither a mason nor a plasterer can do without this tool. One name hides a large number of devices that have a similar structure, but perform different functions:
- Mason's trowel - has the shape of a triangle with a smoothed top or a trapezoid. Using this tool, the mortar is collected and distributed over the brickwork. Also suitable for mixing small quantities of solution.
- The jointing trowel is used to refine the seams of brick or stone masonry. The working surface of the tool is always narrow, but the configurations are different (flat, concave, convex - the appearance of the seam depends on the shape).
- The finishing trowel is always trapezoidal. With its help, it is convenient to mix the plastering solution, collect and measure bulk substances.
- The plaster trowel has the shape of a drop, with a handle attached to the wide part of it. Using this tool, it is convenient to apply a solution of any components to the wall and level it.
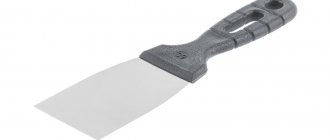
- The trowel is a flat rectangular trowel. It is used for leveling and rubbing mortar that has begun to set. Creates a smooth and aesthetic surface.
- A corner trowel is suitable for making even corners of a building. There are options separately for internal and external wall joints. Some stores also offer universal devices.
- The notched trowel is used to apply adhesive to tiles or mineral wool. It is similar in appearance to a trowel tool, but has jagged edges on one or two edges.
There are other types of this tool, which, of course, are not necessary to buy if in the future there are no plans to professionally plaster facades. Some options are interchangeable. All presented trowels have one design, which consists of:
- Metal plate - the material is well ground and polished. The size and shape of the working part differs depending on the type.
- Handles – made of metal, wood or plastic. There are options with a combination of materials.
- Curved transition from plate to handle. Each tool is different, since the bend is adapted to a specific type of work.
Attention! When purchasing, make sure that the tool is comfortable to hold in your hand, as well as the condition of the metal plate. If there is a defect, do not take such a trowel.
Surface Preparation Tools
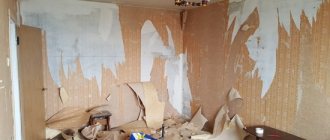
Let's start with the fact that walls and other bases need preparation before plastering.
What to do:
- remove paint, wallpaper, and previous coating from the wall (in whole or in part);
- repair chips and cracks;
- remove stains;
- cut down the ledges;
- embroider seams in stone or brick masonry;
- make notches on the concrete;
- clean the surface from dust;
- prime.
Preparation for plastering also includes measuring work, installing beacons, reinforcing or filling shingles.
Old finishes are removed by hand or with power tools.
Hand tool.
From hand tools you will need:
- hammer (possibly a sledgehammer);
- ax (for cutting down sagging, making notches);
- long chisel (beating old plaster, making notches, cleaning masonry joints);
- scraper (for cleaning masonry joints from mortar);
- Troyanka, zubchatka (types of chisels with teeth on the blade);
- scraping (removing gypsum coatings where access is difficult with other tools);
- spatula (removing wallpaper, paint, loose thin layers of plaster);
- metal brush (cleaning masonry joints, cracks, scratching the surface of bricks, cleaning rust from plastered metal products);
- jointing (sampling mortar from masonry joints);
- cloth-based sandpaper (removing thin-layer mortar).
Of the hammers, which differ in weight and shape of the impact head, the most suitable for plastering work are:
- cam (up to 1.5 kg, wide impact surfaces) for striking a tooth, chisel or treble;
- bush hammer (weight of the toothed head is up to 1.5 kg, the shape of the teeth is pyramid-shaped) for making notches, removing paint coatings, sanding, cutting down small protrusions;
- plaster hammer (weight from 400 grams, the head is not symmetrical, one half with a striker, the other with a pick) for cutting down old plaster, making notches, filling shingles.
Power tools for preparing walls.
It is better to prepare large surfaces using power tools with replaceable attachments:
- hammer drill (for installing dowels, and with an attachment in the form of a wide chisel, suitable for beating old plaster);
- a grinding machine LSM, PShM or angle grinder (angle grinder), simply a grinder (useful for cutting old coating into squares);
- an electric drill with a bumper function;
- vacuum cleaner (to remove dust).
To carry out measurements and markings for placing beacons, use:
- plumb line (with cord);
- building level (bubble);
- roulette;
- squares (metal and wood);
- metal ruler;
- marker or pencil;
- long strip with a smooth side edge;
- nylon cord (useful for measuring and installing beacons).
Separately, it is necessary to mention the laser level, with the help of which marking, measurements, installation of beacons and quality control are performed faster and easier.
You may also need:
- a screwdriver or screwdriver for screwing in self-tapping screws before installing beacons or for taking measurements.
- scissors or a retractable construction knife (for cutting sickle tape, masking tape and other materials);
- Maklovitsa brush for wetting the surface, sweeping away dust, priming;
- roller (preferably foam) for applying primer.
Tools for plastering work, such as levels, hammers, and an angle grinder, are useful around the house and for other purposes. But there are tools that have long been used by plasterers directly for applying, leveling and forming mortars. We should talk about it in more detail.
Types of finishing rollers
A simply plastered facade is boring, so the owners come up with different ways to make the appearance original.
The creators of construction tools picked up this idea, and now there are rollers that can be used to create interesting and unique designs on wet plaster. These tools will be divided according to two criteria:
- the material from which they are made;
- final drawing.
Let's start with the first point. In relation to the material, rollers are:
- Plastic ones are the most popular among beginners. They are easy to work with. They leave a clear pattern in the form of brickwork or a clear pattern. Their price is also attractive. But such rollers are only suitable for a small area of work. With constant use, cracks or chips appear, which distorts the result.
- Wooden ones resemble their plastic counterparts. Over time, the wood swells and the design loses its clarity. If you plan not to use the instrument for a long time, dry it thoroughly.
- Rubber - this type of roller is used by professional craftsmen who constantly work with decorative plaster. They are expensive, but retain the size and shape of the pattern for a very long time, regardless of the frequency of use. In addition, to obtain a high-quality ornament, special working rules are followed.
- Leather - you can’t do without them when creating Venetian plaster. Genuine leather leaves an imprint that resembles a pattern on marble.
- Fleecy - made from natural or artificial fur. Before purchasing, decide what effect you need. The smaller the pile on the tool, the smoother the surface will be. Longer hairs will create a bright and unique pattern. This roller is suitable for creating a “fur coat” on the facade.
- Foam rubber - seal craters or traces of burst bubbles on wet plaster.
As for the pattern created by the roller, there are the following options:
- Imitations of textures, for example, marble, wood, pile. Leather, fleecy and fabric tools are suitable for this.
- Applying a clear pattern or ornament. In this case, choose a wooden, rubber or plastic option.
What will you need?
Plastering the facade is carried out in several stages:
- surface leveling;
- applying a decorative layer;
- creating a drawing.
Each of them requires its own sets of tools, some will be useful both in the first and in subsequent stages. Before starting a specific area of work, all working equipment is assembled.
For surface preparation
Decorative plaster cannot hide flaws on the wall, so first the surface is leveled and a base is created for applying a decorative layer. In addition, additional plastering acts as insulation.
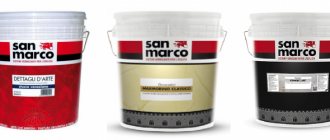
- Containers for mixing the solution.
- Hammer with mixer attachment.
- Plaster beacons are needed when the applied layer exceeds 1 cm. Although professionals recommend installation for beginners even with a smaller amount of work.
- Bucket for pouring mortar.
- The rule is to help quickly level the rough layer. Installed beacons will also speed up the process.
- Small spatula. With its help, it is convenient to remove the remaining mortar from the rule and add it to the wall in those places where there is not enough of it.
- A trowel or float to create the most even layer possible.
For finishing
After the rough layer has dried, you can apply the decorative plaster composition. Now use a different set of tools:
- Containers for mixing the solution.
- Construction mixer and hammer drill with attachment.
- Wide spatula for applying the solution.
- Ironing irons.
To create patterns
The most important and difficult stage is creating patterns. Here it is important to remember with what force and in what direction the first drawing was applied. It is advisable that one person work on the same area with the textured layer. Each drawing has its own device:
- "Bark beetle" - plastic graters. The pattern depends on the geometry of the movements (circular, horizontal, vertical, diagonal).
- “Fur coat” is a fluffy roller or an unnecessary piece of fur.
- Ready stamps. They are pressed tightly onto the dried layer of plaster and the design is imprinted.
- Rollers with a pattern.
- Available means are brushes, washcloths, a plastic bag or burlap wrapped with a regular roller.
Professionals who constantly work with decorative plaster come up with their own designs and patterns, as well as methods for creating them. In their work they use small spatulas, trowels of various sizes, a scraper and even cutlery.
Textured processing of the facade is a flight of fancy both for the owner of the house and for the craftsmen who perform the work. Not only the pattern and tools are selected, but also the color or method of painting.
For mechanization of work
If the amount of work is very large, then it is physically difficult to cope with everything. To make the application process easier, I use a plaster gun. Comprises:
- a compressor that pumps air;
- containers for solution;
- nozzles of different sizes through which plaster is thrown under pressure onto the wall surface.
The use of a mechanical method of applying the solution has the following advantages:
- Speeds up the application process.
- Allows the solution to adhere to the base 100%.
- You can control the thickness of the applied layer.
- Reduces the amount of waste in the form of splashed solution or fallen pieces.
- Simple technology of use allows even beginners to work.
- The applied layer turns out to be quite even, so you will have to work with the rule a little.
One disadvantage is the cost. It is not worth buying such a device for one-time use. If you want to plaster the facade yourself, it is better to rent a car from a construction tools rental company.
Tools for leveling mixture
In addition to the decorative mixture, there is also a leveling mixture. What tools are needed for plastering walls in this case. Of course, these are rollers. With their help, you can trim the mixture and make sure that it does not drain from the surface. Unlike embossed plaster rollers, regular tools do not contain any patterns. They are made of plastic or foam rubber.
Leveling putty can be done using a regular roller
In addition to rollers, you will definitely need a corner for plastering slopes. This tool is a curved metal perforated profile. A small amount of the mixture is applied to it, after which it is slightly sunk into the solution. Its position is checked by level. Ideally, the corner should lie tightly between the wall and the slope.
The perforated corner for slopes is reinforced with reinforcing mesh
Rubber, metal and plastic spatulas, rules and trowels, as well as tools for troweling dry putty or removing its residue from the surface, are used when applying leveling plaster, just like rollers.
How to make a Venetian?
This decorative finish looks rich and attractive. With the help of the Venetian, they create the effect of marble or aged stone. You can apply this plaster to the base using the following tools:
- Containers for mixing solutions.
- Construction mixer.
- Compositions for tinting.
- Thin spatula for mixing and collecting mortar.
- Wide spatula for applying the solution.
- Skins for sanding.
- Rags.
To create Venetian plaster, several shades are used. To begin with, decide on color schemes. Then a base solution is prepared. This layer is applied continuously to the base.
After it dries, the second and third solution are lighter shades, which form the desired pattern. When everything is ready, you need to remove excessively protruding areas, sand them and, if necessary, open them with wax.
How to create complex patterns on a surface?
Drawing on wet plaster is not a difficult process, but it requires a responsible attitude and time. When applying, take into account the consistency of the solution, the tool with which they are working, and the strength and direction of pressure. But there are ways of decorating that only real masters can do:
- Stencil application.
- Modeling using plastic gypsum mortar.
- Varnishes that peel or tear as they dry. In this way, a multi-colored painted surface is obtained.
- Acid etching.
Plastering is not as boring as it might seem to an ignorant person. Solutions applied using different methods and tools create designs that are different from each other and allow you to create an original design not only for the interior of the house, but also for the façade.
Advantages of decorative plaster
Decorative plaster is in great demand in the construction market due to its high aesthetic and performance qualities:
- Increased strength characteristics – ensure the reliability and resistance of the coating to various mechanical influences.
- Good adhesion to different types of substrates - concrete, brick, aerated concrete, etc.
- High plasticity - allows you to hide minor defects and minor unevenness of the surface being finished.
- Crack resistance – the finished coating does not form cracks during natural shrinkage deformations.
- Moisture resistance - can be used even for finishing rooms with specific temperature and humidity conditions and facades.
- Undemanding to surface quality - if there are no significant defects or irregularities on the walls or ceiling, the base is sufficiently primed and a decorative mixture can be applied.
- Durability – if the application technique is followed and proper care is taken, the decorative coating will last for decades.
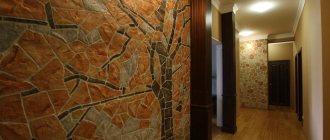
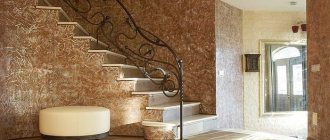
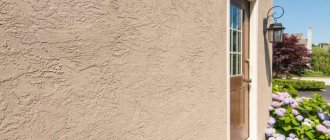
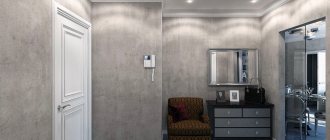
Original types of wall surfaces decorated using decorative plaster