Types and colors of siding with imitation timber
At the moment, several main types of products are produced, differing in the resulting external coating.
Wood
The traditional material is made from recycled wood. The panels are produced by pressing wood fibers and cellulose, which allows for a natural-looking surface. Decorative and protective impregnations determine the color scheme and can emphasize the existing texture. But the product has disadvantages: a predisposition to deformation and the need for re-processing.
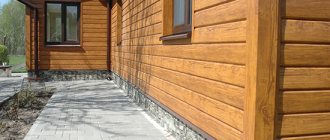
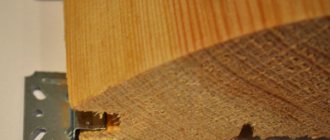
Natural wood requires periodic treatment with protective compounds
Vinyl
This siding is made from PVC and special additives. Thanks to the different color palette and texture, it is possible to achieve a stunning imitation of the natural surface of wood. Different options allow you to show your individuality.
Although plastic has a lot of positive characteristics, its significant drawback is the possibility of fading, to which inexpensive options are especially susceptible. Therefore, an acrylic variety that has rich colors and UV resistance can be used as an alternative. But this material is very expensive and not widely used.
Metal
Metal finishes do not fade in the sun and are considered the most durable
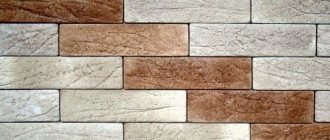
Among all the options, metal siding under timber is the most successful solution and allows you to accurately imitate a wide range of wood surfaces:
- Pine. With a glossy or matte effect and a well-defined texture.
- Oak. Stained and textured golden.
- Cedar. With a pronounced texture.
- Nut. In a variety of colors.
- Maple. Preferably with a glossy effect.
- Cherry. With rich color, it can have several options.
Metal siding can be decorated to resemble any popular type of wood
Each manufacturer has its own line of metal siding for timber, which must be taken into account when choosing a material, since to cover a house, all elements (main and additional) must be from the same company.
It is necessary to ensure the quality of the products; all certificates and detailed characteristics of the panels must be available.
Types and types of panels
The main materials from which timber siding is made are metal and vinyl.
It happens that instead of such a thing as metal siding, you can hear eco-timber. In fact, these are synonyms and the same name for the same material. Eco-beam is one of the brands of siding.
Siding, which in its appearance resembles rounded or regular timber, is very popular. Although the construction market offers a considerable selection of shades and textures of wood.
Metal siding, such as eurobeam, is made with locking fastening, in the form of double-row or single-row panels, and looks like a real profiled beam made of natural wood.
The main advantages of eurobeams:
- It easily matches with any siding.
- It is resistant to sunlight and all weather conditions.
- Not subject to destruction at different temperatures.
- Due to its light weight, there is no need for an additional foundation.
- Reflects the sun's rays, as a result of which the facade does not heat up.
Types of imitation for timber
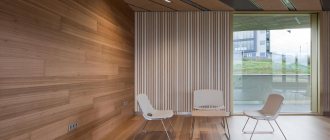
Imitation timber is a material for external and internal finishing of buildings, made from natural wood - mainly pine, spruce or larch.
In fact, this is a type of lining, assembled repeating the texture of the surface of a wall assembled from planed timber.
It is a flat board with beveled edges, having a groove on one side and a tenon on the other for consistent assembly.
On the reverse side there are longitudinal compensation grooves that equalize stress when gaining or releasing moisture, and also promote air movement.
Imitation timber is divided into grades according to the quality of the surface - the number of flaws per 1 linear meter, the number of knots, the presence of cracks, etc.
Basically, glued imitation timber is made, consisting of individual dies, spliced in the longitudinal direction into one panel of the required length.
IMPORTANT! The wood is also intended for outdoor work, so it goes through a full drying cycle and is impregnated with compounds that protect against rotting and fire - antiseptics and fire retardants.
Based on quality, imitation timber is divided into groups:
- A (Extra) - the highest grade of panels, without knots (or a maximum of 3 small ingrown knots per panel), without surface defects. The most expensive type;
- AB - transitional type between highest and first grade, there is minor surface damage, small knots;
- B - the presence of a small number of small irregularities and microcracks. More than 3 knots located on the front side of the panel are allowed;
- VS - a transitional type between low and medium quality, the presence of falling out (dead) knots with a number of more than 3 per 1 linear meter. panels, there are non-critical chips or violations of the integrity of the tenon or groove;
- C - chips, falling knots or cracks are possible without affecting the performance of the material. Resin pockets are allowed.
Not allowed:
- Through fallen knots;
- Resin pockets wider than 8mm;
- Presence of wane on the front side;
- The presence of “fringe”, which is a consequence of poor-quality surface treatment.
The thickness of the panels ranges from 16 to 35 mm, the width is in the range of 110-190 mm.
Kinds
Types of siding
Siding - decorative metal panels intended for cladding facades and lining cornices. It is possible to produce three types of profiles:
“Shipboard”, “Lbrus”, “Woodstock®”, as well as “Lbrus” soffits. The panel is made of thin galvanized steel with a polymer coating in various colors, including imitation of various natural materials.
“Shipboard” siding is the classic, most popular siding profile. Thanks to its shape, it is easy to install and convenient to use. Most often used for wall cladding. Source material: rolled galvanized steel with polymer coating.
Panel characteristics
| Siding name | Metal thickness, mm | Length, mm | Full width, mm | Working width, mm | Profile height, mm | Weight 1m2, kg |
| Ship board MP SK 14x226 | 0.4; 0.45; 0.5 | up to 6000 | 260 | 226 | 14 | 3.96; 4.24; 4.71 |
| Lbeam 15x240 | 0.4; 0.5 | up to 6000 | 264 | 240 | 15 | 5.19; 5.69 |
| Woodstock ® 28x330 | 0.45; 0.5; 0.7 | up to 6000 | 356 | 330 | 28 | 4.13; 4.59; 6.42 |
Additional elements
Arrangement of obtuse and acute angles
Sharp or obtuse angles can occur in the presence of decorative architectural elements, for example, bay windows. To create an obtuse angle, you should lean the corner profile against it and, pressing it, slightly move the profile flanges until the desired configuration is obtained.
Then the installation is carried out according to standard methods.
An acute corner is formed by squeezing the corner profile from the sides to achieve the desired shape. Then install the profile in its proper place.
CAREFULLY!
In order not to destroy the protective polymer coating, operations to bend the profile are carried out carefully, without too sharp bends. Destruction of the coating will cause rapid corrosion and render the part unusable.
Setting obtuse angles
Installation of an acute angle
What is better – siding or imitation timber?
It is difficult to correctly compare siding and imitation timber - different materials, characteristics, type of installation, operational features.
However, the most striking features can be identified:
- First of all, prices for siding and imitation timber vary significantly: siding is almost twice as expensive;
- Siding does not change either the characteristics or appearance. Imitation timber requires periodic maintenance - impregnation, protective coating, painting, etc. Without this, the natural material will blacken and rot;
- Imitation timber withstands mechanical loads better - no dents are left upon impact, the wood is stronger and stiffer;
- Thermal expansion characteristic of vinyl panels is practically absent in imitation timber;
- For natural material there is practically no difference in the installation location - vertically or horizontally;
- Imitation timber does not emit harmful substances, as happens with vinyl siding.
From the point of view of operation, siding is the leader, since it does not require maintenance and does not change its properties and appearance over time.
However, for supporters of natural materials, environmentally friendly and safe, the choice of imitation timber is undeniable and obvious. Both points of view have a right to exist, providing users with a choice based on personal preferences.
Siding
Imitation
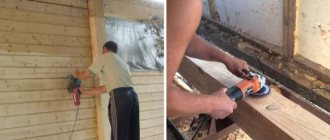
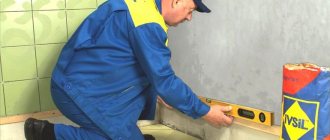
Preparation of lathing and insulation of walls
Before directly installing the siding, it is necessary to install the sheathing, which will serve as a support for the panels. In addition, external wall insulation is often carried out, which helps save thermal energy and improves the microclimate inside the house.
To carry out these operations, which are most often carried out in parallel, it is necessary to install sheathing on the walls - strips corresponding in thickness to the size of the insulation.
The best option for external wall insulation is stone wool slabs with a thickness of 50 mm. Thus, horizontal rows of sheathing are installed, between which the insulation is attached.
After this, a layer of waterproof membrane is attached to the surface of the installed insulation, which facilitates the release of steam from the inside, but does not allow moisture to penetrate from the outside.
Then a vertical layer of counter-lattice is installed, which will serve as a support for the siding panels and at the same time provide a ventilation gap for free air exchange in the space between the sheathing and the wall pie. The thickness of the counter-lattice must meet the requirements for ventilated facades and be at least 40 mm.
Wood can be used as a material for sheathing, but experts strongly recommend using plasterboard guides, which are easier to adjust to obtain a flat plane necessary for installation work.
Lathing and siding insulation
Installation of Eurobrus metal siding
The technology for finishing facades using metal siding Eurobrus is standard, but requires the use of special connecting elements.
Material calculation
Metal Eurobeam has clear geometric parameters, so it’s not at all difficult to independently calculate the required materials. First you need to determine the exact area of the facade.
If the surface to be covered has the correct geometric shape, you need to multiply its length by its height and subtract the area of doors and windows. It is better to entrust the calculation of materials for cladding facades of complex shapes to specialists.
When purchasing material, you need to add 7-10% for waste when cladding rectangular facades. Waste from decorative finishing of facades of complex shapes will be at least 15%.
Preparing the object
Before covering with Eurobrus siding, preliminary preparatory work is carried out: lighting fixtures, drainpipes, cables are dismantled, and the walls are cleaned of dirt.
The preparation of load-bearing walls depends on the material of manufacture. Reinforced concrete and brick foundations require high-quality sealing of seams and cracks.
Wooden surfaces require special attention. The peeling wood is removed, all seams are repaired with oakum or sealant. Clean walls are treated with antiseptic agents that protect the wood from mold and bugs.
Finishing of a newly built wooden house does not begin immediately: at least a year after completion of construction. This will prevent the siding from deforming.
What will you need for work?
For installation of a ventilated facade and further finishing of external walls with Eurobrus siding you will need:
Metal siding Eurobeam is a durable material that requires the use of specialized devices for cutting. Cladding work requires the use of the following tools:
- laser level;
- roulette;
- Bulgarians;
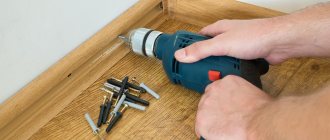
- screwdriver.
Installation of sheathing and wall insulation
Using a laser level, they mark the walls and install the corner elements of the sheathing. The metal profile is fixed with screws to special fastenings. The pitch of the lathing depends on the size of the insulation and vapor barrier material.
To prevent the formation of condensation and natural air circulation, a vapor barrier layer of film or membranes is laid. Any heat-insulating material is placed tightly between the metal profiles.
In the northern regions, multi-layer insulation is practiced.
Windproof membranes are laid on top to protect the walls from blowing, and the insulation from moisture and condensation.
By the way! It will be interesting to know: Foundation insulation with polystyrene foam: technology
Siding installation
The final stage in finishing the facade is the installation of siding. Cladding work begins from the corners of the house. Metal panels are fastened from bottom to top.
To prevent deformation of the material during thermal expansion, the screws are not tightened completely, leaving a small gap for natural movement.
That's all. Installation of Eurobrus siding is completed. With minimal labor costs, a nondescript house was instantly transformed and looks like new.
Additional elements
Each series of metal siding is completed with a set of special elements for decorating corners, door and window openings, as well as finishing and starting strips. offers additional elements, the front sides of which, in color, shade and texture, completely coincide with the main series of metal siding.
Depending on the selected series of metal siding, various fasteners may be required during installation. For example, the Woodstock series allows installation using simple self-tapping screws.
To create a load-bearing frame, you will need fastening brackets, and to fix sheets of metal siding and decorative elements, fastening clamps and screws. Depending on the selected series of siding and the length of the sheets, a different amount of fasteners will be required.
If the space under the siding is planned to be filled with insulation, then it is necessary to calculate its quantity, as well as fasteners for the heat insulator. Consultants or measurers will help you accurately calculate the required amount of a particular fastener.
The warranty on a metal profile can be up to 20 years, but the installation technology must be followed. If installation is incorrect, no warranty is provided; corrosion or destruction of the siding as a result of mechanical stress during transportation, installation, or operation is also not covered under warranty.
Installation
Installation of metal substructure
Before installation begins, it is necessary to clean the surface of elements unrelated to the base (detached plaster, paint, etc.), as well as dismantle elements of the drainage system, antennas, signs, etc.
A hydro-windproof membrane with an overlap of 150 mm is installed on top of the insulation.
The L-shaped profile is installed perpendicular to the direction of the siding panels. For horizontal installation – vertically.
The design of the brackets allows for leveling (straightening) of the sheathing plane up to 30 mm to create a flat surface for the siding. If this is not enough, then it is necessary to install brackets of a different length or a bracket extension.
To remove condensation from the insulation in the system, it is necessary to provide a ventilated gap of at least 40 mm.
Installation of additional elements
Additional elements are decorative elements used for cladding walls with siding, at joints, corners, slopes, etc. Additional elements are divided into complex and simple.
For the normal functioning of the ventilation facade system, it is necessary to leave gaps (40 mm) between the surface of the insulation (hydro-windproof membrane) and the internal structure of the cladding, as well as: at the base, under and above the windows, under the roof eaves.
Installation of simple shaped (additional) elements is carried out after installation of wall panels.
Installation of “Shipboard” siding
For ease of installation, the edge of the siding lock must be cut at an angle of 45 degrees with metal scissors on both sides.
The first strip of “Shipboard” siding is inserted under the lower part of the initial strip, providing a locking grip; the upper part of the siding is attached to the guides with 4.2x16 self-tapping screws in the perforated holes.
After installing the siding panels, the last row with perforations, the junctions with the roof, and the joints of the window and door opening are closed.
Installation of siding Lbrus
Installation of Lbrus siding is carried out from top to bottom, from left to right. This is due to the geometry of the lock, since when installed from the bottom up, precipitation may enter the siding lock, which can lead to negative consequences.
Installation begins with the installation of the PZS-30x25x3000 strip. The first row of siding is inserted into the strip and fixed with 4.2x16 self-tapping screws to the substructure: the self-tapping screw is placed in the center of the perforation hole with some clearance to compensate for temperature deformations.
Installation of Woodstock ® siding
Woodstock ® siding accurately reproduces the relief of log masonry and has a deep profile geometry that completely recreates the pattern of natural wood.
The Woodstock ® siding lock creates a barrier for water, thereby preventing it from penetrating inside and freezing, damaging the integrity of the structure.
This lock makes it possible to install Woodstock ® siding both from the bottom up and from the top down.
Top-down installation option.
The first row of siding is hooked onto the starting strip PNW-12x15x3000. The bottom of the panel is fastened with self-tapping screws to the substructure: the self-tapping screw is placed in the center of the perforation hole with a gap to compensate for temperature deformations.
Subsequent rows of siding interlock with each other and are fastened in the same way. Using a level, you can check the horizontal installation of the siding panels.
By the way! It will be interesting to know: Designs of houses covered with siding, photos of finishing options for private houses in different colors
If the last panel of siding is larger than the size required for the project, it must be trimmed to the required size, install a Z-bar and rivet the last panel of siding.
If there are any external objects in the wall, such as drainpipes, electrical wiring, you need to cut a hole 6-10 mm larger than the device itself.
Installation of window and door frames
Adjusting siding around windows.
- First, the panel is tried on so that the edges protrude from both sides of the window opening. Then the width of the window is noted, with the addition of 6-10 mm. The resulting marks will show the locations of the vertical cuts.
When installing door and window frames, you must first install the top parts, then the side ones.
Completion of installation.
The final touch is framing the top edge of the cladding. Depending on the situation, it can be done: with a window sill, a fastening strip or an internal corner.
All these elements are fastened with self-tapping screws. Step 300 mm.
Types, sizes, prices
Siding l timber can be of two types. “Premium” is made from steel that was produced in Korea. The cost of the material is from 400 rubles per 1 sq. m. "Economy" a polyester coating is applied to the steel plate. Its price is 300 per m2.
Each company sets its own siding sheet size. But basically the sizes are as follows:
- The length of the planks is from 0.8 m to 8 m;
- Width – range from 22.6 cm to 36 cm;
- Overall profile width – 26-39 cm;
- The height of the siding panel is from 12 to 15 mm;
- The thickness of the strip is 0.8-1.1 mm.
Step-by-step installation instructions
The finishing set includes:
- Start and finish bar;
- H-profile;
- Planks for internal and external corners;
- Soffits;
- Types of platbands;
- Moldings;
- Near-window profiles;
- Slopes.
Preparatory work
Before installing siding on a building, you must first install the sheathing. It will serve as a support for the panels. You can also use insulation. Often these operations occur together. Therefore, the planks must meet the parameters of the material for thermal insulation. Then a waterproof membrane is attached to the walls. It removes steam outside and prevents moisture condensation.
After this, the counter-lattice is mounted vertically. It provides the necessary ventilation gap. It also serves as a support for siding panels. The thickness of the counter-lattice must be at least 40 mm. Wood is used for this purpose. But builders recommend using drywall.
Setting the starting line
It is mounted horizontally at the very base of the building. To do this, select the lowest point and draw a line along the perimeter 40 mm above it. Its evenness must be checked using a level. The next panel is installed at a distance of 6-10 mm from the previous one, so that when expanding, the planks do not stick out against each other.
Covering building corners
To cover an obtuse corner, you need to lean the profile against the building. Then press it in, while slightly moving the shelf of the siding profile apart. To cover an acute angle with a profile, you need to squeeze it from the sides until the desired shape appears.
Installation of vertical corner strips and H-shaped connector
Corner profiles can be complex or simple. They differ from each other in that the complex ones have recesses for the ends. They are mounted vertically using a plumb line. Fastenings for self-tapping screws are made at a distance of 0.2 ÷ 0.3 mm. Installation of complex profiles occurs immediately after the initial strip has been laid. Simple ones are installed after installing the panels. The installation process is simpler and experts recommend using this type of profile when cladding a house yourself.
To create an aesthetic appearance of the building, an H-profile is used. It has special recesses for the ends of adjacent planks. It is installed after installing the initial strip. The evenness of the structure is controlled using a plumb line.
Window and door decoration
For such work, slopes, platbands, and J-profiles are used. To install all these elements, the lathing is first made. For this purpose, galvanized steel or wood is used.
Installation of finishing strip
This strip covers the top edge of the cladding. This strip helps prevent rainwater from getting inside. To do this, the last panel is slipped under the finishing strip. Metal lumber siding is a durable material for building cladding. Step-by-step instructions for installing the panels are described above.
You can do the cladding yourself, but if you do not have construction skills, it is best to turn to specialists. They will quickly, efficiently, and accurately carry out all types of work, and the façade of the building will bring aesthetic pleasure to the owners and strangers. But at the same time, your home will be reliably protected from any extreme weather conditions.
Installation of finishing strips
The finishing strip completes the paneling, covering the top edge of the panel. To install, the last panel is cut to the required width and the edge is tucked under the curl of the finishing strip.
The presence of such an element protects the canvas from rainwater entering from above . Installation of the finishing strip is carried out simultaneously with the installation of the top panel.
Installation of finishing strips
Step-by-step installation instructions
The finishing set includes:
- Start and finish bar;
- H-profile;
- Planks for internal and external corners;
- Soffits;
- Types of platbands;
- Moldings;
- Near-window profiles;
- Slopes.
Preparatory work
Before installing siding on a building, you must first install the sheathing. It will serve as a support for the panels. You can also use insulation. Often these operations occur together. Therefore, the planks must meet the parameters of the material for thermal insulation. Then a waterproof membrane is attached to the walls. It removes steam outside and prevents moisture condensation.
After this, the counter-lattice is mounted vertically. It provides the necessary ventilation gap. It also serves as a support for siding panels. The thickness of the counter-lattice must be at least 40 mm. Wood is used for this purpose. But builders recommend using drywall.
Setting the starting line
It is mounted horizontally at the very base of the building. To do this, select the lowest point and draw a line along the perimeter 40 mm above it. Its evenness must be checked using a level. The next panel is installed at a distance of 6-10 mm from the previous one, so that when expanding, the planks do not stick out against each other.
Covering building corners
To cover an obtuse corner, you need to lean the profile against the building. Then press it in, while slightly moving the shelf of the siding profile apart. To cover an acute angle with a profile, you need to squeeze it from the sides until the desired shape appears.
Installation of vertical corner strips and H-shaped connector
Corner profiles can be complex or simple. They differ from each other in that the complex ones have recesses for the ends. They are mounted vertically using a plumb line. Fastenings for self-tapping screws are made at a distance of 0.2 ÷ 0.3 mm. Installation of complex profiles occurs immediately after the initial strip has been laid. Simple ones are installed after installing the panels. The installation process is simpler and experts recommend using this type of profile when cladding a house yourself.
To create an aesthetic appearance of the building, an H-profile is used. It has special recesses for the ends of adjacent planks. It is installed after installing the initial strip. The evenness of the structure is controlled using a plumb line.
Window and door decoration
For such work, slopes, platbands, and J-profiles are used. To install all these elements, the lathing is first made. For this purpose, galvanized steel or wood is used.
Installation of finishing strip
This strip covers the top edge of the cladding. This strip helps prevent rainwater from getting inside. To do this, the last panel is slipped under the finishing strip. Metal lumber siding is a durable material for building cladding. Step-by-step instructions for installing the panels are described above.
You can do the cladding yourself, but if you do not have construction skills, it is best to turn to specialists. They will quickly, efficiently, and accurately carry out all types of work, and the façade of the building will bring aesthetic pleasure to the owners and strangers. But at the same time, your home will be reliably protected from any extreme weather conditions.
DIY installation
So, you have decided to install metal siding without third-party specialists, that is, with your own hands. We offer step-by-step instructions for solving this problem yourself.
Scheme for installing metal siding with your own hands.
If you have basic construction skills and are not afraid of work, then facade cladding will be up to you.
Read here how to level walls with plaster.
Remember: before you start work, you should purchase not only metal plates, but also additional elements (to match the panels):
- internal and external corners;
- initial and final slats;
- connecting strip;
- brackets and platbands.
The protective layer and the service life of the material are a direct dependence of the factors
The longevity of service provided by “L-beam” siding is primarily affected by the outer protective layer of polymer. Polyester film, which they decided to save on the quality and thickness of, thereby selling the skin cheaper, can remain in good condition for up to fifteen years. The minimum acceptable film thickness in this case is 25 microns. Further on, the higher the quality of the film, the more expensive the covering and the longer the service life. Thus, polyester with a thickness of 35 microns, which gives the siding a matte appearance, will provide you with a carefree existence in terms of the need to ensure a beautiful appearance for about 20 years. Pural with a thickness of fifty microns is characterized by retention of properties for up to thirty years, but plasistol (also a polyester derivative, so to speak) can withstand the sun, frost and wind for more than forty years.
Another remarkable advantage that metal “L-beam” (wood) or the same “beam-house” siding has is that it can be of any length. Compared to plastic siding, which has a fixed length not exceeding four meters, the manufacturer can cut metal panels to any length according to the buyer’s order from half a meter to six. Thus, you will be able to measure the length required specifically in your case, and decorate the facade with high-quality, durable material almost waste-free.
Profiles and sizes of metal siding for timber
To implement the design idea and create a presentable appearance of the coating, various profiles can be used.
Metal imitation timber is considered one of the best-selling types of home decoration
Eurobrus
The material is available in two versions: single-fracture and double-fracture panels. Modern production technology makes it possible to achieve a resemblance to profiled timber made of wood.
Single-fracture panels require more installation time
Eurobeam is divided into two types:
- Standard. It has a wide range of colors, selected according to a special table.
- Improved. With great accuracy it repeats the natural wood texture of various species.
Panel dimensions:
- width – 36 cm (usable size – 34 cm);
- length – up to 4 meters (maximum – 6 m);
- thickness – up to 1.1 mm, with profile bending – 20 mm.
Double-fracture siding is much easier to install since it is wider
The parts are easy to install and do not require special care.
L-beam (“Elbrus”)
Exterior finishing material, which is a type of metal siding. It is distinguished by its excellent imitation of small timber - up to 12 cm. It is considered a subspecies of Euro timber, although it is often considered as a separate option. This is because each manufacturer uses a different name for their products. The size is identical to the previous material, but taking into account the double fracture, the width is smaller - 24–28 cm.
The minimum width of the L-beam panel is 240 mm
Eco-beam
This cladding creates an imitation of glued wide boards, which is what makes it different from Elbrus. The panels have a two-row structure and are well suited for DIY home decoration.
Dimensions of parts:
- thickness – up to 0.8 mm when bending the profile – up to 22 mm;
- standard length – from 50 to 600 cm;
- width – 34.5 cm (useful – 32.6 cm).
Parameters of metal siding "Ekobrus"
Eco-beam and L-beam have different widths of parts; the second type is more like lining.
Types and types of material
As already mentioned, imitation timber is made of vinyl or metal.
The greatest demand is for material stylized as regular or rounded timber.
In addition, the market offers a huge range of textures and shades of wood.
Euro-timber - produced in the form of single- or double-row panels, externally identical to profiled timber made of natural wood. Equipped with a locking fastening.
House covered with imitation eurobeam
The main advantages of this type include:
- Euro timber can be combined with any other siding.
- Low mass does not have a harmful effect on the foundation.
- Reflects light and, as a result, prevents heating of the facade.
- Retains heat, thereby reducing heating costs.
- Euro timber is resistant to temperature influences.
- Resistant to weather conditions and ultraviolet radiation.
- Service life up to 20 years.
L-beam - allows you to create an imitation of natural wooden beam. Externally, L-beam is so indistinguishable from wood that your house will always seem as if it had just been built from a finished log house.
L-beam as a finishing coating
The name “L-beam” has two meanings:
- Mount Elbrus - since the shape of the siding groove is similar in shape to the outline of this mountain.
- L = Light, “lightness”, means the low weight of this siding and ease of installation.
With the help of L-beam, the façade can be finished as Euro-beam. There are two types of this finishing material:
- Economy class L-beam (made of steel coated with polyester).
- Premium-class L-beam (made of high-strength Korean galvanized steel with PRINTECH coating, which is visually almost indistinguishable from natural wood).
This type can be mounted both from top to bottom and from left to right using galvanized self-tapping screws. The length of the L-beam varies from 0.2 to 6 m. Each panel is covered with a protective film, which is removed after transportation and installation.
Varieties
The production of L-beam metal siding includes two main types - premium and economy.
Economy L-beam is made of steel, with polyester on top, which provides decorative and protective functions.
For the production of premium siding, Korean steel is used, which has high strength indicators. A high-quality application of the top layer cannot be distinguished externally from natural wood by color and texture.
Siding installation
Like any other siding, this type of cladding is installed on guides. To install the profile, use brackets that are fixed to the wall with anchor bolts. The distance between the guides is from forty centimeters to a meter. Installation of siding panels, according to reviews from builders, can be done in any direction, both horizontal and vertical.
For insulation purposes, slabs of mineral wool, expanded polystyrene and other materials are mounted on the wall. A waterproofing membrane is placed on top of the insulation layer, which will not allow moisture to accumulate.
Wood siding is installed using standard self-tapping screws. The special system has a special geometry, so installation must be done from top to bottom. The first panel is fixed into the guide bar until it stops. It is recommended to start laying from a corner. A finishing strip is attached to the bottom of the structure, which is aligned with the guides and secured with self-tapping screws. If there are no holes for fasteners, you should make them yourself in advance.
Otherwise, the installation of L-beam siding is carried out using the same method as installation of any other type. Self-tapping screws must be screwed into the center of the perforation, at a distance of no more than forty centimeters.
This siding is ideal for walls made of stone, brick, wood and other building materials. Possessing excellent characteristics, it will transform any building into a beautiful, noble structure, shown in the photo. And after watching the video, you will be able to install the siding l beam yourself, without involving a team of specialists.
Getting ready for installation
When preparing to install wood-look metal siding, it is necessary to take certain measures. This includes not only preparing the base of the external walls and installing a heat insulator, but also preparing the necessary tools, laying out the material, and installing the sheathing.
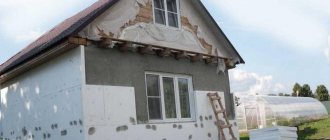
Preparing the base
Preparation of the base of the walls is carried out the same way, no matter what type of cladding you choose.
Although this process does not affect the strength of the facade finishing, it helps to avoid many undesirable consequences - cracks, holes, chipping, destruction of masonry, mold and mildew on the main wall.
Therefore, before you begin installing metal siding, examine the walls, identify the main shortcomings and try to eliminate them:
- removing old plaster or paint;
- sealing holes, chips, cracks;
- restoration of brickwork;
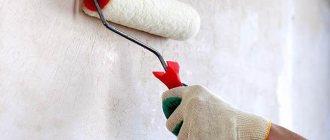
- plaster;
- putty;
- treating walls with primer.
Thermal insulation of walls
Thermal insulation of walls with metal siding for the facade can be done with any available material - polystyrene foam, penoizol, glass wool, mineral wool, basalt insulation.
Facade insulation
The most popular method is material that can be cut, since the distance between the lathing strips does not allow installing an insulator whose width exceeds 30 cm.
Installation of sheathing for metal siding
The sheathing can be of two types:
- metal;
- wooden.
The most durable option is a sheathing made of metal elements. For its installation, galvanized profiles are used, which do not require treatment with anti-corrosion solutions. It is recommended to use it if the main walls are built using brick, cinder block, as well as gas or foam concrete.
Sheathing elements are installed in increments of 30-40 cm, and in regions with bad weather conditions, for example, strong gusts of wind, the distance should be reduced to 20 cm.
When installing the structure, take into account the fact whether a heat insulator will be installed. Fastening of metal profiles is carried out using hangers, which in turn are attached to the wall of the house with dowels.
Any wood with a moisture content of no more than 12-15% is suitable for wooden sheathing. It is better not to use raw material, because when it dries, it can “lead”, and after it the siding will “move out”. Treat the guides in advance with fireproof mixtures, as well as solutions against insects and rot.
Installation of vertical strips - corners and H-shaped connector
Corner strips have two types of design - complex and ordinary. Complex corner profiles have special recesses into which the ends of the panels are inserted.
They are installed strictly vertically along a plumb line, fastenings with self-tapping screws are made in increments of 0.2-0.3 m. Installation of complex corner profiles is carried out after installing the starting strip.
Simple corners are installed after installing the panels. It is much easier to work with them, since they simply cover the joint of the planes. Such corners are fastened with self-tapping screws or rivets. Experts recommend that everyone who independently installs siding on their home use this type of corner.
The joint of the panels along the length can be made with a simple overlap, but the connection with an H-profile, which has recesses on opposite sides for installing the ends of the panels into them, looks more aesthetically pleasing. The H-profile allows you to design the connection more accurately, on one vertical line, which improves the appearance of the house.
It is also installed immediately after installing the starting strip; the vertical is checked with a plumb line.
Installation of vertical strips - corners and H-shaped connector
Benefits of metal siding
The main advantages of metal siding include:
Long service life. The total service life of metal panels can be up to 50 years. The guaranteed service life is about 20 years. It is worth noting that the warranty period means a service life during which the panels not only do not begin to corrode, but also do not lose color.
Resistance to mechanical stress. Metal siding can withstand significantly greater mechanical loads compared to plastic siding. At the same time, even after deformation it can be leveled, and, if necessary, the paintwork can be repaired without dismantling.
Safety. Metal siding is not only non-flammable, but also not a source of various allergens that plastic panels are “rich in”.
Minimizing costs. offers its customers individual panel sizes, which allows them to significantly save on fitting or cutting, eliminate joining elements, and purchase exactly the required amount of material without overspending.
Resistant to temperature changes. Metal siding panels have a coefficient of thermal expansion that is an order of magnitude lower than their PVC counterparts, which makes it possible to use this material without problems even in the most severe climatic conditions (from -300C to +700C).
Even the relatively high cost of metal siding does not cover all the advantages of this facing material.
High performance parameters are ensured by the metal siding structure:
The base is a steel load-bearing material. Provides the panels with the necessary rigidity
Protective coating – galvanizing is usually used. This coating provides long-term protection against corrosion while slightly increasing the cost of the profile.
Additional processing. Application of special additional protective layers that provide chemical and electrolytic protection.
Primer layer. Used to improve the adhesion of the paint layer and the base.
Paintwork. Can be applied both outside and inside the profile. Painting the profile on all sides can significantly increase its service life. In this case, the inside is usually covered with paint, and the outside with a special polymer film.
The use of polymer films allows not only to obtain the required color and shade, but also the texture of the pattern, while the films provide a longer service life without fading and have self-cleaning properties. Dirt particles do not linger on the surface of the film, which allows you to wash the facade much less frequently.
Material advantages
The material may have approximately the following dimensions
Finishing the facade with imitation timber, in comparison with other facing materials, has a number of advantages:
- Metal siding is covered with a polymer coating, which determines the appearance of the finishing material. A transparent protective layer is usually placed on top of the decorative coating, protecting the material from external influences. This structure allows manufacturers to establish a guarantee for repair-free operation of at least 10 years. In fact, such finishing material can easily last up to 50 years.
- The design of siding under the timber is such that its installation can be done independently.
- The finishing material is resistant to corrosion, high and low temperatures, and solar radiation.
- There is a wide range of variations in width, thickness, surface pattern, etc. on sale. The thickness varies between 0.4 - 0.7 mm, the most common width is 120 mm. Siding can be placed both horizontally and vertically.
- Damage from temperature deformations is eliminated due to the loose fit of the finish to the facade. The same installation feature ensures good ventilation.
- Insulation can be installed under the siding, thereby significantly reducing the need for round-the-clock heating.
Imitation timber is well suited for both those already in operation and those just preparing to finish the façade and load-bearing walls.
Popular manufacturing companies
There are many siding manufacturers in the world.
The most famous manufacturers include:
- Mitten;
- Variform;
- Elixir;
- Vytes;
- Gentek;
- Kaycan;
- Foundry and many others.
From domestic ones:
- Dock;
- Grand Line.
The list of manufacturers can be continued for a long time, but there is little point in this, since all products on today’s market are of high quality, since they must meet certification requirements.
Little-known companies that are forced to save on production are of lower quality. It is better not to purchase such products, since with a very long service life of the cladding (50 years or more), the lack of a quality guarantee is not attractive.
One of the manufacturing companies
Basic recommendations for working with metal siding
When covering, a number of factors need to be taken into account:
It is necessary to accurately calculate the amount of material for cladding the building. To do this, measurements are taken of all areas of the facade that will be finished. A scheme of work is drawn up; it is especially relevant when creating complex compositions that involve a combination of several colors on one wall. You can confirm the resulting calculations with the help of consultants at points of sale.
Calculation of siding area for cladding walls, pediment, cornice
The number of additional elements and related materials is calculated separately. The technology assumes that components from the same manufacturer must be used for installation; deviating from this rule is possible only in extreme cases.
The most preferable solution is to cut steel siding to order according to a drawn up diagram, this will allow you to obtain finished parts of the required dimensions. If this is difficult, then trimming is carried out with an electric jigsaw with a suitable attachment or a reciprocating saw. It is not recommended to use a grinder or similar tools that operate at high speeds, as they lead to overheating of the cut area, which causes corrosion.
All parts must be installed taking into account the thermal gap. Iron panels do not expand as much as PVC products, but under the influence of high temperatures, fragments that are too tightly fixed are deformed. The optimal gap between the hole and the head of the self-tapping screw screwed in the center is 1 mm. Fixation is carried out in the direction from the middle to the edges of the panel.
Before purchasing the material, you should read the instructions placed by the manufacturer on the label or separately. It should contain not only the characteristics of the product, but also the order of work, as well as recommendations regarding additional elements. Products must have all necessary certificates. After purchase, the panels are stored on a flat surface in a horizontal position in a place protected from precipitation.
Following the recommendations will help you avoid further problems.
Fastening and installation technology
General diagram of installation of imitation under timber
As an example, consider the technology of installing eurobeams. The installation process can be divided into stages such as lathing, insulation and fastening.
Before starting installation, it is advisable to prepare the following tools:
- Metal scissors;
- Roulette;
- Construction pencil;
- Plumb;
- Square;
- Level;
- Hammer;
- Screwdriver or screwdriver.
You must first clean the covering under the cladding from dirt and old plaster, dismantle decorative trim and lighting.
Lathing is needed to level the walls for installing siding and to ensure high-quality ventilation, which affects the service life of load-bearing structures.
Metal sheathing and thermal insulation layer
- Protection against moisture is provided by an anti-condensation membrane. For most buildings, it is recommended to install a thermal insulation layer with a thickness of at least 100 mm.
- The insulation is mounted from the bottom up using disc-shaped dowels. The bottom plate rests on the sheathing or plinth.
- A special diffusion film is attached on top of the insulation, providing additional protection. If insulation was not installed, then the diffusion film is attached on top of the wall.
Fastening the simulating panels begins with fixing the starting strip 40 mm above ground level. The next bar is placed at a distance of 6 mm from the first. This is necessary to avoid the consequences of inevitable thermal deformations. If there are no holes for self-tapping screws, you should make them yourself in advance.
Correct installation of panels
When further laying siding, the following rules must be observed:
- Do not tighten the screws by 1 - 1.5 mm - this is the necessary gap that will help avoid damage to the material from thermal deformation.
- Self-tapping screws are screwed strictly into the center of the perforation, with a pitch of no more than 400 mm.
- It is recommended to start installation from the corner of the house.
- The first row is attached to the installation strip, and the rest are attached to the locks of the previous ones, until we reach the roof.
- Panels for windows are cut out so that the edge of the material fits neatly against the frame or trim.