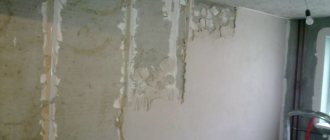
Preparing the surface for installing beacons
The surface to be leveled must be carefully prepared before work begins. This will help make all work as efficient and productive as possible.
The preparation steps are the following:
- Dents, crevices and cracks formed during operation must be filled with the selected solution;
- You also need to clean the surface from dust and other contaminants. It must be perfectly clean;
- Before installing beacons on the floor, you need to prime the surface. This will help make the process closer to ideal and increase the adhesion of the coating to the applied leveling material;
- If there are peelings or unevenness on the floor covering, they must be removed by running sandpaper or a spatula over them;
- Waterproofing and sound insulation must be carried out before the beacons are installed on the floor.
Determination of the highest point of the level
In order for the process of establishing beacons and leveling to be productive and complete, it is necessary to determine the highest point of unevenness, so that the zero level of the future coating can be determined.
Step-by-step instruction
- It is necessary to choose the method by which the level will be determined;
- After using the selected method, it is necessary to measure the height of the unevenness;
- At each level, make marks using a special dye thread or pencil;
- If during the process of upholstering the level a higher mark is found, then a new zero level must be set according to it;
- After circling the highest point, you can begin the process of installing beacons.
Step-by-step instructions for installing a beacon
...to level the floor using mortar
- Step 1. How to markup? The laser device will help to outline the necessary markings. We find the zero level and make marks on the wall with a pencil.
Advice! If you don't have a laser device, use a water level. The water level is the most accurate, since the laser device can be installed incorrectly and it will give an error in measurements.
- Step 2. Select the type of beacon. Make marks with pencil/chalk on the floor. The distance of the beacon from the wall is no more than 300 mm. Let's do the rest of the markings.
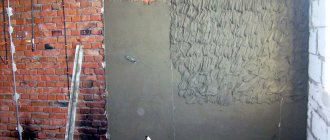
- Step 3. Make a solution based on sand and cement, not too thick. Make the first line of the lighthouse from piles of mortar.
- Step 4. Place a metal profile or lath on the surface.
- Step 5. Install the profile/rail in a horizontal position using a level. Gently press into the solution.
- Step 6. After the solution has hardened, we begin to make a screed.
Attention! You don’t have to wait for the solution to completely harden, but do the screed right away. But very carefully.
Rules by which beacons are installed
Regardless of whether an experienced craftsman or a beginner takes on the job, setting up beacons is mandatory.
To establish them ideally, it is necessary to adhere to general rules, such as:
- Placement of beacons over the entire surface of the coating;
- To clearly understand how to place beacons on the floor, it is best to look at the photo;
- You should not neglect the process of setting guidelines for leveling, because the final result of the surface leveling process directly depends on how well-coordinated and thoughtfully the process of placing beacons is carried out;
- Beacons will help direct even an inexperienced specialist to the right actions.
- The process of installing beacons takes a considerable amount of time. Despite this, it is imperative to install them, because this will reduce time and labor costs in subsequent work. Read also: “Installing beacons for floor screed with your own hands - recommendations.”
How to calculate the number of required beacons
The process of establishing guide structures starts from the door of the room and moves directly to the opposite wall. Depending on the width and length of the space, you can clearly understand how to place beacons to level the floor (for more details: “How to place beacons under a screed - expert advice”). The number of beacons should be calculated depending on the professionalism of the paver and experience in the surface leveling mission.
If a person has sufficient skills in leveling the surface of the floor covering, then one or two beacons, proportionally distributed throughout the room, are enough. If there is no experience, then beacons should be installed every thirty or fifty centimeters in order to achieve the most effective result.
Installation of beacons on self-tapping screws
This method is the most accurate and frequently used. The option of how to place beacons on the floor will help ensure excellent results. Depending on how you decide to fix the beacons on the floor, you need to carry out a number of actions that are aimed at the ideal completion of the process.
Step-by-step instruction
- First you need to prime the surface;
- The next step is to screw the plugs into the marks made when measuring the height;
- A self-tapping screw must be screwed into each plug;
- For every two parallel installations, it is necessary to tighten the fishing line;
- Such manipulations must be done with each subsequent structure inserted into the floor surface;
- When the entire surface in the space is completely furnished with beacons, you can begin the process of filling the floor covering with the selected mixture or solution;
- The next day, after the material has somewhat hardened, the previously installed beacons can be pulled out.
Nuances
- It is necessary to stretch the line at the level that is marked zero when measuring the height of the fill;
- Before starting the process of pouring the floor covering, you need to remove the fishing line from the beacons in order to carry out the work completely correctly;
- To ensure that no unpleasant situations occur with the starting surface before fixing the beacons on the floor, it is necessary to carry out a high-quality primer and putty on the surface.
The most important task is to draw the “zero” line
All subsequent work will only gain some meaning if the zero level is very accurately determined, corresponding to both the horizontal and the required thickness of the future screed.
To work, you will need a water or laser level (the second, of course, is preferable - it will greatly facilitate the process).
Water level
You can, of course, use a building level, but in this case it must be quite long (1.5 - 2 m), very precisely calibrated, and the worker himself must have an excellent eye, since an error with this method is most likely.
Building traditional level
- So, on the wall of the room, in the corner, which, according to a preliminary visual estimate, is located higher than the others, a mark is placed. Its height from the floor can be arbitrary, but it is better to choose, firstly, a multiple value, and secondly, such that it is more convenient to work - for example, 1.5 m.
Punching a reference horizontal line
- With the help of the mentioned devices and tools, the level of this mark is transferred along all the walls, in order to connect the resulting marks with a solid straight line around the perimeter of the room. If everything is done correctly, then the line should close at one point, without the slightest difference in height. This reference line can be useful later not only for pouring the screed, but also for carrying out some other finishing work.
- The distance from the reference line to the floor surface is carefully measured every 0.5 m. The obtained values are recorded on paper or simply on the wall surface (if possible). Now, by simply comparing the results, the highest point of the floor along the perimeter of the room is determined - this is the place where the obtained value is the smallest.
In the example, there is a clear excess of 50 mm
- If you have already decided on the minimum thickness of the future screed, then you can proceed to beating the so-called zero level. At the highest point, mark the required height from the existing base. Let, for example, it be 30 mm - this is the minimum thickness a concrete screed should have to ensure its strength and solidity.
- Next, you can do two things. So, you can apply the method already described above and draw a zero line along the floor surface in the same way. This is not entirely convenient at such a height. Therefore, you can do it easier - measure the distance between the marked mark and the reference horizontal line. Then transfer this value strictly vertically at several points on the walls, so that the distance between the marks allows you to draw a line using an existing ruler. The resulting line, completely outlining the perimeter of the room, will be the zero level.
- It’s too early to limit ourselves to this. In construction practice, it is rare, but still there are times when the floor level in the center of the room is slightly higher than near the walls. This is easy to check - you need to stretch the cord between opposite walls along the zero mark, and check the distance between it and the floor in the center of the room. This check is done in several places. If the distance between the cord and the surface is less than the required minimum thickness of the screed, then you will have to move the zero level up slightly - to the height required to ensure the required thickness.
If everything is normal, the zero-level tapping can be considered complete.
Installation of beacons on the solution
The process of installing beacons on a solution is also quite effective and often applicable. But before placing floor leveling beacons on the solution, you need to carefully study the procedure.
Peculiarities
- As an auxiliary material, you need to take cement or gypsum. Because it must be a material that is not subject to rapid deformation. It is the above-mentioned raw material options that change shape the least.
- A special thread is pulled over the material, which will indicate the level of required filling.
- It is necessary to screw a beacon into each of the piles of material, which, after pouring and drying the solution, can be removed from the substance, and the holes can be filled with the same mixture so that the surface is smooth and uniform.
Lighthouses from solution
Another type of point landmarks that are made by hand. It is considered suitable for pouring on wood surfaces, as it will not damage the insulating layer. But care is needed so that the exposed beacon is not knocked off the uncured mixture.
For reference, take a solution that is used for the leveling layer. For 3D floors, you can add construction plaster to the beacons.
Cement landmarks
It is not difficult to place a beacon on such a hill of solution. But to do everything according to the rules, you need:
- mark lines on the surface in order to place slides of the cement mixture along them at a distance of 50 cm;
- mix the filling solution;
- create slides of the same size just above the intended base level;
- lay the rule on the fresh mortar and press down so that they are at the level of the planned filling;
- remove additional mixture;
- After about a day, the slides should harden, cover them with a primer mixture and begin pouring.
Materials for installing beacons
Of course, before installing floor leveling beacons, you need to purchase the necessary materials. There are a lot of options for installing beacons. Anyone who makes a repair transformation of the lower part of the flooring surface must independently determine what materials to purchase.
It can be:
- Special metal structures sold in hardware stores;
- Plasterboard structures inserted one inside the other so that the structure is square in shape;
- Wooden beams measuring 3x3 centimeters are also used;
- Beacons are also laid out from cement or gypsum mixture.
Required Tools
In addition to the basis for installing beacons, you will need other materials and tools, with the help of which the question of how to set up beacons to level the floor will become much more accessible and understandable.
So, for the whole process to be complete and as suitable as possible, you need to buy at a hardware store:
- A drill, thanks to which you can mix mixtures and get rid of excess material residues on the surface;
- Hammer. This tool will be needed if there is a need to remove past results of repair coatings from the surface;
- Screwdriver. This device will help make the process of screwing in beacons as easy and fast as possible.
- Hammer. The purpose of this tool is clear; it is needed to drive structures into the depths of the coating;
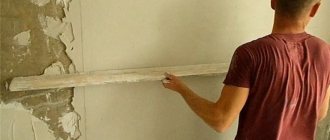
- The rule will be needed for the ideal installation of beacons;
- You should also get a polyethylene film. Some mixtures and solutions require coating with this material for complete drying of the substance;
- A self-tapping screw will be needed to organize the insertion of beacons into the surface;
- Depending on how you plan to level the floor along the beacons, you may need cement or a gypsum mixture;
- Dying thread or fishing line may also be needed in the process of calculating the level of filling height of the floor covering;
- It is worth purchasing various containers of different volumes in order to mix solutions;
- A mixing attachment for a drill or a separate mixer, with which you can make a homogeneous mixture without effort;
- Roller for leveling the applied mixture;
- A device for measuring the level of surface fill height.
Beacons for dry floor screed
Option 1 - “U-shaped profile”
As you know, dry floor screed involves the pouring and subsequent leveling of dry bulk material. Expanded clay is most often used for these purposes. Which beacons to choose for floor screed using dry technology? They can have any form. When performing a dry screed, the beacons remain in a layer of expanded clay or other material. Therefore, the height of the beacons must correspond to the height of the future screed. When backfilling is dry, this is at least 3 cm. In this case, a strong profile is chosen so that it does not sag and thus does not provoke an error when leveling the floor.
A thin profile can also be used. But then, in order to secure it, you will need a whole preparatory process and a lot of additional building materials. Attaching the profile to the ceiling itself with self-tapping screws will also not work, as this will damage the waterproofing layer.
The best option for dry floor screed is a metal profile in the shape of the letter U (U-shaped). The height of the walls should be from 27 mm. This profile is laid and fixed with sharp ends up
The distance between the edges is filled with expanded clay, and the profile itself, touching the gypsum fiber boards only with the edge, does not violate the soundproofing properties of the floor. Such beacons are installed at a distance no greater than the length of the rule. By passing the rule along the beacons, excess material is removed, thereby leveling the dry layer.
Option 2 - “Ceiling profile for plasterboard”
This method of installing beacons with dry screed involves the use of heavier profiles, for example, a ceiling profile for plasterboard (60X27 mm). Such beacons will already be more reminiscent of logs that are installed for a wooden floor. In addition, they are installed more often (on average - 7 pieces per 3 meters), which allows you to then arrange gypsum fiber board sheets into 2-3 profiles. This will also provide additional strength.
Laying and leveling the screed
After the question of how to correctly place the beacons on the floor has been resolved and has come to its logical conclusion, the moment comes when you can pour the mixture into the spaces between the beacons. To do this, it is necessary to moisten the prepared surface with plenty of liquid or re-prime it. To avoid flooding the neighbors below or the lower floors of your own home, it is necessary to treat the cracks at the joints between the wall and the floor. This is best done using polyurethane foam or special barrier tape.
Step by step guide
To ensure that the filling goes smoothly and without flaws, you need to do the following:
- Pour the mixture made in the container into the space between the beacons. Filling is done starting from the far edge of the room;
- Then, using the rule, you need to disperse the mixture or solution around the perimeter of the lighthouse;
- Afterwards, you can begin to fill each of the spaces between the beacons, bringing the solution to the initial part of the room;
- If, during the process of stretching the solution, excess material remains, it is necessary to transfer it to the bottom of the screed, throwing it into the next row;
- It's better to work in pairs. Because while one master is leveling the laid material with a rule, the second master is mixing a new batch of the mixture;
- After the screed from the selected solution has been stretched throughout the entire room, it is necessary to wait until the mixture dries to a state in which no traces of walking remain on the surface. When such a moment has arrived, it is necessary to remove the beacons from the surface and cover the resulting holes with the same solution;
- Next, you need to cover the surface with plastic film and wait for the complete drying process. This process can last from two weeks to a month, depending on the humidity in the room. Under any temperature conditions, it is necessary to regularly wet the surface to prevent cracks from forming.
When all the above steps have been completed, you can safely begin laying the finishing surface, which will fully elevate the appearance of the room. If all leveling procedures are carried out according to the rules, then the final coating will last for many years and will delight you with its immutability.
Screed: preparing the base
Clean the base of the room. Then place waterproofing on its surface: film or special solution. The next layer is polystyrene foam boards as a layer of thermal insulation. Place a reinforcing mesh on top. Then, according to the chosen scheme, place the water heating pipes.
We place water heating pipes in front of the screed