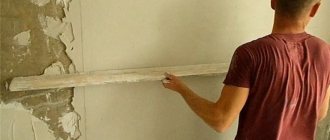
In any repair, accuracy and quality of work are important. Much attention is always paid not only to a beautiful finish, but also to a flat floor, smooth walls, and an ideal ceiling. In capital construction, walls sometimes deviate from the vertical axis; they have relief, irregularities or bends. In such cases, the walls are leveled before finishing. A simple and popular option for performing this process is to align the walls along the beacons. If the work is done correctly, the surface will be smooth, and it will be easy to perform any finishing and decor on it.
What are beacons needed for?
A plaster beacon is a thin-walled metal perforated T-shaped profile. Its height is usually 6 or 10 mm. The 6 mm profile allows you to form a thin layer of plaster, which is suitable for smooth walls. However, in most cases, vertical planes have a curvature, and a noticeable one, and therefore the 10 mm bar is used more frequently.
The installation of plaster beacons plays an important role, as it ensures ideal verticality for the future coating. These elements act as a kind of reference level and at the same time serve as guides for the rule during leveling of the solution.
The plaster beacon is a metal T-shaped profile with perforation
String beacons
A rather rare version of the lighthouse is a string one. Its installation requires some experience. However, professional repairmen who have mastered this technique try to attach string-type plaster beacons when working with large surfaces - both due to the affordable cost and due to the increased speed. Using another option for walls of the same size, the construction team will spend several times more plaster and the guides themselves.
When using these types of fasteners for beacons, you will only need 2 strings, installed within a few minutes. To complete the work you will need a small number of tools:
- hammer;
- plumb line;
- pliers;
- screwdrivers;
- key;
- 2 strings (which can be replaced with cables or thin wire) and 4 dowels with bolts;
- plaster mortar and 4 wooden blocks.
Rules for installation of structures
In order to install fasteners for string-type plaster beacons, you will first need to drill 4 holes, retreating 150–200 mm from each corner in the horizontal direction and a few centimeters in the vertical direction. The next stage is driving in the dowels into which the bolts are screwed. When screwing in the fastener, you should leave about 10 mm of its length for twisting the string.
The process of attaching a string beacon consists of performing the following actions:
- Unwinding the string;
- Fastening the beacon to one of the upper bolts;
- Tensioning a string or wire using wooden blocks and screwing it onto a second fastener;
- Repeat the same steps with the lower bolts and the second guide.
After securing both strings, their verticality is checked. And, in order to reduce the likelihood of their subsidence, a small amount of solution is poured under each to install beacons. Without this, the string may sag, and the section of the wall will have to be leveled again.
When performing work, you should avoid string distortions. The beacon is checked using the rule that it should slide easily along the strings.
Further finishing should begin only after the solution has completely dried and the strings have been removed. You should also remove the dowels to which the beacons were attached. The traces remaining after the guides and fasteners are sealed with the same mixture immediately after completion of the plastering work. Step-by-step instructions for attaching string beacons.
Video:
Factors influencing the correct installation of beacons
Installation of beacon strips is a critical stage of plastering work. It is important to avoid mistakes here, otherwise the entire result will be spoiled and everything will have to be redone. In particular, it is worth highlighting a number of fundamental factors that, one way or another, influence the final result:
- When choosing slats, you should pay attention to their condition. If there are defects or bending, the beacons cannot be leveled.
- If there is a slight difference in the walls, you can do without guide strips altogether. In this case, local alignment of the recesses is sufficient.
- It is worth choosing a suitable profile height, otherwise the plaster consumption will be exceeded. That is, rely on the value of the difference. With an indicator of 5 mm, the use of a 10 mm bar is unjustified.
- Foundation preparation also plays a role. And if pieces of old plaster remain on the wall, it will not be possible to fix the slats evenly.
Fact!
Any property owner tries to reduce the cost of work and the purchase of necessary materials and equipment. The condition of the surface also directly affects how the profiles will be installed.
Types of beacons
So, what are these indispensable helpers for leveling walls? First of all, you need to understand the principle of working with them; there is nothing complicated about it. More generally, beacons are devices that are fixed to walls at certain intervals. Each element must be in line with other parts.
Metal strip
There are several types of beacons, each of which has its own characteristics. The metal version is considered the most popular. It is a strip called a beacon strip. For ease of use, there are parts with a height of 3, 6 and 10 m. Advantages of the product:
Metal lighthouse profiles have different rib heights, but the shape of the structure is similar in all models
- There is no need for additional preparation, the elements are completely ready for use.
- Installation will not take much time, but only if you have some operating skills.
- Plastering is carried out a short period of time after their installation, provided that a gypsum solution was used for fixation. There is no need to wait when using dowels.
- If required, the planks can be quickly cut, this makes it possible to adjust them to any size.
Undoubtedly, this variety has many advantages, so many do not take into account the existing disadvantages and encounter problems that arise during work. Flaws:
- Due to the fact that the slats are quite thin, they easily change their shape. This leads to the fact that the required evenness is lost. Therefore, it is necessary to check the parts at the time of purchase, transport them carefully, and check everything again before installation.
The gypsum hardens within 20 - 30 minutes, during which time it is difficult for a novice master to align a thin metal bar clearly in level - Some problems may arise with the installation of beacons. Plaster is used for this because it sets quickly, but it will require some care.
- It is advisable to remove metal elements after the wall is leveled. If this is not done, then there is a high probability of rust appearing on the decorative coating. However, this procedure will require violating the integrity of the coating, followed by covering up the resulting defects.
If a galvanized profile is left in the wall, it will rust, so the beacons need to be removed and the grooves sealed with the same plaster solution.
Thus, you need to take into account all the pros and cons in order to avoid further problems.
Metal pipe
This option has a significant difference from the previous one, although both are made of metal. Such beacons are a pipe or a square profile and have the following advantages:
- Good strength, which is achieved due to the fact that the fixing composition is applied along the entire length of the part. This prevents elements from falling off.
- Using a square profile makes the job much easier.
- Fragments of different lengths can be used for work. If required, they can be quickly adjusted to the required parameters.
It is convenient to use round or profile pipes as beacons, but this method is only suitable if the plaster composition is very thick.
Of course, there are also disadvantages, which in some cases coincide with the disadvantages of a beacon strip:
- Any defects in parts preclude their use, so it is advisable to check the elements with special care.
- During extraction, the pipe or profile may become bent, making it unsuitable for other work.
- The cost of the material is much higher.
On a note! This option is more suitable for cases when the work is carried out by a home craftsman without experience or there is no opportunity to purchase a metal strip.
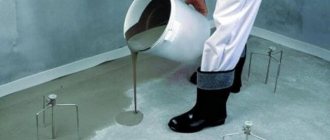
Lighthouses made of plaster or cement
This is the cheapest method, but it can cause difficulties for a person who has not encountered making them. For work you will only need the material that is available for finishing activities - putty or cement mixture. Can be used in large and small areas. A significant disadvantage is the time it takes to create all the elements for alignment, as well as the need to wait for them to dry.
The technique for working with metal and plaster beacons is the same, but setting up a beacon from mortar is much more difficult, and only a professional can do it
Preparing the base for installing beacons
This is the very first and most important stage of the entire technological process. First you need to carefully inspect the entire surface to be treated. The old plaster layer must be removed completely, without leaving pieces, thereby exposing the base. You also need to eliminate stains of various origins, pockets of mold, and remove excess metal parts, if all this is present on the walls.
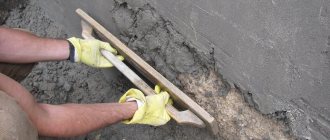
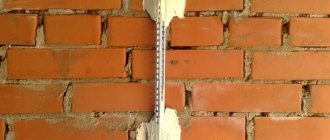
If cracks, chips, or defects are detected, they must be repaired, otherwise the desired result will not be achieved. If the walls are a smooth concrete surface, it makes sense to make several notches in order to increase the adhesive properties of the building mixture. For brickwork, expand joints to 10 mm.
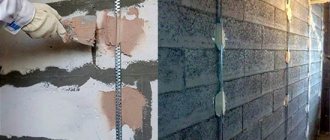
Dust must be removed from the walls, dried and coated with a primer, depending on the base material. If necessary, strengthen the walls.
First of all, the wall is thoroughly dusted and primed
Beacon mounts: types and advantages
The market presents different types of fasteners for beacons, in order to understand which type is better to choose, you need to understand the principle of their installation. After all, ease of use will largely determine how to obtain a high-quality result. Therefore, we will now consider the types of mounts for beacons.
The market presents different types of fasteners for beacons, in order to understand which type is better to choose, you need to understand the principle of their installation.
Clips
Clips for beacons are made of plastic material; they allow you to securely mount the guides, while maintaining the ability to adjust the evenness of the profiles by unscrewing and tightening the screws that were secured in the dowels. Thanks to this ability, it is not difficult to mount the guides evenly, even if the work is carried out on a wall that has large vertical unevenness. However, such a mount for a beacon profile is more suitable for work in small spaces.
Using clips allows you to avoid wasting time securing the guides with mortar and not having to wait for the mixture to dry completely. This stage of work is performed in a minimum number of zones.
Advantages:
- Saving resource time and money, because less plaster mortar is required, and the work is easy to do with your own hands, which will significantly save money on professional services;
- You can do high-quality work without additional skills;
- The operating speed increases approximately four times;
- Having installed the guides evenly, you can immediately proceed to the next stage of work.
Clips for beacons allow you to securely mount the guides, while maintaining the ability to adjust the evenness of the profiles.
Holders
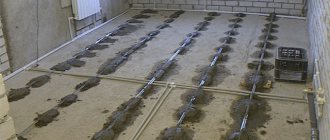
One of the popular holders for plaster beacons is the eared beacon. It is very easy to use, the mounting process when working with it takes no more than three minutes, and even a beginner can handle it quickly. After all, installing an eared ear does not require special skills. It is convenient to use it not only when working with walls, but also as a mount for beacons under floor screed. It will save time and the amount of plaster mixture.
Ushastik is very easy to use; the mounting process when working with it takes no more than three minutes.
Clamps
The cremmer beacon clamp is made of galvanized steel in the shape of a rectangular plate. The creamer has holes along the edges of the plate for bending it, simplifying the work process. There is a hole in the center for screwing in a self-tapping screw; the ability to attach beacons to a self-tapping screw allows you to change the position of the guides if necessary. This is also a convenient and economical option.
The cremmer beacon clamp is made of galvanized steel in the shape of a rectangular plate.
Determining the number of beacon lines
To determine how much profile is required, you need to correctly calculate the distance between the beacons. Beginners are advised to pay attention to the rule of no more than 1.5 m in length to make it easier for them to operate. The optimal pitch lies in the range of 800-1300 mm. It does not need to be exceeded, since then there is no point in using beacons at all.
When the tool rests on the profiles, there should be 15-20 cm left on each edge. That is, with a rule length of 150 cm, the step between the guides should be no more than 120 cm.
Marking along the beacons should start from the corner, stepping back from it by a distance of 10-30 cm. Place a mark with a marker or pencil and then mark the lines according to the chosen step, and it is not necessary to make it the same, but still within the “norm” - 80- 130 cm. When the last gap exceeds the length of the rule, it is divided in half.
Using the marks made, using a long level or any other suitable object, draw vertical lines according to which the profiles will be mounted. If you have a laser level, you don’t have to draw these stripes.
How to properly mark a surface
The first stage is marking. It is carried out after cleaning the surface and preparing the materials. Marked as follows according to the diagram:
- We establish irregularities. To do this, a level and a rule are used. Lumps, irregularities and other defects are marked with a felt-tip pen, pencil or other coloring instrument.
- Beacons are installed from the door to the wall, taking into account a distance of approximately 30 cm.
- Using a marker, create vertical lines. Between the beacons you need to maintain a distance of no more than one and a half meters. How to calculate the length of the lighthouse? It is made slightly smaller than the length of the rule.
- Along the line, counting 15 cm from the floor covering, we create a hole using a drill. We do the same at the top. We insert self-tapping screws into the holes and tie a cord to them.
Where beacons and cords intersect, self-tapping screws are not used.
Types of plaster beacons
Beacon elements are made from different materials:
- Mortar beacons are made in the form of tracks, the upper part of which serves as a guide for the rule.
- Metal - made of galvanized steel or aluminum. According to the standard, the length of the profiles is 3 and 6 meters. Before use, profiles are cut to size.
- Plastic - they have a significant drawback (they bend easily).
- Wooden - these slats are rarely used; they are fixed with nails.
- Strings.
Each variety has its own pros and cons. Regarding metal beacons, it is recommended to remove them from the wall after using them when the solution has set. If left, rust stains will appear later. Wooden slats will begin to swell and also warp under the influence of moisture from the solution. And due to the fact that plastic strips are more prone to deformation, they are more difficult to install and fix smoothly.
Note!
In addition to T-shaped profiles, there are L-shaped options on sale. This is a suitable solution for plastering protruding corners. Once leveling is complete, these elements can be left inside the plaster.
Modern craftsmen use metal beacons for work
Preparing walls for fastening beacons
Mounting for beacons should be done on a previously prepared wall. To do this, it is necessary to remove dirt from the partitions before constructing the plane. And also, remove flaking old fragments of building material. Pay attention to and eliminate oil stains. Remove old coating.
If there are protrusions on the work surface, you need to get rid of them. This will help save the amount of mixture when leveling the walls.
Then the wall is treated with a primer and allowed to dry. If irregularities are visible on the surface of the wall, it is reinforced with wire. Reinforcement is necessary if the thickness of the applied solution exceeds 50 millimeters.
Materials and tools
Before stocking up on materials and preparing tools, you need to choose a method for installing beacons. Actually, how much material and tools are needed will depend on this. A sample list might look like this:
- Reiki are beacons that serve as a guide for the rule. An exception would be the choice in favor of mortar guides. You will also need metal scissors if the choice is in favor of metal profiles for cutting.
- In most cases, the slats are fixed with mortar, which means you cannot do without “equipment” for plastering work. This is primarily a trowel (spatula), a rule. You also need containers and a construction mixer (drill with attachment) to prepare the mixture.
- When choosing self-tapping screws, you also need dowels, as well as a screwdriver (straight or Phillips) or a screwdriver.
In addition, various measuring instruments will serve you well. And not only modern levels, but also old reliable measuring instruments like a plumb line
and a corner.
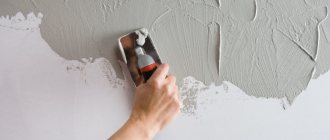
How to apply plaster
In this procedure, the tools must be positioned at a precise angle and at an equal distance from each other, all processes must be controlled by the building level. Before applying the base material, you need to wait for the primer to dry completely. The choice of tools also depends on the characteristics of the surface and room. If the room has an average level of humidity, a gypsum solution is good; if there is high humidity (in the kitchen or bathroom), a mixture of cement and sand will be the best choice. The primary coating is carried out so that about 1 cm remains to the outer level of the beacons.
Next, you again need to wait for the material to harden and cover the wall with the solution again. Be sure to level the plaster using the rule and leave a small margin. Without lifting the tool from the beacons, the rule must be slowly moved up and down to form a smooth coating of the material. If at some point the rule breaks from the beacons or the trajectory is disrupted, the procedure must be started over. This way the plaster will lie perfectly even and smooth. At the end of the work, you need to wait until the layer of material has completely dried and remove all the slats. The remaining recesses are filled with plaster and leveled to match the finished surface. If the decoration is done with tiles or tiles, there is no need to remove metal beacons.
Be sure to level the plaster using the rule and leave a small margin.
The main stages of placing beacons under plaster
Unlike experienced craftsmen, beginners still have little idea of how to correctly place beacons under plaster on walls and how to fix them. At this stage, it is extremely important to avoid mistakes. If the beacon is initially positioned incorrectly or is not securely fixed, this becomes the main reason for the defect.
In general, the process of placing beacons on walls can be divided into several stages:
- Markings are made on the surface to be treated.
- For lighthouses, landmarks are made along the edges.
- Stepping back a little from the wall, an auxiliary vertical plane is created.
- The wall is inspected for deviations. The most prominent area will be considered the “zero point”.
- The position of the auxiliary plane is corrected. To do this, the thickness of the plaster coating is added to the “zero point”.
- The two extreme profiles are mounted according to the current position of the auxiliary plane.
- Intermediate beacons are fixed taking into account the outer guides.
On a note!
If the choice fell on mortar beacons, their surface needs to be coated with a primer.
One of the modern marking tools used is a laser level.
Features of the procedure
Plastering is one of the oldest and most popular methods of leveling walls.
There are many varieties of plaster mixtures, the use of which is determined by:
- the condition of the walls on which they are applied;
- features of the room where the renovation is being carried out;
- the material from which the walls are made.
On a note ! Based on this, a wet or dry method is used. In the second case, dry mixtures are used, which are prepared (diluted) immediately before application. This also includes various sheets, panels and slabs; they are used to cover deformed surfaces, thereby creating new types of coatings.
If we talk about the wet method, then it involves the application of ready-to-use compounds.
Do-it-yourself alignment of walls using beacons
Here are the main stages of leveling walls using plaster:
- Preparation;
- primer;
- applying plaster;
- sanding surfaces.
How to install beacons on a wall for plaster without a laser level
The laser level appeared relatively recently and immediately gained wide popularity due to its advantages.
In plastering work using beacons, markings play an important role. This stage is performed in two ways:
- classic version;
- using the "spider" method.
Before marking, a search for the “zero point” is carried out, which subsequently determines the auxiliary plane and the surface of the future plaster.
Regular markup
For the classic method of installing beacons for plaster, you will definitely need a building level, as well as nylon thread (rope) and self-tapping screws. The goal is to create a strictly vertical plane, which will be removed from “zero” by the thickness of the plaster layer (h). Each composition has this value individually and is usually indicated on the packaging.
Since the profile already has its own height (b), the auxiliary plane needs to be above the “zero point” by a certain value (hb) mm. The algorithm of actions is as follows:
- To begin with, step back from the corner by 100 mm, from the ceiling by 150-200 mm (A) and do the same on the other side (B). At these points, both self-tapping screws are screwed in with a protrusion above the surface of 30-50 mm.
- A plumb line is attached to the first fastening element and new points (A1 and A2) are marked under the thread. The first of them is located at a distance of 150-200 mm from the floor, and the second is exactly in the middle between A and A1. Fasteners are also screwed into them. In the same way, points B1, B2 are marked, where screws should also be screwed in.
- Now all the screw heads should form a single plane. You need to rely on the thread hanging from the top screw. It passes over his hat. The underlying fasteners are adjusted so that their caps touch the thread passing above them. Everything is done in a similar way on the other side of the wall.
- Between opposing points, a thread is pulled over the heads of the hardware. Next, the connection is made diagonally - from A to B1 and from A1 to B. A sign of correct fixation of the screws is when the diagonals of the threads touch.
- At a distance of 10 cm on both sides of marks A, B, points C and D are marked in the direction of the center (horizontally), and the hardware is also screwed in. Next, the distance between C and D is divided into intervals in increments of 80 to 130 cm, making marks at the top and bottom.
- A self-tapping screw is screwed into each mark - along the top and bottom lines.
- Now it is easy to identify the protruding part of the wall. This is determined by measuring the gap between the wall surface and the threads.
For the usual installation method you will need a level and nylon thread
Important!
If the measurement does not allow you to accommodate the future plaster coating, you should adjust the height of the hardware by screwing or unscrewing until an even plane is formed. When using clips, do not forget to take into account their thickness.
Spider markup
The name of the method comes from the use of 4 stretched laces (threads) - 2 horizontal and 2 vertical. Using this technique, you can determine the optimal thickness of the plaster layer.
Here the sequence of actions is as follows:
- First of all, you need to retreat 150 and 50 cm, respectively, from the corners of the wall and ceiling, making marks. Then drill holes, insert dowels and screw in self-tapping screws so that their heads protrude beyond the surface by 50 mm.
- A plumb line at the bottom of the wall marks two more marks for two more hardware - they should be 50 mm from the floor. All fasteners must be positioned strictly vertically one below the other.
- A nylon thread is tied 20 mm from the wall to the upper screws and then a plumb line is used to determine where it will be attached to the lower screws. In this case, the thread must be strictly vertical. The thread itself must be tied with tension. Do this on both sides of the wall.
- To two vertical threads, tie two more threads in the horizontal direction, with the possibility of moving them. This allows you to find the curvature of the wall and its most protruding part, the “zero point”.
- When the distance from “zero” to the thread exceeds the minimum thickness of the plaster layer, you need to deepen the screws a little more equally. As a result, the entire additional plane should recede from the wall surface exactly by the value h (for mortar beacons) or hb (for planks). If the protruding part is outside the conventional plane, then it should be removed or all screws should be unscrewed to the permissible amount.
- Under each vertical thread you need to place from 3 to 5 hardware so that the caps touch them.
Spider marking got its name from its resemblance to a spider's web.
Sequence of actions when installing beacons - Checklist
It is necessary to install beacons for plaster. They are an integral stage of the work, as they allow you to maintain the ideal evenness of the walls in terms of creating a plane.
Only along the beacons can the plaster composition be applied in such a way that all differences on the wall are leveled out and the surface becomes an ideal plane.
Therefore, when starting to plaster the walls, adhere to the following sequence of actions:
- Determine how obvious the unevenness on the walls is.
- Carry out markings.
- The base is primed with special compounds to ensure the proper level of adhesion between the compound and the wall itself.
- Install the beacon profile, maintaining the required distance from the wall and the outer surface of the plank. At the same time, each strip should be in a single plane and form a kind of approximate imaginary level to which orientation will occur during the application of the composition.
- When the beacon strips are fixed, the walls are plastered along the beacons using the rule..
- At the finish, corners and slopes are processed to level them.
- The beacons are removed at the moment when the soil begins to set. At this stage, the planks are removed from the laid mortar.
- After this manipulation, quite often there are recesses in the walls that need to be filled with a solution of the same composition as the wall plaster itself. In this way, leveling of the coating is achieved.
- At the last stage, grouting is carried out at the moment when the solution has set.
How to place beacons under plaster walls using a laser level
The work of setting beacons for plaster will be accelerated by using a laser level. In addition, using this tool it is easy and effective to set a right angle between the joining surfaces.
In addition to the level, you also need a rule with a length less than the height of the wall by 50-100 mm. If the wall is short, the device is placed near the corner and perpendicular to the surface. For long lengths, the device is placed in the middle.
The level itself should be as close as possible to the wall (30-40 mm), and in such a way that the plane created by the laser level becomes parallel to the wall being processed and perpendicular to the adjacent surface. The places where the light lines pass should be marked with a pencil. This will allow you to place the device in the right place when knocking.
Using a metal square, differences between the wall and the auxiliary plane are searched for. It is better to write the result on the wall or a piece of paper. Now you need to measure how many centimeters from the most protruding part to the laser plane. You need to do a simple calculation. For example, the value found is 25 mm. The thickness of the plaster coating is 10 mm, and the profile height is 6 mm. We calculate: 25-10=15 mm.
Important!
On the rule you need to make 2 or 3 marks along the rule and 15 mm from the edge. It is along them that the beam should pass, according to which the beacons will be set.
Next, draw lines along which the profiles will then be installed. Start installation from the line farthest from the laser level - first, throw the solution along it in the form of a vertical strip.
The rule is to apply the edge to the beacon and press it with a tool until the beam coincides with the marks. Set aside the rule, remove excess solution, clean the top of the profile. Install all other beacons in the same way.
How to remove a beacon from a plaster layer
It is recommended to remove beacons not only in rooms where humidity is high. After all, over time, moisture can accumulate in any room, and rust will form on the beacons, which will ruin the coating.
If you immediately forgot to remove the beacons, then they can be easily removed after a long time. When doing this for the first time, you need to learn a number of tips:
- It is necessary to prepare pliers and a tool that is suitable for prying up beacons, for example, a plaster scraper;
- You should find out where the beacons are located; if their location has not been marked in advance, then a magnet can be used to find them;
- Use pliers to grab the beacon; if it is not visible, then you should scrape off part of the plaster. Extraction must be carried out with slow movements, you need to move as if doing a twist.
Removal should be carried out gradually from the ceiling to the floor. Any flaws that appear in the wall are covered again with plaster mortar.
Removal should be carried out gradually from the ceiling to the floor.
The mount for plaster beacons can make working with plaster easier; it is easy to create a smooth surface; the variety of types makes it possible to choose the option that suits you. Thus, by using them you can save time and money on the services of specialists.
Installation of beacons for plastering walls in different ways
Some time ago, various objects served as beacons for craftsmen - pieces of wooden bars and pipes, boards, including any other materials that could be obtained. The visual plane was formed by hammering nails into the wall. Today, all this has been replaced by profiles made of various materials.
When installing, the main thing is to securely fix the beacon profiles on the wall
Installation on plaster mortar or tile adhesive
Lighthouses are often attached to walls using an adhesive base. This is a plaster mixture or glue on which the tiles are laid. When installing the profile on the screw heads, it will rotate during fastening. For this reason, slides are made around the caps from the building mixture, which protrude above them.
The top of the slides is cut off taking into account the previously created vertical plane. The result is flat areas, which, after the solution has hardened, will serve as a good basis for fixing the beacons with plaster mortar or tile adhesive.
Installation of beacons without mortar
The main task facing the master is to securely fix the beacon profiles so that they do not move in different directions during plastering.
For this purpose, several simple designs have been invented that have a lot of advantages. Firstly, fastening does not take much time. Secondly, there is no need to wait for the solution to dry.
Clips
The parts are made on the basis of polypropylene and structurally consist of two parts:
- base – fixed on a self-tapping screw, which holds the beacon;
- plugs - these elements provide reliable fastening of the entire structure.
The thickness of the clip, or KDM-2 for short, is 6 mm. When combined with a profile height of 6 mm, this choice is suitable for the need to create a rough layer. This is exactly the thickness needed - 12 mm.
How is a profile fixed? First you need to remove the plug, after which the main part of the clip is attached to the screw head. Next, the beacon is inserted and the plug is returned to its place. The whole procedure lasts no more than 3-4 minutes.
Thanks to the fixing parts, it is enough to install the beacon profile and secure it with self-tapping screws
Latch "Kremmer"
These are rectangular galvanized plates with a slot in the center that grips the screw head. After installing the beacon, the edges of the part are folded, which ensures a strong fixation.
In addition, the part itself is thin, which allows you to lay a layer of plaster in a minimum layer. As a result, less material is consumed than when using clips.
Fact!
The products themselves are easily attached to almost any fastening elements - self-tapping screws, screws, dowel-nails.
However, with all the advantages, there are also disadvantages. The minimum gap is 300 mm, which is why a lot of them will have to be placed along the lighthouse. If the head of the fastener deviates even slightly from the vertical line, the Kremmer latch will not be able to grab it. In addition, it is very difficult to secure the part to the bar so that the cutout for the cap falls exactly in the middle of the profile.
"Ushastik"
Galvanized steel is used to manufacture the part. It looks like a rectangular plate with ears that bend into a beacon, and also has a hole in the center for a self-tapping screw or screw.
The technology for installing beacons is very simple. Self-tapping screws are screwed into the dowels along with the parts. When all the hardware is leveled into one plane, a profile is applied to the caps (as tightly as possible) and fixed with lugs.
Lighthouses from solution
In order not to spend money from the family budget, one of the ways to install beacons involves the use of homemade beacons, which are not difficult to make with your own hands. For this, a mixture based on cement or gypsum is used. And unlike metal strips, mortar beacons can be left, since the same mixture will be used to plaster the surface.
All you need to make a gypsum beacon is usually a spatula and a trowel. The places where the beacons are to be attached are marked in advance on the wall, after which the “zero point” is determined (with a laser device the work will be quick) and a vertical plane is created. Prepare an elastic composition of viscous consistency.
Fastening beacons from mortar eliminates the need to remove products from the coating
Scheiter's simple method for creating mortar beacons:
- The rule is applied to the wall and fixed in this position on the scaffolding.
- Use a trowel to place a little mixture on the top of the rule.
- Now a flat bar is taken and applied to the solution, after which it is compressed until the line on the rule coincides with the laser beam.
- Use a trowel to adjust the angle of the rule to the wall - it should be straight.
- Excess construction mixture is removed from both sides of the rule with a spatula.
- The rule marks the edge along the created path, after which the tool is removed.
- Allow at least 24 hours to dry the mixture, and then you need to lightly sand the top of the beacon with sandpaper.
With this method, you can create tracks 20 mm wide. After the gypsum mixture has dried, the beacons are ready for plastering work.
Preparing the surface for work
In order to properly and efficiently level the walls using plastering, you need to completely remove the old layer of plaster to the very base . If you do not want to do this, then you should conduct a more thorough inspection of the surface of the wall being treated in order to identify the main defects or areas where there are uneven areas and the plaster is falling off. In such areas, the old coating must be removed.
First you need to carefully examine the entire surface of the wall. If deep depressions are noticeable, they must be lubricated with a layer of plaster. All depressions must be equal to the main surface ; height differences can only vary from 5 to 12 millimeters. Small protrusions need to be cut off with an ax. At the same time, you don’t need to trust your eyes; for this it is better to use simple threads or a professional laser level.
Screws are screwed into the walls near the ceiling on both sides and canopies are tied to them, which reach the floor surface. Between them you need to stretch a horizontal thread, at the ends of which there will be sliding knots. It needs to be moved from top to bottom along the wall, while marking problem areas with a pencil.
Preliminary preparation
After the preparation of marking the walls is completed, you need to thoroughly clean them of dirt and excess dust using a vacuum cleaner or broom. After this, the wall is treated with a special primer that will protect the surface from excessive moisture. In addition, the primer will protect the wall from contact with fungus and the spread of mold. The selection of primer will depend on what material was used in the construction of the wall.
In some cases, it is necessary to use a reinforcing mesh for plastering, especially in the bathroom or kitchen, since special ceramic tiles will be glued there. This requirement also arises if the plaster layer is more than 10 millimeters. The reinforcing mesh is attached with special dowels or directly onto the solution.
Fastening beacons
Not only do beacons differ from each other, but also the methods of their fastening differ . Metal materials can be secured using two methods. The first method involves fastening the beacons using a dowel, and the second using a special solution. To install beacons with dowels, the user will have to use self-tapping screws. A special hammer drill is used to level the level with a rope and drill holes. It is very important to consider the number of lighthouse slats.
The process of attaching metal beacons follows a special principle:
- First, vertical markings are made in the form of lines, which are drawn at a distance of 80-100 centimeters from each other. In this case, the first line drawn should pass at a total distance of about twenty centimeters from the edge of the wall. To install it as level as possible, you should use a canopy or building level.
- Several holes are drilled along the established extreme lines at a total distance of 30 centimeters from each other and with a depth of up to 8 millimeters. Dowels that match their width are driven into such holes. You can use the outdated method, which involves driving choppers into the holes. Then the screws are screwed in, but not all the way, which will help in the future to correctly adjust the level. The surface of the screw heads is leveled, and beacon mounts are placed on top of it, on which the beacons are installed.
- After securing the two vertical screws along the edges of the wall, you need to place a rope between them, which will indicate to the user all noticeable protrusions. Other beacons are installed in the same way, which are adjusted with additional screws. After installing all the beacons, you can begin finishing the wall with plaster. This method is special in that it helps to quickly and easily adjust the overall thickness of the plaster.
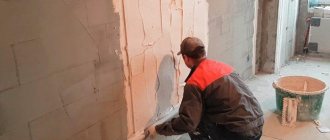
To secure metal beacons with mortar, you need to use sand, cement, gypsum, beacon slats, and a special building level. To apply markings, you can use a rule or a suitable sized strip. With these tools you can quickly and easily check the overall curvature of a surface. Afterwards, mix the thick cement-sand mortar and add gypsum to it to reduce the drying time of the mixture.
This mixture is applied in small portions along the length of all marking lines. It is on this that the beacons are attached. Beacons are fastened after checking the wall with a building level. For complete fastening, after leveling all the walls, apply another layer of mortar. The middle lines are filled in according to the same principle. Theoretically, such work is not at all difficult, but in practice it is quite difficult to carry out without certain skills and experience.
Eliminating beacons
To remove cement beacons, you should follow the following procedure:
- A distance of thirty centimeters is removed from the ceiling and wall and a nail is driven into the resulting place, the head of which is located from the wall at a distance equal to the thickness of the plaster layer. The canopy is attached to a nail and lowered, at a height of 10 cm from the floor. The second nail is driven approximately twenty centimeters from the floor in the area where the cord is located.
- The same is done with the beacon on the second side. After driving in all four nails, you should tighten the ropes between them so that they do not touch the wall. If there are still some points of contact, then the nail should be slightly pulled out and installed in a new position, using awnings for this. The middle beacons will be installed in exactly the same way.
- Then you need to create a solution and apply it to the nails themselves, so that it completely hides their heads. After the solution has hardened, you need to remove all excess with a knife. When the beacons are completely ready, you need to put a rule on them, and fill the space under them with a special mixture. After hardening begins, the rule is eliminated. The result will be a completely flat surface made of mortar in the form of strips, along which the wall will be plastered.
Rules for plastering lighthouses
Leveling surfaces with plaster mortar is carried out according to certain rules:
- The base must be stronger than the material being laid. When the mixture dries and begins to harden and gain strength, internal stresses are generated in the coating.
- Before applying plaster to the walls, their surface must be carefully prepared for further processing. This will avoid various types of defects.
- Any mortar path must be covered with a primer.
- It is extremely undesirable to show haste when beacons are placed on the wall.
- When plastering, the mortar must be applied evenly, leaving no gaps.
- Between the beacons they are plastered in small areas, otherwise too much mixture will accumulate on the rule, which will lead to deformation of the instrument.
- The rule is to carry it along the beacons with gentle pressure so as not to damage the tops of the profiles.
- After moving the rule from bottom to top, you can move it in the opposite direction once to secure the layer.
- While the mixture has not yet gained strength, remove the profiles.
- The grooves after the beacons must be covered with a solution of a more viscous consistency than when plastering walls.
Attention!
When using a gypsum building mixture, its remains from the tool must be thrown onto the wall in those places where there is not enough mortar or in a separate container. Mix them with freshly prepared composition, which will begin to set quickly, which should be avoided.
Beacons when plastering walls make it possible to obtain a flat surface
Proper installation of the outer guides plays an important role when placing intermediate beacons. And the smoother they are fixed on the surface, the easier all the work will be. And for beginners it will be a useful experience.
Was this information useful to you? Share in the comments!
Mortar beacons
Mortar types of beacons are guides made of gypsum composition made in a special way.
Externally, when molded, they form the appearance of an elongated plank, located from the ceiling to the floor. The upper planes of such mortar beacons form a plane along which they are oriented during plastering.
The advantages of this type of work are as follows:
- The cast layer for beacons followed by the composition forms a monolith.
- With this option of applying beacons, there is no need to remove them later, which greatly simplifies the work, because several stages are eliminated from the cycle at once. Additionally, the master then does not need to seal the resulting grooves.
- Additionally, you can save on solutions, since there is no need to remove previously installed levels.
Mortar beacons do not need to be removed from the wall.
The technology for making beacons from mortar will be as follows:
- First, you need to use one of the above methods to mark the room, assessing the unevenness of all the walls and drawing the zero surface level.
- Screw in the screws, aligning the caps flat. For ease of work at a room height of up to 3 m, there should be about 5 pieces.
- A thick layer of mixture is poured vertically directly onto the screws. Then you need to form it into a rectangular, narrow and long strip. This is done in the following way: take a profile for working on drywall and fix it tightly enough so that it adheres to the heads of the hardware. The mixture that will be squeezed out is carefully removed with a trowel or spatula.
- To prevent the solution from flowing and changing the given shape, it is recommended to leave the profile pressed for some time (until half-hardening).
But for those craftsmen who are just starting work and are not yet familiar with the intricacies of all technological stages, it is necessary to take into account one main drawback of working with sand-cement types of beacons.
When the rule is applied after installing a structure made of beacons, it will slide much easier on metal materials. But stretching it along gypsum beacons will be somewhat more difficult. Therefore, you need to be prepared for this.