If you want the ceiling and walls made of plasterboard to look beautiful and sound, then you need to correctly approach the formation of connecting seams when installing them. It is this process that is decisive for obtaining a positive work result.
How to putty drywall joints with your own hands, what mixtures are used and why will be discussed in more detail below.
Sealing the joints of plasterboard panels on the ceiling
Why do you need to putty drywall?
Some home craftsmen consider it inappropriate to putty drywall, because it is already even and smooth. But this seems to be the case at first glance. During transportation, plasterboard sheets may be damaged: scratches, chips and deformations may appear. Some unscrupulous manufacturers stamp already defective material, which can only be noticed during operation.
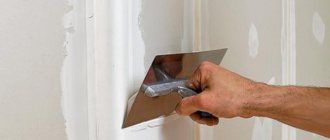
After installation, there will be joints between the slabs, recesses in the fastening areas, gaps in the corners - all this must be puttied.
Plasterboard putty is necessary for sealing joints and smoothing out unevenness that arose during installation.
Many other nuances arise that are inevitable during repairs. The technology for puttingtying drywall for wallpaper and for painting is not much different. But when thick-textured wallpaper or walls are planned to be tiled, the work process is simplified, because the finishing will hide many defects on the surface.
Types of profiles
The profile forms the basis on which gypsum board sheets are mounted.
Support and guide profiles
Table 2. Types of profiles.
| Type | Characteristic |
| Guide | U-shaped in cross-section, the side walls are smooth. Used as a metal support for racks. Mounted along the perimeter of the future partition. |
| Rack-mounted | Installed in the guide profile. It is to this that the sheets of drywall are attached. It is characterized by increased rigidity due to heavy load. The U-shaped structure of the profile is supplemented with stiffening ribs. |
| Ceiling | There are load-bearing and guiding types. The cross-section of metal products is smaller than that of the 2 previous types. Since it does not place a large load on the base of the partition, it is thinner. |
| Arched | The holes in the product make it possible to install them at different angles. |
Prices for various types of partition guides
Roller guides
Types of putties
Manufacturers offer a large number of putties for drywall. Each of them has a different composition and is designed for certain conditions: how high the humidity is in the room where the work is being done, roughing or finishing work. The gypsum itself is wrapped in ordinary cardboard and is moisture resistant, which is important when selecting putty.
Uninformed people believe that putty and putty are different compositions. In fact, these concepts are identical; in Russian they are equal options.
Cement
The main active component of this putty is cement. The putty is improved with polymer additives and minerals. With its help, it is easy to putty plasterboard walls; no additional processing is required.
Cement putty will eliminate cracks and other defects in drywall
There is another component that plays an important role in the purpose of putty - quartz sand. If it contains coarse sand, the putty is called starting putty and is used to apply the first layer. The finishing one contains fine-grained sand. It is sometimes used as an independent decorative coating, and also has thermal insulation properties.
The dry composition is packaged in 20 kg bags, and the paste composition is packaged in buckets of different capacities. Used for indoor and outdoor work. The latter option is not considered, since drywall is installed only in a space protected from external factors due to its low moisture resistance. And in the basement rooms it is quite humid, the drywall will swell, become moldy, crack and gradually crumble.
Cement putty, whether starting or finishing, is divided into gray, white and super white. Gray putty is applied under wallpaper and tiles; for painting, it is advisable to use white or super white.
Plaster
Gypsum is an environmentally friendly, inexpensive composition used for interior work, therefore it is often used in construction and repair. European manufacturers produce mixtures of white gypsum, while Russian ones use unrefined pigment, and accordingly, the shade of plasterboard walls becomes yellow after treatment.
Gypsum putty is one of the most common materials for leveling surfaces
In addition to the main component, the composition includes modifiers, polymers and minerals, as well as fillers - quartz sand and marble flour. Depending on their grinding, mixtures are divided into starting and finishing.
The dry mixture comes in bags, and the pasty mixture comes in buckets. Disadvantage: the composition sets quickly. Therefore, when unpacking the paste mixture, the contents will be consumed within 6 hours. The dry mixture is diluted in the required quantity.
When dry, the putty can be stored for a long time if the necessary conditions are met.
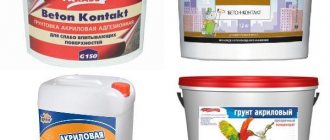
Polymer
This synthetic product appeared on the market not so long ago, but managed to win the hearts of buyers. The main components are polymers and plasticizers. And the auxiliary ones are backfillers, chalk, talc and film formers. To simplify the work, color is added to the paste or dry composition. But with a large area of application with the amount of pigment, you may not guess; as a result, the walls will turn out to be a non-uniform color. Construction stores sell ready-made mixtures of different colors.
Polymer plaster is a very elastic material that does not require much effort during application.
Construction stores have shakers for mixing colors with large amounts of putty. For a small fee you can use this service.
Polymer putty is a conditional name, as there are different types:
- Acrylic - universal in purpose. They work with it in a living room with any humidity and outside. It has good ventilation, which prevents the formation of mold, and is resistant to temperature changes and weather conditions. It is a little capricious when working, since you need to stir occasionally to ensure a uniform consistency.
- Latex - made on the basis of polymer rubber resin. It has excellent vapor permeability and strength, but is intended for indoor use only. During operation it is plastic and does not require constant stirring.
- Polycement - consists of synthetic cement. Universal in purpose.
Acrylic putty
Latex putty
Polycement putty
Polymer putties are expensive, but despite this, they are well sold by both builders and individuals.
Wall drywall: pros and cons of these popular sheets
There are no materials that are ideal for their intended purpose. When choosing the right one, you need to take into account the method of its installation, suitability for its intended purpose, cost and other factors.
Advantages
These are the advantages of plasterboard partition structures that are worth highlighting.
- There is no need to spend money and effort on removing old plaster if the walls are lined with plasterboard.
- The material is considered:
- environmentally friendly;
- "breathable".
Hypocardboard wall after finishing work
So it is ideal for home improvement.
- It is possible to create wall designs of complex decorative shapes and install them. For example, functional cabinets and niches, arched doorways.
- The material is quite light. After its installation, the structure is not significantly heavier. This means that the installed system does not bear additional load on interfloor ceilings and vertical load-bearing elements.
- Drywall is available in different versions:
- simple sheets (gypsum plasterboard);
- fire-resistant sheets (GKLO);
- moisture-resistant sheets (GKLV).
- lightweight sheets - for ceilings.
So partitions and walls can be erected from the designated material in any room. You can choose both for the bathroom and for installation in the location of the fireplace (stove).
Sheets of moisture-resistant plasterboard are used in the bathroom
- You can immediately carry out work to ensure sound insulation and insulation if the walls:
- constructed from plasterboard;
- are leveled using this material in a frame manner.
- No special effort is required; you can do all the work yourself. And if just one assistant is involved, it will be very easy to lay drywall.
- A partition or wall erected using plasterboard becomes perfectly smooth. They are suitable for further coating:
- paint;
- ceramic tiles;
- wallpaper.
- Electrical wiring is allowed along the frame of the built-in wall.
- The cost of drywall is quite affordable. The components from which the frame is formed are also inexpensive.
Mortgages in a drywall frame
Flaws
Firstly, it is not recommended to hang weights directly on drywall. Such a wall will not withstand it, because the sheets are thin (1.25 cm) and the material itself is fragile. And gypsum cannot be called a particularly durable composition.
On a note. If you need to hang a TV or sconce on the wall, it is advisable to plan such actions in advance. Then, for fastening, it is necessary to install auxiliary jumpers made of a metal profile.
Secondly, the wall will become thicker - at least 8 cm on each side. That is, the square footage of the room will decrease slightly.
Drywall prices
This is interesting: Finishing walls with plasterboard without a frame - Instructions
How to choose putty
Which putty to buy, everyone decides for himself, based on financial capabilities and the purpose of the work:
- When puttingtying drywall for painting, buy starting and finishing compounds.
- Under the wallpaper - starting or universal.
- When working in dry rooms, any type of putty will do.
- Cement and polymer are used in the bathroom, toilet and kitchen.
- Cement putty is not used for perfect painting, as it contains sand. Even fine grain will affect the smoothness of the surface.
Russian manufacturers have proven themselves well:
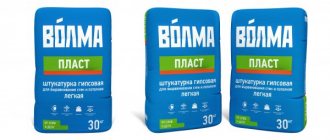
- "Volma";
- "Osnovit Ekonsilk";
- "Rusean TT";
- "Prospectors";
- White House;
- Unis;
- VGT;
- Glims;
- Litokol.
Putty "Volma"
Putty Osnovit Ekonsilk
Putty Rusean TT
Putty Prospectors
White House Putty
Putty Unis
Putty VGT
Putty Glims
Putty Litokol
Foreign ones are also popular:
- Knauf;
- Ceresit;
- Weber LR+;
- Bergauf;
- Sheetrock.
Putty Knauf
Ceresit putty
Weber LR putty
Putty Bergauf
Sheetrock putty
If it is difficult to choose, consult builders or sales consultants.
reasons why you need to prepare drywall for painting
Drywall sheets (GKL) are widely used in interior decoration. You can use them to build walls, ceilings, niches, arches and other decorative elements. The main task of this material is to level out significant irregularities and create shaped structures.
Why do you need additional preparation of drywall for painting:
- Masking and strengthening joints. Seams are the weak point of plasterboard structures. To prevent cracks from appearing in the finishing, the joints are reinforced with reinforcing mesh and filled with putty.
- Moisture protection. The surface of the gypsum board absorbs water well, which is why it swells, and the layers of cardboard move away from the gypsum core.
- Protection against fungus and mold. Cardboard saturated with moisture is a good place to live for microorganisms.
- Masking of manufacturing and installation defects of the sheet. It is difficult to find on the market initially smooth drywall that does not have flaws, and during its installation the surface can be damaged.
- Saving paint. Bare drywall will absorb paint, so it will have to be applied in several layers.
If paint is chosen as a decorative finish for gypsum plasterboard structures, then the preparation process should be approached thoroughly. The surface must be ideal, otherwise, after installing the lighting fixtures, all the slightest irregularities will become noticeable.
Features of putty for different types of finishes
Before plastering the walls, plasterboard sheets are primed to ensure adhesion of the finishing material to the surface of the slabs. Then the selected putty is applied. Puttying technology varies depending on the purpose of the work.
Under the wallpaper
Putty on plasterboard walls for wallpaper is selected:
- starting and finishing - for wallpaper of fine texture;
- starting and universal, or only universal - for wallpaper of medium thickness;
- starting - for thick wallpaper.
Several types of putty mixtures are used for puttying under wallpaper.
With a perfectly flat surface of the gypsum board, it is enough to fill in the errors with starting putty, lightly process the surface with it, then clean everything with a float and go over the top with a primer to begin facing work.
Drywall, even with a perfectly flat surface, must be puttied. If you re-glue wallpaper from plastered walls, the old ones will be removed without any problems. Wallpaper will stick to sheets not treated with putty so that when they are removed, the cardboard will be damaged, and the walls will still have to be puttied.
Under tiles
Novice craftsmen doubt whether they need to putty the walls before finishing with tiles. There is only one answer - it is necessary, since applying the base layer:
- will ensure adhesion between materials;
- strengthens the wall structure;
- will reduce glue consumption.
You should not neglect the primer before and after applying the putty.
Tile putty will strengthen the adhesion of tile adhesive to the surface
For painting
To apply paint, the walls must be perfectly prepared. After all, after painting, even a minor scratch will be clearly visible. To work with the surface you will need:
- starting and finishing putties - for regular painting;
- starting and universal - for applying paint with a dense texture.
Sometimes craftsmen ask the question of whether it is necessary to prime joints before puttying. It is not necessary to process the edge of a sheet with a factory coating. The open one must be additionally trimmed and primed.
The edge of a sheet with a factory coating does not need a primer
Preparing the tool and getting started
To work with plasterboard, you need an extensive list of tools. Professional installers use special expensive tools such as gas guns, jigsaws, sheet lifters and other devices. In cases where installation is carried out manually, it is not worth purchasing the entire set. If we briefly go through the main points, the list will look like this:
- Drill or hammer drill;
- Metal scissors;
- A standard set of building level, tape measure, screwdrivers, spatula and other small tools;
- Construction knife and saw for cutting plasterboard;
- Screwdriver;
- Tool for processing sheet edges.
If the differences are insignificant, then the sheets are glued to the wall
Next, they begin to prepare the base for finishing. Even when gypsum board is glued to the frame, it is recommended to clean the base from the old layers, otherwise the old finish will begin to crumble and create problems in the future. The surface should be cleaned of dust and debris; it is recommended to prime the walls.
Having prepared the base, we begin to mark the wall. It is convenient to carry out markings with a laser level. But such an expensive tool is not always available. Having completed the marking. moving on.
Necessary tool
Before starting work, you need to prepare working tools:
- primer tray;
- brushes and rollers;
- a container and a drill with a whisk attachment for stirring the dry mixture in water;
- flat spatulas (30 cm, 20 cm and 8 cm);
- corner spatula;
- reinforcing tape (fiberglass paper, sickle tape or perforated tape);
- plastic grater or coarse and fine sandpaper;
- wooden trestle or stepladder;
- container with water.
Working tools for puttying walls
You need to remove everything unnecessary away from the work object; if this is not possible, then cover it with film.
Methods for finishing walls
Work on interior wall decoration has several directions. This could be a minor cosmetic repair, a complete replacement of the finish with new materials, or a special European-quality renovation. It all depends on the desires and capabilities of the owner of the premises. But no matter what repairs take place, the finishing of different levels includes plasterboard upholstery, plastering, tiling, painting and glass work, as well as wallpapering. All actions are sequential and require attention and professional skills.
Let us characterize the sequence of some types of work:
in order to level the surface and remove existing cracks on the walls. If the walls are painted after plastering, then high-grade plastering is carried out. If the walls are being prepared for wallpapering, then improved plaster is done. If the plaster is simple, then it is puttied.
Applying plaster- The putty is applied to the wall surface when the primer layer has dried. Finishing makes it possible to obtain a smooth and even wall surface. Finishing walls with finishing putty is a delicate job and requires the ability to work with a spatula 20-60 cm long.
of painting walls
is coming back to us . Today, a large selection of different paints has appeared on sale, and it has become fashionable to create the texture of wood, stone or even leather using paints. The application of paints is carried out when the finishing of the walls is completed and the finishing putty has dried.- Finishing with gypsum board (plasterboard) is used instead of plaster. This method is indispensable for leveling walls if you want to avoid dust and pollution in the house. After all, gypsum boards are made of pure gypsum and covered with cardboard on top.
- Wallpapering the surface of walls is a very common type of finishing. Construction supermarkets have a wide selection of wallpaper with different textures, patterns and prices. If finishing the walls with finishing putty still turns out to be of poor quality, then the wallpaper will make your home cozy and beautiful.
- It just looks luxurious and royal wall decoration with fabric. This is a rather impractical type of finishing, because the fabric collects dust, but the furnishings in the house acquire a special charm and comfort.
- facing tiles for wall decoration . There are now a lot of types and colors of tiles produced. But they all have the same advantages - they are easy to clean and protect the walls from moisture. And the room always looks clean and bright.
creates marble, mother-of-pearl, etc. colors using various mineral additives. There is a wide range of colors of Italian mixtures that do not allow steam to pass through and protect the surface of the walls from mold. This type of decoration will come in handy in the kitchen, bathroom and balcony.
Finishing with decorative plaster- The loggia is finished and the balcony is finished using plastic or wooden lining . This finish allows you to quickly and dust-free cover all the unevenness of the walls, as well as protect the room from excessive noise. This method can be used to decorate a corridor or veranda in a private house. Panels made from lining last a long time and are easy to repair and replace. It is possible to replace the lining with ordinary wooden slats; plywood is used as a finishing material.
- The design solution will be wall decoration using several types of finishing materials . The most unusual combinations are possible here: wooden panels with wallpaper, OSB finishing and painting of part of the wall, decorative plaster and facing tiles. Wall decoration is complemented by shelves, hangers, paintings, panels and other decorations.
All of the above methods for finishing walls are eligible for use. Their level depends only on the starting cost of materials and the quality of work performed.
The most expensive material for finishing wall decoration was and remains wood. Panels in the house, made even from inexpensive types of wood, look noble if they are processed according to the requirements and covered with the necessary paints and varnishes. It is important that the wooden surface fits well into the overall interior of the apartment or house. Wooden wall decor brings warmth and a unique feeling of home.
Instructions for puttying drywall
Preparing drywall is an important part of the work, because the quality of the final result depends on it.
Elimination of irregularities
They carefully inspect the gypsum plasterboard walls, noticing all the irregularities and flaws on the sheet itself. If there are chips or scratches, cut off the protruding cardboard at an angle. The drywall itself is checked for deformation with a perfectly even strip or laser level. All errors are eliminated.
Drywall should be checked for deformation using a laser level
Trimming joints
Drywall edges are either factory cut or exposed. Trimming of drywall joints is done only at the raw edges. The protruding part is also leveled with the surface by chipping.
Untreated drywall joints are trimmed
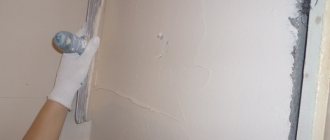
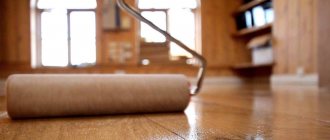
Surface priming
The primer is applied not only to seams and chips, but also to the entire sheet.
There is an opinion that the working plane can be treated simply with water. This is incorrect, because water will not glue dust and larger particles together.
The primer should be applied to the entire sheet of drywall
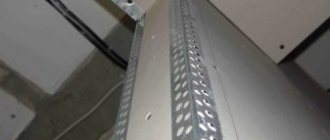
Reinforcement and puttying of corners
Wall corners can be internal or external. To level corner areas, a metal paint corner is used as reinforcement. For someone who has installed it at least once, it will be easy the second time, but not for a beginner.
The corner is glued to the putty and leveled:
| 1. Before gluing, putty is applied in a small amount both to the wall and to the corner of the wall. | |
| 2. The metal corner is carefully applied and installed vertically. |
The composition must pass through the perforations, the excess of which is removed with a spatula.
Sealing screws and seams
Before applying a layer of putty to the entire gypsum board, seal the recesses from the screws and seams. For sealing joints, special mixtures are sold in ready-made and dry form. But starting putty will also work. The screw caps are painted with oil paint before puttying. This will prevent rust from appearing through the wallpaper.
The edges of the drywall are different: along the long part they are uneven, but there are no ledges in height.
Before applying the putty, seal the screws
Vertical joints
Before applying putty, the seams are always treated with primer. Then they are filled with the composition. While the mixture has not dried, a reinforcing tape is glued on top, but so that it is slightly pressed into the joint. This procedure is performed to prevent cracks from appearing. After the mixture has hardened, the seams are puttied a second time.
Reinforcing tape is pressed into the vertical joints of drywall
Trimmed seams
Uneven edges are cut off first. To make this more convenient, they are thoroughly moistened with water using a brush. When the edges of the cardboard are noticeably saturated with moisture, cut with a knife at an angle of 45º. Then the recesses are primed with a brush and putty is applied so that it forms a shaft-like protrusion. They take reinforcing tape, glue it to it, and press it into the putty with an eight-centimeter spatula. The mixture that has leaked through the holes of the tape is removed.
When smoothing the tape with a spatula, a wave and wrinkles are formed. You should try to avoid this by adjusting the tape with your free hand.
When the tape sticks, apply a final thin layer of putty.
The tape is glued using plaster to the cut seams of drywall
The second technology is first tape, then putty
This technology is fast, since the reinforcing tape is glued to the seam before filling the joint. But there is one significant drawback to this - there will be unfilled voids under the tape. And when putting putty on top of the tape, it is inconvenient to level the surface: the spatula bounces around, creating a wave.
Reinforcing tape can be glued to the seams before applying putty
Sanding seams and corners
Sand the surface only when the putty has dried and hardened. Sanding walls is a dusty task. To prevent dust from scattering so much, the floor is covered with wet rags, and the doors to adjacent rooms are tightly closed. Before grinding, even the slightest protrusions are cut off with a spatula.
Since at this stage of construction work there is no need to thoroughly clean the wall, a grater is used with a coarse nozzle. The technician must wear a respirator and safety glasses to prevent dust from getting into the eyes and respiratory tract.
Sanding drywall corners is a labor-intensive process
The most difficult thing when sanding is grouting corners, niches, consoles (an architectural element that protrudes horizontally from a wall), pilasters (a vertical protrusion from a wall), partitions, etc. The sanding grater does not always reach the right place.
Anyone can create a tool with their own hands that will get into the most inaccessible places. To do this, cut the plastic corner to the required length, cut it in half along the bend, cut the end at an angle of 45º and stick sandpaper to one side using double-layer tape. The protruding edges are trimmed with plastic.
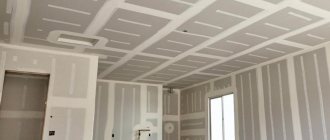
Ceiling finishing
The plasterboard ceiling also needs putty.
The application technique is no different from finishing walls, the only difference being that the junction of the ceiling structures with the wall is cut at an angle. And the resulting gap is filled with basic putty. And it’s inconvenient to work with the ceiling: the applicator’s hands and neck become numb. All work begins from the ceiling so that falling building mixtures do not stain the walls that are ready for cladding.
The puttying process begins with the ceiling surfaces
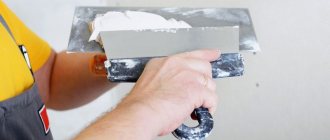
Applying the finishing coat and sanding the entire surface
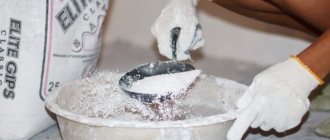
The final finishing of drywall is done after sealing the seams and sanding the walls. When working with a dry composition, the putty is stirred until it reaches the consistency of sour cream. It should not roll off the spatula, but at the same time it should be applied freely and effortlessly to the surface.
When stirring the mixture with a drill, turn on medium speed, since at fast speed the mixture fills with bubbles.
There is no need to prepare a large portion at once; the mixture will harden before it is used. The finishing coat must be applied to drywall at least 2 times. The finishing layer is applied thinly, the thickness should not exceed 0.5 mm. After drying, the surface is sanded with a fine grater and primed.
Applying finishing putty is the final stage of wall preparation
Execution of work
To arrange the joints correctly, it is necessary to carry out preliminary preparation of the areas:
- The accuracy of screwing in the screws is checked. They are placed at a distance of 10 or 15 mm from the edge, so they most often enter the embedding area. The caps should be recessed by 1 mm.
Further work depends on the selected composition and technology.
First way
If it is not intended to reinforce the joints with a special tape, then in the absence of shrinkage, an elastic composition with high strength and adhesion is used for the process - “Uniflot from Knauf.
- You need to putty in two layers. The first is laid so as to completely seal all gaps, eliminating any air bubbles. The mixture is distributed evenly, creating a base.
- After drying, the treatment is repeated over a larger area, completely covering the existing chamfer.
- After 40–50 minutes, grinding is carried out.
It is taken into account that the composition used is capable of leveling out significant vibrations of the slab without the appearance of cracks, but for this, the sheets must be installed according to all the rules.
Second way
This method involves the use of standard mixtures: “Volma”, “Vetonit”, “Starateli”, “Shitrok”, “Fugen” (for this variety, a special paper tape “Knauf” is purchased separately). As an alternative, serpyanka can be used for reinforcement. Each option involves a different installation technology. The process of gluing paper tape is the simplest; it is better to purchase products with perforations.
- The joints are sealed with prepared putty mixture. The solution should fill not only the gaps, but also cover part of the main surface, taking into account the width of the reinforcing material.
- Tape is applied. It is taken into account that some varieties are first wetted in warm water.
- Smoothing is carried out with a spatula, and a thin layer of putty is applied on top.
Before use, it is advisable to wet the reinforcing tape, since dry material will suck moisture out of the solution, thereby reducing the quality of the joint.
Working with serpyanka has some features:
Seams need to be sealed in small sections in a certain sequence. The mixture is distributed similarly to the previous method. The reinforcing mesh is pressed carefully and evenly, it should be completely immersed in the solution. The areas are covered with a layer of putty. Particular attention is paid to the edges of the tape, which often stick out. In both cases, the product is placed so that the element to be laid runs in the middle. In both cases, the product is placed so that the element to be laid runs in the middle
In both cases, the product is placed so that the element to be laid runs in the middle.
Which primer to choose
If the walls are not primed, the putty will not adhere well to the base and will peel off over time. When choosing a primer, take into account a number of features that it should have:
- good adhesion;
- deep penetration;
- adhesive ability;
- quick drying;
- lack of toxicity;
- thermal stability;
- the presence of an antiseptic in the composition.
A primer for drywall must have a number of certain qualities
Trusted manufacturers try to ensure that their products are characterized by all these qualities. Putty primer is available in the form of different mixtures.
In the form of phenolic mixtures
FL-OZK is a phenolic universal paint and varnish primer, which consists of pigments, fillers and phenolic resins. When dry, it forms a protective film that is resistant to water, oils, gasoline and chemicals.
Due to the presence of color in the composition, it can act as a finishing coating.
Phenolic primer FL-OZK can be used as a topcoat
Glyphthalic primer
GF is a universal primer consisting of special fillers in alkyd varnish. It is elastic, dries quickly, resistant to mechanical stress, temperature fluctuations, and provides adhesion to paint and other coatings.
Glypthal primer – quick-drying, resistant to temperature fluctuations
Acrylic universal
Acrylic primer is the most popular type of impregnation. It is multifunctional and is used for treating various surfaces, including putty. Penetrates quite deeply into the base, which subsequently becomes rough, which allows for increased adhesion to subsequent material.
Acrylic primer is completely safe, so it is used for interior work.
Review of manufacturers
There are currently several major brands on the market.
A popular manufacturer producing high-quality mixtures. To seal joints the following are used:
- “Fugen.” Includes three groups of solutions: universal, ordinary and moisture-resistant. The seam is covered in 2 layers, the thickness of each is 1–3 mm. The composition contains gypsum and special modifiers responsible for plasticity. During site preparation, priming is mandatory. Is it possible to putty drywall joints with finishing putty?
A fairly common option, characterized by a reasonable price and good quality. The mixture consists of gypsum and various fillers. It has excellent adhesion, taking into account the composition's lifetime of 35–40 minutes.
For work with drywall and gypsum boards, a variety marked “Seam” is used. The process involves mandatory priming of the joint and thorough drying. Laying is done in two layers followed by sanding.
To seal the gaps between the slabs, a finishing variety is used. A special feature of the product is the need for installation in dry rooms with stable humidity. The mixture contains gypsum and polymer additives. Available in the form of a dry substance, the solution is suitable for use within 50 minutes. The manufacturer indicates the possibility of laying a thick layer, but it is recommended to divide the process into two stages with mandatory preparation.
A universal variety that is also suitable for sealing joints in objects with constant humidity. Due to the fact that polymer glue acts as a binder, it is possible to achieve excellent adhesion, but this increases the drying time (at least a day).
The products of this manufacturer are highly reliable. For DIY work, a polymer variation is used, which can be dry or ready-made, depending on the group. Excellent for damp rooms, drying time – 24 hours.
For puttying, it is better to purchase compounds that have been recently manufactured.
Why glue wallpaper onto plaster?
Any room decorated with wallpaper becomes cozy. The wallpaper will stick well to the leveled and primed plaster, and the resulting wrinkles will smooth out as they dry. Unlike painting, wallpaper peels off easily, and after removing it, you can cover the plaster wall with a new coating. Wallpaper comes in different textures and textures, but they are glued in dry rooms where the walls are usually plaster.
Wallpaper will not only decorate the walls, but will also hide small defects and irregularities.
Using wallpaper you can create an atmosphere of comfort and coziness in your home.
What to do if you decide to attach the gypsum board directly to the base
If the wall has no drops, then the sheets are attached to a base without a frame. The wall is covered with primer, the instructions for use of which require complete drying within 12-24 hours. Fix the gypsum boards in a dry room without drafts or changes in humidity. Otherwise, this will lead to the absorption of different amounts of moisture into the sheets and inconvenience of joining due to differences in thickness.
Sometimes wall preparation requires leveling with putty. This is not difficult to do, although it requires some skill. After leveling the walls, the base is covered with soil again. A material with antifungal components is selected, as described in the instructions for use. This is due to the fact that mold and mildew actively develop in a humid environment, and plasterboard is able to absorb moisture from the air.
Edge processing is an important component
The sheets are attached to special glue for gypsum boards. If putty has not been carried out, and the differences do not exceed 0.5 centimeters, apply glue in small tubercles along vertical strips. The application instructions state that the first sheets are not immediately pressed against the wall, since unexpected bumps will not allow the sheets to be correctly aligned.
If the difference is more than 4-5 millimeters, then the sizing mixture is applied in large cakes to the sheet at a distance of 30-40 centimeters. The instructions say that it is much easier to attach gypsum boards in this way, since the mixture will be crushed on the back surface of the sheet and distributed evenly.
Features of repair work in a new building
Builders recommend making rough repairs in panel and brick new buildings, and postponing major finishing for 2-3 years.
During this time, the house shrinks. There are often cases when impatient owners laid tiles and installed mirrors in the walls in the first year, but subsequently the walls in the house cracked, and along with them the major finishing suffered. Only in a monolithic frame house do finishing work be done due to its minimal shrinkage, using “floating” technologies, expansion joints, reinforcement and foamed polyethylene tapes.
To an inexperienced master, puttying technology will seem complex and time-consuming. There is no need to give up, because only with patience and hard work will experience come. Do-it-yourself repairs will cost much less than hiring a construction crew.
Have you ever puttyed drywall yourself? Share your life hacks in the comments.
How to start finishing?
The final stage of wall finishing must be planned and calculated, like all previous stages of construction. First of all, you need to decide what type of finishing to choose, whether painting the walls, installing panels, wallpapering, etc.
Before the final finishing begins, a starting or rough finishing of the walls . With rough finishing it is easier, there are only two ways: plastering the walls or covering them with plasterboard. What is best to do in your house or apartment is, of course, up to the owner to decide. The choice is small, but the result should be the same - smooth walls ready for finishing.
Rough processing of walls makes it possible to choose any material for subsequent wall decoration. After all, after applying a layer of starting plaster or installing drywall, the walls become smooth, even, and without cracks. It is a pleasure to continue working with such walls.
Next, the apartment owner faces a difficult choice: what material is required for finishing. It is not always possible to reach a consensus at the family council, and sometimes you even have to turn to a professional designer. But for now, you need to try to find an interesting solution for the walls in your home yourself.
Materials for finishing walls surprise with their diversity and uniqueness. This can be ordinary wallpaper with a variety of patterns and textures, as well as ultra-modern materials in the form of decorative plaster, liquid wallpaper and even 3D panels. The owner of an apartment, going to a construction hypermarket, can show his taste and choose any material, as long as it meets all the requirements of the design solution. All materials are impressive with their features, but you only need to choose a certain color, texture, quality in relation to the price.
When the selection stage is over, and wonderful blanks appear in your hands, the time has come for inspiration and creativity.
If you are carrying out cosmetic repairs, you will also have to put your hands into preparing the wall surfaces for decoration. And if everything continues after the rough finishing in the new house, then there is time to evaluate the work of previous masters and show your results.
It is better for you if the work is carried out by a team of craftsmen, but the finishing of the apartment still requires your constant supervision. Everything in the apartment should be arranged to the taste of the residents, and not the owner.
The choice of material for individual rooms of an apartment or house is of great importance. After all, everything should be not only beautiful, but also practical. For example, finishing a corridor requires a special approach, since there is a high level of pollution in this area. The modern approach allows you to use not only painting or washable wallpaper. The same liquid wallpaper can be protected from contamination if it is coated with a primer or varnish. Thus, practical properties can be imparted to any finishing material.
Gypsum mixture is an ideal solution for drywall
Construction and repair specialists claim that for finishing plasterboard walls, a gypsum-based mixture is one of the most optimal options. This putty is made on the basis of natural material and fillers that improve performance characteristics.
Gypsum putty is the best option for puttying gypsum boards
Among the advantages of the gypsum mixture are the following characteristics:
- does not shrink when drying;
- adheres well to the surface of drywall;
- has high plasticity;
- easy to apply and level;
- dries quickly and adheres firmly.
To prepare the putty, you just need to add the required amount of water to the plaster in accordance with the manufacturer’s recommendations indicated on the packaging.
Important! The only drawback of gypsum is its low resistance to moisture, so in rooms with high humidity, preference should be given to other putty materials.
Storage tips to prevent drying out
When the product has hardened, it cannot be used for application; it will simply fall off and become covered with cracks. It will be difficult to remove such a solution from the container. Therefore, it is better to fill the container with water and turn on the mixer at high speed to remove the residue.
It is almost impossible to increase the shelf life of the finished solution; you can only stir it periodically. But this method is not ideal. For this reason, it is recommended to prepare small volumes, for 30-40 minutes of work, in order to have time to use the solution on time.
It is recommended to prepare small volumes, for 30-40 minutes of work, in order to have time to use the solution on time.
The article described in detail how to mix putty correctly. The process has subtleties, they are related to the type of mixtures. If you follow the preparation steps, you will be able to create a high-quality solution that will well level the surface. The main thing is to take your time and thoroughly mix the ingredients until a homogeneous mass is obtained, and use it within the allotted time.
Sealing technology
Drywall seams are sealed using different spatulas. Typically, the mixture is scooped up with one spatula and applied to another. Or you can put it on one spatula and hold it in your hand. Using the second spatula, the putty is taken from the first as needed. This scheme allows you to work faster, without being distracted by constantly collecting solution from a bucket.
Do-it-yourself puttying of drywall joints begins with filling the void between them. Many people like to work quickly, applying sickle tape or paper tape to the seams, and then a layer of putty on top. Although this technology speeds up work, it is fraught with consequences.
If thin-layer textured plaster is eventually applied to such a surface, then over time it will simply crack at the seams where voids remain. Also, with this method, problems may arise when cutting wallpaper in the corners, when the pressure can cause the knife to fall into the void.
The first job you will need is a 20 cm spatula. It is used because the seams between sheets of drywall need to be sealed as quickly as possible. A sufficient amount of solution is poured onto its surface to fill the voids between the joints. Using a tool, apply the mixture across the seams, trying to push it into the joints as much as possible.
Sealing drywall seams along factory edges and hand-made chamfers
It is necessary to completely fill the joints between the cut edge and the factory edge. In this case, you should not leave sagging on the drywall. It should remain level. After this, you can seal all the screw heads with putty, but you still need to give the solution time to dry. The putty will retract a little and then a hollow may even form at the place of the seams.
This technology is used by those who want to know how to properly seal seams in drywall. If you do not fill the voids with putty, but immediately apply the solution and then the reinforcing tape, then tubercles may eventually form at the joints. Therefore, the voids are first filled with putty, and then paper tape or sickle is applied.
How does polymer putty differ from gypsum putty, which one is better?
They have the same base - gypsum. Polymer is simply more elastic. It does not crack or shrink, which cannot be said about purely gypsum compositions.
After drying, the gypsum version has a pure white color. Polymeric with a little yellowness. But this doesn’t matter when the topcoat is paint or wallpaper. Namely, putty is placed under them.
Today, polymer cement compositions have appeared on the building materials market. They differ in all characteristics from gypsum. And in terms of strength, and in terms of application method, and in terms of service life.
It is impossible to say that one is better than another. Each mixture has its own tasks. Eg:
- polymer is often used for finishing;
- Pure gypsum is used to level walls and ceilings with large deviations from evenness and flaws.