Home |Construction |How to properly plaster a brick wall?
Date: November 5, 2018
Comments: 0
Carrying out repairs in a brick country house or a new building inevitably involves the need to finish the brick surface. It is good if the renovation is carried out in a newly built building, the walls of which are made of fresh brick. Before plastering a brick wall in such a house, you will not have to spend a lot of time and effort on preparatory measures. It will only be necessary to level the beacons for plastering.
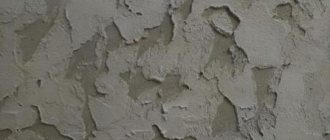
Old brickwork will cause many problems. You will have to plan for unevenness, control the flatness by level, and remove the old plaster. Brittle masonry seams will need to be cleaned and filled with a special compound. If this is not done, and a new solution is applied to the old layer, then it is difficult to predict how long such a surface can last.
It is not practical to conduct expensive experiments. We recommend starting from scratch and will tell you how to properly plaster a brick wall. This is not difficult if you follow the recommendations outlined in the article and choose the right mixture for the job.
How good the entire wall will look depends on the quality of the plastering work and the plaster itself.
Preparing a brick wall for plastering internal surfaces and plastering the facade
Even when planning the work, you will need to decide how to properly plaster a brick wall. The durability of the finish depends on the preparation of the surface for applying the mixture.
The reasons for plaster lag are:
- layer of old coating;
- oil stains from paint;
- surface poorly cleaned of wallpaper residues.
Before applying the composition, the wall will need to be repaired. Assessing the evenness and inspecting the object allows you to determine how to properly plaster, outline the treatment area and calculate the need for materials.
Preparatory stages include:
- Completion of construction and installation of the wall.
- Cleaning of old coating, wallpaper and paint.
- Sealing cracks that serve as a source of condensation reduces sound insulation and increases heat loss.
- Expansion of masonry joints for strong adhesion of the plaster to the surface.
- Applying notches to create adhesion.
- Penetrating primer coating.
New wall
A brick wall, even a new one, needs a preparatory process before leveling and plastering the surface. The main task of the finishing mixture is to ensure high-quality adhesion and create conditions for masonry.
Preparatory work includes:
- expansion of masonry joints (1 cm deepening);
- scratching with a wire brush;
- treatment with bioprotection agents;
- removing residual grease and old grease.
old wall
Brickwork deteriorates over time and is partially stained. Chips and cracks form on the old surface, and the bricks become loose. During operation, the walls inside the premises become covered with stains; nails are often hammered into them, screws and other fasteners are screwed in. Before starting finishing work, you will need to prepare the old masonry.
Before applying new plaster coating:
- the wall is cleaned of old finishing;
- weak mortar and brick crumbs are removed from the seams;
- large gaps are filled with cement mixture;
- wobbly bricks are replaced or pulled out, and after cleaning they are inserted back, seated on the DSP;
- clean large chips and cracks from dust, and then fill them with a solution using a reinforcing mesh;
- stains are washed and treated with special products;
- foreign objects are removed, and metal parts are coated with oil paint.
After the work is done, the surface to be treated is cleaned of dust, covered with a layer of primer and dried. The preparatory stage ends with measurement, installation of beacons, and, if necessary, reinforcing mesh.
Surface preparation
The degree of adhesion of materials, and therefore the strength and durability of the entire structure, depends on the quality of preparation of the brickwork before applying the plaster mixture. Below is a step-by-step process for preparing walls.
Cleaning
From the surface that is planned to be plastered, it is necessary to remove: dust, dirt, cement stains and fasteners. This procedure must be carried out not only on old walls, but also in new buildings. At this point, you should also “unravel” the seams by removing excess mortar, for which you use a metal scraper or chisel.
Identifying deficiencies and eliminating them
Before starting the main work, you need to conduct an external inspection of the wall surface and identify all cracks and crevices. Disadvantages are eliminated with a cement-sand mixture.
If you skip this stage of work, especially in the case of walls that separate the interior from the street, moisture may accumulate in cracks and cracks. When frost sets in, the water freezes and the brickwork breaks.
At this stage, it is also recommended to treat the surface with antiseptic agents to avoid the appearance of mold and mildew.
Primer
This is a mandatory procedure for preparing a wall for plastering, which beginners often skip, considering priming the walls unnecessary. Application of a deep penetration primer solution can significantly reduce surface porosity and enhance the adhesion of brickwork and mortar.
Reinforcement
Reinforcing the plaster layer with reinforcing mesh is carried out during external work; for internal partitions this procedure is not necessary.
Metal or plastic mesh is secured with special anchors into the masonry seams, but most often this process is performed after applying the first layer of plaster, into which the mesh is pressed.
Tool for working with plaster for house cladding
An experienced craftsman has up to 30 different tools for finishing work.
The minimum set includes:
- trowel;
- electric drill (perforator) with mixer;
- "half grater";
- smoother and spray bottle;
- building level;
- usually a plumb line and tape measure;
- 2 rules of different sizes with bubble level.
Preliminary stage
The set of preparatory activities consists of the following types of work:
- Cleaning the surface, which involves removing dirt, fasteners, and old plaster down to the base.
- Visual inspection, during which cracks and crevices that increase heat loss and reduce the level of sound insulation are eliminated.
The use of antiseptics helps to avoid the spread of insects and the appearance of mold. In finishing, brickwork has its own characteristics. If you plan to do all the interior finishing yourself, then knowing them is critical - Coating with deep penetration primer that prevents moisture absorption. It also ensures reliable adhesion of the plaster mixture to the brick.
- Strengthening an uneven surface by reinforcing it with a special plastic mesh attached to hooks.
- Preparation of a binder solution for plaster in accordance with the recipe of the adopted version. A dense initial batch allows you to fix the beacons, and then prepare a more fluid solution.
How to plaster a brick wall with your own hands - step-by-step instructions
Plastering brick walls is a coating that does not require the involvement of specialists to apply. Having familiarized yourself with useful recommendations on how to properly plaster a brick wall, the work can be easily done with your own hands.
How to prepare a solution for plaster
Plastering is considered a rough finishing option, on which the evenness and smoothness of the wall depends,
Various methods are used to prepare plaster:
- The cement-sand mixture is mixed in a ratio of 1:3, adding a little water.
- To prepare lime plaster, pour 1 part slaked lime and 5 volumes of sand into a bucket, to which water is added until a homogeneous mass is obtained.
- Gypsum solution is obtained by combining with water in a given proportion.
Primer
To adhere the layers of the finishing mixture to each other, it is necessary to use a primer that prevents moisture from entering the bricks, which have different porosities.
The properties of building materials can be easily determined using water. Brick has increased porosity if the liquid is absorbed immediately, and it is better to buy a mineral-based mixture for application in 2 layers. Bricks on which water dries in 5-20 minutes are characterized by medium porosity; in this case, a universal primer is used.
The building material is highly dense if the moisture has taken a long time to dry out, and a solution with increased adhesion is better suited for it. The primer should be applied in a layer of 0.2 mm.
Reinforcement of brick surface
For finishing work on very uneven walls, reinforcement is used, which consists of the use of special hooks on which a special mesh is attached. It is better to buy a plastic product that is not subject to corrosion. The metal mesh is coated with a special varnish to prevent rust.
Marking and installation of beacons for leveling the walls of a brick house
Beacons are special metal profiles from 2.5 to 3 mm long and 6 and 10 mm thick, the number and height of which are adjusted to the size of the room. First, install the 2 outermost ones, between which the fishing line is pulled. All lighthouses do this; the distance between neighboring ones is set to no more than 1.5 m.
First, second and third layer
Spraying is done with a liquid solution. Throw the mixture onto the pre-moistened wall with a trowel or ladle, leaving no gaps. The base layer, no more than 1 cm thick, is made from a thicker composition. The mixture is applied to fill the space under the beacons and smoothed using the rule. To obtain increased thickness, the surface is covered with plaster several times.
The third layer, 1.2-2 mm thick, is applied to create an even coating for painting or wallpapering. The density of the mixture is similar to spray, but fine sand (up to 1.5 mm) is added as a filler. The coating is made on soil that has not yet dried or moistened, after which the excess is removed and leveled.
Final grout
Grouting is done using a trowel in a circular motion on fresh plaster. This step allows you to finally level the wall for painting and wallpapering. This step is skipped if the surface was plastered under the tiles.
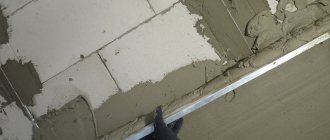
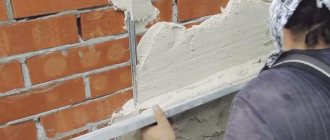
Installation of beacons
External plastering of brick walls begins with the installation of beacons. If this stage is carried out correctly, you can completely eliminate the need for subsequent leveling of the surface, making it initially flat.
The beacons consist of a metal profile; a gypsum-based mixture is used for fixation. Using a level, the accuracy of installation of beacons is determined; a plumb line is also required for this work. Also, the modern building materials market offers laser systems for faster and easier measurements. An economical option is to attach threads to beacons.
How to fix beacons:
- gypsum mixture is prepared;
- small cakes of approximately the same size are formed from the mixture;
- each is attached to the walls at an equal distance;
- beacons are applied so that the plaster layer is a maximum of 2.5 cm (if the plaster is strong and thick, then the maximum limit increases to 4-5 cm).
Plastering of brick walls outside begins when the beacons installed on the plaster dry well.
The mesh, which is attached to the wall before covering with plaster, will help strengthen the adhesion of the materials and increase the strength of the canvas. This will make it possible in the future not to redo the entire plaster layer that protects the brick from negative natural factors.
Differences between plastering the walls of a house outside and inside
Important differences when covering external surfaces with plaster:
- To finish surfaces on the outside of the building, DSP is used.
- The slopes of the openings and the corners of the walls before attaching the beacons are covered with plastic parts.
- External walls are reinforced with reinforcing mesh in each case.
- The plaster is primed 2 times before applying the final coating.
Otherwise, the technology for plastering brick walls is the same.
What is the best way to plaster walls made of facing bricks inside a house?
Brick is a durable building material, but it is not suitable for every interior and style. Even before construction begins, you need to decide what is better: plaster or facing brick. The choice of finishing mixtures for internal walls is wider than for external ones.
Decorative coatings based on:
- cement;
- lime;
- gypsum;
- clay and lime;
- lime and cement.
For wet rooms, specially developed gypsum compositions are used.
How can you plaster the facade of a brick house on the street?
External plastering of walls is most often done with cement mortars, but it is possible to include lime. To treat areas with salt protrusion, sanitizing mixtures are used. Gypsum-based compositions are not used. The facades are decorated with decorative plaster, with the choice of the desired effect. The plinths are finished with cement mixtures in a ratio of 1:3 or 1:4.
Differences in brick plastering technology
Plastering the surface of external walls has the following features:
- Reinforcement of the entire area of finishing work is carried out.
- Plastic parts with mesh are attached to slopes and corners.
- The thickness of one coating layer should not exceed 1.5 cm, and the total thickness - 3 cm.
- After drying, the base layer is primed 2 times.
- When finishing the base, the coating is deepened 5-6 cm below ground level.
- After grouting, the plane of the wall is smoothed with a trowel.
- A chamfer is created on the base or the husks are rounded.
- Take measures to protect the surface from the penetration of moisture from the atmosphere or soil.
Other differences are in creating the conditions for curing.
Preparation of the solution
Before starting work, you should decide what is better to plaster the brick walls inside the house in a particular room. The use of mixtures based on gypsum and clay in rooms with high humidity is not recommended. Mixtures based on cement and lime can be used in any room.
Currently, for plastering walls, they mainly use ready-made dry mixtures, which only need to be diluted with water according to the instructions.
Before plastering brick walls inside the house with mixtures with a predominance of gypsum, you should know that such mixtures gain strength and dry out very quickly, so the quantity for a single batch should be limited.
The technology for preparing the solution is the same for all types of mixtures:
- Dry ingredients are poured into a container intended for preparing the solution.
- The required volume of water is prepared according to the instructions and poured into the container.
- Using a mixer, the mixture is brought to a homogeneous mass.
- The prepared solution is left to “rest” for 10 minutes.
- The mixture is stirred again with a mixer. The solution is ready for use.
The nuances of plastering brick walls from the outside
The surface to be treated is covered with a canopy to protect it from precipitation and sunlight. When plastering external walls with cement mortar, choose weather without wind. To prevent increased evaporation of moisture in the heat, the surface is covered with a film and, if necessary, regularly moistened. For carrying out plastering work, the acceptable ambient temperature is +5...+35 °C, and humidity ≤ 65%.
Before plastering begins, the electrical wiring is de-energized, and the trims and places for attaching switches and sockets are sealed with masking tape.
Exterior decoration has the following features:
- in mixtures prepared independently, it is recommended to include quicklime;
- the addition of porous substances (pumice, sawdust) increases the thermal insulation properties of the composition;
- Drying the plaster layer with a hairdryer or other methods is prohibited because it may promote cracking.
Types of Tools Required
Plastering external walls made of brick and other materials is not complete without the following types of tools:
- Spatulas. It’s better to take two – one larger (6 cm), the other smaller (8 cm). With the help of a small one you can work out hard-to-reach areas, and a large one will make the surface of the main area smoother.
- Trowel, primer brush. The brush can be synthetic, durable, with thin bristles.
- Grater. With its help you need to carry out several types of manipulations with the wall.
- Rule. Useful for creating a smooth surface of applied plaster.
- Level and plumb line, beacons. All these devices are needed to ensure uniformity of the applied layer. The result is measured with a level, and they work with a plumb line and beacons when using plastered material.
- Mixer. Necessary for stirring the composition, avoiding the appearance of lumps. Mixer is a special mixing attachment for a drill.
You can also prepare a scoop and trowel. These tools will allow you to quickly level the surface of the wall, but you can do without them.
Manual and mechanized plastering indoors or for external brick work - which is better?
There are many options for how to plaster a brick wall with your own hands. In addition to manual application of the solution, a technology is used that is optimal for processing a large surface - mechanized.
The work is performed according to the following algorithm:
- Surface preparation is carried out similarly to the manual method.
- A plastering unit is installed near the wall, which is connected to the water supply and power supply networks.
- The dry mixture of the selected brand is loaded into the hopper.
- The material is fed into the mixing chamber, where it is combined with water and mixed. The continuity of the process helps to obtain a mixture of uniform consistency.
- Through a special nozzle installed on the supply hose, the wall is covered with plaster mortar at an angle of 90°.
- Once the beacons are closed, the process ends.
- The final coating is applied manually.
Advantages of machine application
Mechanical mixing allows you to obtain plaster with an increased content of air bubbles. The process reduces the weight of the solution while simultaneously increasing the volume, which leads to material savings of almost 2 times.
Advantages of machine surface treatment:
- one-time application over a large area eliminates the “scale effect”;
- reducing the work completion time by more than 2 times and improving the quality of the wall plane;
- possibility of simultaneous filling and plastering of an area of up to 200 sq.m per shift;
- reducing the cost of work.
Plaster application technology
Before plastering a brick wall, beacons are mounted on it. At this stage, the greatest importance is attached to installing them level in the same plane. Here are some basic installation rules:
- the strips are attached to the working structure on average every 1 m, starting from 0.5 m from the corner to which special pads are attached;
- carry out a level check at 3 points (top, bottom and middle), the control device must capture 3 beacon guides.
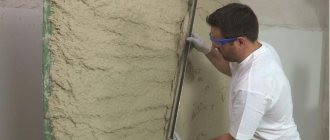
Having prepared the foundation and installed the beacons, they proceed directly to the main work. All activities boil down to the following:
- check the reliability of fastening of the guide beacons;
- the working base is moistened with water with a brush (roller, spray);
- the prepared composition is diluted to a more liquid state and thrown over the wall to seal small cracks and irregularities;
- after drying, the main part of the working material is applied to it, and its thickness should correspond to the height of the installation of the beacons from the base;
- the solution thrown between the guides is smoothed from the bottom to the top, and the excess is removed and transferred to a container with the material;
- when the surface dries, the beacons are dismantled and the seams are sealed;
- The completely set coating is rubbed off.
The leveled surface is ready for further processing. The whole process is clearly visible in detail in the photo.
Plastering walls on beacons
How to plaster with decorative building mixtures depends on the chosen material. Achieving the desired effect requires the use of an appropriate technique for applying the composition to the prepared base.
It is very important to plaster correctly to get a quality result. This is facilitated by installing level beacons and observing the exact sequence of work performed.
Decorative plaster on a brick wall
Before applying the decorative composition, first select the desired effect, and then a mixture that allows you to realize it. For example, textured compositions are not suitable for creating bark beetles, and “pebble” ones are not suitable for Venetian beetles.
For the finishing coating of the facade surface use:
- travertine;
- bark beetle;
- lamb;
- rain;
- fur coat;
- mosaic;
- sgraffito or pebble.
Often for interior decoration they choose: wet silk, craquelure, Venetian and imitation wood or brickwork.
Sequence of operations
The technology for performing a full range of plastering activities involves the following types of work:
- preparatory activities involving the removal of old plaster down to the brick base, external inspection, priming, reinforcement and preparation of mortar;
- installation of beacons that ensure high flatness of the finished surface;
- finishing that gives the surface an aesthetic appearance;
- dismantling of lighthouses with filling of cavities with mortar and final planning of walls;
- finishing grouting, performed in a circular motion over a solution that has not completely hardened.
Depending on the characteristic features of the object where work is being carried out, each developer makes an individual decision about which stages he will carry out.
Which plaster is best to use?
The primary issue that needs to be resolved before starting work is how to plaster the external and internal surfaces of the walls. Plastering brick walls is done using various dry mixtures:
- cement-sand;
- limestone;
- plaster;
- perlite.
Cement-sand mixtures
This is the optimal solution if you need to plaster walls for painting or wallpaper. Their recipe includes cement of various brands, sand, water (you can add additives, for example, frost-resistant ones). The mixture is universal. This type of plaster is used inside and outside the house.
Rice. 1. Cement-sand mixtures
The performance characteristics of plaster depend on the materials chosen. Cement grades M150 – M300 are used only in mixtures for interior finishing. From M400 and above, for external facade work. If you prepare the solution yourself, you must strictly maintain the proportions of the components and use materials of the required quality. Otherwise, everything will have to be redone.
It is undesirable to use fine sand for brick plaster, as it will be prone to cracking. The use of contaminated sand with various inclusions (soil, clay, etc.) also does not contribute to the necessary strength and durability.
The optimal solution is to use river or quarry (after washing) with a fraction of 0.5-2.0 mm. Coarser grains increase the roughness of the outer surface of the plaster. Therefore, such sand is used for laying bricks or installing reinforced concrete structures.
The advantages of the DSP include:
- long period of operation (if applied correctly), reaching 30 years;
- significant plasticity, achieved by long drying times (it is permissible to level the surface within several hours after finishing plastering);
- high resistance to high humidity allows the use of this plaster on external facades and when decorating bathrooms;
- resistance to sub-zero temperatures;
- fire resistance;
- environmentally friendly;
- versatility - no special equipment is needed for application.
Disadvantages include long periods of complete drying, the need for significant physical effort for application, and the importance of strict adherence to application technology. The material is quite heavy and does not have adequate resistance to shrinkage of the structure and vibration loads.
Lime mixtures
These solutions are divided into three subgroups:
- purely calcareous;
- lime-clay;
- lime-gypsum.
They are used for laying on walls that are not exposed to the negative effects of atmospheric factors (primarily precipitation) - indoors, closed loggias and balconies, interior partitions. To increase their strength and reduce setting time, building gypsum is added to the formulation.
Rice. 2. Lime mixtures
The total curing time is only 30 minutes, and the setting process begins as early as 4 minutes. The average proportions of lime and sand are 1:3. A properly diluted mixture has a dough-like consistency. This group is considered budget.
Advantages:
- vapor permeability;
- environmental cleanliness;
- bactericidal;
- durability;
- fire resistance;
- high adhesion to various substrates;
- versatility.
The disadvantages are:
- low resistance to moisture;
- slow development of design strength;
- cracking under vibration loads;
- weak, compared to other compositions, strength;
- When working, it is necessary to use protective equipment.
Gypsum plaster
It is a finishing material for work inside the house. Due to the high adhesion of the material, it is easier to work with. It is prohibited to add water to the prepared mixture, which has a rapid setting. This imposes certain restrictions on the volume of plaster that can be mixed at a time.
The advantages of the material include:
- rapid development of design strength (up to 7 days);
- significant plasticity;
- environmental cleanliness;
- vapor permeability;
- low thermal conductivity;
- high adhesion;
- light weight;
- fire resistance;
- ease of grinding;
- maintainability.
Rice.
3. Gypsum plaster The disadvantages of the material are:
- low resistance to moisture;
- short service life;
- does not tolerate negative temperatures;
- easily affected by pathogenic microflora.
Perlite plaster
Perlites are sand with a coarse fraction obtained from obsidian. Visually, it resembles fine off-white crushed stone. It is a material for exterior finishing. The coating made from perlite plaster is very durable and differs in:
- high wear resistance;
- light weight;
- low thermal conductivity;
- fire safety;
- resistance to pathogenic microflora;
- acceptable vapor permeability.
Due to its characteristics, it can be used as an additional noise and heat insulator. Belongs to the category of “warm” finishes. The disadvantages include significant dust formation and technical difficulties in preparing the solution.
The recipe includes:
- aggregate belonging to sponge class building materials;
- base – perlite;
- binder – cement, gypsum, lime;
- polymer additives – help to increase water-repellent properties, ductility, and air filling intensity.
All plastering materials discussed in this chapter can be made independently directly on the construction site. This reduces the cost of purchased materials. However, only using factory-made plaster from well-known manufacturers allows you to obtain a plaster coating of guaranteed quality.
Read about other types of plasters in this article.
The best plaster mixtures
There are many different dry plaster mixtures from well-known brands on the market, the quality of which is not satisfactory. First of all, these are Ceresit and Knauf.
In addition to them, it is worth noting the materials produced:
- (the entire Osnovit line, including dry mixtures for rough leveling (Startwell, Bigwell), finishing (Slimwell), decorative (Exterwell).
- Saint-Gobain group of companies (for example, mixtures of the Weber-Vetonit line).
- Brands Bolars and Kiilto, Glims and Unis.
Application of mortar and final finishing
If the beacons are installed and fixed, you can plaster the brick wall while maintaining the level. Follow the sequence of operations:
- Prepare the tool for work, mix the solution.
- Moisten the brick until completely absorbed.
- Pour the prepared mixture onto the surface.
- After 1.5-2 hours, increase the layer thickness to 3 centimeters.
- Remove, as a rule, from top to bottom, excess solution that extends beyond the boundaries of the guides.
- Shake off excess plaster for reuse.
- Fill visual defects with the solution.
If the masonry must be plastered several times, then a new layer of mortar can be applied only after the previous one has “set” - Correct until completely flat.
- Seal small gaps with a putty knife.
- Remove the small guides and leave the large ones.
- Fill the cavities with the mixture and finally plan the surface.
- Perform a final sanding using a felt float or other tool.
What if the layer must be very thick?
When this problem occurs, the process looks something like this:
- An initial layer is applied that will hold the surface together and cover all seams.
- After waiting for it to dry (set a little), they begin to lay the reinforcing mesh. It is fixed to the walls with staples and self-tapping screws. It is necessary to ensure that there is no sagging.
- Apply a second layer. This is done by casting. The process starts from the bottom and goes gradually upward.
On a note! The final step is mashing. To do this, take a wide spatula and moisten it with water. This is done fifteen minutes after finishing the work, just when the plastered area has set. Now the spatula is placed at a slight angle to the surface and rubbing begins with light movements. The result is a smooth layer.
Before interior work
The home has acquired an external gloss; now the brick walls inside the house have to be plastered.
Plastering premises requires a high degree of quality. This is the last stage before wallpapering, painting or other finishing work. The homeowner again faces the question of what to plaster with. The most preferred material for interior work is gypsum plaster. The basis of the mixture is gypsum with the addition of components that improve adhesion and reduce material consumption. Gypsum plaster on brick provides good adhesion, quick drying, and elasticity of the coating, which facilitates trouble-free grouting and obtaining a smooth surface. The advantage of gypsum plasters is that they apply a thick layer to the surface of brick walls. This makes it possible to smooth out any unevenness and straighten walls that are falling back. The mixture can hide large defects: holes, chips, deep grooves. Finishing with gypsum plaster allows you to reduce heating costs, since this type of plaster has waterproofing properties, provides additional sound insulation and fire protection. Treating walls with gypsum plaster prevents the spread of fungi and mold.
Before starting plastering work, you need to prepare the surface: remove dirt, wipe off dust, knock down chips, remove metal parts. Those that cannot be removed need to be coated with an anti-corrosion coating. Brick strongly absorbs moisture, so before starting work it is necessary to treat the surface of the brickwork with a primer. Less gypsum mixture is required to finish a room than cement mixture, and the likelihood of cracks occurring is negligible. The temperature in the room where plastering work is carried out should not exceed 30 and be less than 5 °C.