Leveling walls with plaster is one of the main stages of pre-finishing work, which affects the quality of repairs, durability and aesthetics of the finish. Here, more often than others, lime mortar is used for plaster - durable, easy to work with, relatively inexpensive, and proven over time.
In the article we will tell you how to make a lime mortar for plaster, we will analyze several recipes for preparing the mixture, how much lime to pour into the mortar for plaster, we will talk about the advantages and disadvantages, and we will make a comparative description of ready-made materials.
Where is lime-based plaster used?
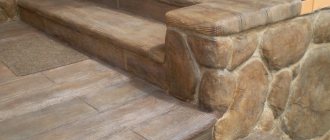
Lime mortar for plaster can be called almost universal for external and internal work. Depending on the composition, the mixture is used for finishing residential and industrial premises, facades, open balconies and loggias, and outbuildings.
Lime plaster is afraid of a damp environment, so there are restrictions according to building codes:
- It is not recommended to use the composition for finishing damp rooms: basements, bathrooms, on the facades of buildings in humid climate zones;
- According to SNiP, it is prohibited to use lime mortar for interior and exterior work where air humidity exceeds 65%.
For plastering bathrooms, it is permissible to use cement-lime mortar.
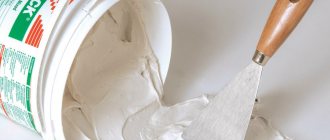
The mixture should be thick and homogeneous
Making sawdust concrete with your own hands
Independent production of lightweight concrete composite is carried out according to the following algorithm:
- The necessary materials are being prepared. There is no need to purchase components in advance. All components can be prepared immediately before production by visiting stores or building materials warehouses, as well as using waste from woodworking enterprises.
- The ingredients are mixed according to the proportions. Mixing of components can be carried out mechanically using a concrete mixer or manually using shovels. Automation of the technological process through the use of a concrete mixer increases productivity, improves mixing intensity, and has a positive effect on product quality.
- Molding is in progress. The group molding process is predominantly used, when the pre-mixed composition is poured into several dozen molds. Single and group forms of collapsible design are used, made of wood 2 cm thick and upholstered in metal or plastic. The use of polyethylene film makes it easier to remove finished products.
- The finished product is dried naturally. The molds are removed 4–5 days after pouring by loosening the wing nuts, removing the threaded rods and disassembling the molding box. The natural drying process lasts, depending on the type of wood, up to three months, during which the moisture concentration is significantly reduced and the product acquires operational strength.
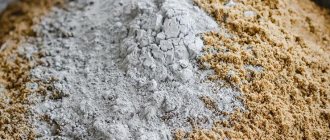
Standard composition of concrete with sawdust: cement-sand mixture, wood shavings, lime (if necessary)
Composition of lime mortar for plaster - components, scope of application, recipes
The plaster mixture consists of a binder and fillers; simple solutions for painting or wallpapering, compositions for decorative plaster of walls and facades are created on a lime base. The main difference lies in the components with which the lime dough will be mixed.
Preparation of lime mortar for plaster
For plastering, only hydrated lime is used, so before work the lump lime must be quenched; the process takes 36 hours until the reaction is complete, but it is recommended to let the solution sit for 2 weeks.
The extinguishing process is accompanied by a violent chemical reaction, releasing a huge amount of heat. It is necessary to observe safety precautions: safety glasses, rubber gloves, boots, thick clothing.
Containers for extinguishing: metal, without signs of corrosion, wood, plastic. Hydrated lime increases in volume up to 3 times, which should be taken into account when choosing the container volume. The process uses only cold water. Lime/water ratio:
- fluff (lime milk) in a ratio of 1 kg per 1 liter;
- dough - for 1 kg of lime 0.5 liters of water.
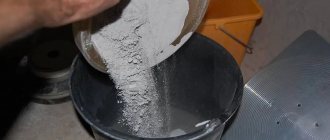
The lump lime is placed in a container, filled with water, the boiling process begins, after which the mass is mixed well several times and left to stand. Before use, hydrated lime is passed through a construction sieve.
Next, we will consider how to prepare lime mortar for plaster, the proportions of components depending on the application.
Plaster
Lime composition with gypsum is suitable for finishing cornices, stone, and wooden surfaces; it is not used for concrete surfaces. Scope of application: interior decoration of walls and ceilings; external use in exceptional cases. It sets quickly, half an hour is enough for complete drying, it is prepared in small portions, and cannot be stored in its finished form.
How to prepare gypsum-lime plaster for interior work: 1 part of gypsum for 4 parts of lime paste. Gypsum is mixed until it becomes sour cream, lime is added to the resulting mixture, the solution should be thick and not run off the spatula.
The lime-gypsum mixture is fine-grained and goes on smoothly.
Cement based
Cement-lime plaster is a complex, versatile, durable mortar, suitable for all types of plastering work, including facades, finishing bathrooms, and basements.
The composition of cement-lime mortar for plaster depends on the application. For the mixture, cement of the M400-500 grade and sandstone of the middle fraction, sifted and washed, are usually used. The more sand, the weaker the solution.
Table of proportions of lime-cement mortar for plaster, solutions of different densities, calculation for 1 bag of cement (25 kg):
| Type of solution | cement | lime | sand | water |
| Plastic for interior decoration | 25 kg | 14 kg or 35 l | 230 kg | 60 l |
| Durable, matching brand M50 | 25 kg | 7 kg or 17.5 l | 175 kg | 55 l |
Cement-lime plaster is most often used in repairs. The technical characteristics of the composition can be improved by adding additives: for plasticity, maximum adhesion and increased moisture resistance, add liquid soap: 0.2 l/20 l of the mixture or PVA glue: 0.5 l/20 l of solution.
How to prepare a lime mortar for plaster with the addition of cement: Add cement and lime to 2/3 of the total volume of water, mix, add all the sand, when the components are combined until smooth, pour out the rest of the water and mix well again.
Clay mixture
Clay-lime mixture for plaster is rarely used for finishing huts, stoves, fireplaces.
A popular recipe for how to make a clay-lime mortar with your own hands: the clay is soaked, ground through a sieve, mixed with lime dough, sand is added, proportions: 1 hour: 0.4 hours: 5 hours, then add water in portions, mix well until the consistency is very thick sour cream.
Lime-sand plaster with the addition of clay is not durable and is only suitable for rooms with a dry microclimate.
Eco-friendly mixture of lime and clay suitable for finishing stoves and restoring masons
Plaster cement-lime-sand mixture.
, a plaster cement-lime-sand mixture is often used for brick, concrete and wooden walls. And although the popularity of gypsum plaster mixtures is enormous, many customers still choose cement-lime mortars for plastering. Lime-cement mortar for plastering walls has many positive characteristics, but its main advantage is its relatively low price. This material is flexible and also very durable. Cement-lime plaster has excellent adhesion to the surface and is usually used for finishing interior walls of rooms with high humidity.
Features and comparisons
Lime plaster mortar is used mainly indoors; it is much cheaper than ready-made store-bought mixtures, is not inferior to them in strength, and is easy to work with. The only negative that arises during the work process is how much lime to add to the plaster solution. To do this, we have given you several recipes for different types of finishing.
Properly prepared mixture for plaster is the key to quality and durability of repairs
The finished mixture retains its properties for 6 hours, which should be taken into account when preparing the required volume. The consumption of lime mortar per 1 m2 of plaster is approximately 10-12 kg, with a layer thickness of 10 mm. The solution can be applied in a thickness of 0.5-30 mm; a thicker layer will lead to peeling and cracks.
Mixture proportions
There is a classic version of the mixture, which is determined by the ratio 1:3 - 1 part cement and 3 parts sand. Both components are first mixed dry with each other, and then water is added to this mixture in portions. All this is thoroughly mixed until a solution is formed, the consistency of which is similar to thick sour cream. Be sure to give the finished mixture 15 minutes to thicken, after which it is mixed again.
By the way, the cement-sand mortar “lives” for no more than 1.5 hours. After which it begins to lose moisture and dries out. So a small batch is a justified decision.
To mix the components, it is recommended to use a construction mixer or a drill with a special attachment. If you need a large volume of material, for example, to pour a foundation, then we recommend carrying out the preparation process in a concrete mixer
Please note that the end result is a lump-free composition in the form of a homogeneous mass
Sand for masonry mortar
Main ingredients of the solution:
Cement is a binding component. It must be in paper bags. It is recommended to buy it before starting construction processes. That is, it must be “fresh”. After all, during long-term storage this material cakes, which means it loses its qualities. Sand is a filler. There is one point regarding quality here. There should be no foreign materials in the sand. This is especially true for clay. Therefore, it is recommended to purchase river sand
Pay attention to the fraction of the material. For example, fine material promotes the spreading of the mortar, so it is not used for masonry mixtures. But in screed mortars, such sand is an ideal choice
The coarse fraction is not used for preparing plaster, although it works great in foundation mortars. Water is the basis, so it must be clean. The main requirement for it is the absence of acid and oil impurities.
Features of choosing a brand of solution
Now you can move on to the proportions and understand such an indicator as the brand of solution:
- The masonry composition is grade M100. It is used in the construction of walls and barrier structures made of bricks or blocks based on different materials. To do this, you will need M400 cement and sand, which are mixed in a ratio of 1:4.
- To increase the strength of the masonry, you can use M200 grade mortar. To do this, you will have to reduce the amount of sand by 2 times.
- To level the floor bases, the M300 grade of mortar is used. To do this, you can use cement M400 or M500 with the addition of water and sand in a ratio of 1:3:0.5.
- To plaster the walls, use exactly the same solution as above, only with a slight increase in the amount of cement. For example, it could be 1.2-1.5. Plaster mortars are often made with the addition of lime milk. This reduces the strength of the material, but increases its ductility. In this case, the cement-sand-milk ratio will be 1:5:2.
Standard proportions
Making the solution in the correct ratio
There are certain technological standards that regulate the ratio of building mixture components. Here are three examples:
- To prepare the screed solution, use proportions of 1:2-1:6. In this case, the amount of water is not indicated, but only the cement-sand ratio is indicated.
- In low-rise construction, 1:3 or 1:4 solutions are most often used.
- For erected structures - from 1:3 to 1:6.
Why don't the standards specify water? The fact is that it is easy to make a mistake with the volume of water. After all, the sand may be wet, and it is impossible to determine the degree of humidity at home. At the factory, this indicator is strictly controlled. What can you offer to those who use handmade solutions? To do this, it is better to double the batch if the first one turns out to be liquid. Just add cement and sand to it according to the standard, but reduce the amount of water.
3be072818ab0367a28183b8064b824bf.pic
Today, facing tiles and stone are placed on ready-made adhesive mixtures, which greatly simplifies the process of preparing the composition. But since we are considering all cement-sand mortars, we should not ignore this masonry material. Let's just designate the proportions - 1:2.4:0.4. This is such a non-standard ratio.
Many people ask a question regarding determining the volume of one serving. What means and instruments can be used to measure the required amount of material? Construction stores sell special measuring buckets, with the help of which the building mixture is measured or weighed.
Penetration ability
The cement-lime mixture is characterized by excellent adhesion to the surface, so it completely fills small depressions and cracks, providing high fixation strength. The solution also has good adhesion, which allows it to be used in conjunction with wood products. So, plaster for wooden sheathing is made using this technology.
Due to its improved strength properties, ductility and resistance to moisture, the mixture is suitable for any finishing work on buildings, both inside and outside. It is in demand for finishing work in the bathroom, on facades or the foundation where it adjoins the blind area.
Usage
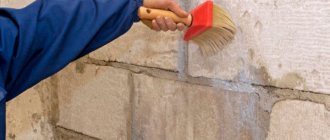
Preparing the base
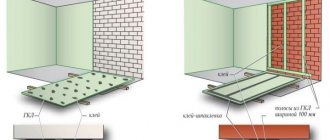
After the lime has been quenched and all the required materials have been prepared, you can begin to prepare directly for application. All furniture should be removed from the room, the windows and floor should be covered with plastic film, and all places where the walls and ceiling are connected should be sealed with masking tape. After this, all metal elements, for example, the same screws, should be cleaned from the surface. Using a grinder, cut off the reinforcement, and then apply a corrosion inhibitor to its surface. The surface should be sanded, dust wiped off and a primer applied.
Please note that in some cases the use of a primer alone is not enough, in which case a reinforcing mesh should be used. It is this that will help strengthen the coverage.
Now you should tighten the mesh and secure it with self-tapping screws. If the base is made of wood, it is permissible to use shingles, and for a concrete base, you can use a painting mesh or a thin chain-link. After this, the walls should be covered with a primer material and beacons can be installed. These types of elements will make it possible to make the surface as smooth as possible. When installing beacons, you should often use a building level.
Application method
The first step is spraying. Some builders skip it, but it is better not to neglect it, since spraying makes it possible to ensure an excellent connection between the surface and the plaster. Ideally, you should use a solution that has a consistency similar to jelly - it should contain a little more water than a regular solution. Next, take the mixture onto a trowel and spread it onto the surface. After this, stretch the material along the wall, but do not try to make the coating perfectly even yet; leave everything for a day. After this, you can begin applying the second layer.
The base layer can be made thick, up to 5 cm. Apply lime plaster using a spatula and stretch with a trowel. The layer must correspond to the level where there are beacons. The movement must be carried out from top to bottom. When the treatment of one area of the surface is completed, remove excess plaster using the rule. Now you can start covering. This requires the same liquid material as spraying. The thickness of the coating should not be more than 0.3 cm. After application, level the layer and wait a couple of hours. Afterwards, treat the entire surface using a grater with coarse sandpaper. Finally, you can switch to fine-grit sandpaper.
If you take into account all the tips that are described in the article, and also do not, like some masters, skip important stages in the work, you will receive a high-quality coating, and you will not have to do any finishing work. If you want to use tiles or wallpaper afterwards, you don’t have to cover it.
Lime slaking method
When starting to prepare lime, it is important to follow the step-by-step instructions and take care of personal safety equipment.
These include safety glasses and a mask:
- Mix lime and water in a container in a 1:1 ratio.
- When the mixture boils, which will be confirmed by a strong reaction, you will need to add a small amount of liquid so that it completely covers the raw material.
- After this, the composition is thoroughly mixed and covered with a lid.
- The material is kept without use for 14 hours. This process does not require much effort, but it takes a lot of time.
Therefore, most builders buy slaked lime in the store.
If it is necessary to slak lime using the slow and medium slaking method, then you need to adhere to the following guidelines:
- First of all, you need to dig a hole and place a container made of a wooden box with dimensions of 1.5x2 m near it. A damper with a small mesh is placed at the bottom.
- Lump lime is placed at ¼ of the volume. Then a small amount of water is added. When the lumps fall apart into small pieces, you will need to add a little more liquid and mix everything thoroughly.
- After the mixture has been successfully quenched, it needs to be diluted to a thick consistency, remove the damper and drain the solution through a sieve.
- To prevent rapid drying, the mass is covered with clean sand.
Regardless of the extinguishing methods used, it is best to perform actions in a protective suit made of canvas material, gloves and goggles. The mixture should not penetrate open areas of the skin, as this may cause burns.
What is lime
In the solution, this substance plays the role of a binder, that is, a component that connects the filler. Accordingly, the binder in cement mortar is cement, and in gypsum mixtures it is gypsum.
The method of its manufacture has not changed for thousands of years . The main raw material for it is the mineral of the same name - limestone. It is a sedimentary rock whose main component is calcium carbonate. Limestone is ground into powder and burned in special furnaces, where carbon dioxide is separated from it. The resulting lumps consist of calcium oxide, which is called quicklime.
Its common name is boiling water. It is due to the fact that when water is added to quicklime, it begins to attach it and this reaction proceeds with a large release of heat. The resulting mass increases in size and consists of calcium hydroxide (or slaked lime). It is the binder in lime mortar.
Application in plaster mortars
After applying the lime mortar to the wall, slaked lime (also called fluff) reacts with carbon dioxide in the atmosphere. This reaction requires water, so the room with fresh plaster should not become too dry. After a few days, the plaster layer hardens and turns into stone, consisting of sand and calcium carbonate.
Quality of the substance
Limestone itself is rarely a chemically pure rock. And if we take into account the fact that part of the lime is produced from industrial waste, the content of calcium oxide in it may vary.
The content of impurities determines the quality of the material. So, if the initial raw material contained clay, then during firing the resulting product will contain up to 20% silicates, aluminates and calcium ferrites. This lime is called hydraulic lime and is used in exterior work when the plastered surface is exposed to water.
Simple or air lime is divided into three main types depending on the effect of impurities in it:
- fat;
- normal;
- skinny.
This classification is important because impurities affect the rate of extinction, acting as inhibitors. So, fatty varieties are extinguished completely within 8 minutes, normal ones - up to 25, and lean ones - more than 25 minutes. In the old days, complete slaking could take even longer: when plastering the surface for a fresco, this process could take up to a year, during which the lime was washed and mixed.
This is still important today, since incomplete slaking process leads to delamination of the plaster layer, poor adhesion to the wall surface and the appearance of efflorescence.
Making your own solution
First you need to slak the lime for the plaster so that it is suitable for work. This requires a metal container, since the reaction is accompanied by a large release of heat and an increase in volume by 3 times. The lime packaging indicates the slaking speed: slow (25 minutes or less), fast (8 to 10 minutes), medium, 15 to 20 minutes. It is better to mix the mixture with a shovel or oar. Slaking is carried out for at least a day, however, ideally use lime that has been standing for a month.
The note! The sand also needs to be prepared before preparing the plaster: remove impurities, clean it by passing it through a sieve.
Instructions for creating a limestone-sand mortar:
- Sand is mixed with lime paste in the selected proportion. This is done dry and mixed thoroughly.
- After which water is gradually added to the container. There is no need to pour in the entire volume at once; it is poured in in a thin stream, and the solution is constantly stirred.
Now that the preparation is complete, you can begin plastering the surface.